stop start CITROEN C-ZERO 2017 Handbook (in English)
[x] Cancel search | Manufacturer: CITROEN, Model Year: 2017, Model line: C-ZERO, Model: CITROEN C-ZERO 2017Pages: 174, PDF Size: 4.15 MB
Page 6 of 174

4
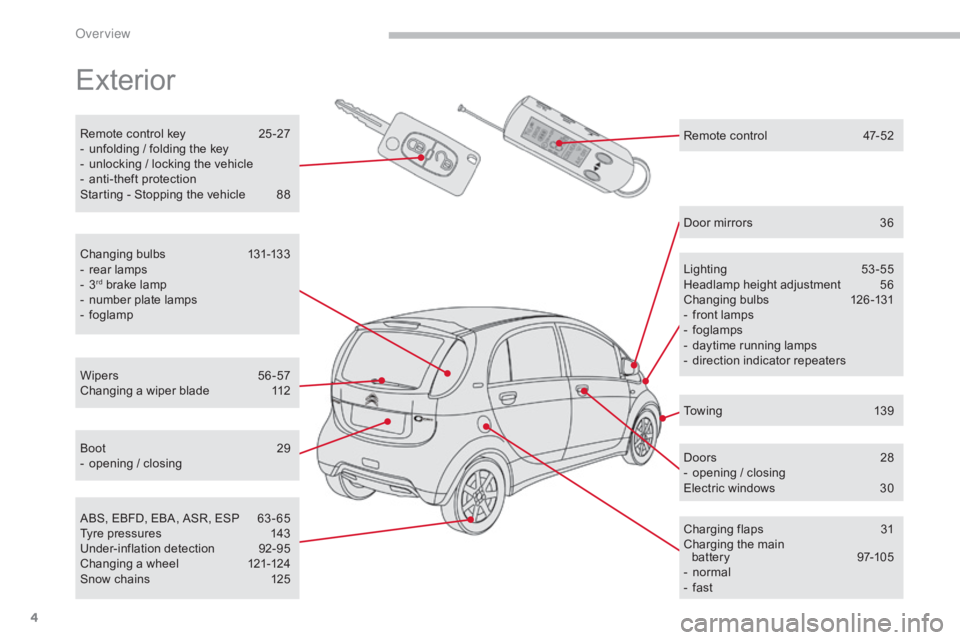
Exterior
Remote control key 25 -27
- u nfolding / folding the key
-
u
nlocking / locking the vehicle
-
a
nti-theft protection
Starting - Stopping the vehicle
8
8
Lighting
5
3-55
Headlamp height adjustment
5
6
Changing bulbs
1
26-131
-
f
ront lamps
-
fo
glamps
-
d
aytime running lamps
-
d
irection indicator repeaters
Wipers
5
6 -57
Changing a wiper blade
1
12 Door mirrors
3
6
Doors
2
8
-
o
pening / closing
Electric windows
3
0
Charging flaps
3
1
Charging the main battery
9
7-105
-
n
ormal
-
f
ast
ABS, EBFD, EBA, ASR, ESP
6
3 - 65
Tyre pressures
1
43
Under-inflation detection
9
2-95
Changing a wheel
1
21-124
Snow chains
1
25
Boot
2
9
-
o
pening / closing
Changing bulbs
1
31-133
-
r
ear lamps
-
3rd brake lamp
-
n
umber plate lamps
-
fo
glamp
To w i n g
1
3 9
Remote control
4
7-52
Over view
Page 9 of 174

7
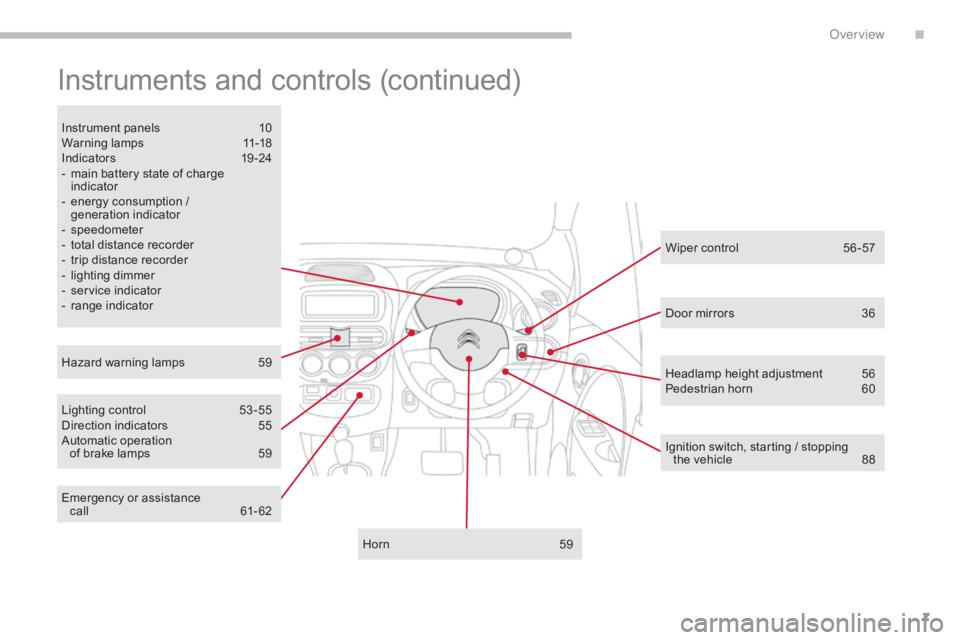
Instruments and controls (continued)
Lighting control 53 -55
Direction indicators 5 5
Automatic operation
of brake lamps
5
9
Instrument panels
1
0
Warning lamps
1
1-18
Indicators
19
-24
-
m
ain battery state of charge
indicator
-
e
nergy consumption /
generation indicator
-
s
peedometer
-
t
otal distance recorder
-
t
rip distance recorder
-
l
ighting dimmer
-
s
ervice indicator
-
r
ange indicator
Horn
5
9
Hazard warning lamps
5
9 Wiper control
5
6 -57
Ignition switch, starting / stopping the
vehicle
8
8
Door mirrors
3
6
Emergency or assistance call
61
- 62 Headlamp height adjustment
5
6
Pedestrian horn
6
0
.
Over view
Page 29 of 174

27
Lost keys
Visit a CITROËN dealer with the vehicle's V5 registration document and your personal
identification documents.
The CITROËN dealer will be able to retrieve the key code and the transponder code
required to order a replacement key.
Remote control
The high frequency remote control is a sensitive system; do not operate it while it is in your
pocket as there is a possibility that it may unlock the vehicle, without you being aware of it.
Do not repeatedly press the buttons of your remote control out of range and out of sight of
your vehicle. You run the risk of stopping it from working.
The remote control does not operate when the key is in the ignition, even when the ignition
is switched off.
Locking the vehicle
Driving with the doors locked may make access to the passenger compartment by the
emergency services more difficult in an emergency.
As a safety precaution (with children on board), remove the key from the ignition when you
leave the vehicle, even for a short time.
Anti-theft protection
Do not make any modifications to the electronic immobiliser system; this could cause
malfunctions.
When purchasing a second-hand vehicle
Have the key codes memorised by a CITROËN dealer, to ensure that the keys in your
possession are the only ones which can start the vehicle.
2
Access
Page 48 of 174

46
Switch off the demisting/defrosting
of the rear screen and, depending on
version, the door mirrors as soon as
appropriate, so as to limit electrical
consumption and optimise the range of
the vehicle.
Front demist -
defrostRear screen demist - defrostThe control button is located on the dashboard, to the right of the steering wheel.
F
P
ress this button to demist /
defrost the rear screen and,
depending on version, the door
mirrors. The indicator lamp
associated with the button
comes on.
Place the air distribution control in
this position.
Switching on
Switching off
The demisting/defrosting switches off
automatically to prevent an excessive electric
consumption.
F
I
t is possible to stop the demisting/
defrosting operation before it is switched
off automatically by pressing the button
again. The indicator lamp associated with
the button goes off.
For rapid demisting - defrosting, you
can also press the " MAX" button.
The intake of exterior air is selected (indicator
lamp off) and depending on equipment, the air
conditioning starts running (indicator lamp on).
Place the temperature control
between "●" and " H".
Place the air flow control
in the desired position.
Ease of use and comfort
Page 50 of 174

48
If there is no action on the remote
control within 30 seconds, it will switch
off automatically.If the start of charging is programmed
without programming the duration of
charging, the battery will be charged
fully.The duration of charging can be
programmed between 0.5 and
19.5
hours. However, you can also
select the duration "-h": in this case,
charging will stop when the battery
is fully charged. This duration is the
default value.
On / Off Programming the duration
of charging
This function is used to programme the
duration of charging of your vehicle.
Switch on the remote control.
Press the MODE button to select the
programming of the duration of charging.
Extend the aerial.
Press and hold this button to switch
the remote control on or off.
Programming the start of
charging
This function is used to set the time remaining
before starting the charging of your vehicle.
(e.g. it is 19:00 at the time of programming, the
programmed charging start time is 2:00 hours:
charging will begin at 21:00).
Switch on the remote control.
This symbol is displayed on the screen.
Use the arrows to set the charging start time:
each press changes the time in steps of half
an hour.
Press the on/off button briefly to transmit the
data to the vehicle.
This symbol is displayed on the screen.
Use the arrows to set the charging time: each
press changes the time in steps of half an hour.
Press the on/off button briefly to transmit the
data to the vehicle.
If the duration of charging is
programmed without programming
the start time, the battery will be
charged immediately for the duration
programmed.
Ease of use and comfort
Page 62 of 174

60
Pedestrian horn*
System used to warn pedestrians of the presence of the vehicle.
When the vehicle is started, lighting of the
indicator lamp on the button for a few seconds
indicates the activation of the system.
The warning is heard when the vehicle speed is
between 0 and 22 mph (0 and 35 km/h).
Deactivation
In certain driving conditions, you can deactivate
the system.Press this button.
The indicator lamp on the button comes on and
the audible warning stops.
Pressing the button again reactivates the system.
The indicator lamp on the button switches off. Before deactivating the system, ensure
that you are not driving in an area
frequented by pedestrians.
Operation
* Depending on equipment.
Operating fault
If a system fault occurs, the indicator lamp on
the button flashes. Contact a CITROËN dealer
or a qualified workshop to have the system
checked.
The system is reactivated automatically
each time the vehicle is started.
Safety
Page 90 of 174

88
Starting - stopping the vehicle
- Position 1: LOCK The steering is locked.
-
P
osition 2: ACC
T
he ancillaries (radio, 12 V socket, etc.)
can be used.
-
P
osition 3: ON
I
gnition on.
-
P
osition 4: S TA R T
"
Ready" lamp on.
M
otor ready to drive the vehicle.
Ignition switch
F Check that the drive selector is in position P.
F
I
nsert the key in the ignition switch.
F
T
urn the key to position 4 (S TA R T ) .
StartingStopping
F Stop the vehicle.
F
K eep your foot on the brake pedal.
F
P
lace the drive selector in position P .
F
A
pply the parking brake.
F
T
urn the key to position 1 (LOCK) .
F
R
emove the key from the ignition switch.
F
H
old it in this position for a few
seconds until the " RE ADY" lamp
comes on accompanied by an
audible signal.
F
R
elease the key.
T
he key returns automatically to
position
3
(ON) . Do not attach any heavy objects to the
key as this could weigh down on it when
in the ignition switch and cause a fault.
If you use the ancillaries for a prolonged
period (with the key in the ACC
position), you risk discharging the 12 V
battery. Starting your vehicle will then
no longer be possible. Be aware.
Driving
Page 101 of 174

99
F Check that the charging lamp in the instrument panel and
the green CHARGING lamp of
the control unit are on fixed.
The start of charging may be
accompanied by the noise of a fan
running. This noise is per fectly normal.
The charge may be interrupted at any
time by withdrawing the charging plug.
If this is not the case, charging has not
started; repeat the procedure, ensuring that all
connections are correct.
The state of charge indicator for the main
battery is displayed in the instrument panel and
the number of bars illuminated increases as the
battery is charged.
If exceptionally you have to interrupt the
charge by disconnecting the charging
cable from the power point, it is
essential to first press the Manual Stop
button on the control unit.Control unit
There are four indicator lamps:
- S TOP: on red.
I
t indicates that charging has been
interrupted by a press on the Manual Stop
button. This action is essential before
disconnecting the charging cable from the
power point when charging.
-
P
OWER : on green.
I
t indicates that the electric connection has
been established. If it does not come on,
check that the connections are correct. If
the problem persists, contact a CITROËN
dealer or a qualified workshop.
-
F
A U LT : on red.
I
t indicates the presence of a fault. Check
that the connections are correct. If this
warning lamp does not go off, contact a
CITROËN dealer or a qualified workshop.
-
C
HARGING : on green.
I
t indicates that charging is in progress.
If it does not come on, check that the
connections are correct. If the problem
persists, contact a CITROËN dealer or a
qualified workshop.
7
Practical information
Page 107 of 174

105
F Check that the charging warning lamp in the instrument panel is
on fixed.
Fast charging stops automatically
when the main battery is around 80%
charged. It is possible to attain a charge
of 100% by restarting the procedure.
However, the time taken by this
additional charge will be relatively long,
as the charging rate is reduced. During fast charging, the vehicle's air
conditioning may start automatically,
if needed to cool the main battery. It is
therefore per fectly normal to hear the
noise of a fan running from outside the
vehicle and to see a puddle of water
form under the vehicle. As a safety measure, the motor will
not start when the charging cable is
connected to the vehicle's socket.
Also, any attempt to start the motor
interrupts the charging procedure. It
will then be necessary to disconnect
and reconnect the charging cable to
the vehicle's socket, then to restart the
charging following the instructions for
using the charging station.If the exterior temperature is
below
0 °C, the charging time may be
longer.
If the exterior temperature is
below
-25 °C, charging may not be
possible.
If this is not the case, charging has not started;
check the operating instructions for the
charging station. The charging warning lamp in the instrument
panel goes off when charging is complete.
F
D
isconnect the charging cable following
the instructions for the charging terminal.
F
C
lose the charging socket cover and
the
flap.
After charging, close the charging
socket cover and flap.
Take care to avoid the ingress of water
or dust into the socket, under its cover
or into the charging plug. Risk of fire or
electrocution.
Vehicle out of use for a long
period
When your vehicle is going to be out
of use for a long period, charge the
main battery completely every three
months (following the normal charging
procedure).
Before charging, check that the
12 V battery is not disconnected or
discharged. If this is the case, refer
to the "12 V battery" section for
reconnecting or charging the battery.
7
Practical information
Page 156 of 174

154
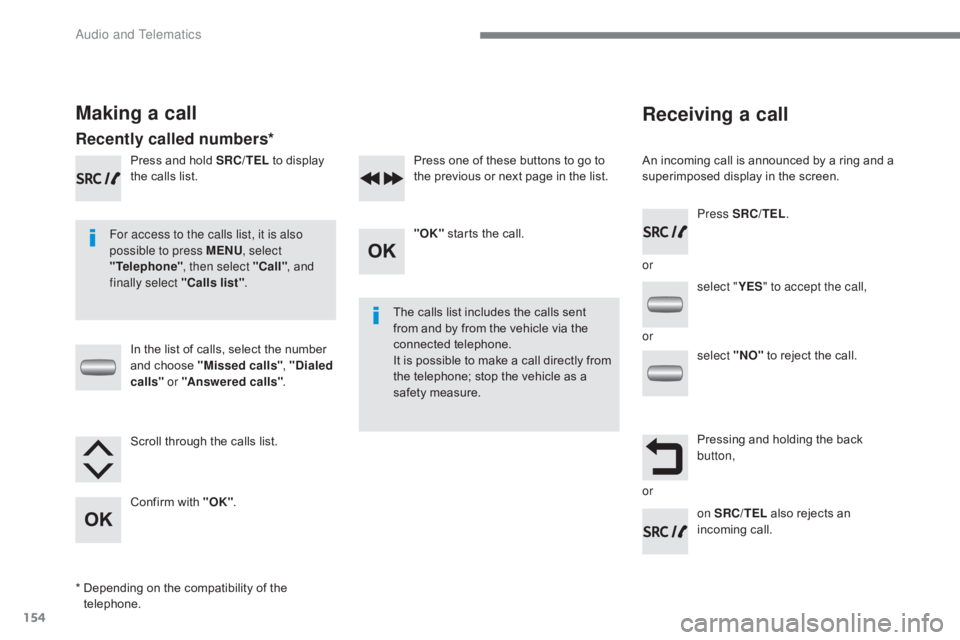
Receiving a call
An incoming call is announced by a ring and a
superimposed display in the screen.
For access to the calls list, it is also
possible to press MENU , select
"Telephone" , then select "Call" , and
finally select "Calls list" .
The calls list includes the calls sent
from and by from the vehicle via the
connected telephone.
It is possible to make a call directly from
the telephone; stop the vehicle as a
safety measure.
Making a call
Recently called numbers*
In the list of calls, select the number
and choose "Missed calls" , "Dialed
calls " or "Answered calls" .
Press and hold SRC/TEL
to display
the calls list.
Press SRC/TEL.
on SRC/TEL also rejects an
incoming call.
or
or
or
Scroll through the calls list.
Confirm with "OK"
. "OK"
starts the call.
Press one of these buttons to go to
the previous or next page in the list.
*
D
epending on the compatibility of the
telephone. select "
YES" to accept the call,
select "NO" to reject the call.
Pressing and holding the back
button,
Audio and Telematics