ECO mode Citroen C ZERO RHD 2015 1.G Owner's Manual
[x] Cancel search | Manufacturer: CITROEN, Model Year: 2015, Model line: C ZERO RHD, Model: Citroen C ZERO RHD 2015 1.GPages: 176, PDF Size: 5.22 MB
Page 3 of 176
We draw your attention to the following...
keys
afety warning
additional information
contributes to the protection of the environment
refer to the page indicated
Reading the detailed sections is essential to
make the most of your vehicle, in complete
safety.
Your vehicle is fitted with only some of the
equipment described in this document,
depending on the trim level, version and the
specifications for the country in which it is sold.
The fitting of electrical equipment or
accessories which are not recommended
by CITROËN may result in a failure of
your vehicle's electronic system. Contact
a CITROËN dealer for information on the
recommended equipment and accessories.
CITRoËn
has a presence on every continent,
a complete product range,
bringing together technology and a permanent spirit of innovation,
for a modern and creative approach to mobility.
We thank you and congratulate you on your choice.
Happy motoring!
at the wheel of your new vehicle,
getting to know each system,
each control, each setting,
makes your trips, your journeys
more comfortable and more enjoyable.
Page 10 of 176
8
For more economical driving, and increased rangePractical advice for everyday use to optimise the range of your vehicle by conserving battery power.
Adopt a smooth driving
style
The electrical consumption of your vehicle
depends greatly on your journey, your driving
style and your speed.
In all cases, adopt a smooth driving style.
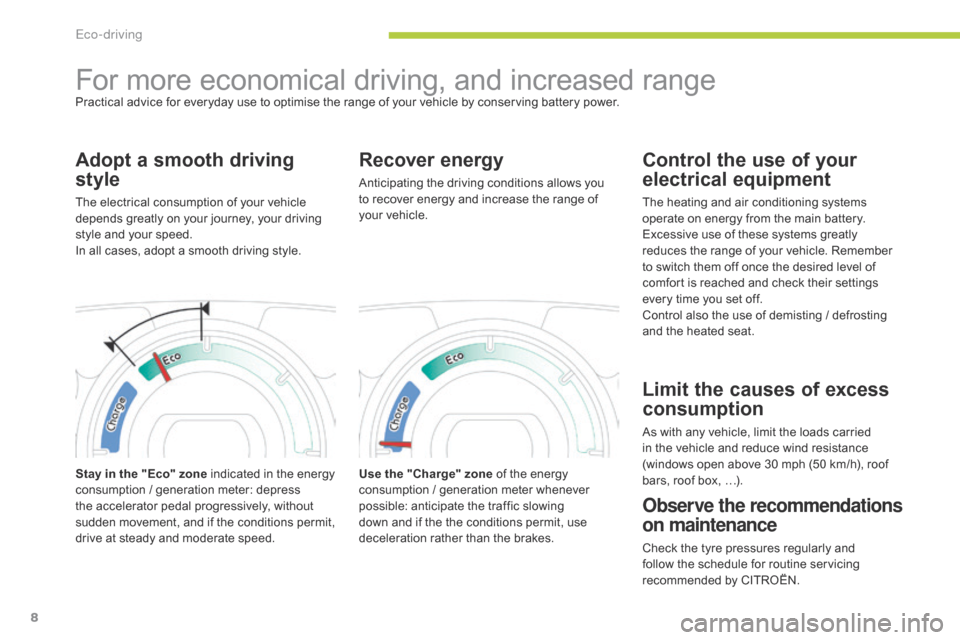
Stay in the "Eco" zone indicated in the energy
consumption / generation meter: depress
the accelerator pedal progressively, without
sudden movement, and if the conditions permit,
drive at steady and moderate speed.
Recover energy
Anticipating the driving conditions allows you
to recover energy and increase the range of
your
vehicle.
Use the "Charge" zone of the energy
consumption
/ generation meter whenever
possible: anticipate the traffic slowing
down and if the the conditions permit, use
deceleration rather than the brakes.
Control the use of your
electrical equipment
The heating and air conditioning systems
operate on energy from the main battery.
Excessive use of these systems greatly
reduces the range of your vehicle. Remember
to switch them off once the desired level of
comfort is reached and check their settings
every time you set off.
Control also the use of demisting
/ defrosting
and the heated seat.
Limit the causes of excess
consumption
As with any vehicle, limit the loads carried
in the vehicle and reduce wind resistance
(windows open above 30 mph (50 km/h), roof
bars, roof box, …).
Observe the recommendations
on maintenance
Check the tyre pressures regularly and
follow the schedule for routine servicing
recommended by CITROËN.
Eco-driving
Page 12 of 176
10
Indicator and warning lamps
Visual indicators informing the driver that a
system is in operation, is deactivated or has
a fault.Associated warnings
The illumination of certain warning lamps may
be accompanied by an audible signal.
The warning lamps may come on continuously
(fixed) or flash.
Certain warning lamps may come on in
one of two modes. Only by relating the
type of lighting to the operating status
of the vehicle can it be ascertained
whether the situation is normal or
whether a fault has occurred.
When the ignition is switched on
Certain warning lamps come on for a few seconds
when the vehicle's ignition is switched on.
These same warning lamps go off after a few
seconds.
If you notice one of these warning lamps
remaining on, refer to the information on the
warning lamp in question.
Monitoring
Page 21 of 176
19
Energy consumption / generation indicator
Energy consumption
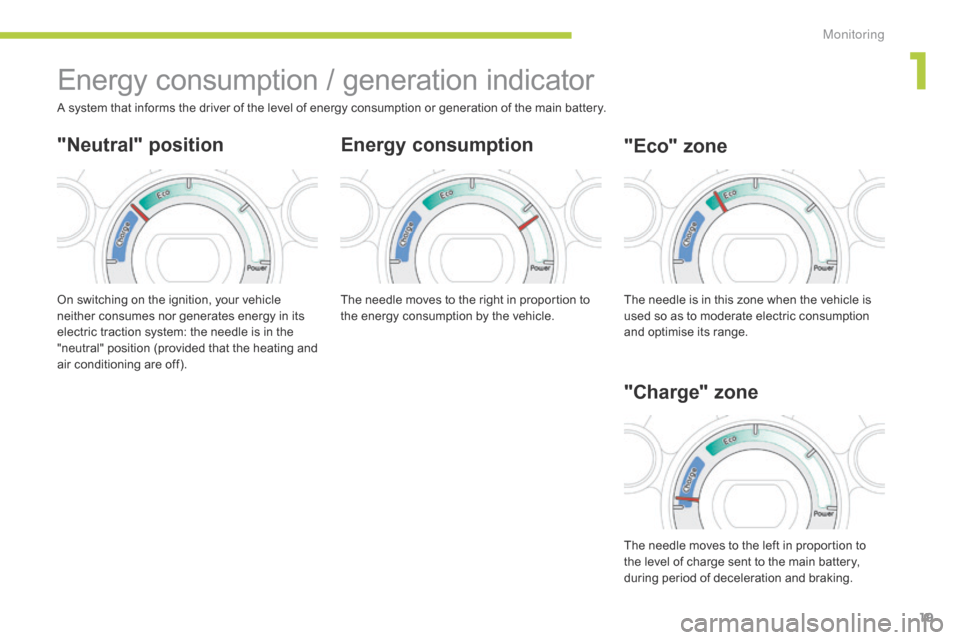
On switching on the ignition, your vehicle
neither consumes nor generates energy in its
electric traction system: the needle is in the
"neutral" position (provided that the heating and
air conditioning are off).
"Eco" zone
A system that informs the driver of the level of energy consumption or generation of the main battery.
"Neutral" position"Charge" zone
The needle moves to the right in proportion to
the energy consumption by the vehicle.The needle is in this zone when the vehicle is
used so as to moderate electric consumption
and optimise its range.
The needle moves to the left in proportion to
the level of charge sent to the main battery,
during period of deceleration and braking.
1
M
Page 23 of 176
21
Service indicator
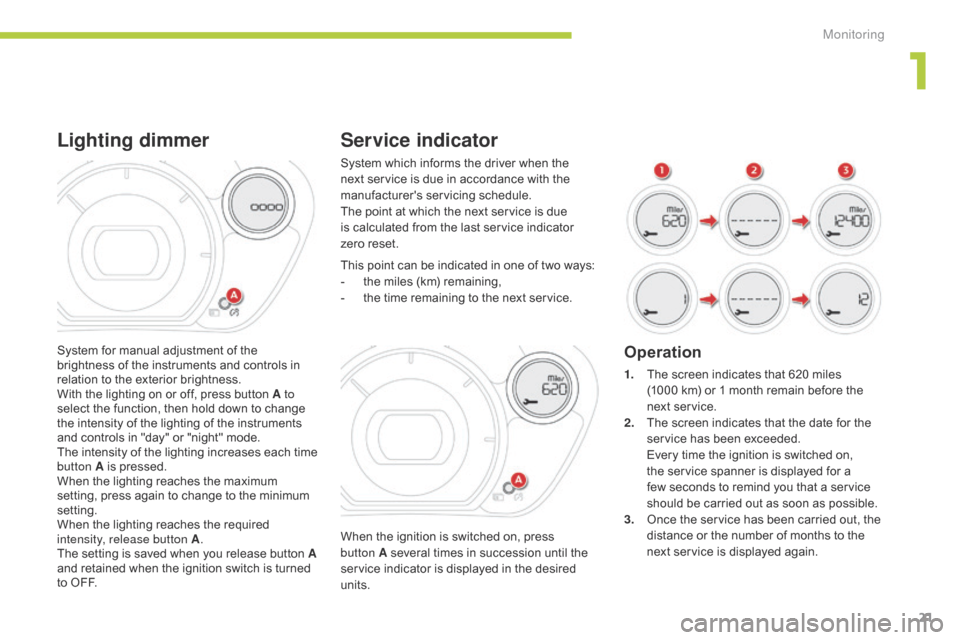
When the ignition is switched on, press
button A several times in succession until the
service indicator is displayed in the desired
units. This point can be indicated in one of two ways:
-
t
he miles (km) remaining,
-
t
he time remaining to the next service.
Operation
1. The screen indicates that 620 miles
(1000 km) or 1 month remain before the
next service.
2.
T
he screen indicates that the date for the
service has been exceeded.
E
very time the ignition is switched on,
the service spanner is displayed for a
few seconds to remind you that a service
should be carried out as soon as possible.
3.
O
nce the service has been carried out, the
distance or the number of months to the
next service is displayed again.
System which informs the driver when the
next service is due in accordance with the
manufacturer's servicing schedule.
The point at which the next service is due
is calculated from the last service indicator
zero
reset.
System for manual adjustment of the
brightness of the instruments and controls in
relation to the exterior brightness.
With the lighting on or off, press button A to
select the function, then hold down to change
the intensity of the lighting of the instruments
and controls in "day" or "night" mode.
The intensity of the lighting increases each time
button A is pressed.
When the lighting reaches the maximum
setting, press again to change to the minimum
setting.
When the lighting reaches the required
intensity, release button A .
The setting is saved when you release button A
and retained when the ignition switch is turned
to OFF.
Lighting dimmer
1
Monitoring
Page 31 of 176
29
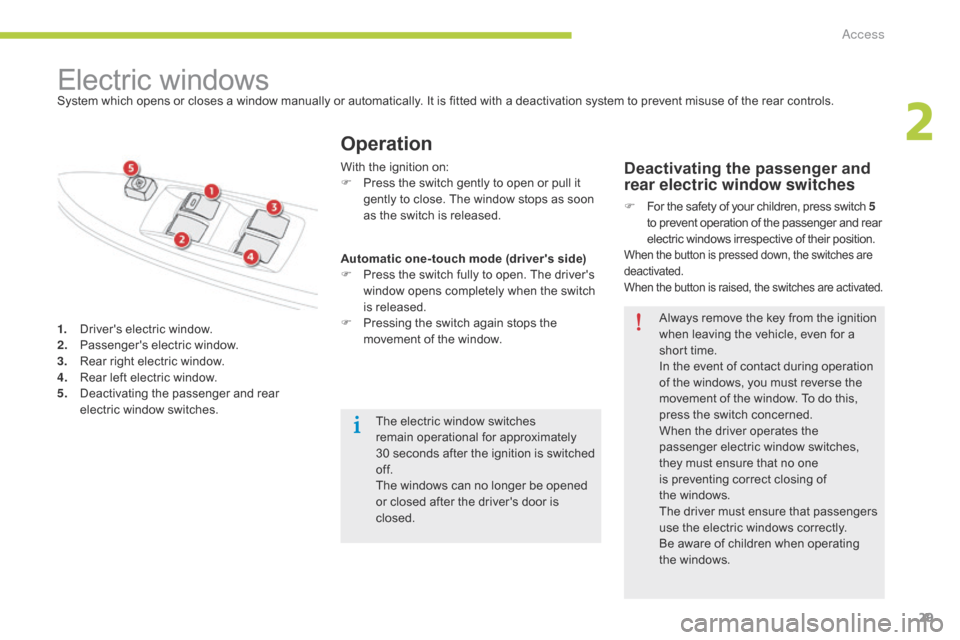
1. Driver's electric window.
2. Passenger's electric window.
3.
R
ear right electric window.
4.
R
ear left electric window.
5.
D
eactivating the passenger and rear
electric window switches.
Electric windows
Operation
Deactivating the passenger and
rear electric window switches
F For the safety of your children, press switch 5
to prevent operation of the passenger and rear
electric windows irrespective of their position.
When the button is pressed down, the switches are
deactivated.
When the button is raised, the switches are activated.
System which opens or closes a window manually or automatically. It is fitted with a deactivation system to prevent misuse of the rear controls.
The electric window switches
remain operational for approximately
30
seconds after the ignition is switched
of f.
The windows can no longer be opened
or closed after the driver's door is
closed.
With the ignition on:
F
P
ress the switch gently to open or pull it
gently to close. The window stops as soon
as the switch is released.
Always remove the key from the ignition
when leaving the vehicle, even for a
short time.
In the event of contact during operation
of the windows, you must reverse the
movement of the window. To do this,
press the switch concerned.
When the driver operates the
passenger electric window switches,
they must ensure that no one
is preventing correct closing of
the
w
indows.
The driver must ensure that passengers
use the electric windows correctly.
Be aware of children when operating
the windows.
Automatic one-touch mode (driver's side)
F
P
ress the switch fully to open. The driver's
window opens completely when the switch
is released.
F
P
ressing the switch again stops the
movement of the window.
2
Access
Page 56 of 176

54
Wiper control
Windscreen wipers
The wipers are controlled directly by the driver
by means of the stalk A and its ring B.Single wipe.
Park.
Intermittent (the speed can be set
manually).
Slow.
Fast.
B.
I
ntermittent operation adjustment ring.
F
T
urn this ring to increase or reduce the
wiping frequency in intermittent mode.
A.
W
iping speed selection stalk: raise or lower
the stalk to the desired position.
Windscreen wash
Pull the wiper stalk towards you.
The windscreen wash, then the windscreen
wipers, operate for a pre-determined time.
Rear wiper
Park.
Intermittent wipe.
The wiper wipes twice then switches to
intermittent mode with an interval of a few
seconds. Wipe with screenwash.
Keep the ring in this position to operate the
screenwash with several wipes of the wiper.
Do not operate the wipers on a dry
windscreen. Under extremely hot or
cold conditions, ensure that the wiper
blades are not stuck to the windscreen
before operating the wipers. In wintry conditions, remove snow, ice
or frost present on the windscreen,
around the wiper arms and blades and
the windscreen seal, before operating
the wipers. C.
R
ear wiper selection ring.
Visibility
Page 137 of 176
135
Audio system / Bluetooth®
01 First steps
For safety reasons, the driver must only carry out
operations which require prolonged attention while the
vehicle is stationary.
When the engine is switched off and to prevent
discharging of the battery, the system switches off after
activation of the energy economy mode.
CONTENTS
02 Radio
03
Audio
04
Using
the telephone
05
Audio
settings
06
Configuration
07
Screen
menu maps
Frequently asked questions p.
p.
p.
p.
p.
p.
p.
p.
136
137
140
146
152
153
154
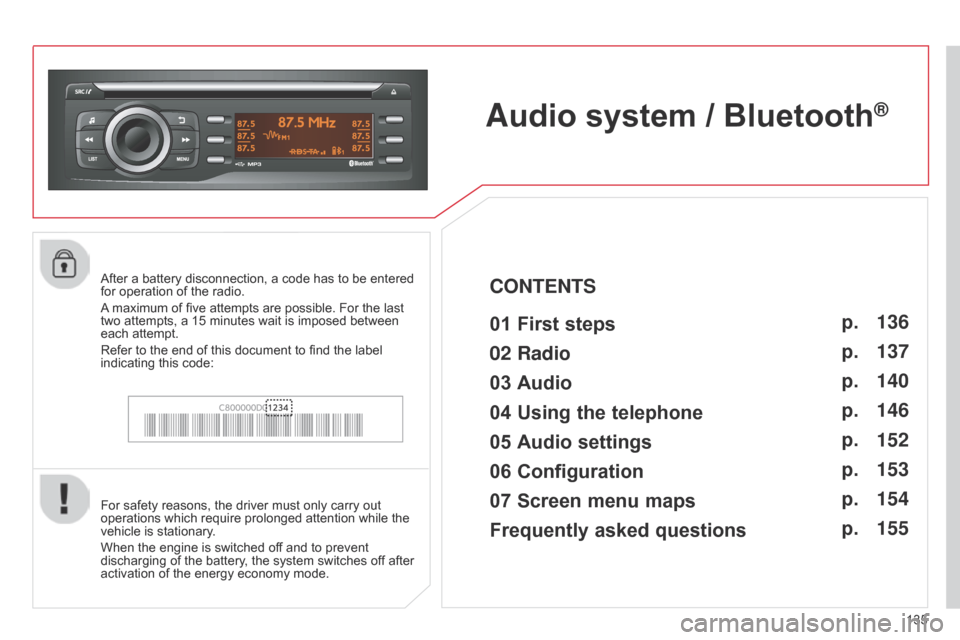
155After a battery disconnection, a code has to be entered
for operation of the radio.
A maximum of five attempts are possible. For the last
two
attempts, a 15 minutes wait is imposed between
each attempt.
Refer to the end of this document to find the label
indicating this code:
Page 145 of 176

03
143
Select a line in the list.
Jump a page.
Press MENU, select "Media" then
select or deselect
"TA" to activate
or deactivate reception of traffic
messages.
Up a level in the menu.
AUDIO
Return to the top level of the folder structure to select the type of
tracks.
-
By
Folders (CD or USB): all folders containing audio files
recognised on the peripheral device, in alphabetical order
without
following the folder structure.
-
By
Artist (USB only): all of the artist names defined in the
ID3
T
ags, in alphabetical order.
-
By
Genre (USB only): all of the genres defined in the ID3 Tags.
-
By
Playlist (CD or USB): if playlists have been saved.
Press LIST
to display the structure of
the folders in the compilation.
Select the play mode: "Normal",
"Random", "Random all" or
"Repeat" .
Page 158 of 176

156
FREqUENTLY ASKED q UESTIONS
qUESTION ANSWER SOLUTION
The quality of reception
of the radio station
listened to gradually
deteriorates or the stored
stations do not function
(no sound, 87.5
MHz is
displayed...). The vehicle is too far from the transmitter used by the station listened
to or there is no transmitter in the geographical area through which the
vehicle is travelling.
Activate the RDS function to enable the system
to check whether there is a more powerful
transmitter in the geographical area.
The environment (hills, buildings, tunnels, basement car parks...) block
reception, including in RDS mode. This phenomenon is normal and does not indicate
a failure of the audio equipment.
The aerial is absent or has been damaged (for example when going
through a car wash or into an underground car park). Have the aerial checked by a CITROËN dealer.
Sound cut-outs of 1 to
2
seconds in radio mode. During this brief sound cut-out, the RDS searches for any frequency
permitting better reception of the station. Deactivate the RDS function if the phenomenon is
too frequent and always on the same route.
Traffic announcement
TA is displayed. I do
not receive any traffic
information. The radio station does not broadcast traffic information.
Tune to a radio station which broadcasts traffic
information.
The stored stations are
not found (no sound,
87.5
MHz is displayed...). An incorrect waveband is selected.
Press the SRC/TEL button to return to the
waveband (FM1 or FM2) on which the stations are
stored.