buttons CITROEN C1 2018 Owners Manual
[x] Cancel search | Manufacturer: CITROEN, Model Year: 2018, Model line: C1, Model: CITROEN C1 2018Pages: 269, PDF Size: 7.63 MB
Page 28 of 269
26
Indicators
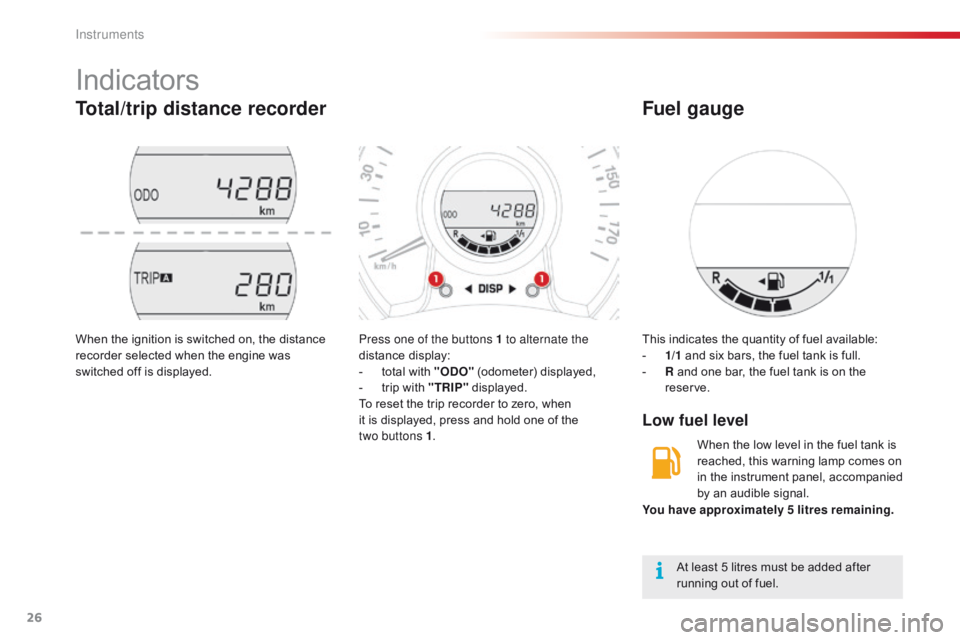
Total/trip distance recorder
Press one of the buttons 1 to alternate the
distance display:
-
t
otal with "ODO"
(odometer) displayed,
-
t
rip with "TRIP"
displayed.
To
reset the trip recorder to zero, when
i
t is displayed, press and hold one of the
t
wo buttons 1 .
When
the
ignition
is
switched
on,
the
distance
r
ecorder
selected
when
the
engine
was
s
witched
off
is
displayed. This
indicates the quantity of fuel available:
- 1/ 1 and six bars, the fuel tank is full.
-
R
and one bar, the fuel tank is on the
r
eserve.
Low fuel level
Fuel gauge
At least 5 litres must be added after running out of fuel.
You have approximately 5 litres remaining.
When the low level in the fuel tank is
r
eached, this warning lamp comes on
i
n the instrument panel, accompanied
b
y an audible signal.
Instruments
Page 29 of 269
.
Information display
F Press one �")
27
C1_en_Chap01_instrument- de-bord_ed01-2016
Trip computer
System that gives you information on the journey in progress (range, fuel consumption…).
Information display
F Press one of theses buttons to display the v
arious trip computer tabs in turn:
-
T
he total distance.
-
T
he trip "A".
-
T
he trip "B".
-
T
he Stop & Start partial time counter*.
-
T
he Stop & Start global time counter*.
-
T
he ambient temperature*.
-
T
he current fuel consumption.
-
T
he average fuel consumption.
-
T
he remaining range.
-
T
he average speed.
-
T
he lighting dimmer.
Trip reset
F When the trip required is displayed, press o
ne of the two " DISP"
buttons for more
t
han two seconds.
Tr i p s "A"
and "B"
are independent but their
u
se is identical.
For
example, trip "A"
can be used for daily
f
igures, and trip "B"
for monthly figures.
* Depending
on version.
Ambient temperature
In certain situations, the ambient temperature may only be displayed after a delay or not at all,
in par
ticular:
-
w
hen stationary or at low speed (less than
a
bout 18 mph (25 km/h),
-
where there is too much variation in temperature (
entering or leaving a garage, a tunnel...),
- during very short journeys (less than about 2
minutes).
Lighting dimmer
When driving at night, this function allows certain displays in the instrument panel to be
s
witched off to reduce visual fatigue for the
d
river.
It
operates only when the sidelamps are on.
F
W
hen the "Lighting dimmer" menu
i
s displayed, press and hold one of
t
he "DISP " buttons for access to the
adjustment.
F
T
hen make repeated presses on one of the
t
wo "DISP "
buttons to increase or reduce
t
he brightness.
T
he display flashes to show you the
b
rightness chosen.
1
Instruments
Page 34 of 269

32
C1_en_Chap02_ouvertures_ed01-2016
Remote control
This is used to lock, unlock and locate the vehicle at a distance.
Unfolding / Folding the keyLocking
F Press this button to unfold / fold the key.F
P
ress the closed padlock to lock
t
he vehicle.
The direction indicators flash once.
After locking, if you notice that a door
i
s not closed properly, close it then lock
t
he vehicle again.
F
P
ress the open padlock to unlock
t
he vehicle.
Unlocking
The direction indicators flash twice.F
P
ress the closed padlock to
l
ocate your locked vehicle in a
c
ar
par
k.
Locating your vehicle
This is indicated by lighting of the direction i
ndicators for a few seconds.
The
high frequency remote control is
a
sensitive system; do not handle it in
y
our pockets as there is a risk that it may
u
nlock the vehicle without you being
a
ware of this.
Avoid
pressing the buttons of your
r
emote control out of range of your
v
ehicle, you risk rendering it inoperative.
Access
Page 36 of 269

34
C1_en_Chap02_ouvertures_ed01-2016
Keyless Entry and Starting system
System that allows the opening, closing and starting of the vehicle while keeping the electronic key on your person.
Electronic key
This electronic key can also be used as a remote control.
It
includes an integral emergency key.
For
more information on the remote control,
r
efer to the corresponding section.
Unlocking the vehicle
Unlocking by the doors
F With the electronic key on your person a
nd in one of the recognition zones, press
o
ne of the buttons on the door handles to
u
nlock the vehicle.
F
T
hen pull on the door handle to open the
d
o o r.
Unlocking by the boot
F With the electronic key on your person a
nd in the recognition zone located at the
r
ear, press the button on the boot handle to
u
nlock the vehicle and release the tailgate.
F
T
hen raise the tailgate to open it.
The
direction indicators flash twice to
c
onfirm the unlocking of the vehicle.
As
a
safety
measure,
the
detection
z
ones
in
which
the
the
electronic
key
i
s
operational
have
a
radius
of
about
7
0 cm
around
each
opening
button.
Access
Page 37 of 269

35
C1_en_Chap02_ouvertures_ed01-2016
Locking the vehicle
Locking
F With the electronic key in the recognition z
one, press one of the buttons on the front
door
handles or press the button on the
b
oot sill.
The
direction indicators flash once.If
one of the doors or the boot is still
o
pen or if the electronic key for the
K
eyless Entry and Starting system has
b
een left inside the vehicle, you are
w
arned by an audible signal and the
c
entral locking does not take place.
If the vehicle is unlocked and no door
o
r the boot is opened, the vehicle will l
ock again automatically after about 3
0 seconds.For
reasons of safety and theft
p
rotection, do not leave your electronic
k
ey in the vehicle, even when you are
c
lose to it.
It is recommended that you keep it on y
our person.
Never expose the electronic key to
e
xtreme temperatures (below -20°C or
a
bove +60°C); this could cause faults.
2
Access
Page 38 of 269

36
C1_en_Chap02_ouvertures_ed01-2016
Emergency procedure
Unlocking
F Insert the integral key into the driver's door l
ock barrel and turn it towards the front of
t
he vehicle to unlock the vehicle.
Locking
F Insert the integral key into the driver's door l
ock barrel and turn it towards the rear of
t
he vehicle to lock the vehicle.
The
integral
key
is
used
to
lock
and
unlock
the
v
ehicle
when
the
electronic
key
cannot
operate
a
nd
in
the
event
of
a
fault
with
the
Keyless
E
ntry
and
Starting
system:
-
c
ell
battery
discharged,
vehicle
battery
d
ischarged
or
disconnected,
...
-
v
ehicle
located
in
an
area
with
strong
e
lectromagnetic si
gnals.
F
P
ress
and
hold
the
latch
1
to
extract
the
i
ntegral
key
2 .
Saving the electronic key
battery
To preserve the battery, it is possible to prevent
the
electronic key working (no reception of
r
adio waves).
When
this function is activated, the "Keyless
E
ntry and Starting" system is inoperative.
To
reactivate the electronic key, press one of
t
he buttons (open or closed padlock).
F
P
ress on the open padlock twice,
w
hile pressing on and holding
t
he closed padlock.
Check
that the indicator lamp in the electronic
k
ey flashes 4 times.
Access
Page 39 of 269

37
C1_en_Chap02_ouvertures_ed01-2016
Changing the battery of
the electronic key
Battery ref.: CR2032 / 3 volts.
W hen replacement of the battery is
n
eeded, this warning lamp comes on
i
n the instrument panel.
F
U
nclip the cover using a small screwdriver
a
t the cutout.
F
R
emove the cover.
F
R
emove the protective battery holder,
p
ulling it upwards.
F
R
emove the discharged battery from its
h
ousing.
F
F
it the new battery into its housing
o
bserving the original direction of fitment.
F
R
efit the battery holder.
F
C
lip the cover onto the casing.
Lost keys
Go to a CITROËN dealer with the vehicle's registration document, your personal identification documents and if possible the key code label.
The
CITROËN dealer will be able to look up the key code and the transponder code
r
equired to order a new key.
Remote control / Electronic key
These high frequency devices are sensitive systems; do not handle them while in your pocket as there is a risk of unlocking the vehicle, without you being aware of it.
Do
not repeatedly press the buttons of your remote control or electronic key out of range
a
nd out of sight of your vehicle. You run the risk of stopping it from working and the remote
c
ontrol would have to be reinitialised.
Locking the vehicle
As a safety precaution, never leave children alone in the vehicle, except for a very short period.
In
all cases, it is essential to remove the key from the ignition switch, or take the electronic
k
ey with you when leaving the vehicle.
When purchasing a second-hand vehicle
Have the pairing of all of the keys in your possession checked by a CITROËN dealer, to ensure that only your keys can be used to open and start the vehicle.
Driving
with the doors locked may make access to the passenger compartment by the
e
mergency services more difficult in an emergency.
2
Access
Page 60 of 269

58
C1_en_Chap03_ergonomie-confort_ed01-2016
For maximum cooling or heating of the cabin, it is possible to go beyond the
m
inimum 14 or maximum 28 value.
F
P
ress the temperature adjustment
b
utton down or up until "LO" or
"HI"
is displayed.
A
setting around 21
gives optimum comfort.
H
owever, depending on your requirements,
a s
etting between 18 and 24 is normal.
On
entering the vehicle, if the interior is very
c
old
or hot, there is no need to change the
v
alue
displayed in order to reach the required
l
evel
of comfort. The system corrects the
t
emperature difference automatically and as
q
uickly as possible.
Temperature adjustment
F Press
this button downward to r
educe the value and upward to
inc
rease
it
.
The
value
indicated in the screen corresponds
t
o
a
level
of comfort and not to a temperature in
d
egrees
Celsius or Fahrenheit.
Air flow adjustment
F Press this button to increase air
f low.
The
air
flow symbol, the fan, fills progressively.
F
P
ress this button to decrease air
f
low.
Air distribution adjustment
- the centre and side air vents,
- t he centre vent, side air vents and
f
ootwells,
-
t
he footwells,
-
t
he windscreen and footwells,
-
t
he centre vent, side air vents and
w
indscreen,
-
t
he windscreen.F
P
ress this button repeatedly to
d
irect the air to:
Air intake / Air recirculation
Avoid prolonged recirculation of interior a
ir (risk of condensation or deterioration
o
f the air quality).
F
P
ressing this buttons isolates the
p
assenger compartment from the
o
utside air.
T
he air recirculation symbol is
d
isplayed.
Air
recirculation enables the passenger
c
ompartment to be isolated from exterior odours
a
nd
smoke.
Press
this button again or press the "AUTO"
button
to resume automatic management of the
i
ntake
of air. The air recirculation symbol goes off.
Ease of use and comfort
Page 85 of 269

Operation
Going into engine STOP
mode
This indicator lamp comes on in the instrument panel and the engine")
83
C1_en_Chap04_conduite_ed01-2016
Stop & Start (VTi 68 S&S engine)
Operation
Going into engine STOP
mode
This indicator lamp comes on in the instrument panel and the engine
g
oes into standby automatically:
-
w
hen
stationary, in neutral, and you
r
elease the clutch pedal.
Never
refuel with the engine in
S
TOP mode; you must switch off the
i
gnition with the button.
For
smoother operation, during p
arking manoeuvres STOP mode is n
ot available for a few seconds after
c
oming out of reverse gear.
The
Stop & Start does not affect the
v
ehicle's systems, such as for example,
b
raking, power steering...
The
Stop
&
Start system
puts
the
engine
t
emporarily
into
standby
-
STOP
mode
-
during
s
tops
in
the
traffic
(red
lights,
traffic
jams,
or
o
ther...).
The
engine
restarts
automatically
-
S
TART
mode
-
as
soon
as
you
want
to
move
o
ff.
The
restart
takes
place
instantly,
quickly
a
nd
silently.
Per fect
for
urban
use,
the
Stop
&
Start
system
r
educes
fuel
consumption
and
exhaust
e
missions
as
well
as
the
noise
level
when
s
tationary.
Stop & Start time counters
A partial time counter counts the periods in S TOP mode during a journey.
It
is displayed in the trip computer once the
S
top & Start is operating.
Press one of the " DISP" buttons to return to the
previous
d
isplay.
A
global time counter counts the periods in
S
TOP mode since the last reset.
When
it is displayed, press one of the
"D
ISP " buttons
to reset the counter.
4
Driving
Page 188 of 269

186
C1_en_Chap10a_ Autoradio-Toyota-tactile-1_ed01-2016
In the event of prolonged exposure to sunlight and very hot conditions, the
s
ystem may go into stand-by (screen
a
nd sound completely off) for at least
5 m
inutes.
Return
to normal operation takes
p
lace when the temperature in the
p
assenger
c
ompartment
d
rops.
First steps
In ACC mode or when starting the vehicle, the system comes on.
Use
the button at bottom right of the screen for
a
ccess to the main menus.
A
second press returns the system to the last
s
ource activated, then press the virtual buttons
i
n the screen.
Audio and Telematics