instrument panel CITROEN C1 2020 Owners Manual
[x] Cancel search | Manufacturer: CITROEN, Model Year: 2020, Model line: C1, Model: CITROEN C1 2020Pages: 269, PDF Size: 7.63 MB
Page 4 of 269

.
.
C1_en_Chap00a_sommaire_ed01-2016
Instrument panels 11
Display screens
1
3
Indicator
and warning lamps
1
5
Indicators
2
6
Trip
computer
2
7
Setting
the time
2
9
InstrumentsOver view
Keys 31
K eyless Entry and Starting system
3
4
Doors
3
8
Boot
3
9
Front
electric windows
4
1
Rear
quarter windows
4
1
Electric
fa
bric
ro
of
4
2
Access
Front seats 46
Rear seats
4
8
Mirrors
5
0
Steering
wheel adjustment
5
1
Ventilation
5
2
Heating
5
4
Manual
a
ir
c
onditioning
5
5
Automatic
air conditioning
5
7
Front
demist - defrost
6
0
Rear
screen demist - defrost
6
1
Courtesy
lamp
6
2
Boot
lamp
6
2
Interior
fittings
6
3
Rear
parcel shelf
6
7
Boot
fittings
6
8
Ease of use a nd c omfort
Driving recommendations 7 0
Starting - switching off the engine
with
the key
7
1
Starting
- switching off the engine with
t
he Keyless Entry and Starting system
7
2
Manual
par
king
b
rake
7
6
5 -speed
manual gearbox
7
6
ETG
electronic gearbox
7
7
Gear
shift indicator
8
1
Hill
start assist
8
2
Stop
& Start
8
3
Speed
limiter
8
6
Reversing
camera
9
2
Lane
departure warning system
9
3
Under-inflation
d
etection
9
5
Driving
Eco-driving
Contents
Page 8 of 269

6
C1_en_Chap00b_vue-ensemble_ed01-2016
Dashboard fuses 168 -172
Instruments and controls
Door mirrors 5 0
Electric windows 4 1Courtesy
lamp
6
2
Control for electric fabric roof
4
2
Rear view mirror
5
1
Sun visors
6
4
Manual
par
king
b
rake
7
6Heating,
v
entilation
5
2-54
Manual
a
ir
c
onditioning
5
5-56
Automatic air conditioning
5
7-59
Windscreen demist / defrost
6
0
Rear screen demist / defrost
6
1
7-inch touch screen tablet
1
85 -234
Audio system
2
35 -254
Setting the time
2
9, 30
Manual
g
earbox
7
6
ETG
electronic gearbox
7
7- 80
Gear
shift indicator
8
1
Hill
start assist
8
2
12
V accessory socket
6
4
USB
port
6
5
Jack
auxiliary socket
6
5
Instrument
panel
1
1-12
Rev counter
1
2
Central screen
1
3
Indicator and warning lamps
1
5 -25
Indicators
2
6
Trip computer
2
7-28
Side air vents
5
2
Passenger's front airbag
1
19
Glove box
6
4
Deactivating
t
he
p
assenger's
f
ront
ai
rbag
1
19
Reinitialising t he u nder-inflation d
etection 9 6-97
O
Page 11 of 269

9
C1_en_Chap00c_eco-conduite_ed01-2016
Optimise the use of your gearbox
With a manual gearbox, move off gently and change up without waiting. During acceleration change up early.
With
an ETG electronic gearbox, give preference to automatic (Easy)
m
ode and avoid pressing the accelerator pedal heavily or suddenly.
Control the use of your electrical
equipment
Before moving off, if the passenger compartment is too warm, ventilate it by opening the windows and air vents before using the air conditioning.
Above
30 mph (50 km/h), close the windows and leave the air vents
ope
n.
Remember
to make use of equipment that can help keep the
t
emperature in the passenger compartment down (sunroof and window
b
linds...).
Switch
off the air conditioning, unless it has automatic regulation, as
s
oon as the desired temperature is attained.
Switch
off the demisting and defrosting controls, if not automatic.
Switch
off the heated seat as soon as possible.
Switch
off the headlamps and front foglamps when the level of light
d
oes not require their use.
Avoid
running the engine before moving off, particularly in winter; your
v
ehicle will warm up much faster while driving.
As
a passenger, if you avoid connecting your multimedia devices
(
film, music, video game...), you will contribute towards limiting the
c
onsumption of electrical energy, and so of fuel.
Disconnect
your portable devices before leaving the vehicle.
Eco-driving
Eco-driving is a range of everyday practices that allow the motorist to optimise their fuel consumption and CO2 emissions.
The
gear
shift
indicator
invites
you
to
engage
the
most
suitable
gear:
a
s
soon
as
the
indication
is
displayed
in
the
instrument
panel,
follow
it
s
traight
away.
For
vehicles
fitted
with
an
ETG
electronic
gearbox,
this
indicator
a
ppears
only
in
manual
mode.
Drive smoothly
Maintain a safe distance between vehicles, use engine braking rather t han the brake pedal, and press the accelerator progressively. These
p
ractices contribute towards a reduction in fuel consumption and CO
2
emissions
and
also
helps
reduce
the
background
traffic
noise.
.
Eco-driving
Page 13 of 269
.
2. C entral display screen.
F
or more information, r")
11
C1_en_Chap01_instrument- de-bord_ed01-2016
Instrument panels
Type 1 instrument panel
1. Speedometer (mph or km/h).
2. C entral display screen.
F
or more information, refer to the
c
orresponding
s
ection.
3.
G
ear shift indicator. 4. D
isplay management button (DISP). D
isplay of information in ascending order.
5.
D
isplay management button (DISP).
D
isplay of information in descending order.
1
Instruments
Page 14 of 269
.
2. C entral display screen.
F
or more information, refer to the
c
orresponding
s
ection.
3.
G
ear shift indicator.
4.")
12
1. Speedometer (mph or km/h).
2. C entral display screen.
F
or more information, refer to the
c
orresponding
s
ection.
3.
G
ear shift indicator.
4.
D
isplay management button (DISP).
D
isplay of information in ascending order.
Type 2 instrument panel
5. Display management button (DISP). D
isplay of information in descending order.
6.
R
ev counter
T
he engine speed is indicated by the
d
isplay of orange illuminated bars.
A
bove the maximum engine speed, the
b
ars are displayed in red to warn you of the
n
eed to change up.
Instruments
Page 17 of 269
 or
f
lashing.
Only
�")
15
C1_en_Chap01_instrument- de-bord_ed01-2016
Indicator and warning lamps
Certain warning lamps may come on in one of two modes: fixed (continuous) or
f
lashing.
Only
by relating the type of illumination
t
o the operation of the vehicle can it
be
determined whether the situation is
n
ormal or a fault has occurred.
Refer
to the tables in the following
p
ages
f
or
m
ore
i
nformation.
Visual
indicators
informing
the
driver
that
a
system
is
in
operation
or
is
switched
off
(indicator
lamp)
or
has
a
fault (warning lamp).When the ignition is switched on
Certain warning lamps come on for a few s
econds in the instrument panel when the
v
ehicle's ignition is switched on.
When the engine is star ted, these same
warning lamps should go off.
If
they remain on, before moving off, refer to the
i
nformation on the warning lamp concerned.
Associated warnings
The illumination of certain warning lamps may be accompanied by an audible signal.
The
warning lamps may come on continuously
(
fixed) or flash.
Warning lamps
STOP flashing, associated w
ith another warning
lam
p.It
is associated with the engine o
il pressure or the engine coolant
t
emperature.Stop
as soon as it is safe to do so.
Park, switch off the
ignition and call a CITROËN
d
ealer or qualified workshop.
When
the engine is running or the vehicle is being driven, illumination of one of the following warning lamps indicates a fault which requires action on
t
he
part
of the driver.
Any
fault
resulting in the illumination of a warning lamp must be investigated further.
If
you
encounter any problems, do not hesitate to contact a CITROËN dealer or a qualified workshop.
Warning
/ indicator lamp
State Cause Action
/ Observations
1
Instruments
Page 28 of 269
26
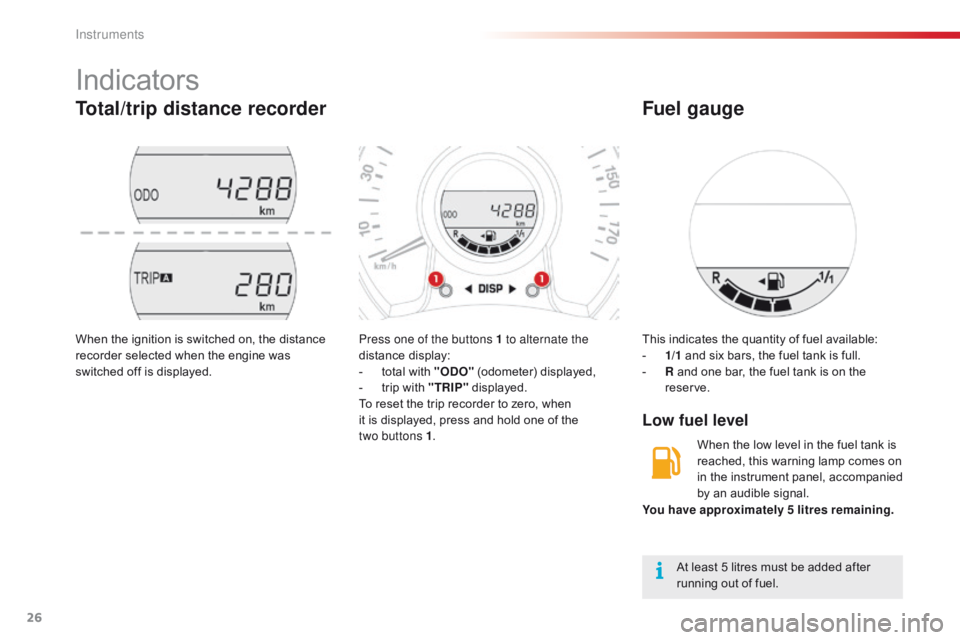
Indicators
Total/trip distance recorder
Press one of the buttons 1 to alternate the
distance display:
-
t
otal with "ODO"
(odometer) displayed,
-
t
rip with "TRIP"
displayed.
To
reset the trip recorder to zero, when
i
t is displayed, press and hold one of the
t
wo buttons 1 .
When
the
ignition
is
switched
on,
the
distance
r
ecorder
selected
when
the
engine
was
s
witched
off
is
displayed. This
indicates the quantity of fuel available:
- 1/ 1 and six bars, the fuel tank is full.
-
R
and one bar, the fuel tank is on the
r
eserve.
Low fuel level
Fuel gauge
At least 5 litres must be added after running out of fuel.
You have approximately 5 litres remaining.
When the low level in the fuel tank is
r
eached, this warning lamp comes on
i
n the instrument panel, accompanied
b
y an audible signal.
Instruments
Page 29 of 269
.
Information display
F Press one �")
27
C1_en_Chap01_instrument- de-bord_ed01-2016
Trip computer
System that gives you information on the journey in progress (range, fuel consumption…).
Information display
F Press one of theses buttons to display the v
arious trip computer tabs in turn:
-
T
he total distance.
-
T
he trip "A".
-
T
he trip "B".
-
T
he Stop & Start partial time counter*.
-
T
he Stop & Start global time counter*.
-
T
he ambient temperature*.
-
T
he current fuel consumption.
-
T
he average fuel consumption.
-
T
he remaining range.
-
T
he average speed.
-
T
he lighting dimmer.
Trip reset
F When the trip required is displayed, press o
ne of the two " DISP"
buttons for more
t
han two seconds.
Tr i p s "A"
and "B"
are independent but their
u
se is identical.
For
example, trip "A"
can be used for daily
f
igures, and trip "B"
for monthly figures.
* Depending
on version.
Ambient temperature
In certain situations, the ambient temperature may only be displayed after a delay or not at all,
in par
ticular:
-
w
hen stationary or at low speed (less than
a
bout 18 mph (25 km/h),
-
where there is too much variation in temperature (
entering or leaving a garage, a tunnel...),
- during very short journeys (less than about 2
minutes).
Lighting dimmer
When driving at night, this function allows certain displays in the instrument panel to be
s
witched off to reduce visual fatigue for the
d
river.
It
operates only when the sidelamps are on.
F
W
hen the "Lighting dimmer" menu
i
s displayed, press and hold one of
t
he "DISP " buttons for access to the
adjustment.
F
T
hen make repeated presses on one of the
t
wo "DISP "
buttons to increase or reduce
t
he brightness.
T
he display flashes to show you the
b
rightness chosen.
1
Instruments
Page 39 of 269

37
C1_en_Chap02_ouvertures_ed01-2016
Changing the battery of
the electronic key
Battery ref.: CR2032 / 3 volts.
W hen replacement of the battery is
n
eeded, this warning lamp comes on
i
n the instrument panel.
F
U
nclip the cover using a small screwdriver
a
t the cutout.
F
R
emove the cover.
F
R
emove the protective battery holder,
p
ulling it upwards.
F
R
emove the discharged battery from its
h
ousing.
F
F
it the new battery into its housing
o
bserving the original direction of fitment.
F
R
efit the battery holder.
F
C
lip the cover onto the casing.
Lost keys
Go to a CITROËN dealer with the vehicle's registration document, your personal identification documents and if possible the key code label.
The
CITROËN dealer will be able to look up the key code and the transponder code
r
equired to order a new key.
Remote control / Electronic key
These high frequency devices are sensitive systems; do not handle them while in your pocket as there is a risk of unlocking the vehicle, without you being aware of it.
Do
not repeatedly press the buttons of your remote control or electronic key out of range
a
nd out of sight of your vehicle. You run the risk of stopping it from working and the remote
c
ontrol would have to be reinitialised.
Locking the vehicle
As a safety precaution, never leave children alone in the vehicle, except for a very short period.
In
all cases, it is essential to remove the key from the ignition switch, or take the electronic
k
ey with you when leaving the vehicle.
When purchasing a second-hand vehicle
Have the pairing of all of the keys in your possession checked by a CITROËN dealer, to ensure that only your keys can be used to open and start the vehicle.
Driving
with the doors locked may make access to the passenger compartment by the
e
mergency services more difficult in an emergency.
2
Access
Page 75 of 269

73
C1_en_Chap04_conduite_ed01-2016
Starting using the
electronic key
With the first press on the "S TA R T/
STOP "
button, this indicator lamp f
lashes slowly in the instrument panel.Depending
on the ambient temperature,
e
ach attempt at starting can take up to
a
round 30 seconds. During this period,
d
o not press the "START/STOP " button
again,
or release the clutch pedal or
b
rake pedal (depending on the type of
g
earbox).
After
this period, if the engine has not
s
tarted, press the "START/STOP "
button
again for another attempt at
s
tarting. If
one of the starting conditions is
n
ot met, the "Keyless Entry and
S
tarting" system indicator lamp flashes
i
n the instrument panel. In some
c
ircumstances, it is necessary to
t
urn the steering wheel slightly while
p
ressing the "
START/STOP " button to
assist unlocking of the steering.
For vehicles fitted with a manual gearbox:
F
W
ith
the electronic key inside the vehicle,
p
ut
the gear lever into neutral and fully
d
epress the clutch pedal. The
presence of the electronic key in t
he vehicle is essential for switching
o
n the ignition and starting only. Once
t
he engine has started, make sure that
t
he electronic key remains with the
v
ehicle until the end of the journey:
o
ther wise you would not be able to lock
t
he vehicle.
F
P
ress and release the "S TA R T/
STOP "
button.
This
indicator lamp comes on in the
in
strument
pan
el. For vehicles fitted with an ETG gearbox:
F
W
ith the electronic key inside the vehicle,
p
ut the gear selector at N and press the
b
rake
ped
al.
This indicator lamp comes on in the
in
strument
pan
el.
F
P
ress and release the "
S TA R T/
STOP " button.
4
Driving