display Citroen C1 RHD 2014 1.G Owner's Guide
[x] Cancel search | Manufacturer: CITROEN, Model Year: 2014, Model line: C1 RHD, Model: Citroen C1 RHD 2014 1.GPages: 256, PDF Size: 5.59 MB
Page 96 of 256
94
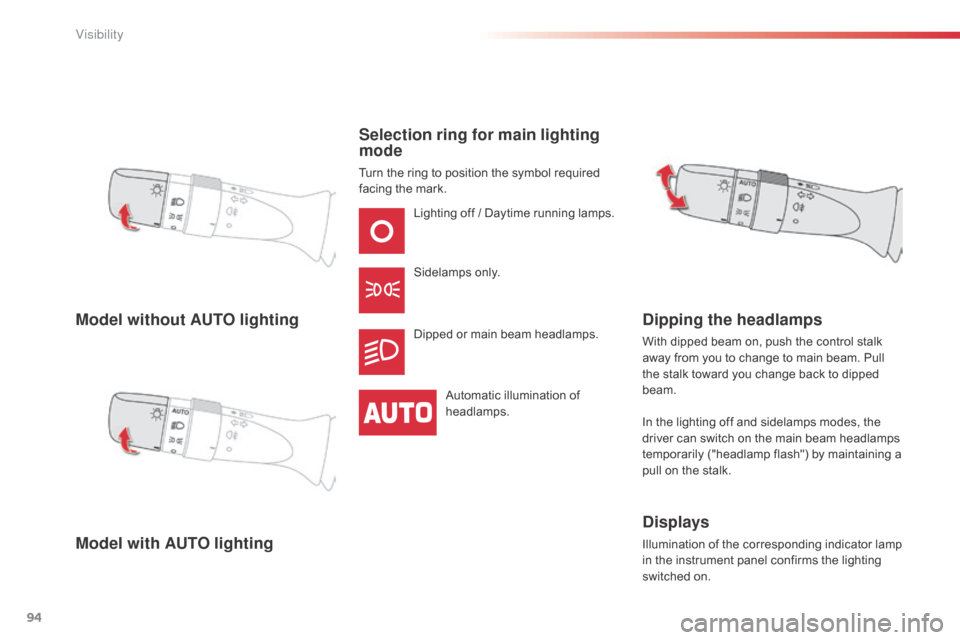
Model without AUTO lighting
Model with AUTO lightingSelection ring for main lighting
mode
Turn the ring to position the symbol required
facing the mark.
Lighting off / Daytime running lamps.
Sidelamps only.
Dipped or main beam headlamps.
Automatic illumination of
headlamps.
Dipping the headlamps
With dipped beam on, push the control stalk
away from you to change to main beam. Pull
the stalk toward you change back to dipped
beam.
In the lighting off and sidelamps modes, the
driver can switch on the main beam headlamps
temporarily ("headlamp flash") by maintaining a
pull on the stalk.
Displays
Illumination of the corresponding indicator lamp
in the instrument panel confirms the lighting
switched on.
Visibility
Page 113 of 256
111
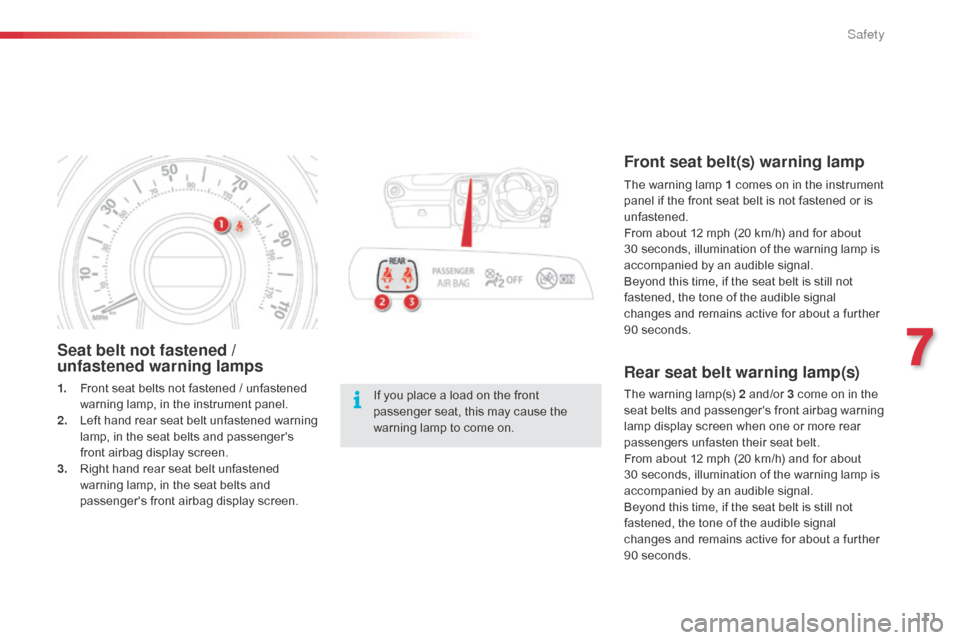
Seat belt not fastened /
unfastened warning lamps
1. Front seat belts not fastened / unfastened warning lamp, in the instrument panel.
2.
L
eft hand rear seat belt unfastened warning
lamp, in the seat belts and passenger's
front airbag display screen.
3.
R
ight hand rear seat belt unfastened
warning lamp, in the seat belts and
passenger's front airbag display screen.Rear seat belt warning lamp(s)
The warning lamp(s) 2 and/or 3 come on in the
seat belts and passenger's front airbag warning
lamp display screen when one or more rear
passengers unfasten their seat belt.
From about 12 mph (20 km/h) and for about
30 seconds, illumination of the warning lamp is
accompanied by an audible signal.
Beyond this time, if the seat belt is still not
fastened, the tone of the audible signal
changes and remains active for about a further
90 seconds.
If you place a load on the front
passenger seat, this may cause the
warning lamp to come on.
Front seat belt(s) warning lamp
The warning lamp 1 comes on in the instrument
p anel if the front seat belt is not fastened or is
unfastened.
From about 12 mph (20 km/h) and for about
30 seconds, illumination of the warning lamp is
accompanied by an audible signal.
Beyond this time, if the seat belt is still not
fastened, the tone of the audible signal
changes and remains active for about a further
90 seconds.
7
Safety
Page 116 of 256
114
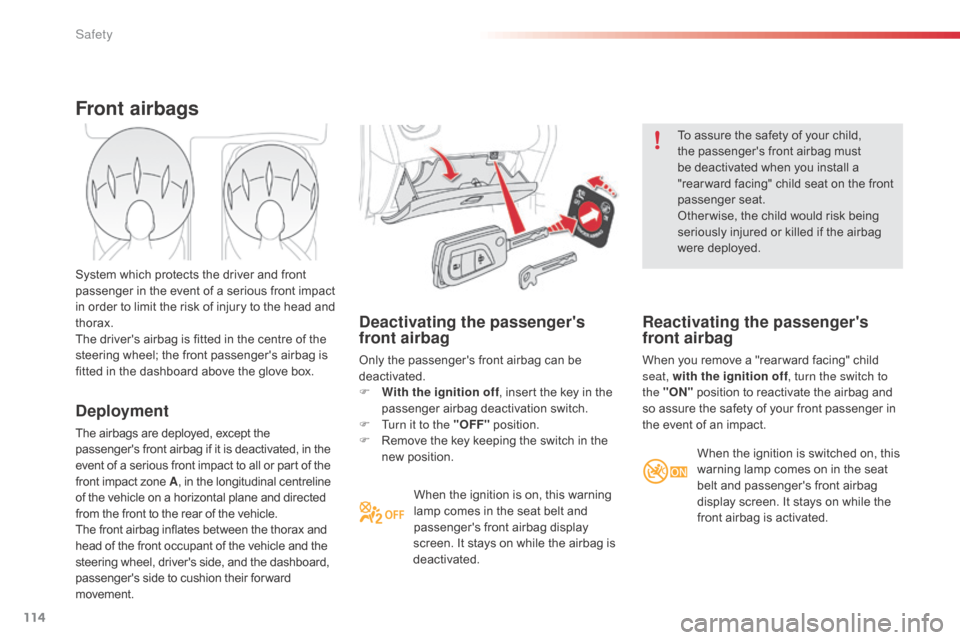
Deactivating the passenger's
front airbag
Only the passenger's front airbag can be
deactivated.
F
W
ith the ignition off , insert the key in the
passenger airbag deactivation switch.
F
T
urn it to the "OFF" position.
F
R
emove the key keeping the switch in the
new position.
When the ignition is on, this warning
lamp comes in the seat belt and
passenger's front airbag display
screen. It stays on while the airbag is
deactivated. To assure the safety of your child,
the passenger's front airbag must
be deactivated when you install a
"rear ward facing" child seat on the front
passenger seat.
Other wise, the child would risk being
seriously injured or killed if the airbag
were deployed.
Reactivating the passenger's
front airbag
When you remove a "rear ward facing" child
seat, with the ignition off
, turn the switch to
the "ON" position to reactivate the airbag and
so assure the safety of your front passenger in
the event of an impact.
Front airbags
Deployment
The airbags are deployed, except the
passenger's front airbag if it is deactivated, in the
event of a serious front impact to all or part of the
front impact zone A , in the longitudinal centreline
of the vehicle on a horizontal plane and directed
from the front to the rear of the vehicle.
The front airbag inflates between the thorax and
head of the front occupant of the vehicle and the
steering wheel, driver's side, and the dashboard,
passenger's side to cushion their for ward
movement. System which protects the driver and front
passenger in the event of a serious front impact
in order to limit the risk of injury to the head and
thorax.
The driver's airbag is fitted in the centre of the
steering wheel; the front passenger's airbag is
fitted in the dashboard above the glove box.
When the ignition is switched on, this
warning lamp comes on in the seat
belt and passenger's front airbag
display screen. It stays on while the
front airbag is activated.
Safety
Page 156 of 256
154
Dashboard fuses
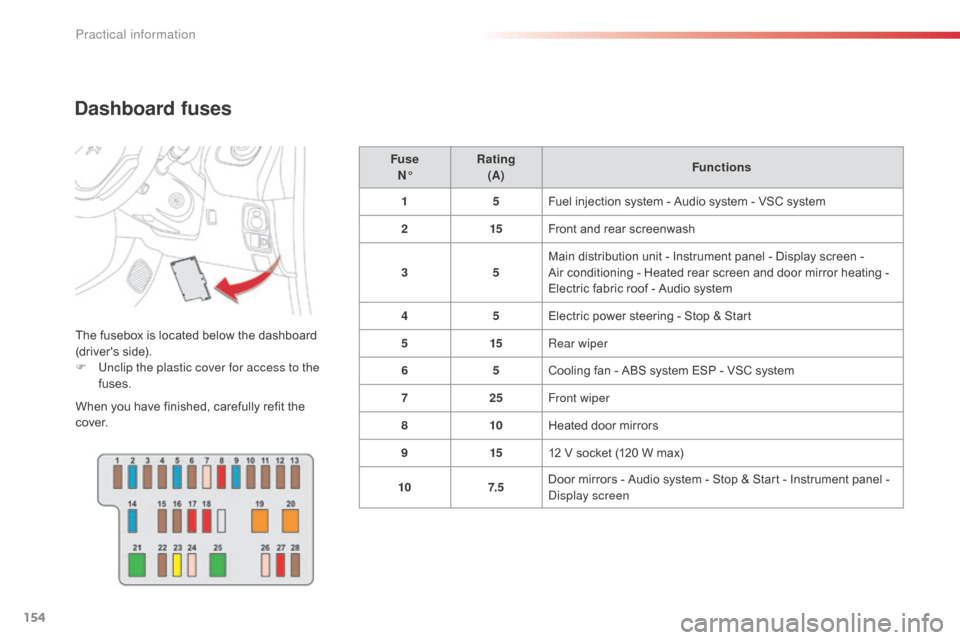
The fusebox is located below the dashboard
(driver's side).
F
U
nclip the plastic cover for access to the
fuses.
When you have finished, carefully refit the
c ove r. Fuse
NĀ° Rating
(A) Functions
1 5Fuel injection system - Audio system - VSC system
2 15Front and rear screenwash
3 5Main distribution unit - Instrument panel - Display screen -
Air conditioning - Heated rear screen and door mirror heating -
Electric fabric roof - Audio system
4 5Electric power steering - Stop & Start
5 15Rear wiper
6 5Cooling fan - ABS system ESP - VSC system
7 25Front wiper
8 10Heated door mirrors
9 1512 V socket (120 W max)
10 7. 5Door mirrors - Audio system - Stop & Start - Instrument panel -
di
splay screen
Practical information
Page 157 of 256
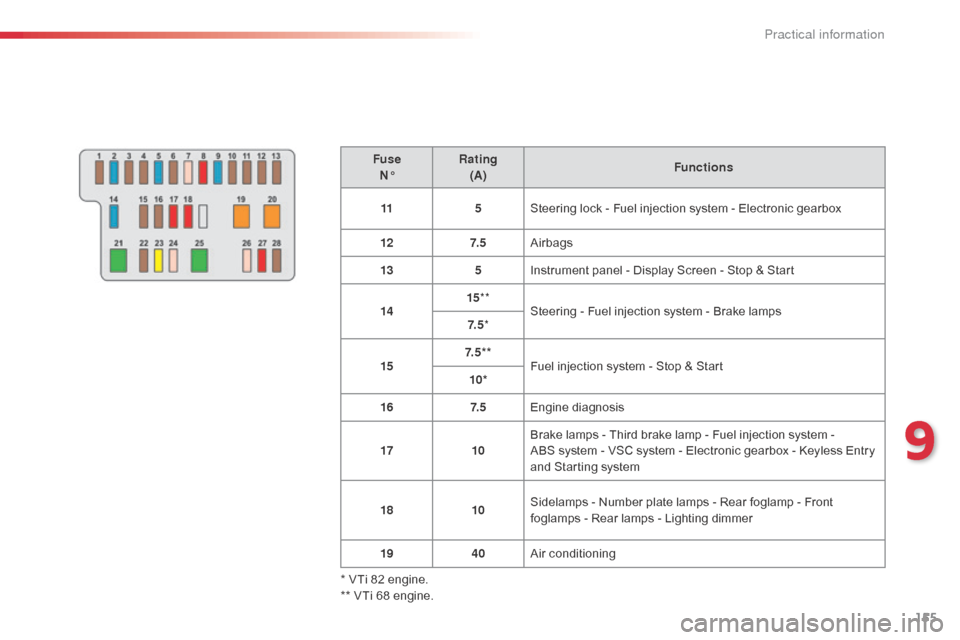
155
FuseNĀ° Rating
(A) Functions
11 5Steering lock - Fuel injection system - Electronic gearbox
12 7. 5Airbags
13 5Instrument panel - Display Screen - Stop & Start
14 15
**
Steering - Fuel injection system - Brake lamps
7. 5 *
15 7. 5 * *
Fuel injection system - Stop & Start
10*
16 7. 5Engine diagnosis
17 10Brake lamps - Third brake lamp - Fuel injection system -
ABS
system - VSC system - Electronic gearbox - Keyless Entry
and Starting system
18 10Sidelamps - Number plate lamps - Rear foglamp - Front
foglamps - Rear lamps - Lighting dimmer
19 40Air conditioning
* VTi 82 engine.
** VTi 68 engine.
9
Practical information
Page 159 of 256
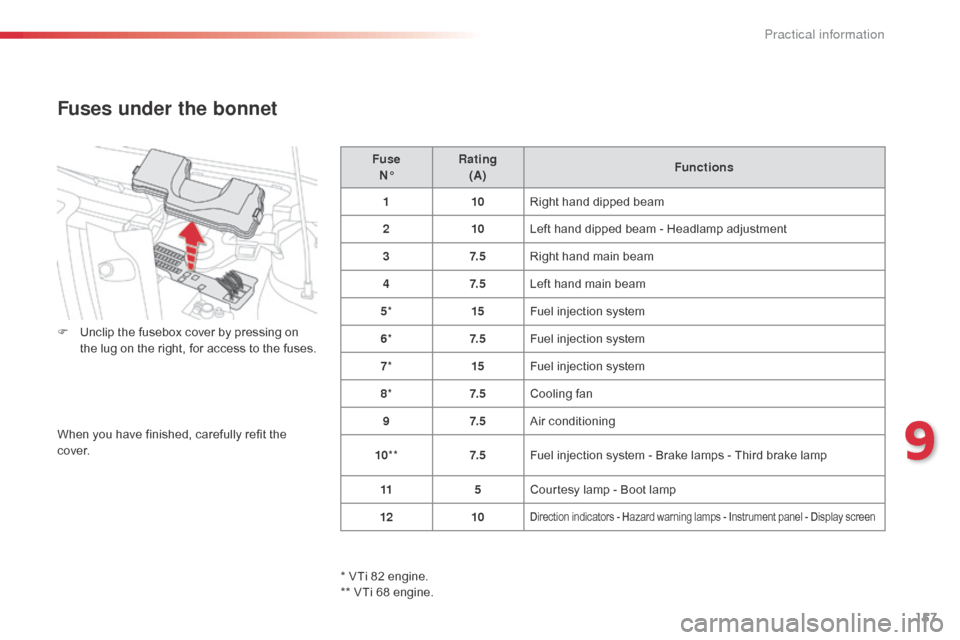
157
Fuse
NĀ° Rating
(A) Functions
1 10Right hand dipped beam
2 10Left hand dipped beam - Headlamp adjustment
3 7. 5Right hand main beam
4 7. 5Left hand main beam
5 * 15Fuel injection system
6 * 7. 5Fuel injection system
7 * 15Fuel injection system
8 * 7. 5Cooling fan
9 7. 5Air conditioning
10 ** 7. 5Fuel injection system - Brake lamps - Third brake lamp
11 5Courtesy lamp - Boot lamp
12 10
Direction indicators - Hazard warning lamps - Instrument panel - Display screen
Fuses under the bonnet
F Unclip the fusebox cover by pressing on
the lug on the right, for access to the fuses.
When you have finished, carefully refit the
c ove r.
* VTi 82 engine.
** VTi 68 engine.
9
Practical information
Page 160 of 256
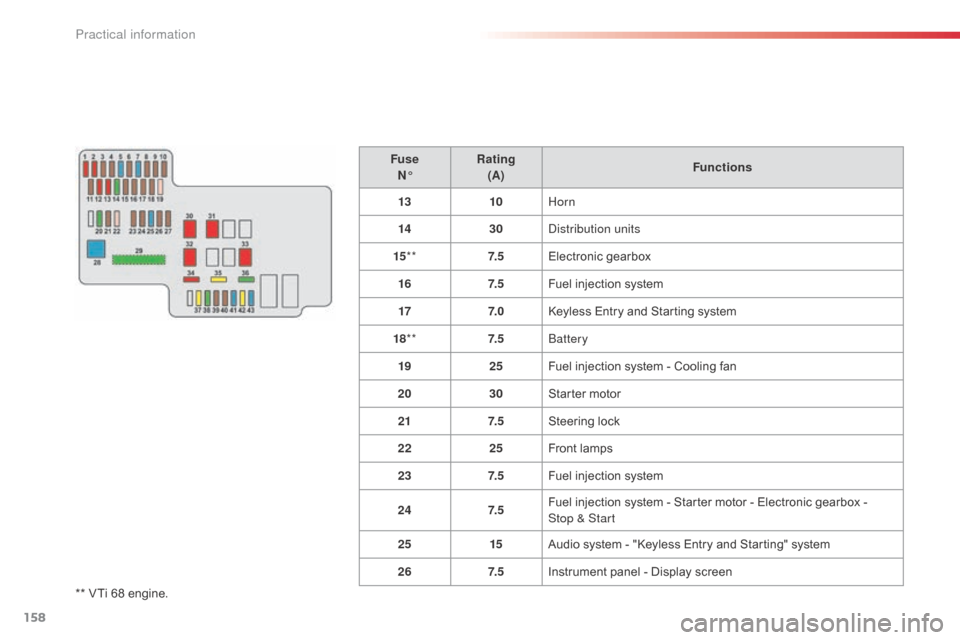
158
** VTi 68 engine.Fuse
NĀ° Rating
(A) Functions
13 10Horn
14 30
di
stribution units
15 ** 7. 5Electronic gearbox
16 7. 5Fuel injection system
17 7. 0Keyless Entry and Starting system
18 ** 7. 5
bat
tery
19 25Fuel injection system - Cooling fan
20 30Starter motor
21 7. 5Steering lock
22 25Front lamps
23 7. 5Fuel injection system
24 7. 5Fuel injection system - Starter motor - Electronic gearbox -
Stop
& Start
25 15Audio system - "Keyless Entry and Starting" system
26 7. 5Instrument panel - Display screen
Practical information
Page 162 of 256
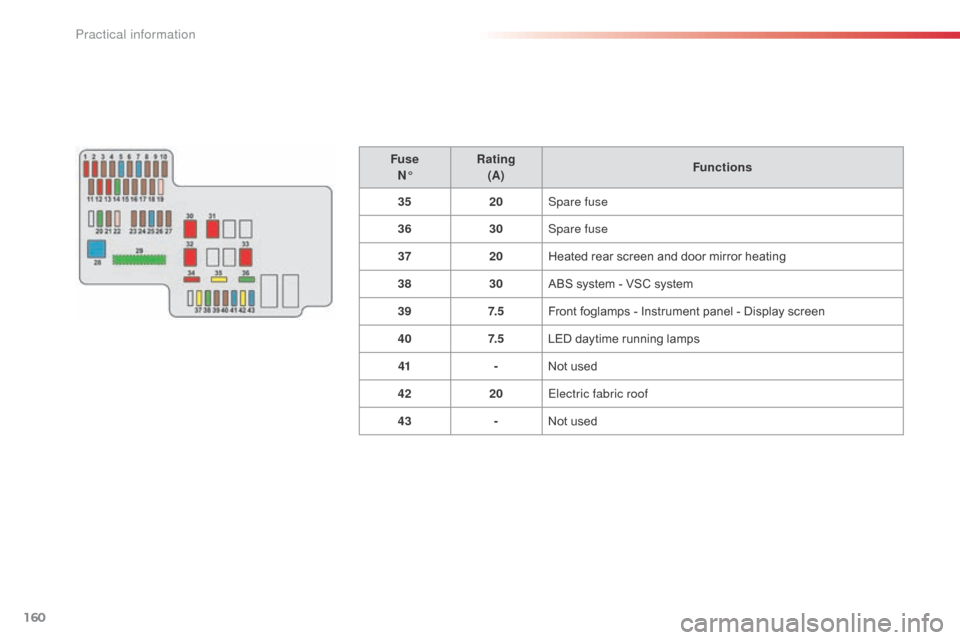
160
FuseNĀ° Rating
(A) Functions
35 20Spare fuse
36 30Spare fuse
37 20Heated rear screen and door mirror heating
38 30ABS system - VSC system
39 7. 5Front foglamps - Instrument panel - Display screen
40 7. 5LED daytime running lamps
41 -Not used
42 20Electric fabric roof
43 -Not used
Practical information
Page 191 of 256
189
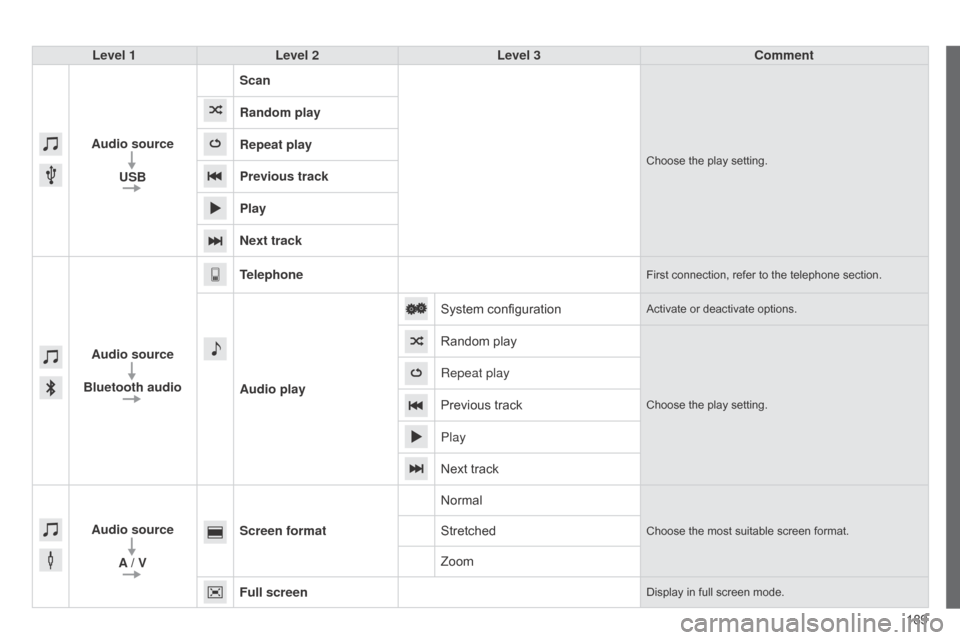
Level 1
Level 2 Level 3 Comment
Audio source USB Scan
Choose the play setting.
Random play
Repeat play
Previous track
Play
Next track
Audio source
Bluetooth audio Telephone
First connection, refer to the telephone section.
Audio play
System configuration
Activate or deactivate options.
Random play
Choose the play setting.
Repeat play
Previous track
Play
Next track
Audio source A / V Screen format
Normal
Choose the most suitable screen format.Stretched
Zoom
Full screen
Display in full screen mode.
Page 192 of 256
04
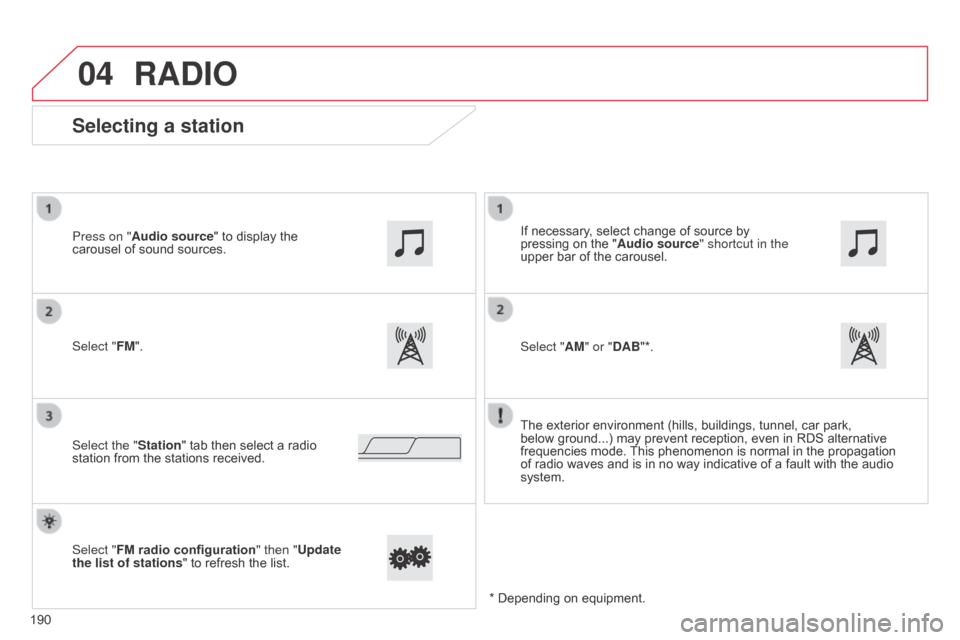
Selecting a station
The exterior environment (hills, buildings, tunnel, car park,
below ground...) may prevent reception, even in RDS alternative
frequencies mode. This phenomenon is normal in the propagation
of radio waves and is in no way indicative of a fault with the audio
system.
Select "FM". Press on "Audio source" to display the
carousel of sound sources.
Select the "Station" tab then select a radio
station from the stations received. If necessary, select change of source by
pressing on the "
Audio source" shortcut in the
upper bar of the carousel.
Select "AM" or "DAB"*.
Select "FM radio configuration " then "Update
the list of stations " to refresh the list.
RADIO
190 * Depending on equipment.