ECU Citroen C1 RHD 2015 1.G User Guide
[x] Cancel search | Manufacturer: CITROEN, Model Year: 2015, Model line: C1 RHD, Model: Citroen C1 RHD 2015 1.GPages: 260, PDF Size: 6.35 MB
Page 132 of 260

130
Your vehicle has been approved in accordance
with the latest ISOFIX regulation .
The seats, represented below, are fitted with
regulation ISOFIX mountings:
"ISOFIX" mountings
There are three anchorages for each seat: -
a
n anchorage B behind the seat for
fixing the upper strap, referred to as the
Top
Tether
. I t is identified by a marking.
The top tether is used to secure the upper strap
of child seats that have one. This arrangement
limits the for ward tipping of the child seat in the
event of a front impact.
This ISOFIX mounting system provides fast,
reliable and safe fitting of the child seat in your
vehicle. Follow the instructions for fitting
child seats contained in the seat
manufacturer's installation guide. The incorrect installation of a child seat
in a vehicle compromises the child's
protection in the event of an accident.
The ISOFIX child seats are fitted with
two latches which are secured on the two
anchorages A.
Some seats also have an upper strap ,
known as the Top Tether, which is attached to
anchorage B. To secure the child seat to the top tether:
-
r
emove and stow the head restraint before
installing the child seat in this seating
position (refit it once the child seat has
been removed),
-
p
ass the strap of the child seat over the
top of the seat backrest, between the
apertures for the head restraint rods,
-
f
ix the hook of the upper strap to the
anchorage B,
-
t
ighten the upper strap.
For information on the possibilities for installing
ISOFIX child seats in your vehicle, refer to the
summary table.
-
t
wo anchorages A , located between the
vehicle seat back and cushion, indicated by
a marking,
Child safety
Page 133 of 260

131
Baby P2C Mini and its ISOFIX base
(size categories: C, D, E)
Group 0+: from bir th to 13 kg
Installed rear ward facing using an ISOFIX base which is attached to the anchorage rings A .
The base has a support leg, adjustable for height, which sits on the vehicle's floor.
This seat can also be secured with a seat belt. In this case only the seat shell is used.
ISOFIX child seats recommended by CITROËN
CITROËN offers a range of ISOFIX child seats listed and type approved for your vehicle.
Refer also to the child seat manufacturer's fitting instructions for information on installing and removing the seat.
The ISOFIX BABY P2C base must be installed so that on the ISOFIX clamps, the N
os 3, 4 and 5 are visible. And the support leg must have 6 holes visible.
"RÖMER Baby- Safe Plus" and its ISOFIX base (size category: E )
Group 0+: from bir th to 13 kg
Installed rear ward facing using an ISOFIX base which is attached to the rings A .
The base has a support leg, adjustable for height, which sits on the vehicle's floor.
This child seat can also be secured with a seat belt. In this case, only the shell is used and attached to the vehicle's seat by the three-point seat belt.
8
Child safety
Page 134 of 260

132
"Baby P2C Midi" and its ISOFIX base (size categories: D, C, A, B, B1 )
Group 1: from 9 to 18 kg
Installed rear ward facing using an ISOFIX base which is attached to the anchorage rings A .
The base has a support leg, adjustable for height, which sits on the vehicle's floor. This child seat can also be used for ward facing.This seat can not be secured with a seat belt.
We recommend that you use the seat in the rear ward facing position up to the age of 3 years.
"RÖMER Duo Plus ISOFIX" (size category B1 )
Group 1: from 9 to 18 kg Is installed only in the for ward facing position.
Is attached to the anchorage rings A and the upper anchorage ring B, referred to as the Top Tether, using an upper strap.
Three seat body angles: sitting, reclining, lying down. We recommend the lying down position.
This child seat can also be used on seats not equipped with ISOFIX mountings. In this case, it must be secured to the vehicle's seat by the three-point seat belt. Adjust the position of the
vehicle's front seat so that the child's feet are not touching the backrest.
Child safety
Page 136 of 260
134
The incorrect installation of a child seat in a
vehicle compromises the child's protection in
the event of an accident.
Check that there is no seat belt or seat belt
buckle under the child seat as this could
destabilise it.
Remember to fasten the seat belts or the
child seat harnesses keeping the slack in
relation to the child's body to a minimum,
even for short journeys.
For the installation of a child seat using a
seat belt, ensure that this is well tensioned
on the child seat and that it is holding the
child seat firmly against the seat of your
vehicle. If your front passenger seat is
adjustable, move it for ward if necessary.
At the rear seats, always leave sufficient
space between the front seat and:
-
a r
ear ward facing child seat,
-
t
he feet of a child seated in a for ward
facing child seat.
For this, move the front seat for ward and if
necessary straighten its backrest.
Recommendations on child seats
The chest part of the seat belt must be
positioned on the child's shoulder without
touching the neck.
Ensure that the lap part of the seat belt
passes correctly over the child's thighs.
CITROËN recommends the use of a booster
seat which has a back, fitted with a seat belt
guide at shoulder level.
As a safety precaution, never leave:
-
o
ne or more children alone and
unsupervised in a vehicle,
-
a c
hild or an animal in a vehicle which
is exposed to the sun, with the windows
closed,
-
t
he keys within reach of children inside
the vehicle.
To prevent accidental opening of the doors,
use the "Child lock".
Take care not to open the rear windows by
more than one third.
To protect young children from the rays of
the sun, fit side blinds on the rear windows.
The legislation on carrying a child on the
front passenger seat is specific to each
country. Refer to the legislation in force in
your country.
Deactivate the passenger's front airbag
when a rear ward facing child seat is installed
on the front seat. Other wise, the child would
risk being seriously injured or killed if the
airbag were deployed. For optimum installation of the forward facing
child seat, ensure that the back of the child
seat is as close as possible to the backrest
of the vehicle's seat, or in contact if possible.
The head restraint must be removed before
installing a child seat with a backrest on the
passenger seat.
Ensure that the head restraint is stowed or
attached securely so that it is not thrown
around the vehicle in the event of sharp
braking.
Refit the head restraint as soon as the child
seat is removed.
Installing a booster
cushion
Children at the front
Child safety
Page 140 of 260
138
Comprising a compressor and a sealant
cartridge, it allows the temporary repair of
a tyre so that you can drive to the nearest
garage.
It is designed to repair most punctures which
could affect the tyre, located on the tyre tread
or shoulder.
Temporary puncture repair kit
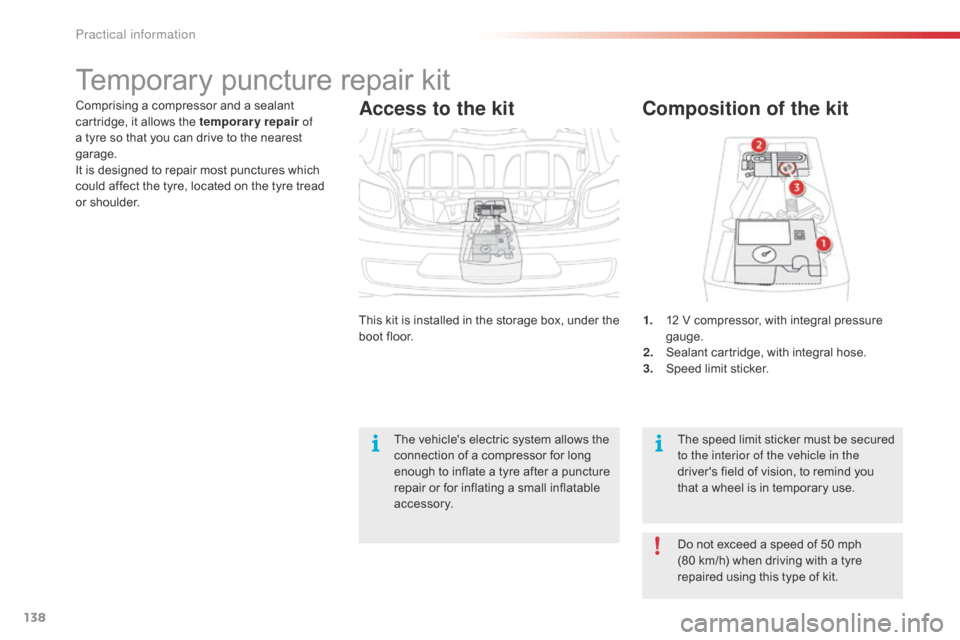
Composition of the kit
1. 12 V compressor, with integral pressure gauge.
2.
S
ealant cartridge, with integral hose.
3.
S
peed limit sticker.
The speed limit sticker must be secured
to the interior of the vehicle in the
driver's field of vision, to remind you
that a wheel is in temporary use.
This kit is installed in the storage box, under the
boot floor.
The vehicle's electric system allows the
connection of a compressor for long
enough to inflate a tyre after a puncture
repair or for inflating a small inflatable
accessory. Do not exceed a speed of 50 mph
(80 km/h) when driving with a tyre
repaired using this type of kit.
Access to the kit
Practical information
Page 141 of 260

139
F Uncoil the pipe stowed under the compressor.
F
C
onnect the pipe from the compressor to
the sealant cartridge.
F
T
urn the the sealant cartridge and secure it
in the cut-out provided on the compressor.
Repair procedure
Avoid removing any foreign bodies
which have penetrated into the tyre. F
R
emove the valve cap from the tyre to be
repaired, and place it in a clean area.
F
C
onnect the hose from the sealant
cartridge to the valve of the tyre to be
repaired and tighten firmly.
F
S
witch off the ignition.
F
S
ecure the speed limit sticker inside
the vehicle.
9
Practical information
Page 148 of 260

146
Fitting the "space-saver"
type spare wheel
If your vehicle is fitted with alloy wheels,
it is normal to notice when tightening
the wheel bolts that the washers do not
come into contact with the "space-
saver" type spare wheel. The wheel is
secured by the conical contact sur face
on each bolt.
Fitting a wheel
F Remove the bolts and put then in a clean place.
F
R
emove the wheel.
F
Ra
ise the vehicle until there is sufficient
space between the wheel and the ground,
so that the (not punctured) spare wheel can
be easily fitted.
Practical information
Page 157 of 260

155
Before changing a fuse, it is necessary to
F i mmobilise the vehicle and switch off the
ignition,
F
s
witch off all electrical consumers,
F
i
dentify the failed fuse using the fuse
allocation tables and diagrams in the
following pages,
F
i
dentify and correct the cause of the
problem.
Replacing a fuse
Good Failed
Tw e e z e r
When replacing a fuse, you must always :
F
u
se the special tweezer to extract the fuse
from its holder and check the condition of
its element,
F
r
eplace a failed fuse by on of the same
rating (same colour) ; the use of a different
rating fuse could cause a fault (risk of fire).
If the problem recurs after replacing the fuse,
have the vehicle's electrical system checked by
CITROËN dealer or a qualified workshop. CITROËN will not accept any
responsibility for the costs incurred
in repairing your vehicle or for the
malfunctions resulting from the
installation of auxiliary accessories which
were not supplied or recommended by
CITROËN
and which were not installed
in accordance with its instructions, in
particular where the current consumption
of all the the additional equipment
connected exceeds 10 milliamps. Installation of electrical accessories
Your vehicle's electrical system is
designed to operate with standard or
optional equipment.
Before installing other electrical
equipment or accessories on your
vehicle, contact a CITROËN dealer or a
qualified workshop.
9
Practical information
Page 165 of 260

163
12 V battery
The battery is located under the bonnet.
For access to the (+) terminal:
F
r
elease the bonnet using the interior lever,
then the exterior safety catch,
F
r
aise the bonnet and secure it with its stay,
F
l
ift the plastic cover for access to the
(+) terminal.
Access to the battery
Procedure for starting the engine using another battery or charging a discharged battery.
Before doing any work
Immobilise the vehicle: apply the
parking brake, put the gearbox in
neutral, then switch off the ignition.
Check that all electrical equipment is
switched off.
The presence of this label, in particular
with the Stop & Start system, indicates
the use of a 12 V lead-acid battery with
special technology and specification;
the involvement of a CITROËN dealer
or a qualified workshop is essential
when replacing or disconnecting the
battery.
After refitting the battery, the Stop &
Start system will only be active after a
continuous period of immobilisation of the
vehicle, a period which depends on the
climatic conditions and the state of charge
of the battery (up to about 8 hours).
Do not push the vehicle to start the
engine if you have an ETG electronic
gearbox.
9
Practical information
Page 171 of 260
169
Accessories
A wide range of accessories and genuine parts is available from the CITROËN dealer network.
These accessories and parts are all suitable for your vehicle and benefit from CITROËN's recommendation and warranty.
"Transport solutions":
boot carpet, boot liner,
transverse roof bars, bicycle carrier, ski carrier,
roof boxes, boot dividers, ...
"Styling": rear diffuser, aluminium gear knob,
alloy wheels, exterior expressive stickers,
chrome side mouldings, chrome mirror shells,
door sill finishers, ... "Comfort":
air deflectors, insulated module,
sun blinds, scented air freshener, portable
ashtray, coat hanger fitted to head restraint,
reading lamp, front and rear parking sensors,
centre armrest, cigarette lighter... "Security and safety":
anti-theft alarm,
vehicle tracking system, snow chains, wheel
non-slip covers, wheel security bolts, child
seats, first aid kit, warning triangle, high
visibility vest, breathalyzer, fire extinguisher,
pet seat belt, foglamp kit, seat belt cutter/glass
hammer, ...
"Protection": mats, mud flaps, vehicle cover,
seat covers, side protective mouldings, bumper
protectors, ...
To prevent the mat from becoming caught
under the pedals:
-
e
nsure that the mat is secured correctly,
-
n
ever fit one mat on top of another."Multimedia":
audio system, speaker, semi-
integral navigation systems, hands-free kit,
driving assistance systems, 230 V socket,
rear multi-media support, DVD players,
portable satellite navigation system, telephone/
smartphone support, digital radio, ...
9
Practical information