stop start Citroen C1 RHD 2015 1.G Owner's Guide
[x] Cancel search | Manufacturer: CITROEN, Model Year: 2015, Model line: C1 RHD, Model: Citroen C1 RHD 2015 1.GPages: 260, PDF Size: 6.35 MB
Page 111 of 260

109
Activation
Press the button, this warning lamp
comes on in the instrument panel.
Operation
Three levels of operation are possible:
● A lert: if a risk of collision with a vehicle is
detected, a warning lamp comes on in the
instrument panel together with an audible
signal. The thresholds for triggering the
alert can be set.
●
Br
aking assistance : increases the
braking started by the driver, only if a risk
of collision is detected.
●
A
utomatic braking : when your vehicle
is too close to or closing too quickly on
the vehicle ahead of you, the system
automatically operates the brakes to
reduce the speed of impact. A collision can
be avoided automatically if the difference
in speed between your vehicle and the one
ahead is not more than 18 mph (30 km/h).
You are then alerted by the display of
this warning lamp, accompanied by
an audible signal. The automatic braking may bring the vehicle to
a complete stop if the situation requires it.
The brake lamps on your vehicle come on to
warn other road users. The triggering of the system may cause
the engine to stall, unless the driver
depresses the clutch pedal quickly
enough during automatic braking.
7
Safety
Page 113 of 260
111
Unwanted triggering of the system
It is possible for the system to detect a risk of
imminent collision and start working, in the
following conditions in particular:
-
d
etection of an object located close to the
outer edge of a bend (safety barrier, lamp
post or road sign),
-
d
etection of an object located at the top or
bottom of a steep slope,
-
d
etection of reflective objects (central
reservation...) in the road,
-
d
etection of the upper bar of a bridge or a
traffic light gantry,
-
d
etection of a vehicle on a bend travelling
in the other direction,
-
d
etection of a vehicle traveling in the other
direction, at a crossroads, when your
vehicle is turning left or right,
-
i
f the vehicle ahead of you sends up water
or snow,
-
i
f your vehicle stops very close to a wall or
other vehicles,
-
w
hen your vehicle closes rapidly on the
vehicle ahead,
-
i
f the vehicle is raised or lowered,
-
i
f the vehicle passes through a plastic curtain,
-
i
f driving through mist or smoke,
-
i
f the sensor is misaligned (following
replacement after a collision).
Never leave accumulations of snow or
any object projecting above the bonnet
or in front of the roof: this might fall into
the field of vision of the sensor and
generate a detection.
Operating limits
The system only detects
vehicles (cars, lorries)
that are stationary or moving in the same
direction as your vehicle. In difficult weather conditions (very
heavy rain, snow, fog, hail...), braking
distances increase, which can reduce
the ability of the system to avoid a
collision.
The driver must therefore remain
particularly vigilant.
The system is not triggered or is interrupted if
the driver:
-
a
ccelerates strongly (even if the speed
limiter is on),
-
o
r turns the steering wheel suddenly
(avoiding manoeuvre).
Detection capability is less effective if:
-
y
ou are driving on roads with pronounced
bends and/or on roads in poor condition,
-
y
our vehicle is excessively loaded, as
this changes the horizontal attitude of the
vehicle. It does not detect small vehicles
(bicycles, motorcycles), pedestrians or
animals, nor non-reflective stationary
objects.
7
Safety
Page 138 of 260
136
Fuel tank
Low fuel levelRefuelling
When the low fuel level is reached,
this warning lamp comes on and the
last bar flashes, accompanied by an
audible signal.
You have approximately 5 litres remaining.
In certain driving conditions and depending on the
engine, the distance which can be travelled with the
fuel remaining may be less than 30 miles (50 km).
When the frequency of the flashing increases, you
have approximately 3 litres remaining .
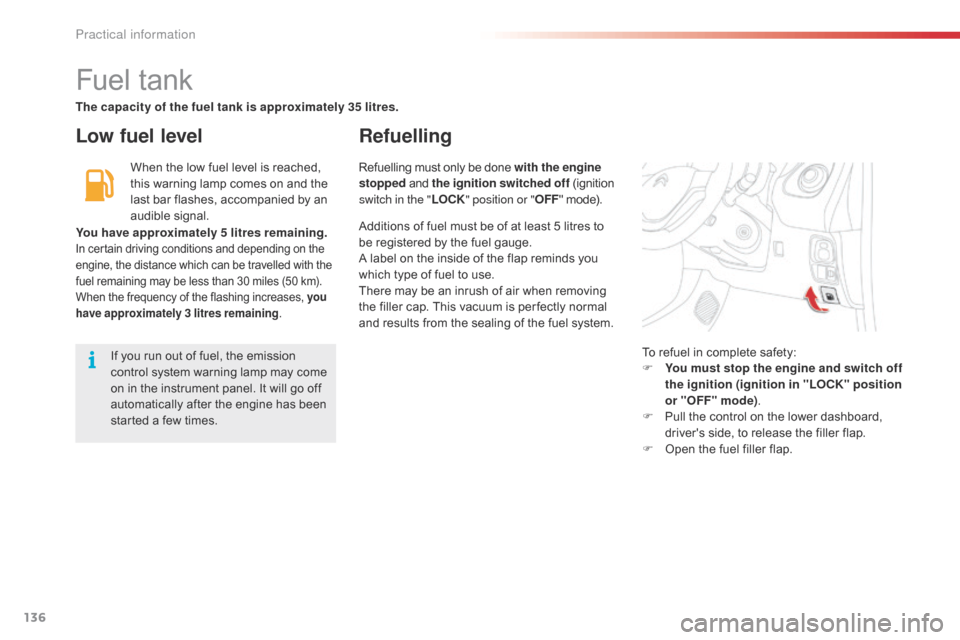
To refuel in complete safety:
F
Y ou must stop the engine and switch off
the ignition (ignition in "LOCK" position
or "OFF" mode) .
F
P
ull the control on the lower dashboard,
driver's side, to release the filler flap.
F
O
pen the fuel filler flap.
If you run out of fuel, the emission
control system warning lamp may come
on in the instrument panel. It will go off
automatically after the engine has been
started a few times. Refuelling must only be done with the engine
stopped
and the ignition switched off (ignition
switch in the " LOCK" position or " OFF" mode).
The capacity of the fuel tank is approximately 35 litres.
Additions of fuel must be of at least 5 litres to
be registered by the fuel gauge.
A label on the inside of the flap reminds you
which type of fuel to use.
There may be an inrush of air when removing
the filler cap. This vacuum is per fectly normal
and results from the sealing of the fuel system.
Practical information
Page 158 of 260

156
Dashboard fuses
The fusebox is located below the dashboard
(driver's side).
F
U
nclip the plastic cover for access to the
fuses.
When you have finished, carefully refit the
c ove r. Fuse
N° Rating
(A) Functions
1 5Fuel injection system - Audio system - VSC system
2 15Front and rear screenwash
3 5Main distribution unit - Instrument panel - Display screen -
Air conditioning - Heated rear screen and door mirror heating -
Electric fabric roof - Audio system
4 5Electric power steering - Stop & Start
5 15Rear wiper
6 5Cooling fan - ABS system - VSC system
7 25Front wiper
8 10Heated door mirrors
9 1512 V socket (120 W max)
10 7. 5Door mirrors - Audio system - Stop & Start - Instrument panel -
Display screen
Practical information
Page 159 of 260
157
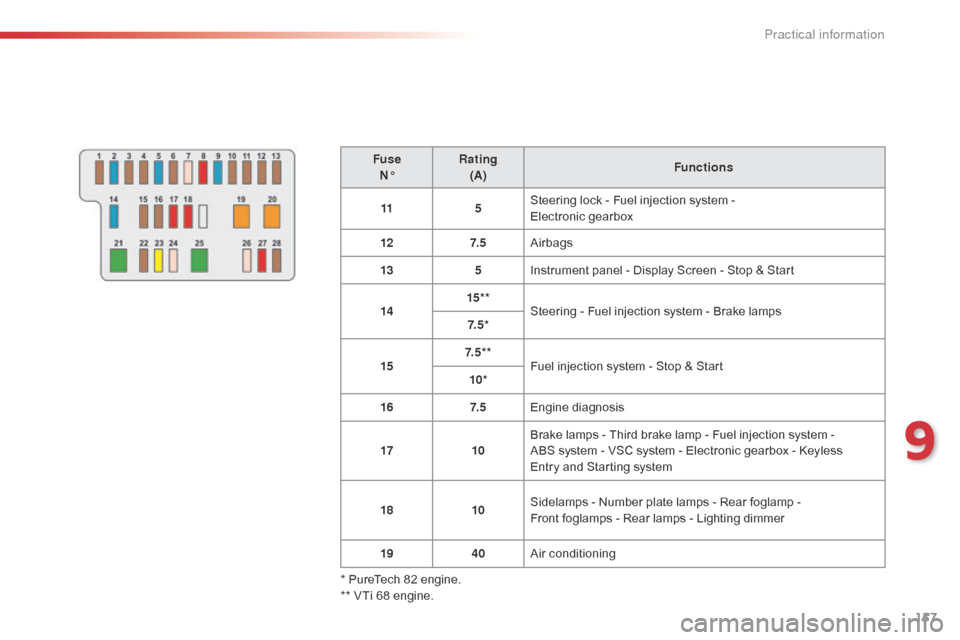
FuseN° Rating
(A) Functions
11 5Steering lock - Fuel injection system -
Electronic gearbox
12 7. 5Airbags
13 5Instrument panel - Display Screen - Stop & Start
14 15* *
Steering - Fuel injection system - Brake lamps
7. 5 *
15 7. 5 * *
Fuel injection system - Stop & Start
10*
16 7. 5Engine diagnosis
17 10Brake lamps - Third brake lamp - Fuel injection system -
ABS system - VSC system - Electronic gearbox - Keyless
Entry and Starting system
18 10Sidelamps - Number plate lamps - Rear foglamp -
Front foglamps - Rear lamps - Lighting dimmer
19 40Air conditioning
* PureTech 82 engine.
** VTi 68 engine.
9
Practical information
Page 160 of 260
158
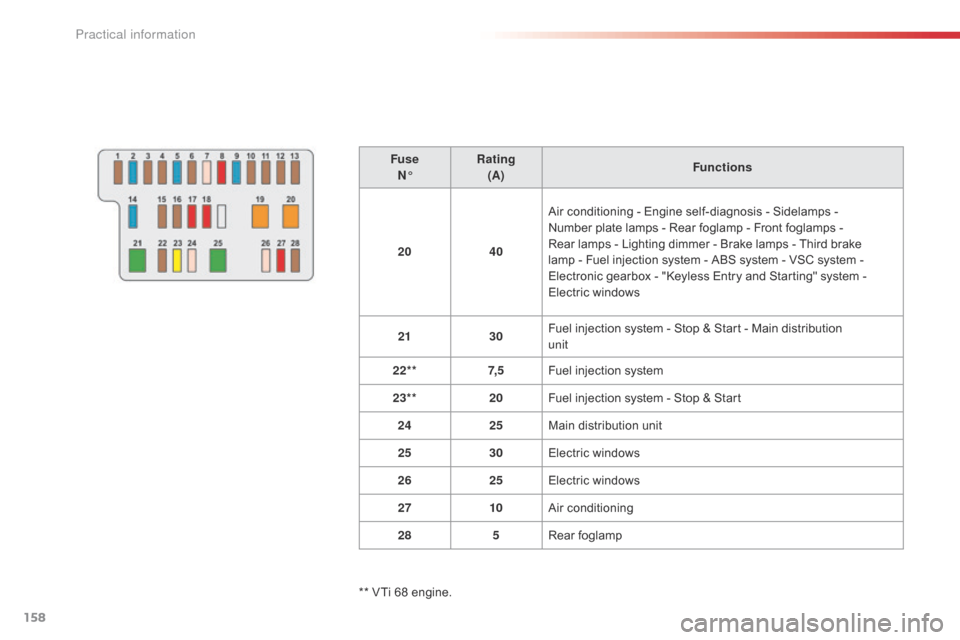
FuseN° Rating
(A) Functions
20 40Air conditioning - Engine self-diagnosis - Sidelamps -
Number plate lamps - Rear foglamp - Front foglamps -
Rear lamps - Lighting dimmer - Brake lamps - Third brake
lamp - Fuel injection system - ABS system - VSC system
-
Electronic gearbox - "Keyless Entry and Starting" system -
Electric windows
21 30Fuel injection system - Stop & Start - Main distribution
unit
22** 7, 5Fuel injection system
23** 20Fuel injection system - Stop & Start
24 25Main distribution unit
25 30Electric windows
26 25Electric windows
27 10Air conditioning
28 5Rear foglamp
** VTi 68 engine.
Practical information
Page 162 of 260
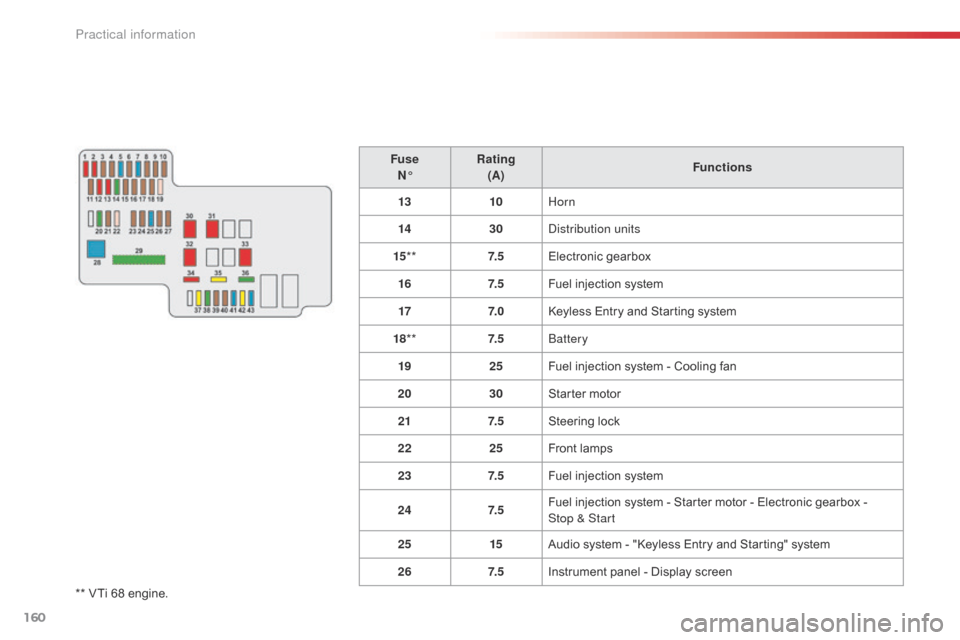
160
** VTi 68 engine.Fuse
N° Rating
(A) Functions
13 10Horn
14 30Distribution units
15 ** 7. 5Electronic gearbox
16 7. 5Fuel injection system
17 7. 0Keyless Entry and Starting system
18 ** 7. 5Battery
19 25Fuel injection system - Cooling fan
20 30Starter motor
21 7. 5Steering lock
22 25Front lamps
23 7. 5Fuel injection system
24 7. 5Fuel injection system - Starter motor - Electronic gearbox -
Stop & Start
25 15Audio system - "Keyless Entry and Starting" system
26 7. 5Instrument panel - Display screen
Practical information
Page 163 of 260

161
FuseN° Rating
(A) Functions
27 7. 5VSC system
28 60Passenger compartment fusebox
29** 125***Heated rear screen and door mirror heating -
Electric fabric roof - ABS system - VSC system -
Cooling fan - Front foglamps - LED daytime running lamps
30 50
Electronic gearbox
40 Stop & Start
31 50Power steering
32 50*
Cooling fan
30
40
33 50ABS system - VSC system
34 10Spare fuse
* PureTech 82 engine.
** VTi 68 engine.
***
T
his fuse must be replaced only by a
CITROËN dealer or a qualified workshop.
9
Practical information
Page 165 of 260

163
12 V battery
The battery is located under the bonnet.
For access to the (+) terminal:
F
r
elease the bonnet using the interior lever,
then the exterior safety catch,
F
r
aise the bonnet and secure it with its stay,
F
l
ift the plastic cover for access to the
(+) terminal.
Access to the battery
Procedure for starting the engine using another battery or charging a discharged battery.
Before doing any work
Immobilise the vehicle: apply the
parking brake, put the gearbox in
neutral, then switch off the ignition.
Check that all electrical equipment is
switched off.
The presence of this label, in particular
with the Stop & Start system, indicates
the use of a 12 V lead-acid battery with
special technology and specification;
the involvement of a CITROËN dealer
or a qualified workshop is essential
when replacing or disconnecting the
battery.
After refitting the battery, the Stop &
Start system will only be active after a
continuous period of immobilisation of the
vehicle, a period which depends on the
climatic conditions and the state of charge
of the battery (up to about 8 hours).
Do not push the vehicle to start the
engine if you have an ETG electronic
gearbox.
9
Practical information
Page 168 of 260

166
Electrical energy economy mode*
System which manages the duration of use of certain functions to conserve a sufficient level of
charge in the battery.
After the engine has stopped, you can still use functions such as the audio system, windscreen
wipers, dipped beam headlamps,
courtesy lamps, etc. for a maximum combined duration of
twenty
m
inutes.
This period may be greatly reduced if the battery is not fully charged.
Let the engine run for the duration
specified to ensure that the battery
charge is sufficient.
Do not repeatedly and continuously
restart the engine in order to charge the
battery.
A flat battery prevents the engine from
starting.
Refer to the "Battery" section.
Switching to economy mode
Once this time has elapsed the active functions
are put on standby.
Exiting economy mode
These functions are reactivated automatically
next time the vehicle is driven.
To restore the use of these functions
immediately, start the engine and let it run for at
least 5 minutes.
Changing a wiper
blade
Removing the front wiper blade
F Raise the wiper arm.
F R emove the wiper blade, sliding it towards
the outside.
Fitting the front wiper blade
F Put the corresponding new wiper blade in place and fix it.
F
F
old down the wiper arm carefully.
To conserve the effectiveness of
the flat-blade type wiper blades, we
recommend that they are:
-
h
andled with care,
-
c
leaned regularly with soapy water,
-
n
ot used to hold a cardboard sheet
against the windscreen,
-
r
eplaced at the first signs of wear.
*
O
nly on vehicles with the "Keyless Entry and
Starting" system.
Practical information