window Citroen C3 2014 2.G User Guide
[x] Cancel search | Manufacturer: CITROEN, Model Year: 2014, Model line: C3, Model: Citroen C3 2014 2.GPages: 284, PDF Size: 9.01 MB
Page 96 of 284
94
C3_en_Chap07_Securite-enfants_ed01-2014
The chest part of the seat belt must be
positioned on the child's shoulder without
touching the neck.
Ensure that the lap part of the seat belt
passes correctly over the child's thighs.
CITR
oËn
recommends the use of a booster
seat which has a back, fitted with a seat belt
guide at shoulder level.
as a s
afety precaution, do not leave:
-
a c
hild or children alone and
unsupervised in a vehicle,
-
a c
hild or an animal in a vehicle which
is exposed to the sun, with the windows
closed,
-
t
he keys within reach of children inside
the vehicle.
To prevent accidental opening of the doors
and rear windows, use the "Child lock".
Take care not to open the rear windows by
more than one third.
To protect young children from the rays of
the sun, fit side blinds on the rear windows.
Children at the front Installing a booster seat
The legislation on carrying children on the
front passenger seat is specific to each
country. Refer to the legislation in force in
your country.
Deactivate the passenger airbag when a
"rear ward-facing" child seat is installed on
the front seat.
Other wise, the child would risk being
seriously injured or killed if the airbag were
to inflate.For optimum installation of the "for ward-
facing" child seat, ensure that the back of
the child seat is as close as possible to the
backrest of the vehicle's seat, in contact if
possible.
You mst remove the head restraint before
installing a child seat with backrest to a
passenger seat.
Ensure that the head restraint is stored or
attached securely to prevent it from being
thrown around the vehicle in the event of
sharp braking. Refit the head restraint when
the child seat is removed.
The incorrect installation of a child seat in a
vehicle compromises the child's protection in
the event of an accident.
Ensure that there is no seat belt or seat belt
buckle under the child seat, as this could
destabilise it.
Remember to fasten the seat belts or the
child seat harnesses keeping the slack
relative to the child's body to a minimum,
even for short journeys.
When installing a child seat using the seat
belt, ensure that the seat belt is tightened
correctly on the child seat and that it secures
the child seat firmly on the seat of your
vehicle. If your passenger seat is adjustable,
move it for wards if necessary.
At rear seating positions, always leave
sufficient space between the front seat and:
-
a "
rear ward facing" child seat,
-
t
he child's feet for a child seat fitted
"forward facing".
To do this, move the front seat for wards
and, if necessary, move its backrest into the
upright position.
advice on child seats
Child safety
Page 97 of 284
95
C3_en_Chap07_Securite-enfants_ed01-2014
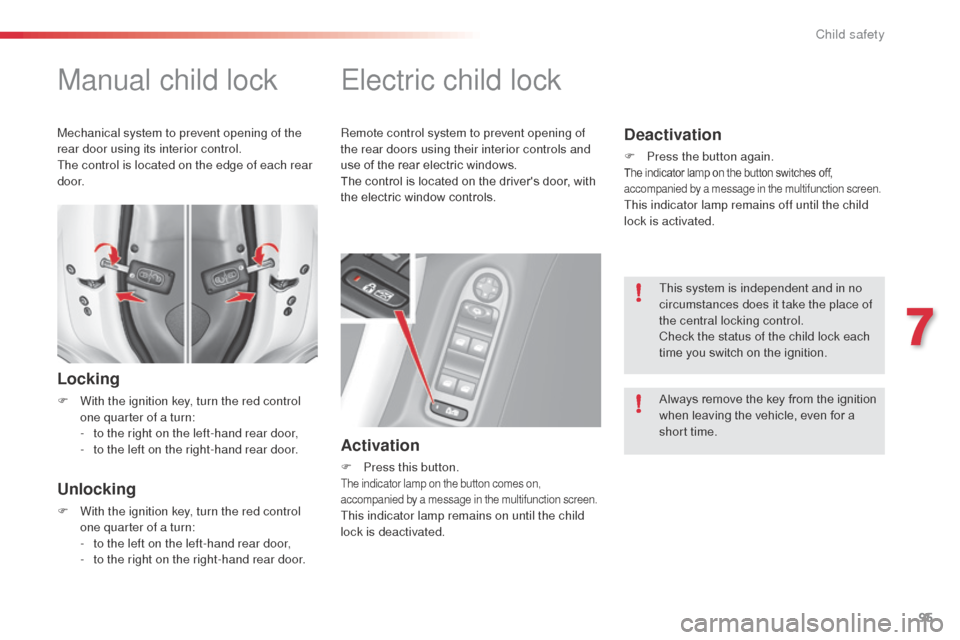
Manual child lock
Locking
F With the ignition key, turn the red control one quarter of a turn:
-
t
o the right on the left-hand rear door,
-
t
o the left on the right-hand rear door.
Unlocking
F With the ignition key, turn the red control one quarter of a turn:
-
t
o the left on the left-hand rear door,
-
t
o the right on the right-hand rear door.
Electric child lock
Activation
F Press this button.The indicator lamp on the button comes on,
accompanied by a message in the multifunction screen.
This indicator lamp remains on until the child
lock is deactivated.
Deactivation
F Press the button again.The indicator lamp on the button switches off,
accompanied by a message in the multifunction screen.
This indicator lamp remains off until the child
lock is activated.
This system is independent and in no
circumstances does it take the place of
the central locking control.
Check the status of the child lock each
time you switch on the ignition.
Always remove the key from the ignition
when leaving the vehicle, even for a
short time.
Remote control system to prevent opening of
the rear doors using their interior controls and
use of the rear electric windows.
The control is located on the driver's door, with
the electric window controls.
Mechanical system to prevent opening of the
rear door using its interior control.
The control is located on the edge of each rear
d o o r.
7
Child safety
Page 110 of 284
108
C3_en_Chap08_Securite_ed01-2014
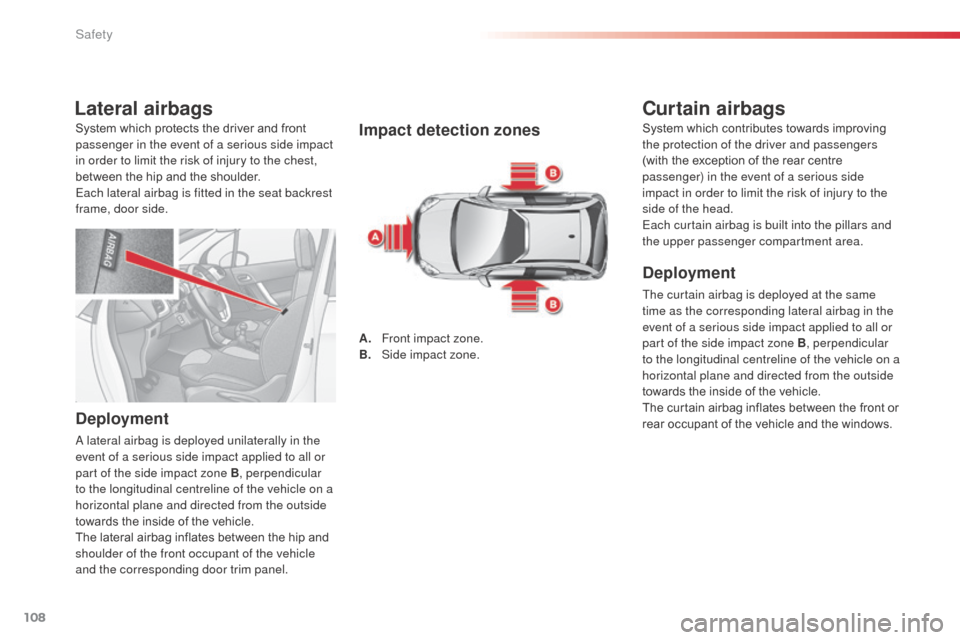
Lateral airbags
Deployment
a lateral airbag is deployed unilaterally in the
e vent of a serious side impact applied to all or
part of the side impact zone B, perpendicular
to the longitudinal centreline of the vehicle on a
horizontal plane and directed from the outside
towards the inside of the vehicle.
The lateral airbag inflates between the hip and
shoulder of the front occupant of the vehicle
and the corresponding door trim panel.
Impact detection zones
A. Front impact zone.
B. S ide impact zone.
Curtain airbags
Deployment
The curtain airbag is deployed at the same
time as the corresponding lateral airbag in the
event of a serious side impact applied to all or
part of the side impact zone B, perpendicular
to the longitudinal centreline of the vehicle on a
horizontal plane and directed from the outside
towards the inside of the vehicle.
The curtain airbag inflates between the front or
rear occupant of the vehicle and the windows.
System which protects the driver and front
passenger in the event of a serious side impact
in order to limit the risk of injury to the chest,
between the hip and the shoulder.
Each lateral airbag is fitted in the seat backrest
frame, door side.
System which contributes towards improving
the protection of the driver and passengers
(with the exception of the rear centre
passenger) in the event of a serious side
impact in order to limit the risk of injury to the
side of the head.
Each curtain airbag is built into the pillars and
the upper passenger compartment area.
Safety
Page 164 of 284
162
C3_en_Chap11_Info-pratiques_ed01-2014
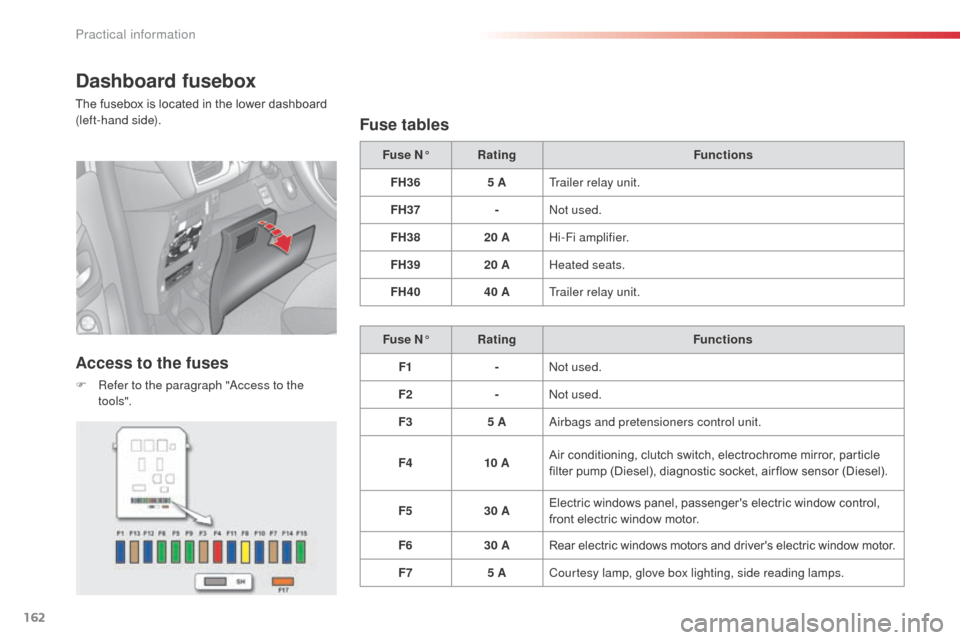
Dashboard fusebox
The fusebox is located in the lower dashboard
(left-hand side).
Access to the fuses
F Refer to the paragraph "access to the
to o ls".
Fuse tables
Fuse N° Rating Functions
FH36 5 ATrailer relay unit.
FH37 -
no
t used.
FH38 20 AHi-Fi amplifier.
FH39 20 AHeated seats.
FH40 40 ATrailer relay unit.
Fuse N° Rating Functions
F1 -
no
t used.
F2 -
no
t used.
F3 5 A
ai
rbags and pretensioners control unit.
F4 10 AAir conditioning, clutch switch, electrochrome mirror, particle
filter pump (Diesel), diagnostic socket, air flow sensor (Diesel).
F5 30 AElectric windows panel, passenger's electric window control,
front electric window motor.
F6 30 ARear electric windows motors and driver's electric window motor.
F7 5 ACourtesy lamp, glove box lighting, side reading lamps.
Practical information
Page 181 of 284
179
C3_en_Chap11_Info-pratiques_ed01-2014
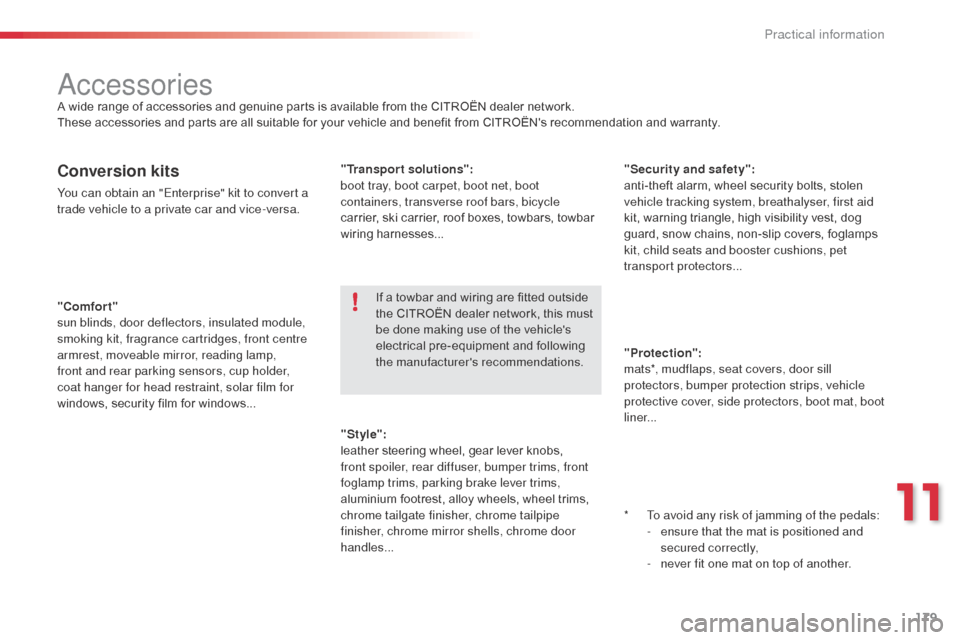
"Comfort"
sun blinds, door deflectors, insulated module,
smoking kit, fragrance cartridges, front centre
armrest, moveable mirror, reading lamp,
front and rear parking sensors, cup holder,
coat hanger for head restraint, solar film for
windows, security film for windows... "Security and safety":
anti-theft alarm, wheel security bolts, stolen
vehicle tracking system, breathalyser, first aid
kit, warning triangle, high visibility vest, dog
guard, snow chains, non-slip covers, foglamps
kit, child seats and booster cushions, pet
transpor t protectors...
Conversion kits
You can obtain an "Enterprise" kit to convert a
trade vehicle to a private car and vice-versa.
"Style":
leather steering wheel, gear lever knobs,
front spoiler, rear diffuser, bumper trims, front
foglamp trims, parking brake lever trims,
aluminium footrest, alloy wheels, wheel trims,
chrome tailgate finisher, chrome tailpipe
finisher, chrome mirror shells, chrome door
handles... "Transport solutions":
boot tray, boot carpet, boot net, boot
containers, transverse roof bars, bicycle
carrier, ski carrier, roof boxes, towbars, towbar
wiring harnesses...
accessoriesA wide range of accessories and genuine parts is available from the CITROËN dealer network.
These accessories and parts are all suitable for your vehicle and benefit from CITROËN's recommendation and warranty.
*
T
o avoid any risk of jamming of the pedals:
-
e
nsure that the mat is positioned and
secured correctly,
-
n
ever fit one mat on top of another.
"Protection":
mats*, mudflaps, seat covers, door sill
protectors, bumper protection strips, vehicle
protective cover, side protectors, boot mat, boot
liner...
If a towbar and wiring are fitted outside
the CITROËN
dealer network, this must
be done making use of the vehicle's
electrical pre-equipment and following
the manufacturer's recommendations.
11
Practical information
Page 201 of 284
03
199
C3_en_Chap13b_RT6-2-8_ed01-2014
For the details of the menus, refer to the "Screen menu map"
section.
For cleaning the screen, the use of a soft, non-abrasive cloth
(spectacles cloth) is recommended, with no additional product.
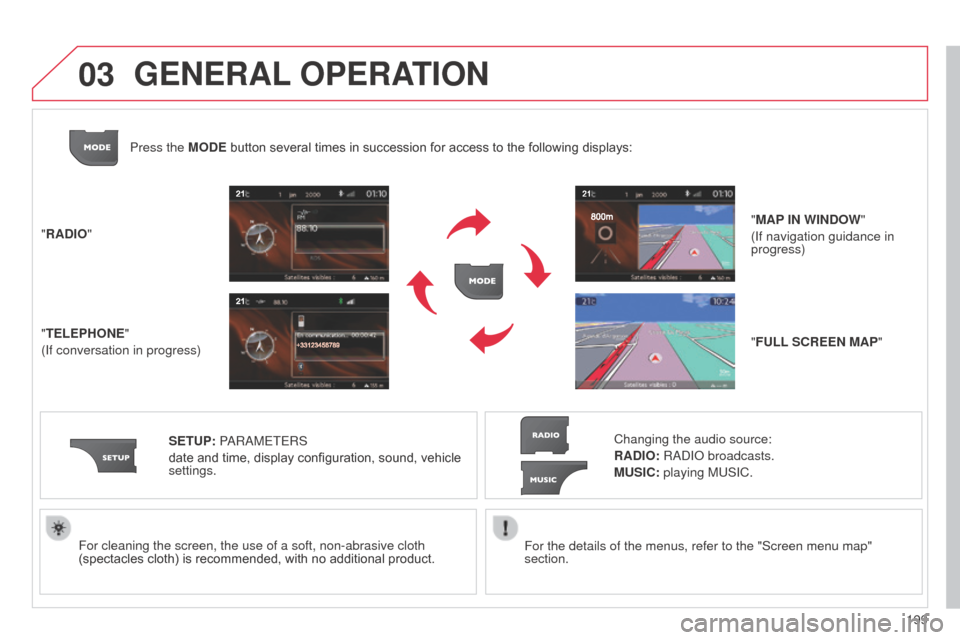
"RADIO"
"TELEPHONE"
(If conversation in progress)
SETUP: P
a
R
a
METERS
date and time, display configuration, sound, vehicle
settings. Changing the audio source:
RADIO: Rad I o broadcasts.
MUSIC: playing MUSIC.
Press the MODE button several times in succession for access to the following displays:
"FULL SCREEN MAP" "MAP IN WINDOW"
(If navigation guidance in
progress)
GENERAL OPERATION
Page 202 of 284
03
200
C3_en_Chap13b_RT6-2-8_ed01-2014
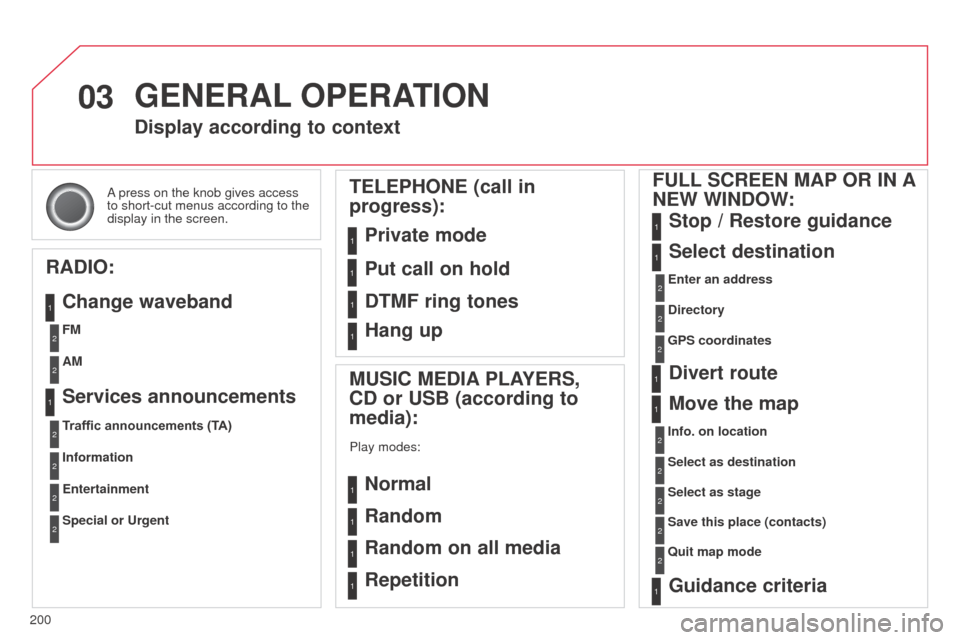
a press on the knob gives access
to short-cut menus according to the
display in the screen.
Display according to context
RADIO: Change waveband
MUSIC MEDIA PLAYERS,
CD or USB (according to
media):
Play modes:
Normal
Random
Random on all media
Repetition
TELEPHONE (call in
progress):
Private mode FULL SCREEN MAP OR IN A
NEW WINDOW:
Stop / Restore guidance
Select destination
Enter an address
Directory
GPS coordinates
Divert route
Move the map
Info. on location
Select as destination Select as stage
Save this place (contacts)
Quit map mode
Guidance criteria
Put call on hold
DTMF ring tones
Hang up
1
1
1
1
1
1
1
2
2
2
2
2
1
2
2
2
1
1
1
1
1
1FM
Traffic announcements (TA) AM
Information
Entertainment
Special or Urgent2
2
2
2
2
2
Services announcements1
GENERAL OPERATION
Page 245 of 284
243
C3_en_Chap13b_RT6-2-8_ed01-2014
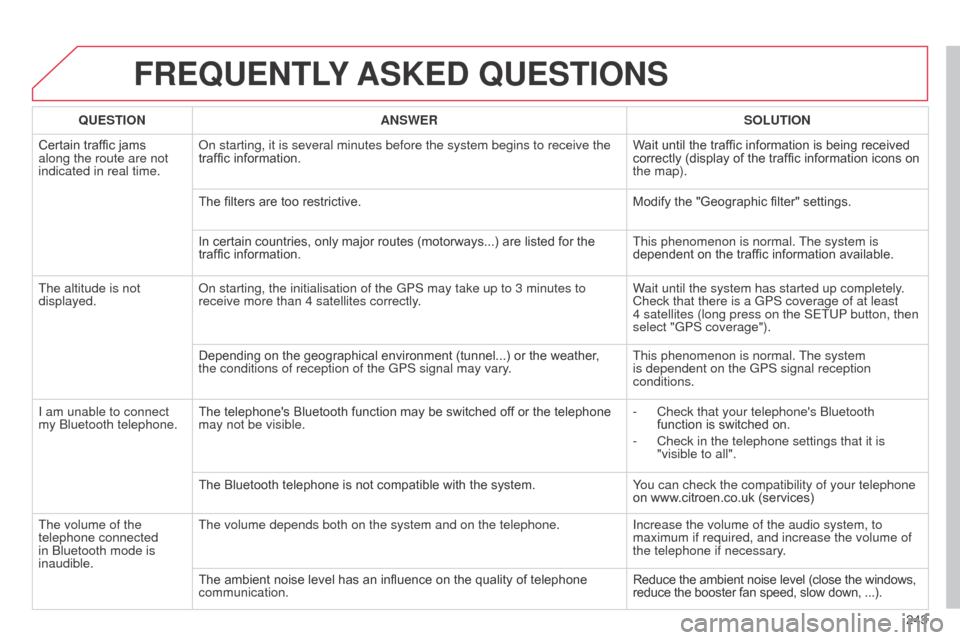
FREQUENTLY ASKED QUESTIONS
QUESTION ANSWER SOLUTION
Certain traffic jams
along the route are not
indicated in real time.
o
n starting, it is several minutes before the system begins to receive th\
e
traffic information. Wait until the traffic information is being received
correctly (display of the traffic information icons on
the map).
The filters are too restrictive. Modify the "Geographic filter" settings.
In certain countries, only major routes (motorways...) are listed for the
traffic information. This phenomenon is normal. The system is
dependent on the traffic information available.
The altitude is not
displayed.
o
n starting, the initialisation of the GPS may take up to 3 minutes to
receive more than 4 satellites correctly. Wait until the system has started up completely.
Check that there is a GPS coverage of at least
4
satellites (long press on the SETUP button, then
select "GPS coverage").
Depending on the geographical environment (tunnel...) or the weather ,
the conditions of reception of the GPS signal may vary. This phenomenon is normal. The system
is dependent on the GPS signal reception
conditions.
I am unable to connect
my
b
luetooth telephone. The telephone's Bluetooth function may be switched off or the telephone
may not be visible. -
Check that your telephone's
b luetooth
function is switched on.
-
Check in the telephone settings that it is
"visible to all".
The Bluetooth telephone is not compatible with the system. Y
ou can check the compatibility of your telephone
on www.citroen.co.uk (services)
The volume of the
telephone connected
in
b
luetooth mode is
inaudible. The volume depends both on the system and on the telephone.
Increase the volume of the audio system, to
maximum if required, and increase the volume of
the telephone if necessary.
The ambient noise level has an influence on the quality of telephone
communication. Reduce the ambient noise level (close the windows,
reduce the booster fan speed, slow down,
...).
Page 261 of 284
06
259
C3_en_Chap13c_Rd45_ed01_2014
BLUETOOTH FUNCTIONS
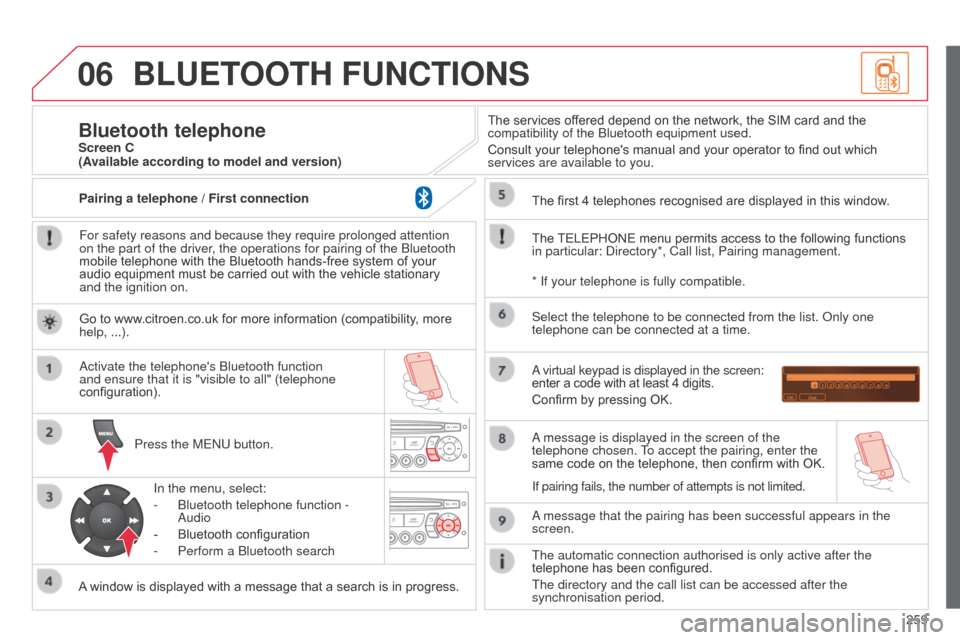
For safety reasons and because they require prolonged attention
on the part of the driver, the operations for pairing of the b luetooth
mobile telephone with the Bluetooth hands-free system of your
audio equipment must be carried out with the vehicle stationary
and the ignition on.
Press the ME
n U button.
A window is displayed with a message that a search is in progress.
a
ctivate the telephone's b luetooth function
and ensure that it is "visible to all" (telephone
configuration).
In the menu, select:
-
b luetooth telephone function -
a
udio
-
Bluetooth configuration
-
Perform a
b luetooth search The services offered depend on the network, the SIM card and the
compatibility of the
b luetooth equipment used.
Consult your telephone's manual and your operator to find out which
services are available to you.
Bluetooth telephoneScreen C
The TELEPHONE menu permits access to the following functions
in particular:
d irectory*, Call list, Pairing management.
The first 4 telephones recognised are displayed in this window.
a virtual keypad is displayed in the screen:
enter a code with at least 4 digits.
Confirm by pressing OK.
a message that the pairing has been successful appears in the
screen. Select the telephone to be connected from the list.
o nly one
telephone can be connected at a time.
a message is displayed in the screen of the
telephone chosen.
To accept the pairing, enter the
same code on the telephone, then confirm with OK.
The automatic connection authorised is only active after the
telephone has been configured.
The directory and the call list can be accessed after the
synchronisation period.
(Available according to model and version)
* If your telephone is fully compatible.
If pairing fails, the number of attempts is not limited.
Go to www.citroen.co.uk for more information (compatibility, more
help, ...).
Pairing a telephone / First connection
Page 272 of 284
270
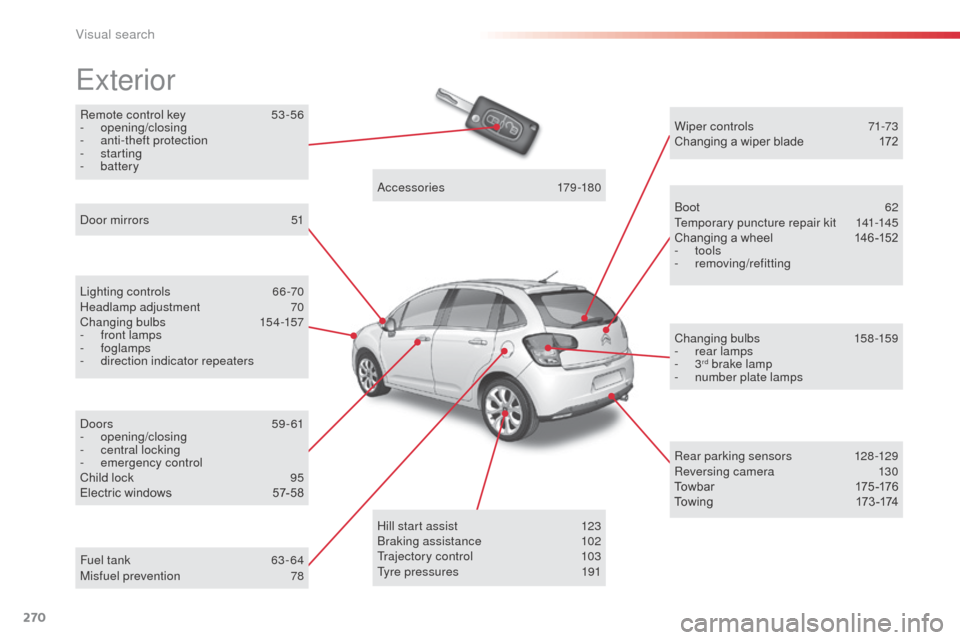
Remote control key 53 -56
- opening/closing
-
a
nti-theft protection
-
starting
-
battery
Exterior
Lighting controls 6 6-70
Headlamp adjustment 7 0
Changing bulbs
1
54-157
-
f
ront lamps
-
foglamps
-
d
irection indicator repeaters
do
or mirrors
5
1
do
ors
5
9 - 61
-
opening/closing
-
c
entral locking
-
em
ergency control
Child lock
9
5
Electric windows
5
7-58
ac
cessories
179-180
Wiper controls
7
1-73
Changing a wiper blade
1
72
b
oot
62
Temporary puncture repair kit
1
41-145
Changing a wheel
1
46 -152
- tools
-
removing/refitting
Changing bulbs
1
58-159
-
r
ear lamps
-
3
rd brake lamp
-
n
umber plate lamps
Rear parking sensors
1
28-129
Reversing camera
1
30
To w b a r
17
5 -176
To w i n g
17
3 -174
Hill start assist
1
23
br
aking assistance
1
02
Trajectory control
1
03
Tyre pressures
1
91
Fuel tank
6
3 - 64
Misfuel prevention
7
8
Visual search