ECU Citroen C3 2015 2.G Owner's Manual
[x] Cancel search | Manufacturer: CITROEN, Model Year: 2015, Model line: C3, Model: Citroen C3 2015 2.GPages: 401, PDF Size: 13.04 MB
Page 58 of 401
56
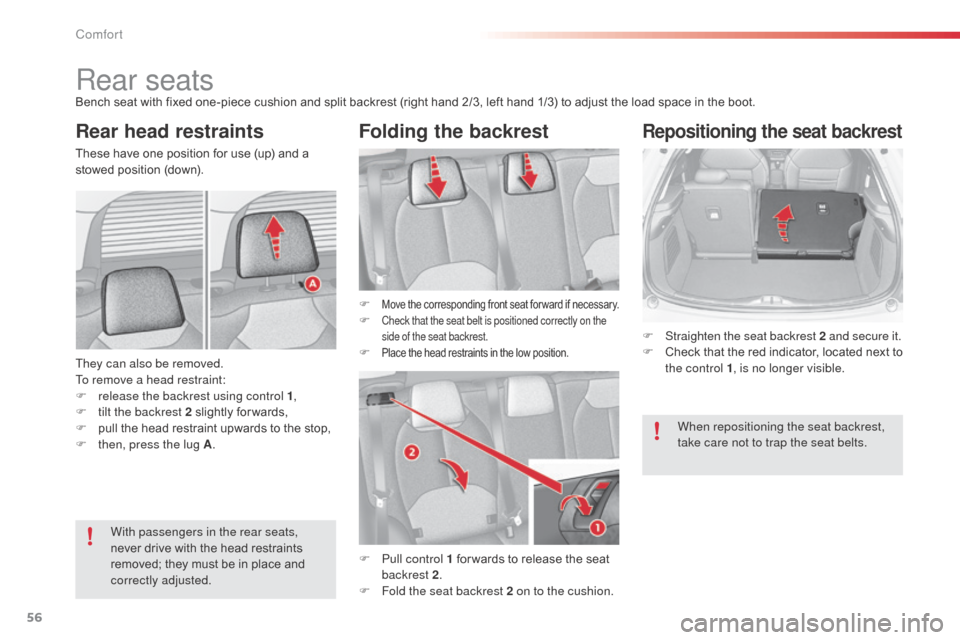
Rear seatsBench seat with fixed one-piece cushion and split backrest (right hand 2/3, left hand 1/3) to adjust the load space in the boot.
Rear head restraintsFolding the backrest
They can also be removed.
To remove a head restraint:
F
r
elease the backrest using control 1 ,
F
t
ilt the backrest 2 slightly for wards,
F
p
ull the head restraint upwards to the stop,
F
t
hen, press the lug A . F
Move the corresponding front seat for ward if necessary.F Check that the seat belt is positioned correctly on the
side of the seat backrest.
F Place the head restraints in the low position.
With passengers in the rear seats,
never drive with the head restraints
removed; they must be in place and
correctly adjusted.
These have one position for use (up) and a
stowed position (down).
F
P
ull control 1 for wards to release the seat
backrest 2 .
F
F
old the seat backrest 2 on to the cushion.
Repositioning the seat backrest
When repositioning the seat backrest,
take care not to trap the seat belts.
F
S
traighten the seat backrest 2
and secure it.
F
C
heck that the red indicator, located next to
the control 1 , is no longer visible.
Comfort
Page 63 of 401
61
"Comfort"
sun blinds, door deflectors, insulated module,
smoking kit, fragrance cartridges, front centre
armrest, moveable mirror, reading lamp,
front and rear parking sensors, cup holder,
coat hanger for head restraint, solar film for
windows, security film for windows... "Security and safety":
anti-theft alarm, wheel security bolts, stolen
vehicle tracking system, breathalyser, first aid
kit, warning triangle, high visibility vest, dog
guard, snow chains, non-slip covers, foglamps
kit, child seats and booster cushions, pet
transpor t protectors...
Conversion kits
You can obtain an "Enterprise" kit to convert a
trade vehicle to a private car and vice-versa.
"Style":
leather steering wheel, gear lever knobs,
front spoiler, rear diffuser, bumper trims, front
foglamp trims, parking brake lever trims,
aluminium footrest, alloy wheels, wheel trims,
chrome tailgate finisher, chrome tailpipe
finisher, chrome mirror shells, chrome door
handles ... "Transport solutions":
boot tray, boot carpet, boot net, boot
containers, transverse roof bars, bicycle
carrier, ski carrier, roof boxes, towbars, towbar
wiring harnesses...
accessoriesA wide range of accessories and genuine parts is available from the CITROËN dealer network.
These accessories and parts are all suitable for your vehicle and benefit from CITROËN's recommendation and warranty.
*
T
o avoid any risk of jamming of the pedals:
-
e
nsure that the mat is positioned and
secured correctly,
-
n
ever fit one mat on top of another.
"Protection":
mats*, mudflaps, seat covers, door sill
protectors, bumper protection strips, vehicle
protective cover, side protectors, boot mat, boot
liner...
If a towbar and wiring are fitted outside
the CITROËN
dealer network, this must
be done making use of the vehicle's
electrical pre-equipment and following
the manufacturer's recommendations.
3
Comfort
Page 88 of 401
86
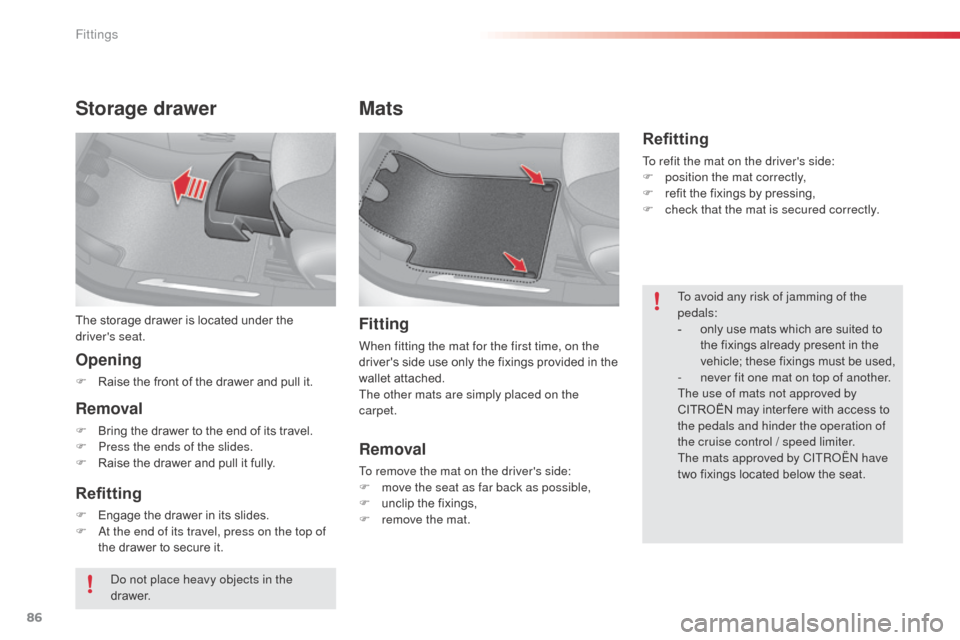
Storage drawer
The storage drawer is located under the
driver's seat.
Opening
F Raise the front of the drawer and pull it.
Removal
F Bring the drawer to the end of its travel.
F P ress the ends of the slides.
F
R
aise the drawer and pull it fully.
Refitting
F Engage the drawer in its slides.
F at t he end of its travel, press on the top of
the drawer to secure it.
Mats
Fitting
When fitting the mat for the first time, on the
driver's side use only the fixings provided in the
wallet attached.
The other mats are simply placed on the
carpet.
Removal
To remove the mat on the driver's side:
F m ove the seat as far back as possible,
F
u
nclip the fixings,
F
r
emove the mat.
Refitting
To refit the mat on the driver's side:
F p osition the mat correctly,
F
r
efit the fixings by pressing,
F
c
heck that the mat is secured correctly.
To avoid any risk of jamming of the
pedals:
-
o
nly use mats which are suited to
the fixings already present in the
vehicle; these fixings must be used,
-
n
ever fit one mat on top of another.
The use of mats not approved by
CITROËN may inter fere with access to
the pedals and hinder the operation of
the cruise control / speed limiter.
The mats approved by CITR
oËn
have
two fixings located below the seat.
do n
ot place heavy objects in the
drawer.
Fittings
Page 97 of 401
95
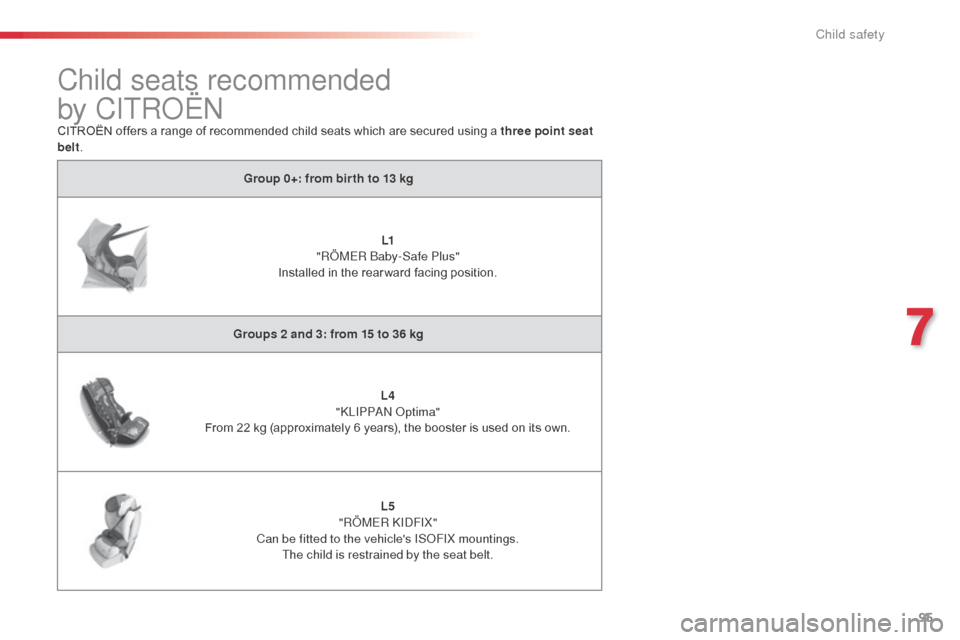
Child seats recommended
by CITR
oËnCITROËN offers a range of recommended child seats which are secured using a three point seat
belt.
Group 0+: from bir th to 13 kg
L1
"RÖMER
b
a
by-Safe Plus"
Installed in the rear ward facing position.
Groups 2 and 3: from 15 to 36 kg L4
"
kL
IPP
a
n o
p
tima"
From 22 kg (approximately 6 years), the booster is used on its own.
L5
"RÖMER
k I d FIX"
Can be fitted to the vehicle's IS
oF
IX mountings.
The child is restrained by the seat belt.
7
Child safety
Page 98 of 401
96
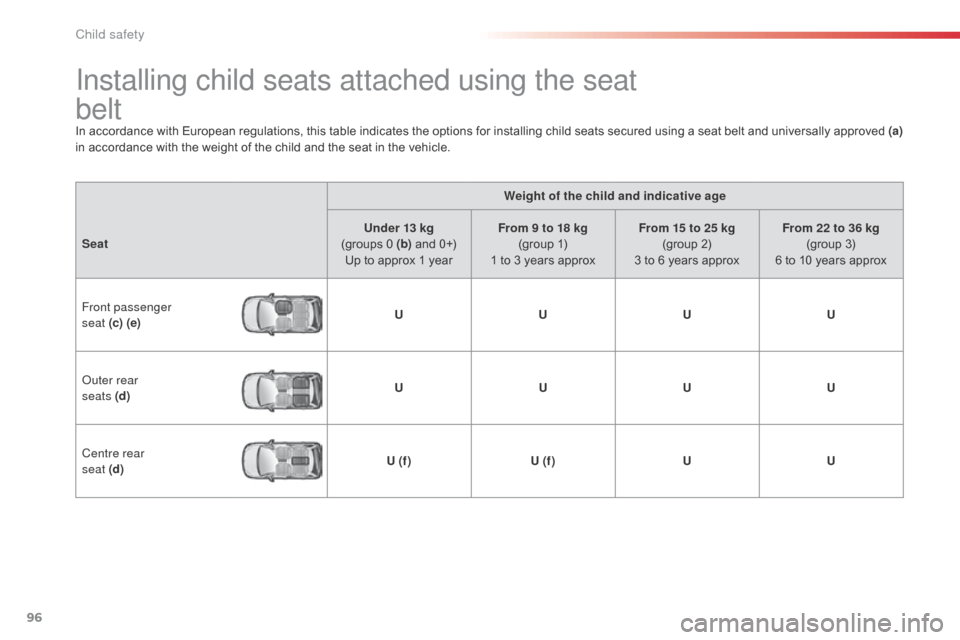
Installing child seats attached using the seat
belt
In accordance with European regulations, this table indicates the options for installing child seats secured using a seat belt and universally approved (a)
in accordance with the weight of the child and the seat in the vehicle.
Weight of the child and indicative age
Seat Under 13 kg
(groups 0 (b) and 0+)
Up to approx 1 year From 9 to 18 kg
(group 1)
1 to 3 years approx From 15 to 25 kg
(group 2)
3 to 6 years approx From 22 to 36 kg
(group 3)
6 to 10 years approx
Front passenger
seat (c) (e) U
UUU
ou
ter rear
seats (d) U
UUU
Centre rear
seat (d) U (f )
U (f ) UU
Child safety
Page 99 of 401

97
(a) Universal child seat: child seat that can be installed in all vehicles using a seat belt.
(b)
G roup 0: from birth to 10 kg. Shells seats and baby carriers cannot be installed in the front
passenger seat. When installed in the 2
nd row, they may prevent use of the other seats.
(c ) Consult the legislation in force in your country before installing your child on this seat.
(d)
T
o install a child seat on a rear seat, rear ward facing or for ward facing, move the front seats
for ward, then straighten their backrests to allow sufficient space for the child seat and the child's
legs.
(e)
W
hen a rear ward facing child seat is installed on the front passenger seat , the passenger's
front airbag must be deactivated. Other wise, the child risks being seriously injured or killed
if the airbag is deployed .
When a for ward facing child seat is installed on the front passenger seat , the passenger's front
airbag must remain active.
(f ) A child seat with support leg must never be installed on this passenger seat .
U :
S
eat suitable for the installation of a child seat secured using a seat belt and universally
approved, rear ward facing and/or for ward facing. Remove and stow the head restraint
before installing a child seat with a
backrest on a passenger seat. Refit the
head restraint once the child seat has
been removed.
7
Child safety
Page 100 of 401

98
Your vehicle has been approved in accordance
with the latest ISOFIX regulation.
The seats, represented below, are fitted with
regulation IS
oF
IX mountings:
-
t
wo rings A , located between the vehicle
seat back and cushion, indicated by a
label, The TOP TETHER is used to secure the
upper strap of child seats that have one. This
arrangement limits the for ward tipping of the
child seat in the event of a front impact. -
a r
ing B, behind the seat, referred to as the
TOP TETHER for securing the upper strap.
Follow strictly the advice given in the
installation instructions provided with
the child seat.
"ISoFIX" mountings
The incorrect installation of a child seat
in a vehicle compromises the child's
protection in the event of an accident.
There are three rings for each seat: To secure the child seat to the top tether:
-
r
emove and stow the head restraint before
installing the child seat on this seat (refit it
once the child seat has been removed),
-
p
ass the child seat strap over the top of
the backrest of the seat, keeping it centred
between the head restraint apertures,
-
s
ecure the hook of the upper strap to the
ring B ,
-
t
ighten the upper strap.
When fitting an IS
oF
IX child seat to the right
hand rear seat, before fixing the seat in place,
first move the centre rear seat belt towards the
middle of the vehicle so as to not inter fere with
the operation of the seat belt.
Refer to the table for the possibilities for fitting
IS
oF
IX child seats in your vehicle.
This ISoF
IX mounting system provides fast,
reliable and safe fitting of the child seat in your
vehicle.
The ISOFIX child seats are fitted with
two
l
atches which are secured on the two rings A.
Some seats also have an upper strap which is
attached to ring B .
Child safety
Page 101 of 401

99
ISoFIX child seat recommended by CITRoËn and approved for
your vehicle
This child seat can also be used on seats which are not fitted with ISOFIX mountings. In this case, it must be attached to the vehicle seat using
the three point seat belt.
Follow the instructions for fitting the child seat given in the seat manufacturer's installation guide. "
RÖMER Duo Plus ISOFIX"
(size category B1 )
Group 1: from 9 to 18 kg
Installed only in the for wards facing position.
Secured to rings A , as well as the third ring B, called the T
oP T
ETHER,
using the upper strap.
Three seat body angles: sitting, reclining, lying.
7
Child safety
Page 102 of 401

100
Installing ISoFIX child seatsIn accordance with European regulations, this table indicates the options for the installation of ISOFIX child seats on the vehicle seats fitted with
ISoF
IX mountings.
In the case of the universal and semi-universal ISOFIX child seats, the child seat's ISOFIX size category, determined by a letter between A and G , is
indicated on the child seat next to the ISOFIX logo.
I UF:
s
eat suitable for the installation of an I sofix Universal seat, F or ward facing and secured using
the T
oP T
ETHER upper strap.
IL- SU: seat suitable for the installation an I sofix Semi-Universal seat which is:
-
r
ear ward facing fitted with a Top Tether upper strap or a support leg,
-
f
or ward facing fitted with a support leg,
-
b
aby cot fitted with a Top Tether upper strap or a support leg.
For the securing of the Top Tether upper strap, refer to the "IS
oF
IX Mountings" section.
X:
s
eat which is not suitable for the installation of an ISOFIX child seat or cot of the weight group
indicated. Weight of the child and indicative age
Less than 10 kg (group 0)
Up to 6 months approx Less than 10 kg
(group 0)
Less than 13 kg (group 0+)
Up to 1 year approx From 9 to 18 kg (group 1)
From 1 to 3 years approx
Type of ISOFIX child seat Infant car seatrearward facing rearward facing forward facing
ISOFIX size categor y F G C D E C D A B B1
Universal and semi-universal ISOFIX child
seats which can be installed on the outer
rear seats X
XIL- SU XIL- SU IUF
IL- SU
Remove and stow the head restraint
before installing a child seat with a
backrest on a passenger seat. Refit the
head restraint once the child seat has
been removed.
Child safety
Page 103 of 401

101
The chest part of the seat belt must be
positioned on the child's shoulder without
touching the neck.
Ensure that the lap part of the seat belt
passes correctly over the child's thighs.
CITR
oËn
recommends the use of a booster
seat which has a back, fitted with a seat belt
guide at shoulder level.
as a s
afety precaution, do not leave:
-
a c
hild or children alone and
unsupervised in a vehicle,
-
a c
hild or an animal in a vehicle which
is exposed to the sun, with the windows
closed,
-
t
he keys within reach of children inside
the vehicle.
To prevent accidental opening of the doors
and rear windows, use the child lock.
Take care not to open the rear windows by
more than one third.
To protect young children from the rays of
the sun, fit side blinds on the rear windows.
Children at the front Installing a booster
seat
The legislation on carrying children on the
front passenger seat is specific to each
country. Refer to the legislation in force in
your country.
Deactivate the passenger airbag when a
rear ward facing child seat is installed on the
front seat.
Otherwise, the child risks being seriously
injured or killed if the airbag is deployed.For optimum installation of the forward facing
child seat, ensure that the back of the child
seat is as close as possible to the backrest
of the vehicle's seat, in contact if possible.
You mst remove the head restraint before
installing a child seat with backrest to a
passenger seat.
Ensure that the head restraint is stored or
attached securely to prevent it from being
thrown around the vehicle in the event of
sharp braking. Refit the head restraint when
the child seat is removed.
The incorrect installation of a child seat in a
vehicle compromises the child's protection in
the event of an accident.
Ensure that there is no seat belt or seat belt
buckle under the child seat, as this could
destabilise it.
Remember to fasten the seat belts or the
child seat harnesses keeping the slack
relative to the child's body to a minimum,
even for short journeys.
When installing a child seat using the seat
belt, ensure that the seat belt is tightened
correctly on the child seat and that it secures
the child seat firmly on the seat of your
vehicle. If your passenger seat is adjustable,
move it for wards if necessary.
At rear seating positions, always leave
sufficient space between the front seat and:
-
a r
ear ward facing child seat,
-
t
he child's feet for a child seat fitted
forward facing.
To do this, move the front seat for wards
and, if necessary, move its backrest into the
upright position.
advice on child seats
7
Child safety