Oil Citroen C3 2017 2.G User Guide
[x] Cancel search | Manufacturer: CITROEN, Model Year: 2017, Model line: C3, Model: Citroen C3 2017 2.GPages: 450, PDF Size: 10.11 MB
Page 211 of 450
209
B618_en_Chap07_info-pratiques_ed01-2016
Checking levels
Take care when working under the
bonnet, as certain areas of the engine
may be extremely hot (risk of burns)
and the cooling fan could start at any
time (even with the ignition off).
Engine oil level
The check is carried out either when
the ignition is switched on using the
oil level indicator in the instrument
panel for vehicles so equipped, or
using the dipstick.
Checking using the dipstick
Check all of these levels regularly, in line with the manufacturer's service schedule. Top them up if necessary, unless other wise indicated.
If a level drops significantly, have the corresponding system checked by a CITROËN dealer or a qualified workshop.If you find that the level is above the A mark or
below the B mark, do not star t the engine.
-
I
f the level is above the MAX mark (risk
of damage to the engine), contact a
CITROËN dealer or a qualified workshop.
-
I
f the level is below the MIN mark, you
must top up the engine oil.
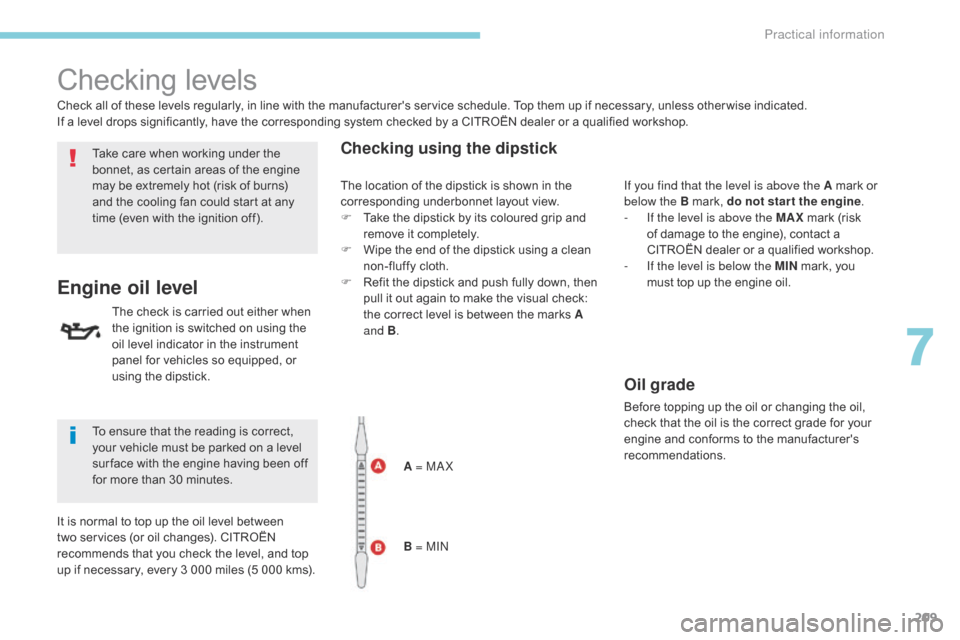
A = MA X
B = MIN
To ensure that the reading is correct,
your vehicle must be parked on a level
sur face with the engine having been off
for more than 30 minutes.
It is normal to top up the oil level between
two services (or oil changes). CITROËN
recommends that you check the level, and top
up if necessary, every 3 000 miles (5 000 kms). The location of the dipstick is shown in the
corresponding underbonnet layout view.
F
T
ake the dipstick by its coloured grip and
remove it completely.
F
W
ipe the end of the dipstick using a clean
non-fluffy cloth.
F
R
efit the dipstick and push fully down, then
pull it out again to make the visual check:
the correct level is between the marks A
and B .
Oil grade
Before topping up the oil or changing the oil,
check that the oil is the correct grade for your
engine and conforms to the manufacturer's
recommendations.
7
Practical information
Page 212 of 450
210
B618_en_Chap07_info-pratiques_ed01-2016
After topping up the oil, the check when
switching on the ignition with the oil
level indicator in the instrument panel
is not valid during the 30 minutes after
topping up.
Topping up the engine oil level
The location of the oil filler cap is shown in the
corresponding underbonnet layout view.
F
U
nscrew the oil filler cap to reveal the filler
aperture.
F
A
dd oil in small quantities, avoiding any
spills on engine components (risk of fire).
F
W
ait a few minutes before checking the
level again using the dipstick.
F
A
dd more oil if necessary.
F
A
fter checking the level, carefully refit the
oil filler cap and the dipstick in its tube.
Engine oil change
Refer to the manufacturer's service schedule
for details of the interval for this operation.
In order to maintain the reliability of the engine
and emission control system, never use
additives in the engine oil. The brake fluid level should be close
to the "MA X" mark. If it is not, check
the brake pad wear.
Brake fluid level
Changing the fluid
Refer to the manufacturer's service schedule
for details of the interval for this operation.
Fluid specification
The brake fluid must conform to the
manufacturer's recommendations.
Practical information
Page 214 of 450
212
B618_en_Chap07_info-pratiques_ed01-2016
To p p i n g u p
The reservoir must be topped up without delay
by a CITROËN dealer or a qualified workshop.
Diesel fuel additive level
(Diesel with particle filter)
The additive reservoir low level is
indicated by fixed illumination of this
warning lamp, accompanied by an
audible signal and a message that
the particle filter additive level is too
low.Avoid prolonged contact of used oil or
fluids with the skin.
Most of these fluids are harmful to
health or indeed very corrosive.
Do not discard used oil or fluids into
sewers or onto the ground.
Take used oil to a CITROËN dealer or
a qualified workshop (France) or to an
authorised waste disposal site.
Used products
AdBlue level
An alert is triggered when the reserve level is
reached.
To avoid statutory immobilisation of the vehicle,
the AdBlue must be topped up.
For more information on AdBlue and the SCR
system, and in particular topping up, refer to
the corresponding section.
Practical information
Page 215 of 450
213
B618_en_Chap07_info-pratiques_ed01-2016
Checking components
12 V battery
The battery does not require any maintenance.
However, check regularly that the terminals
are correctly tightened (versions without quick
release terminals) and that the connections
are clean.Refer to the manufacturer's
service schedule for details of the
replacement intervals for these
components.
Air filter and passenger compartment filter
Replace the oil filter each time the
engine oil is changed.
Refer to the manufacturer's
service schedule for details of
the replacement interval for this
component.
Oil filter
Unless other wise indicated, check these components in accordance with the manufacturer's service schedule and according to your engine.
Other wise, have them checked by a CITROËN dealer or a qualified workshop.Depending on the environment (e.g. dusty
atmosphere) and the use of the vehicle (e.g.
city driving), replace them twice as often if
necessary.
A clogged passenger compartment filter may
have an adverse effect on the per formance
of the air conditioning system and generate
undesirable odours.
Particle filter (Diesel)
The start of saturation of the particle
filter is indicated by the fixed
illumination of this warning lamp
accompanied by a warning message.
As soon as the traffic conditions permit,
regenerate the filter by driving at a speed of at
least 40 mph (60 km/h) until the warning lamp
goes off.
If the warning lamp stays on, this indicates a
low additive level.
For more information on Checking levels and
the Diesel additive level in particular, refer to
the corresponding section.
On a new vehicle, the first particle
filter regeneration operations may be
accompanied by a "burning" smell,
which is per fectly normal.
Following prolonged operation of the
vehicle at very low speed or at idle,
you may, in exceptional circumstances,
notice the emission of water vapour at
the exhaust on acceleration. This does
not affect the behaviour of the vehicle
or the environment.
For more information and the precautions to
take before starting work on the 12 V batter y
,
refer to the corresponding section.
Versions equipped with Stop & Start are
fitted with a 12 V lead-acid battery of
specific technology and specification.
Its replacement should be carried out
only by a CITROËN dealer or a qualified
workshop.
7
Practical information
Page 216 of 450
214
B618_en_Chap07_info-pratiques_ed01-2016
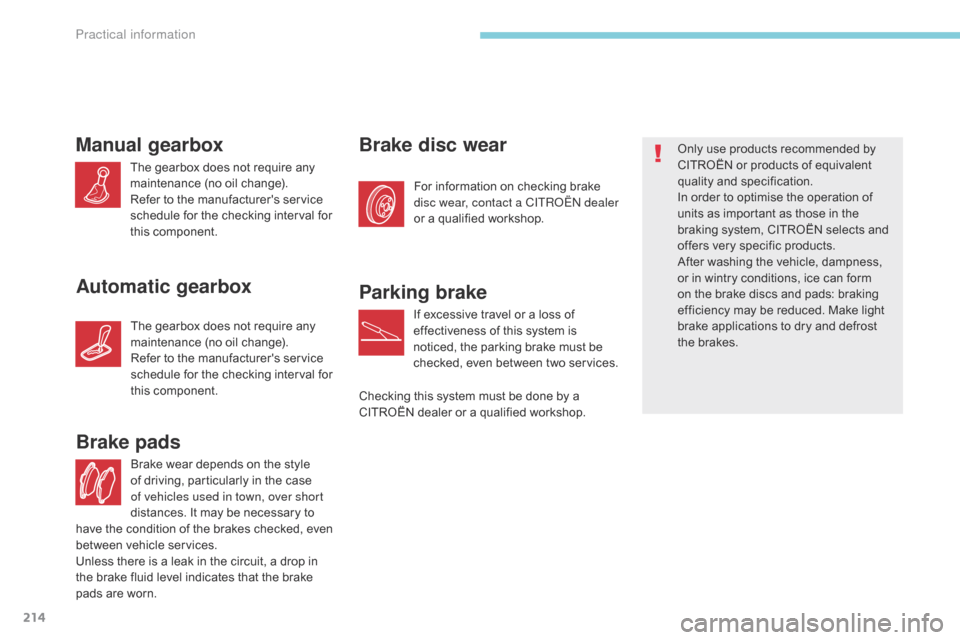
Brake wear depends on the style
of driving, particularly in the case
of vehicles used in town, over short
distances. It may be necessary to
Brake pads
For information on checking brake
disc wear, contact a CITROËN dealer
or a qualified workshop.
Brake disc wearOnly use products recommended by
CITROËN or products of equivalent
quality and specification.
In order to optimise the operation of
units as important as those in the
braking system, CITROËN selects and
offers very specific products.
After washing the vehicle, dampness,
or in wintry conditions, ice can form
on the brake discs and pads: braking
efficiency may be reduced. Make light
brake applications to dry and defrost
the brakes.Manual gearbox
The gearbox does not require any
maintenance (no oil change).
Refer to the manufacturer's service
schedule for the checking interval for
this component.
Automatic gearbox
The gearbox does not require any
maintenance (no oil change).
Refer to the manufacturer's service
schedule for the checking interval for
this component.
Parking brake
If excessive travel or a loss of
effectiveness of this system is
noticed, the parking brake must be
checked, even between two services.
Checking this system must be done by a
CITROËN dealer or a qualified workshop.
have the condition of the brakes checked, even
between vehicle services.
Unless there is a leak in the circuit, a drop in
the brake fluid level indicates that the brake
pads are worn.
Practical information
Page 224 of 450

222
B618_en_Chap08_En-cas-de-panne_ed01-2016
F Switch off the ignition.
F S ecure the speed limit sticker inside the
vehicle.
Repair procedure
Avoid removing any foreign bodies
which have penetrated into the tyre. F
T
urn the sealant cartridge and secure it in
the cut-out provided on the compressor. F
R
emove the valve cap from the tyre to be
repaired, and place it in a clean area.
F
C
onnect the hose from the sealant
cartridge to the valve of the tyre to be
repaired and tighten firmly.
F
U
ncoil the pipe stowed under the
compressor.
F
C
onnect the pipe from the compressor to
the sealant cartridge.
In the event of a breakdown
Page 225 of 450
223
B618_en_Chap08_En-cas-de-panne_ed01-2016
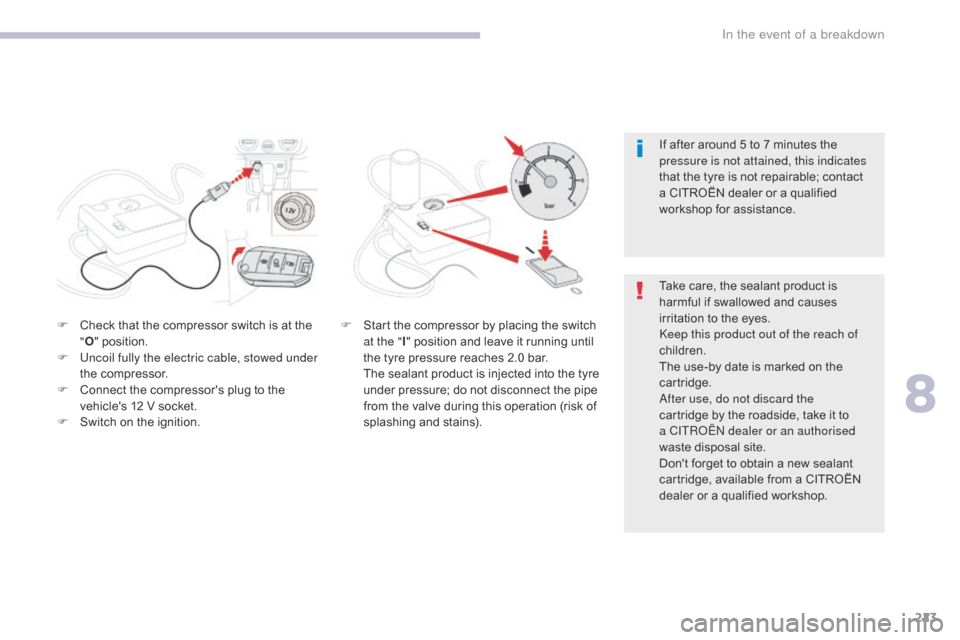
F Check that the compressor switch is at the "O " position.
F
U
ncoil fully the electric cable, stowed under
the compressor.
F
C
onnect the compressor's plug to the
vehicle's 12 V socket.
F
S
witch on the ignition. If after around 5 to 7 minutes the
pressure is not attained, this indicates
that the tyre is not repairable; contact
a CITROËN dealer or a qualified
workshop for assistance.
F S tart the compressor by placing the switch
at the " I" position and leave it running until
the tyre pressure reaches 2.0 bar.
T
he sealant product is injected into the tyre
under pressure; do not disconnect the pipe
from the valve during this operation (risk of
splashing and stains). Take care, the sealant product is
harmful if swallowed and causes
irritation to the eyes.
Keep this product out of the reach of
children.
The use-by date is marked on the
cartridge.
After use, do not discard the
cartridge by the roadside, take it to
a CITROËN
dealer or an authorised
waste disposal site.
Don't forget to obtain a new sealant
cartridge, available from a CITROËN
dealer or a qualified workshop.
8
In the event of a breakdown
Page 226 of 450
224
B618_en_Chap08_En-cas-de-panne_ed01-2016
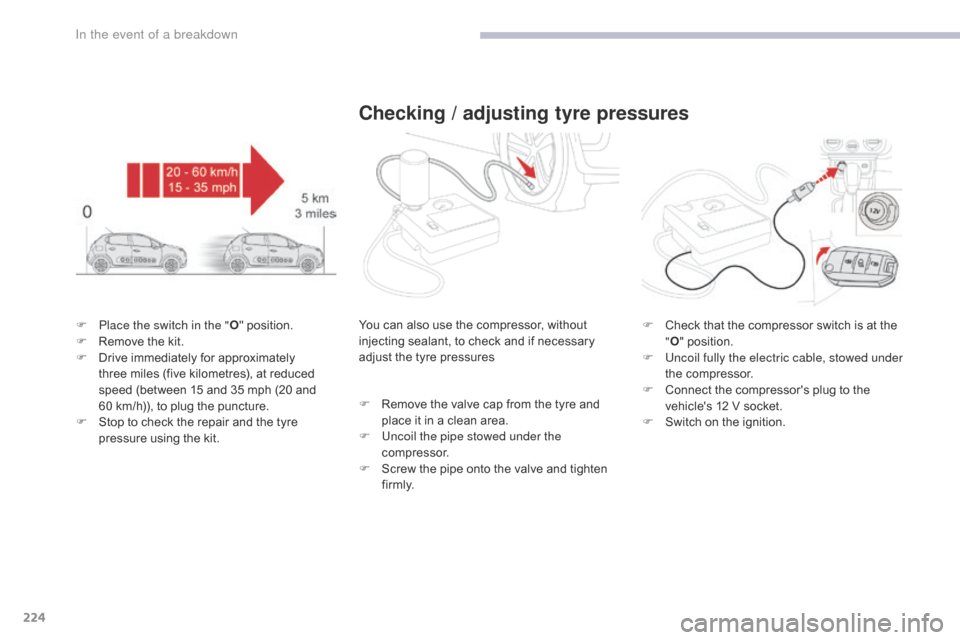
F Place the switch in the "O" position.
F R emove the kit.
F
D
rive immediately for approximately
three miles (five kilometres), at reduced
speed (between 15 and 35 mph (20 and
60
km/h)), to plug the puncture.
F
S
top to check the repair and the tyre
pressure using the kit.
Checking / adjusting tyre pressures
You can also use the compressor, without
injecting sealant, to check and if necessary
adjust the tyre pressures
F
R
emove the valve cap from the tyre and
place it in a clean area.
F
U
ncoil the pipe stowed under the
compressor.
F
S
crew the pipe onto the valve and tighten
f i r m l y. F
C heck that the compressor switch is at the
" O " position.
F
U
ncoil fully the electric cable, stowed under
the compressor.
F
C
onnect the compressor's plug to the
vehicle's 12 V socket.
F
S
witch on the ignition.
In the event of a breakdown
Page 262 of 450
260
B618_en_Chap11_index-alpha_ed01-2016
Accessories ...........................................117, 157
AdBlue® ............................... ......26, 36, 215, 216
Adjusting headlamps .................................... 11
2
Adjusting head restraints
................................ 77
A
djusting seat
................................................. 76
A
djusting the air distribution
.....................8
5, 88
Adjusting the air flow
.................................8
5, 88
Adjusting the date
..................................... 4
1, 54
Adjusting the height and reach of the steering wheel
...............................
.........82
Adjusting the temperature
........................8
5, 88
Adjusting the time
............................... 4
1, 54, 55
Advice on driving
..............................
....151, 152
Airbags
...............
............................. 29, 129, 137
Airbags, curtain
..................................... 13
2, 13 3
Airbags, front......................................... 13 0, 13 3
Airbags, lateral
...................................... 13
1, 13 3
AIRBUMP
® .................................................... 2 19
Air conditioning ............................... ............ 9, 87
Air conditioning, automatic
.......................8
4, 88
Air conditioning, manual
........................... 8
4, 86
Air intake
...............
.................................... 86, 88
Air vents
..............................
............................ 83
Alarm
............................................................... 72
A
nti-lock braking system (ABS)
....................12
3
Anti-slip regulation (ASR)
............................. 12
3
Anti-theft
..............................
.........................153
Armrest, front
............................................9
6, 98
Assistance call
...............................
....... 119, 121
Assistance, emergency braking
................... 12
3
Audio system
...............................
....................41
Auxiliary socket
............................................... 98
ABChild seats, ISOFIX .......................14 3 -145, 147
C ITROËN C onnect Box ....................... 1 19, 121
C
ITROËN
L
ocalised Emergency Call... 119, 121
Closing the boot
...............................
......... 57, 69
Closing the doors
.......................... 5
7, 60, 61, 68
Coat hanger
..............................
......................99
Configuration, vehicle
......................... 4
1, 44, 46
ConnectedCAM C
ITROËN
™
.......................19
3
Control, electric windows
................................ 74
C
ontrol, emergency boot release
...................69
C
ontrol, emergency door
................................ 64
C
ontrol, heated seats
...................................... 78
C
ontrol stalk, lighting
.............. 1
6, 105, 106, 110
Control stalk, wipers
..............................11
3 -115
Courtesy lamp
...............................
..........94, 240
Cruise control
................................ 1
70, 173, 178
Cruise control by speed limit recognition
.....17
3
Cup holder
...............................
........................96
Capacity, fuel tank
..............................
.......... 19 6
Cap, fuel filler
................................................ 19
6
Central locking
.................................... 6
0, 61, 70
Changing a bulb
........................... 2
34, 238, 240
Changing a fuse
............................ 2
41, 243, 246
Changing a wheel
...............................
. 226, 227
Changing a wiper blade
........................ 11
6 , 2 0 4
Changing the remote control battery
.............. 66
C
hecking the engine oil level
.......................... 35
C
hecking the levels
............................... 2
0 9 -212
Checking tyre pressures (using the kit)
........ 2
21
Checks
...............
................... 207, 208, 213, 214
Child lock
...............................
........................ 150
Children
...............................
... 141, 143 -145, 147
Children (safety)
...............................
............. 150
Child seats
............ 1
28, 134-136, 140, 141, 149
Child seats, conventional
...................... 14
0, 141
Child seats, i-Size
...............................
.......... 147 Date (setting)
...............................
.............. 41, 54
Daytime running lamps
.........1
06, 110, 234, 235
Deactivating the passenger airbag
....... 13
0, 137
Deadlocking
...............................
............... 57, 62
Demisting - defrosting
...............................9
2, 93
Dimensions
..............................
.....................257
Dipstick
................
....................................35, 209
Direction indicators
...... 1
08, 110, 234, 235, 238
Display screen, instrument panel
.................16
5
Doors
..............................................................
.68
Driving economically ......................................... 9
Driving time warning
..................................... 18
2
Dynamic stability control (DSC)
...... 2
2, 123, 125
C
D
Battery ................................... 203, 213, 248 -251
Battery, charging ............................... ............250
Battery, remote control
.............................6
3, 66
Blanking screen (snow shield)
......................2
01
Blind, panoramic roof
...................................... 95
B
lind spot monitoring system
........................18
4
Blind spot sensors
.................................. 18
, 18 4
BlueHDi
...............................
......32, 36, 215, 220
Bonnet
...............
............................................ 206
Boot
........
.......................................... 69, 95, 100
Brake discs
.................................................... 2
14
Brake lamps
...............................
...................238
Brakes
..................................................... 2
2, 214
Bulbs (changing)
...............................
... 234, 238
Alphabetical index
Page 263 of 450
261
B618_en_Chap11_index-alpha_ed01-2016
Earth point, remote ............................... 207, 208
Eco-driving (advice) .......................................... 9
E
conomy mode
...............................
..............203
Electronic brake force distribution (EBFD)
...12
3
Emergency braking assistance (EBA)
..........12
3
Emergency call
..................................... 1
19, 121
Emergency switching off
...............................15
8
Emergency warning lamps
................... 1
18, 220
Emissions control system, SCR
.....................2
7
Energy economy mode
.................................20
3
Engine compartment
............................ 2
07, 208
Engine, Diesel
.............................. 1
99, 208, 220
Engine, petrol
........................................1
99, 207
Engines
..............................
...................254-256
Environment
...............................
.................9, 63
Electronic stability control (ESC)
..................12
3Gauge, fuel....................................................
19 6
Gearbox, automatic
... 9
, 161, 166, 167, 214, 248
Gearbox, manual
........ 9
, 96, 160, 166, 167, 214
Gear efficiency indicator
............................... 16
5
Gear lever
..............................
........................... 9
Gear lever, manual gearbox
.........................16
0
Glove box
..................................................9
6, 97
Hazard warning lamps
.......................... 1
18, 220
Headlamps, automatic illumination
...............................
... 106, 109, 111
Headlamps, dipped beam
............ 1
05, 234, 235
Headlamps, main beam
............... 1
05, 234, 236
Head restraints, front
......................................77
H
ead restraints, rear
.......................................79
H
eating
................
..................................9, 85, 86
Hill start assist
...............................................16
6
Hooks
...............................
.............................101
Horn ............................................................... 118
G
H
I
F
Folding the rear seats .....................................79
Fu el............................................................9, 199
Fuel consumption
.............................................. 9
F
uel tank........................................................ 198
Fusebox, engine compartment
..................... 24
6
Fuses
................
............................. 241, 243, 246
E
Fatigue detection .............................. ............182
Filling the fuel tank ........................1 96, 198, 199
Filter, air
...............
......................................... 213
Filter, Diesel fuel
........................................... 20
8
Filter, oil
......................................................... 2
13
Filter, particle
........................................ 21
2, 213
Filter, passenger compartment
..................... 2
13
Fitting a wheel
...............................
................229
Fitting roof bars
............................................. 20
5
Fittings, boot
......................................... 10
0, 102
Fittings, interior
.........................................9
6, 97
Flap, fuel filler
...............................
.........19 6, 198
Flashing indicators
........................ 1
08, 110, 235
Foglamps, rear
...................................... 1
07, 238
Foglamps, front
............................. 1
07, 234, 236 Ignition
................
............................. 91, 155, 157
Immobiliser, electronic
............................6
3, 153
Indicator, AdBlue
® range ...........................2 6, 36
Indicator, coolant temperature ........................ 3
1
Indicator, engine oil level
................................ 35
I
ndicator lamps, operation
........................ 1
6, 19
Indicators, direction
..............................1
08, 235
Inflating tyres
..............................
......9, 221, 258
Instrument panel
...............................
........ 11, 13
ISOFIX
...............
................................... 143, 14 4
Key
.......
.................................. 56, 59, 61, 63, 64
Key, electronic
........................................... 5
9 - 61
Keyless Entry and Starting
.............................5
9, 61, 63, 153, 156
Key not recognised
....................................... 15
8
Key with remote control
................................ 15
3
Kit, temporary puncture repair
..............1
01, 2 21
Jack
........
.............................................. 226, 227
Jump starting
..............................
..................249
K
J
.
Alphabetical index