height Citroen C3 2017 2.G Owner's Manual
[x] Cancel search | Manufacturer: CITROEN, Model Year: 2017, Model line: C3, Model: Citroen C3 2017 2.GPages: 450, PDF Size: 10.11 MB
Page 4 of 450
.
.
B618_en_Chap00a_sommaire_ed01-2016
Instrument panels 11
Indicator and warning lamps
1
5
Indic ators
31
D
istance recorders
3
9
Configuration of the equipment on vehicles without a screen
4
0
Monochrome screen C
4
1
Touch screen
4
4
Trip computer
5
0
Setting the date and time
5
4
InstrumentsOver view
Remote control 5
6
Keyless Entry and Starting
5
9
Back-up procedures
6
4
Doors
68
Boot
6
9
Central locking
7
0
Alarm
7
2
Electric windows
7
4
Access
Front seats 76
Rear seats
7
9
Steering wheel adjustment
8
2
Ventilation
8
3
Heating
8
5
Manual air conditioning
8
6
Automatic air conditioning
8
8
Front demist - defrost
9
2
Rear screen demist - defrost
9
3
Courtesy lamp
9
4
Panoramic sunroof
9
5
Boot lamp
9
5
Interior fittings
9
6
Boot fittings
1
00
Rear parcel shelf (enterprise version)
1
02
Ease of use and comfort
Mirrors 10 3
Lighting control
1
05
Direction indicators
1
08
Automatic illumination of headlamps
1
09
Daytime running lamps / Sidelamps
1
10
Headlamp beam height adjustment
1
12
Wiper control stalk
1
13
Automatic rain sensitive wipers
1
15
Lighting and visibility
General safety recommendations 1 17
Hazard warning lamps
1
18
H o r n
11
8
Emergency or assistance
1
19
Electronic stability control (ESC)
1
23
Seat belts
1
26
Airbags
1
29
Child seats
1
34
Deactivating the passenger front airbag
1
37
ISOFIX child seats
1
43
i-Size child seats
1
47
Child lock
1
50
Safety
Eco-driving
Contents
Page 6 of 450
4
B618_en_Chap00b_vue-ensemble_ _ed01-2016
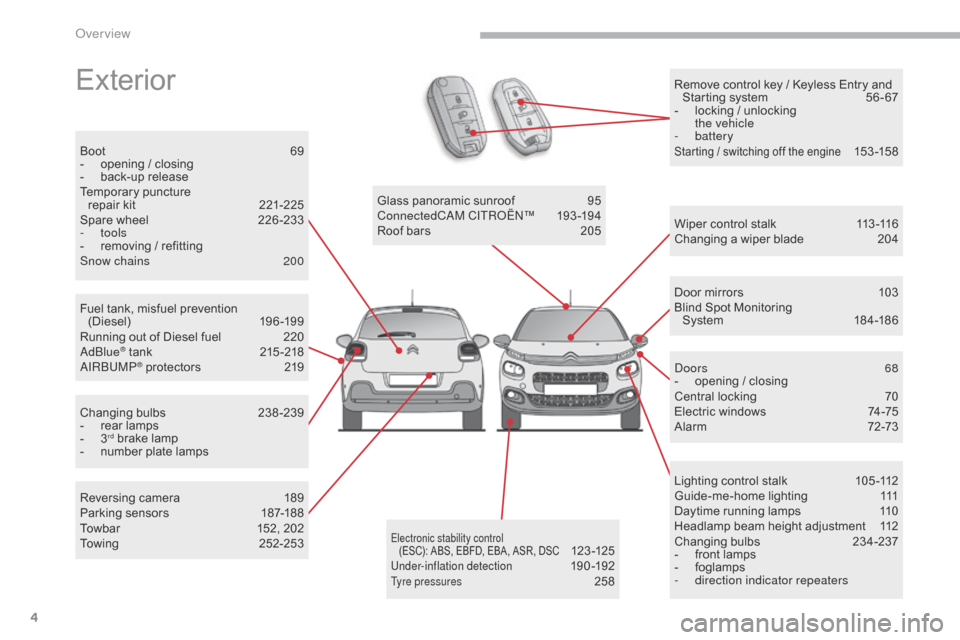
Remove control key / Keyless Entry and Starting system 5 6 - 67
-
l
ocking / unlocking
the vehicle
-
battery
Starting / switching off the engine 153 -15 8
Exterior
Fuel tank, misfuel prevention (Diesel) 19 6 -19 9
Running out of Diesel fuel
2
20
AdBlue
® tank 21 5 -218
AIRBUMP® protectors 2 19
Boot
6
9
-
o
pening / closing
-
b
ack-up release
Temporary puncture
repair kit
2
21-225
Spare wheel
2
26-233
-
tools
-
r
emoving / refitting
Snow chains
2
00
Changing bulbs
2
38-239
-
r
ear lamps
-
3rd brake lamp
-
n
umber plate lamps Glass panoramic sunroof
9
5
ConnectedCAM C ITROËN
™ 19
3 -19 4
Roof bars
2
05
Wiper control stalk
1
13 -116
Changing a wiper blade
2
04
Door mirrors
1
03
Blind Spot Monitoring System
18
4 -18 6
Doors 68
-
o
pening / closing
Central locking
7
0
Electric windows
7
4-75
Alarm 7 2-73
Lighting control stalk
1
05 -112
Guide-me-home lighting
1
11
Daytime running lamps
1
10
Headlamp beam height adjustment
1
12
Changing bulbs
2
34-237
-
f
ront lamps
-
fo
glamps
-
d
irection indicator repeaters
Electronic stability control (ESC): ABS, EBFD, EBA, ASR, DSC 123 -125Under-inflation detection 19 0 -192Tyre pressures 25 8
Reversing camera
1
89
Parking sensors
1
87-188
Towbar
1
52, 202
Towing
2
52-253
Over view
Page 9 of 450
7
B618_en_Chap00b_vue-ensemble_ _ed01-2016
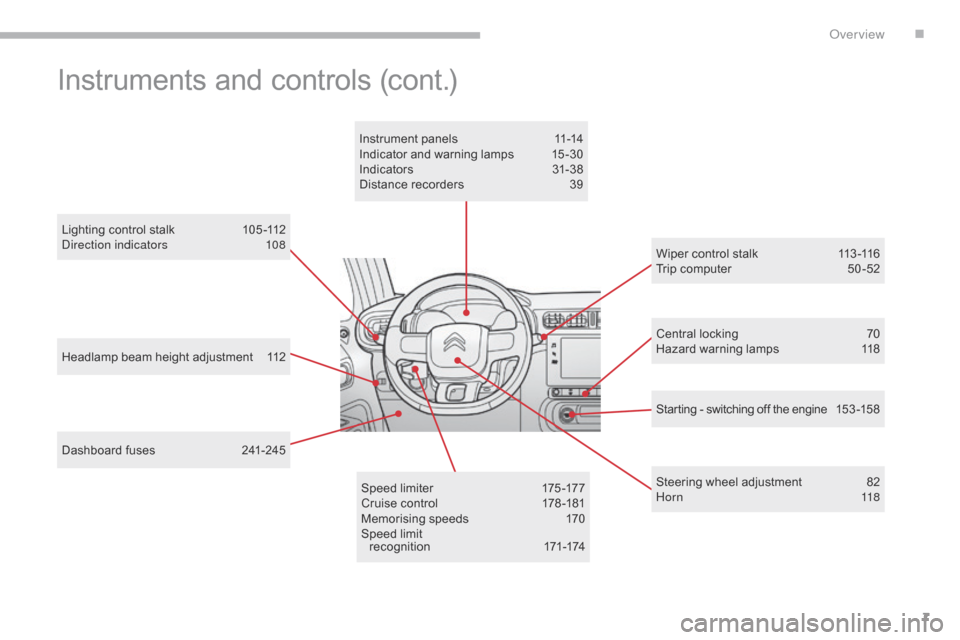
Headlamp beam height adjustment 112
Lighting control stalk
1
05 -112
Direction indicators
1
08
Dashboard fuses
2
41-245 Central locking
7
0
Hazard warning lamps 1 18
Wiper control stalk
1
13 -116
Trip computer
5
0 -52
Speed limiter
1
75 -177
Cruise control
1
78 -181
Memorising speeds
1
70
Speed limit r e c o g n i t i o n
17
1-174
Instrument panels
1
1-14
Indicator and warning lamps
1
5 -30
Indicators
3
1-38
Distance recorders
3
9
Steering wheel adjustment
8
2
H o r n
118
Instruments and controls (cont.)
Starting - switching off the engine 15 3 -15 8
.
Over view
Page 78 of 450
76
B618_en_Chap03_Ergonomie-et-confort_ed01-2016
Front seats
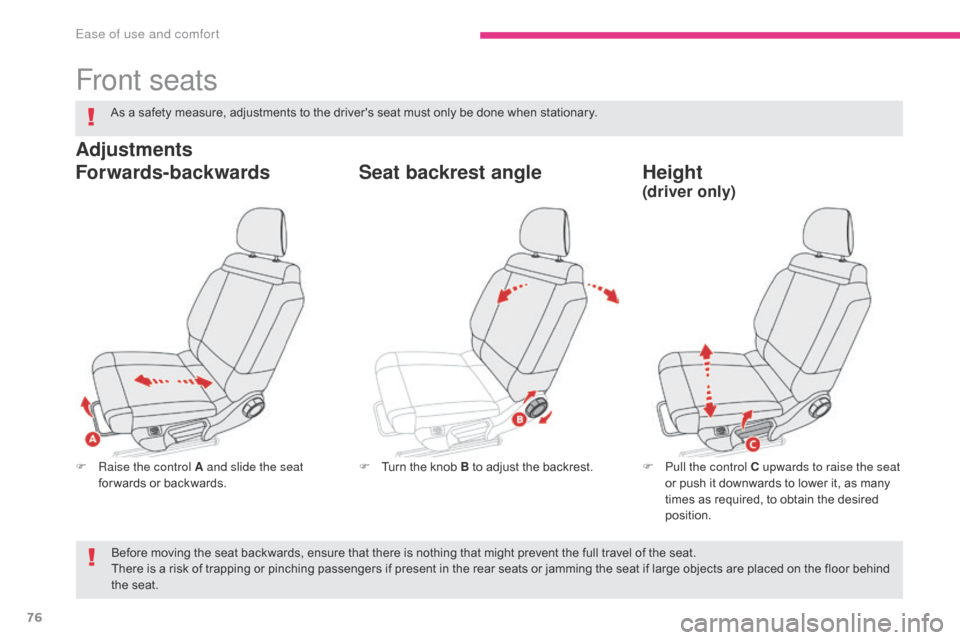
F Raise the control A and slide the seat for wards or backwards. F
P ull the control C upwards to raise the seat
or push it downwards to lower it, as many
times as required, to obtain the desired
position.
F
T urn the knob B to adjust the backrest.
Forwards-backwards
Height
Seat backrest angle
Adjustments
(driver only)
As a safety measure, adjustments to the driver's seat must only be done when stationary.
Before moving the seat backwards, ensure that there is nothing that might prevent the full travel of the seat.
There is a risk of trapping or pinching passengers if present in the rear seats or jamming the seat if large objects are placed on the floor behind
the seat.
Ease of use and comfort
Page 79 of 450
77
B618_en_Chap03_Ergonomie-et-confort_ed01-2016
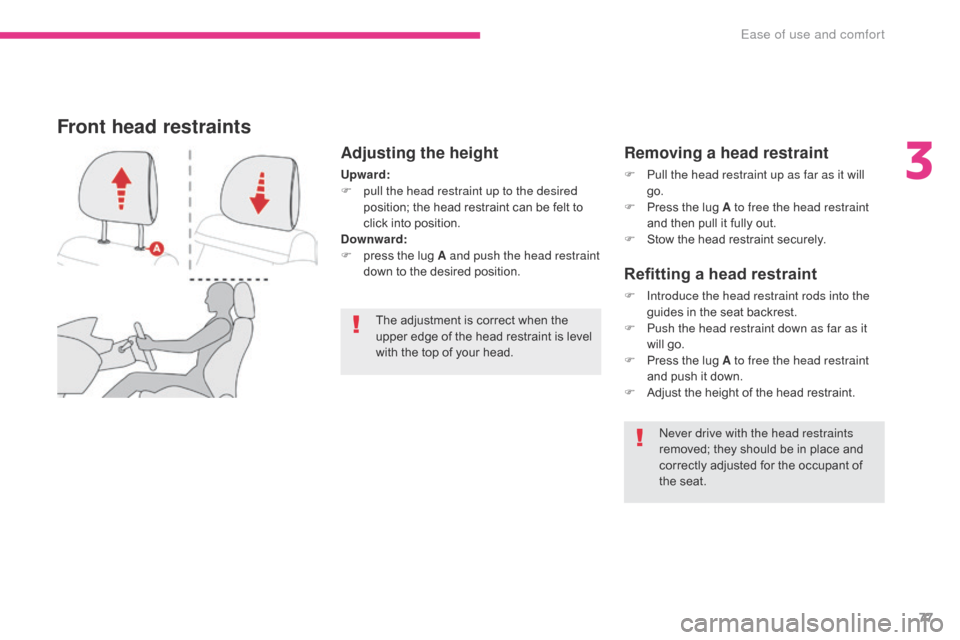
Adjusting the height
Upward:
F p ull the head restraint up to the desired
position; the head restraint can be felt to
click into position.
Downward:
F
p
ress the lug A and push the head restraint
down to the desired position.
The adjustment is correct when the
upper edge of the head restraint is level
with the top of your head.
Front head restraints
Never drive with the head restraints
removed; they should be in place and
correctly adjusted for the occupant of
the seat.
Removing a head restraint
F Pull the head restraint up as far as it will go.
F
P
ress the lug A to free the head restraint
and then pull it fully out.
F
S
tow the head restraint securely.
Refitting a head restraint
F Introduce the head restraint rods into the guides in the seat backrest.
F
P
ush the head restraint down as far as it
will go.
F
P
ress the lug A to free the head restraint
and push it down.
F
A
djust the height of the head restraint.
3
Ease of use and comfort
Page 84 of 450
82
B618_en_Chap03_Ergonomie-et-confort_ed01-2016
Steering wheel adjustment
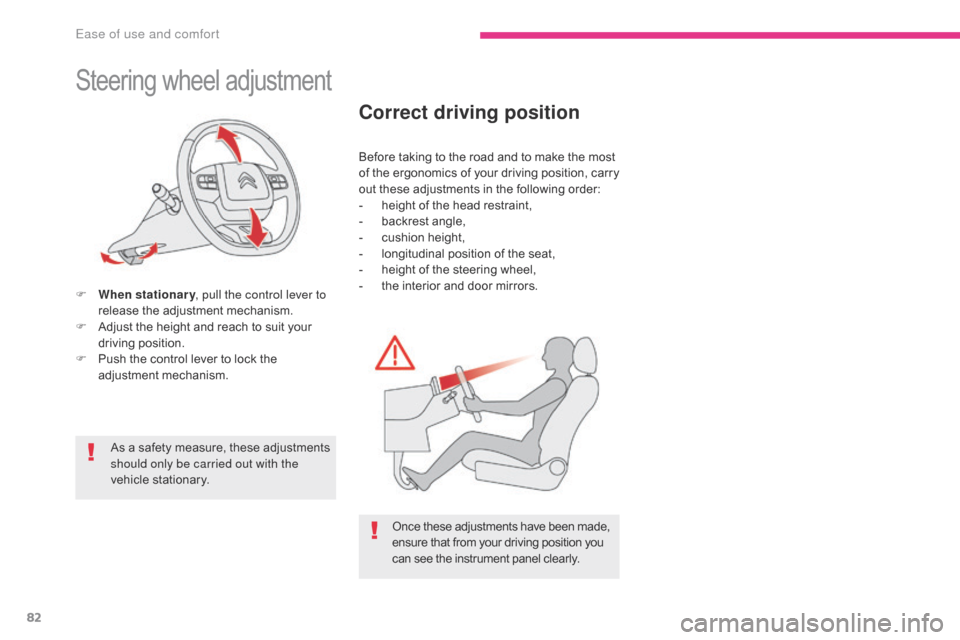
F When stationary, pull the control lever to
release the adjustment mechanism.
F
A
djust the height and reach to suit your
driving position.
F
P
ush the control lever to lock the
adjustment mechanism.
As a safety measure, these adjustments
should only be carried out with the
vehicle stationary.
Correct driving position
Before taking to the road and to make the most
of the ergonomics of your driving position, carry
out these adjustments in the following order:
-
h
eight of the head restraint,
-
b
ackrest angle,
-
c
ushion height,
-
l
ongitudinal position of the seat,
-
h
eight of the steering wheel,
-
t
he interior and door mirrors.
Once these adjustments have been made,
ensure that from your driving position you
can see the instrument panel clearly.
Ease of use and comfort
Page 100 of 450
98
B618_en_Chap03_Ergonomie-et-confort_ed01-2016
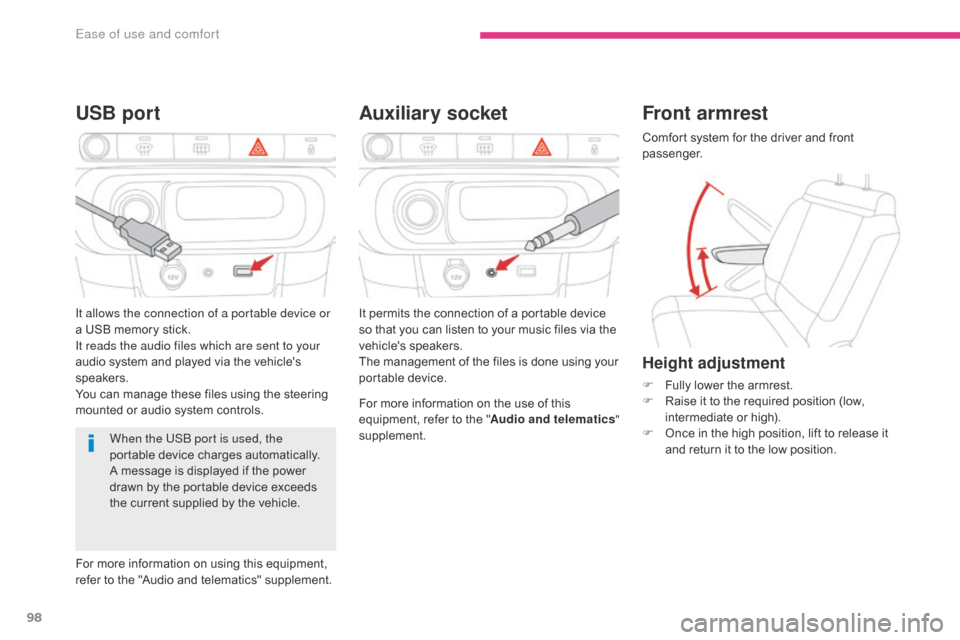
Auxiliary socket
USB port
For more information on the use of this
equipment, refer to the " Audio and telematics"
supplement.
When the USB port is used, the
portable device charges automatically.
A message is displayed if the power
drawn by the portable device exceeds
the current supplied by the vehicle. It permits the connection of a portable device
so that you can listen to your music files via the
vehicle's speakers.
The management of the files is done using your
portable device.
It allows the connection of a portable device or
a USB memory stick.
It reads the audio files which are sent to your
audio system and played via the vehicle's
speakers.
You can manage these files using the steering
mounted or audio system controls.
For more information on using this equipment,
refer to the "Audio and telematics" supplement.
Front armrest
Comfort system for the driver and front
passenger.
Height adjustment
F Fully lower the armrest.
F
R aise it to the required position (low,
intermediate or high).
F
O
nce in the high position, lift to release it
and return it to the low position.
Ease of use and comfort
Page 114 of 450
112
B618_en_Chap04_Eclairage-et-visibilite_ed01-2016
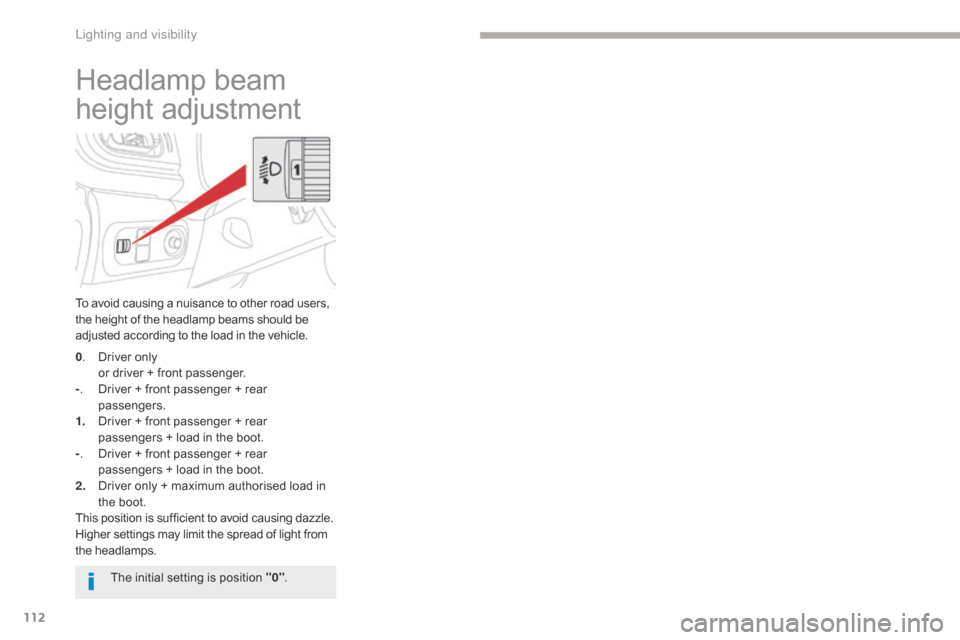
Headlamp beam
height adjustment
To avoid causing a nuisance to other road users,
the height of the headlamp beams should be
adjusted according to the load in the vehicle.
0.
D
river only
o
r driver + front passenger.
- .
D
river + front passenger + rear
passengers.
1.
D
river + front passenger + rear
passengers
+ load in the boot.
- .
D
river + front passenger + rear
passengers
+ load in the boot.
2.
D
river only + maximum authorised load in
the boot.
This position is sufficient to avoid causing dazzle.
Higher settings may limit the spread of light from
the headlamps.
The initial setting is position "0" .
Lighting and visibility
Page 146 of 450
144
B618_en_Chap05_securite_ed01-2016
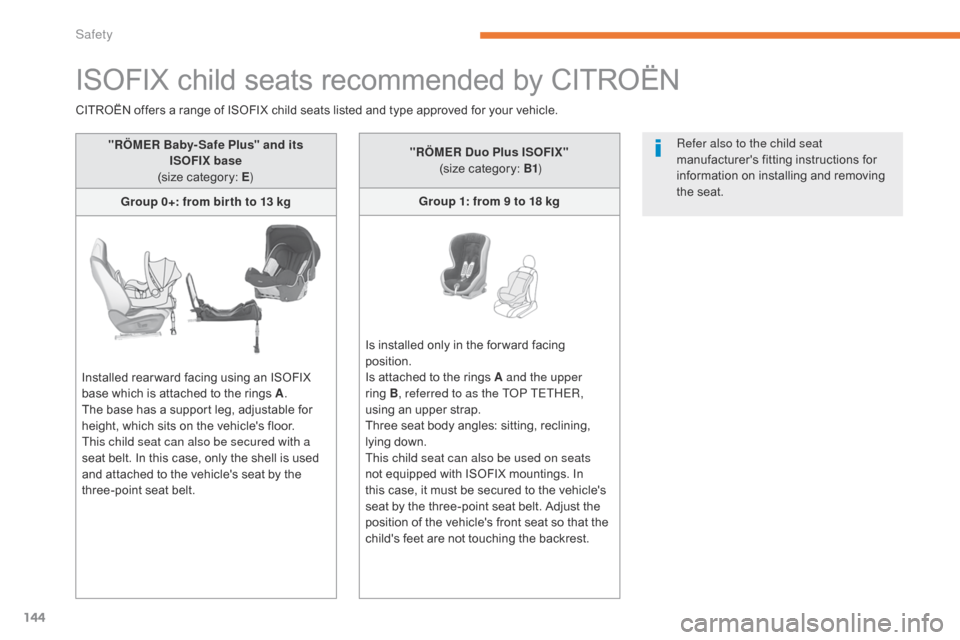
ISOFIX child seats recommended by CITROËN
"RÖMER Baby- Safe Plus" and its ISOFIX base
(size category: E )
Group 0+: from bir th to 13 kg
Installed rear ward facing using an ISOFIX
base which is attached to the rings A .
The base has a support leg, adjustable for
height, which sits on the vehicle's floor.
This child seat can also be secured with a
seat belt. In this case, only the shell is used
and attached to the vehicle's seat by the
three-point seat belt. "RÖMER Duo Plus ISOFIX"
(size category: B1 )
Group 1: from 9 to 18 kg
Is installed only in the for ward facing
position.
Is attached to the rings A and the upper
ring
B, referred to as the TOP TETHER,
using an upper strap.
Three seat body angles: sitting, reclining,
lying down.
This child seat can also be used on seats
not equipped with ISOFIX mountings. In
this case, it must be secured to the vehicle's
seat by the three-point seat belt. Adjust the
position of the vehicle's front seat so that the
child's feet are not touching the backrest.
CITROËN offers a range of ISOFIX child seats listed and type approved for your vehicle.
Refer also to the child seat
manufacturer's fitting instructions for
information on installing and removing
the seat.
Safety
Page 154 of 450
152
B618_en_Chap06_conduite_ed01-2016
When towing
Distribution of loads
F Distribute the load in the trailer so that the heaviest items are as close as possible to
the axle and the nose weight approaches
the maximum permitted without
exceeding
it.
Air density decreases with altitude, thus
reducing engine per formance. Above
1
000 metres, the maximum towed load must
be reduced by 10
% for every 1 000 metres of
altitude.
For more information on Weights , refer to the
corresponding section.
Side wind
F Take into account the increased sensitivity to side wind.
Cooling
Towing a trailer on a slope increases the
temperature of the coolant.
As the fan is electrically controlled, its cooling
capacity is not dependent on the engine speed.
F
T
o lower the engine speed, reduce your
speed.
The maximum towed load on a long incline
depends on the gradient and the exterior
temperature.
In all cases, keep a check on the coolant
temperature.
F
I
f the warning lamp and the
STOP warning lamp come on,
stop the vehicle and switch off
the engine as soon as possible.
Braking
Towing a trailer increases the braking distance.
To avoid overheating of the brakes, the use of
engine braking is recommended.
Ty r e s
F Check the tyre pressures of the towing vehicle and of the trailer, observing the
recommended pressures.
Lighting
F Check the electrical lighting and signalling on the trailer and the headlamp beam
height of your vehicle.
For more information on Adjusting the
headlamp beam height , refer to the
corresponding section.
The rear parking sensors will be
deactivated automatically to avoid the
audible signal if a genuine CITROËN
towbar is used.
If the exterior temperature is high, it
is recommended that the engine be
allowed to idle for 1 to 2 minutes after
the vehicle comes to a stop, to facilitate
its cooling.
Driving