wipers CITROEN C3 2023 Owners Manual
[x] Cancel search | Manufacturer: CITROEN, Model Year: 2023, Model line: C3, Model: CITROEN C3 2023Pages: 104, PDF Size: 2.38 MB
Page 23 of 104

21
Lighting and visibility
4Knob
switch
positionStatic loading condition
0 Driver + 1 passenger
1 All the seats occupied
2 All the seats occupied + load
evenly distributed in the boot
3 Driver + load evenly distributed
in the boot
Wiper control stalk
In wintry conditions, remove snow, ice or
frost present on the windscreen, around
the wiper arms and blades and on the
windscreen seal, before operating the wipers.
Do not operate the wipers on a dry
windscreen. Under extremely hot or cold
conditions, ensure that the wiper blades are
not stuck to the windscreen before operating
the wipers.
Windscreen wipers
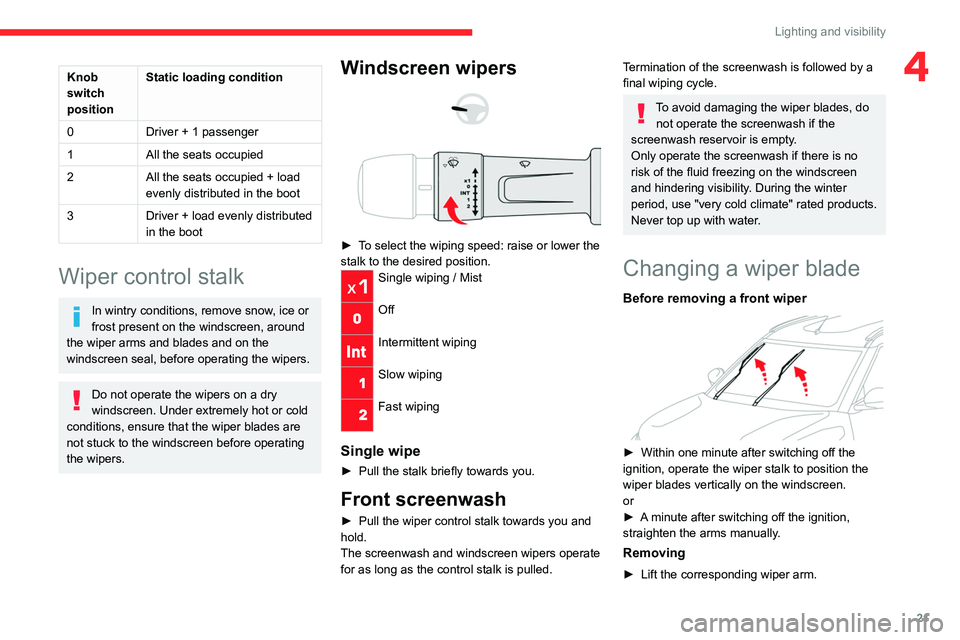
► To select the wiping speed: raise or lower the
stalk to the desired position.
Single wiping / Mist
Off
Intermittent wiping
Slow wiping
Fast wiping
Single wipe
► Pull the stalk briefly towards you.
Front screenwash
► Pull the wiper control stalk towards you and
hold.
The screenwash and windscreen wipers operate
for as long as the control stalk is pulled.
Termination of the screenwash is followed by a
final wiping cycle.
To avoid damaging the wiper blades, do not operate the screenwash if the
screenwash reservoir is empty.
Only operate the screenwash if there is no
risk of the fluid freezing on the windscreen
and hindering visibility. During the winter
period, use "very cold climate" rated products.
Never top up with water.
Changing a wiper blade
Before removing a front wiper
► Within one minute after switching off the
ignition, operate the wiper stalk to position the
wiper blades vertically on the windscreen.
or
►
A
minute after switching off the ignition,
straighten the arms manually.
Removing
► Lift the corresponding wiper arm.
Page 59 of 104

57
In the event of a breakdown
8at least equal to that of the discharged
battery.
The two vehicles must not be in contact with
each other.
Switch off all electricity-consuming equipment
on both vehicles (audio system, wipers,
lighting, etc.).
Make sure that the jump leads are well away
from the engine’s moving parts (fan, belt,
etc.).
Do not disconnect the (+) terminal while the
engine is running.
During jump start, extra care should be taken
to ensure right terminals are connected. If
terminal connections are reversed, it will
lead to failure of alternator & other electrical,
electronic components.
Never power electrical or electronic
components directly from battery terminals
as it will lead to poor battery charging, poor
performance of components and battery
sensor malfunction, which will impact fuel
economy. For Naturally Aspirated engine version
► Lift the cover on the (+) terminal, if the vehicle
has one.
►
Connect the red cable to the (+) terminal
of flat battery
A, then to the (+) terminal of the
backup battery
B or of the booster.
►
Connect one end of the green or black cable
to the (-) terminal of the backup battery
B or of
the booster (or to an earth point on the assisting
vehicle).
►
Connect the other end of the green or black
cable to the (-) terminal of flat battery
A.
►
Start the engine on the assisting vehicle and
leave it running for a few minutes.
►
Operate the starter on the broken down
vehicle and let the engine run.
If the engine does not start immediately
, switch
off the ignition and wait a few moments before
trying again.
►
W
ait for it to return to idle.
►
Disconnect the jump leads in reverse order:
first remove (-) terminal then (+) terminal.
► Refit the cover to the (+) terminal, if the
vehicle has one.
►
Allow the engine to run for at least
30
minutes, with the vehicle stationary, so that
the battery reaches an adequate state of charge.
For Turbo engine version
The negative cable must be connected to the car ground (not to the battery
negative terminal) so that the battery sensor
can detect all charging and discharging
currents.
►
Lift
the cover on the (+) terminal, if the vehicle
has one.
►
Connect the red cable to the (+) terminal of
flat battery
A (at the metal elbow), then to the
(+) terminal of the backup battery
B or of the
booster.
►
Connect one end of the green or black cable
to the (-) terminal of the backup battery
B or of
Page 60 of 104

58
In the event of a breakdown
the booster (or to an earth point on the assisting
vehicle).
►
Connect the other end of the green or black
cable to the earth point
C
on the broken down
vehicle.
►
Start the engine on the assisting vehicle and
leave it running for a few minutes.
►
Operate the starter on the broken down
vehicle and let the engine run.
If the engine does not start immediately
, switch
off the ignition and wait a few moments before
trying again.
►
W
ait for it to return to idle.
►
Disconnect the jump leads in reverse order:
first remove (-) terminal then (+) terminal..
►
Refit the cover to the (+) terminal, if the
vehicle has one.
►
Allow the engine to run for at least
30
minutes, with the vehicle stationary, so that
the battery reaches an adequate state of charge.
Driving immediately without having
reached a sufficient level of charge may
affect some of the vehicle's functionalities.
Disconnecting/removing the
battery
In order to maintain an adequate state of charge
for starting the engine, it is recommended that
the battery be disconnected if the vehicle is
taken out of service for a long period.
Before disconnecting the battery: ►
Close all openings (doors, boot, windows).
►
Switch off all electrical consumers (audio
system, wipers, lighting, etc.).
►
Switch off the ignition and wait for 4
minutes.
Naturally Aspirated engine version
Turbo engine version
►
Disconnect the negative cable.
►
Disconnect the positive cable.
► Remove the mounting bracket if you need to
remove the battery .
Be careful not to cause accidental short
circuits between the positive and
negative battery terminals.
Do not allow smoking, sparks or flames
around fuel or the battery.
After reconnection
After reconnecting the battery, turn on the
ignition and wait 1 minute before starting the
engine, to enable the electronic systems to
initialise.
If minor problems nevertheless persist following
this operation, contact a CITROËN dealer.
Referring to the relevant section, initialise or
reset certain equipment:
–
Date and time.
–
Preset radio stations.
Towing the vehicle
General recommendations
Observe the legislation in force in the
country where you are driving.
Ensure that the weight of the towing vehicle is
higher than that of the towed vehicle.
The driver must remain at the wheel of the
towed vehicle and must have a valid driving
licence.
Page 72 of 104

70
Alphabetical index
A
ABS 23
Adjusting headlamps
20
Adjusting seat
14
Adjusting the air distribution
17
Adjusting the air flow
17
Adjusting the headlamp beam height
20
Adjusting the height and reach of
the steering wheel
15
Adjusting the temperature
17
Advice on care and maintenance
41
Advice on driving
4, 31
Airbags
26–27
Airbags, front
26–27
Air conditioning
16–17
Air conditioning, manual
17
Air intake
18
Air vents
16
Anti-lock braking system (ABS)
23
Antitheft / Immobiliser
10
B
Battery, 12 V 39, 56, 58
Battery, remote control
10
Bodywork
41
Bonnet
35–36
Boot
11
Brake discs
40
Brake lamps
47
Brakes 40
Bulbs
45
Bulbs (changing)
45–47
C
Capacity, fuel tank 35
Cap, fuel filler
35
Care of the bodywork
41
Central locking
9–10
Changing a bulb
45–47
Changing a fuse
48, 51
Changing a wheel
42
Changing the remote control battery
10
Checking the levels
37–38
Checks
37, 39–41
Checks, routine
39–40
Child lock
30
Children
25
Children (safety)
30
Child seats
25, 28–29
Child seats, conventional
29
Cleaning (advice)
41
Closing the boot
11
Control, emergency boot release
11
Control, emergency door
10
Control stalk, lighting
20
Control stalk, wipers
21
Courtesy lamp
47
Courtesy lamps
19
D
Dimensions 60
Dipstick
37
Direction indicators (turn signals)
20, 46–47
Doors
11
Driving
31
Driving economically
4
E
EBFD 23
Eco-driving (advice)
4
Electric windows
12
Electronic brake force distribution (EBFD)
23
Emergency warning lamps
23
Engine
35–36, 41
Engine compartment
37
Engine, petrol
60
Engines
60
Environment
10
F
Filling the fuel tank 35
Filter, air
40
Filter, oil
40
Filter, passenger compartment
16, 40
Fitting a wheel
43–44
Fittings, boot
19
Page 74 of 104

72
Alphabetical index
P
Pads, brake 40
Paint
41
Parking sensors, audible and visual
33
Parking sensors, rear
33
Plates, identification
60
Port, USB
18
Pressures, tyres
40, 61
Pre-tensioning (seat belts)
25
Protecting children
26–28
Puncture
42
R
Recirculation, air 18
Reminder, lighting on
20
Remote control
9–10
Removing a wheel
43–44
Replacing bulbs
45–47
Replacing fuses
48
Replacing the air filter
40
Replacing the oil filter
40
Replacing the passenger compartment
filter
40
Reservoir, screenwash
38
Reversing lamps
47
Roof rack
41
S
Safety, children 26–28
Screenwash
21
Screenwash, front
21
Seat belts
24–25
Seats, front
14
Seats, rear
15–16
Serial number, vehicle
60
Servicing
7, 39, 40–41
Sidelamps
47
Starting the engine
31
Starting the vehicle
31–32
Starting using another battery
56
Stay, engine bonnet
36
Steering wheel (adjustment)
15
Stopping the vehicle
31–32
Storage
18
Suspension
40
Switch, ignition
31
Switching off the engine
31
T
Tables of engines 60
Tables of fuses
48, 51
Tank, fuel
35
Technical data
60
Temperature, coolant
7
Tools
42
Towing
58–59
Trip computer 7–8
Tyres
40, 61
U
Unlocking 9
Unlocking from the inside
10
Unlocking the doors
10
V
Ventilation 16
W
Warning and indicator lamps 5
Warning lamp, driver's seat belt not
fastened
25
Warning lamps
5
Warning lamp, seat belts
25
Warnings and indicators
5
Washing (advice)
41
Wheel, spare
40, 42–44
Wipers
21
Wipers, windscreen
21