seat adjustment CITROEN C3 AIRCROSS 2020 Owners Manual
[x] Cancel search | Manufacturer: CITROEN, Model Year: 2020, Model line: C3 AIRCROSS, Model: CITROEN C3 AIRCROSS 2020Pages: 308, PDF Size: 9.13 MB
Page 4 of 308

2
.
.
Instrument panels 8
I nstrument panel displays 1 0
Warning and indicator lamps
1
0
Indicators
25
Distance recorders
3
0
Equipment configuration for vehicles
without
screen
3
1
Monochrome screen C
3
2
Touch screen
3
3
Trip computer
3
7
Lighting dimmer
3
9
Date and time adjustment
3
9Remote control
4
1
K
eyless Entry and Starting
4
3
Back-up procedures
4
5
Doors 48
Boot
4
8
Central locking
49
A
larm
51
Panoramic opening sunroof
5
3
Anti-intrusion security
5
0
Electric windows
5
5
Front seats 5 7
Rear seats
6
0
Steering wheel adjustment
62
M
irrors 63
Ventilation
64
Recommendations for ventilation and air conditioning 65Heating/Manual air conditioning 66
Automatic air conditioning 6 7
Front demist – defrost
6
9
Recirculation of interior air
6
9
Heated windscreen
7
0
Rear screen demist – defrost
7
0
Boot lighting
7
0
Front fittings
7
1
Rear fittings
7
5
Boot fittings
7
6
Courtesy lamps
7
8
Interior mood lighting
7
9Main lighting
8
0
Lighting control
8
0
Direction indicators (flashing)
8
1
Automatic illumination of headlamps
8
2
Daytime running lamps/Sidelamps
8
2
Parking lamps
8
2
Guide-me-home lighting
8
3
Automatic headlamp dipping
8
3
Automatic exterior welcome lighting
8
3
Headlamp adjustment
8
5
Cornering lighting
8
5
Wiper control stalk
8
6
Automatic windscreen wipers
8
8
General safety recommendations
9
0
Hazard warning lamps
9
1
Horn
91
Emergency or assistance call
9
1
Electronic stability control (ESC)
9
3
Grip control
9
5
Hill Assist Descent 9 7
Seat belts 9 8
Airbags
1
02
Child seats
1
05
Deactivating the front passenger airbag
1
06
ISOFIX mountings and child seats
1
12
i-Size mountings and child seats
1
15
Child lock
1
17
Over view
Dashboard instruments Access
Ease of use and comfort Safety
Lighting and visibility
Eco-driving
Eco-driving 6
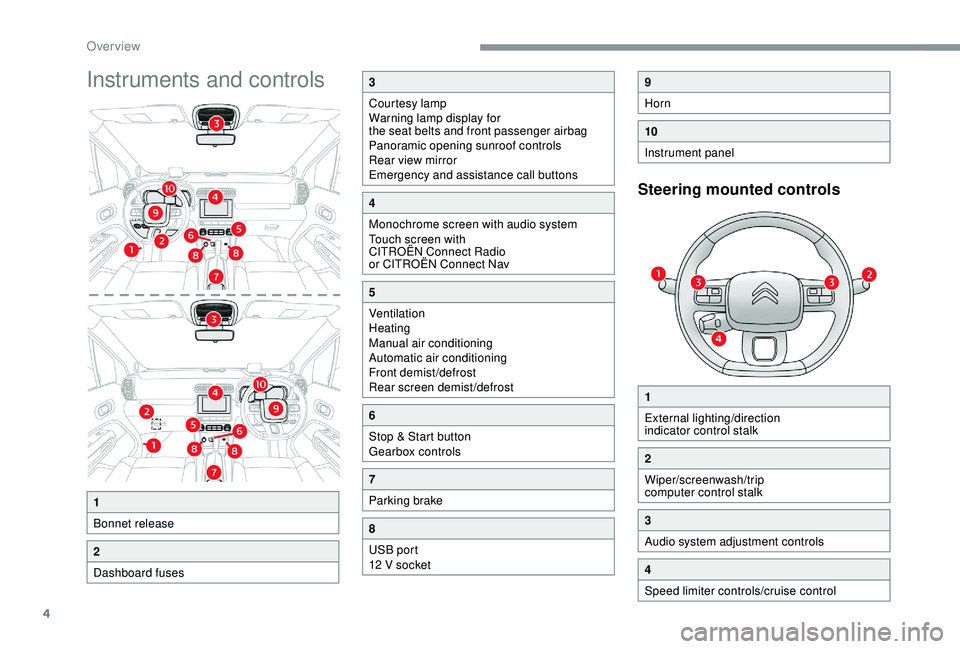
Instruments and controls
4
Contents
Page 6 of 308

4
Instruments and controls
Steering mounted controls
1
Bonnet release
2
Dashboard fuses
3
Courtesy lamp
Warning lamp display for
the seat belts and front passenger airbag
Panoramic opening sunroof controls
Rear view mirror
Emergency and assistance call buttons
4
Monochrome screen with audio system
Touch screen with
CITROËN Connect Radio
or CITROËN Connect Nav
5
Ventilation
Heating
Manual air conditioning
Automatic air conditioning
Front demist/defrost
Rear screen demist/defrost
6
Stop & Start button
Gearbox controls
7
Parking brake
8
USB port
12 V socket
9
Horn
10
Instrument panel
1
External lighting/direction
indicator control stalk
2
Wiper/screenwash/trip
computer control stalk
3
Audio system adjustment controls
4
Speed limiter controls/cruise control
Over view
Page 59 of 308

57
Front seats
For safety reasons, the driver's seat must
only be adjusted when the vehicle is
stationary.
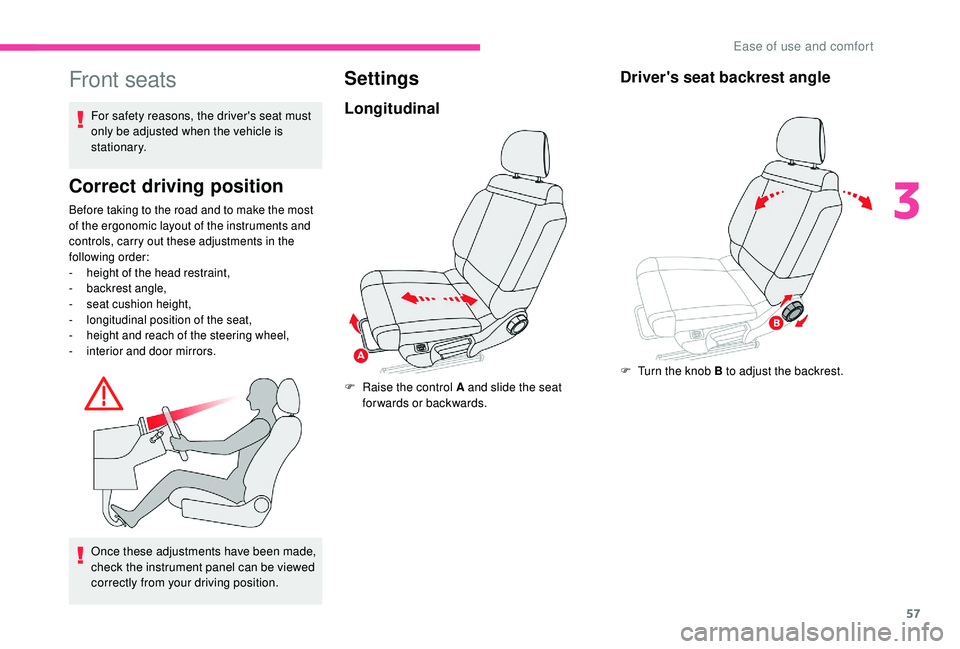
Correct driving position
Before taking to the road and to make the most
of the ergonomic layout of the instruments and
controls, carry out these adjustments in the
following order:
-
h
eight of the head restraint,
-
b
ackrest angle,
-
sea
t cushion height,
-
l
ongitudinal position of the seat,
-
hei
ght and reach of the steering wheel,
-
i
nterior and door mirrors.
Once these adjustments have been made,
check the instrument panel can be viewed
correctly from your driving position.
Settings
Longitudinal
F Raise the control A and slide the seat forwards or backwards.
Driver's seat backrest angle
F Turn the knob B to adjust the backrest.
3
Ease of use and comfort
Page 61 of 308

59
Before moving the seat backwards,
ensure that there is nothing that might
prevent the full travel of the seat.
When the front passenger seat is fully
folded, only the outer rear seat behind the
driver can be occupied by a passenger.
Do not place hard, heavy or sharp objects
in the centre of the folded backrest to
ensure that you do not damage rear lining
behind the backrest.
When sharp deceleration occurs, objects
placed on the folded backrest can turn into
dangerous projectiles.Front head restraints
Height adjustment
The adjustment is correct when the upper
edge of the head restraint is level with the
top of the head.
Removing a head restraint
F Pull the head restraint up as far as it will go.
F P ress the lug A to release the head restraint
and remove it completely.
F
S
tow the head restraint securely.
Refitting a head restraint
F Introduce the head restraint rods into the guides in the seat backrest.
F
P
ush the head restraint down as far as it will go.
F
P
ress the lug A to free the head restraint and
push it down.
F
A
djust the height of the head restraint.
Never drive with the head restraints
removed; they should be in place and
correctly adjusted for the occupant of the
seat.
Heated seats
Upward:
F p ull the head restraint up to the desired
position; the head restraint can be felt to
click into position.
Downward:
F
p
ress the lug A and push the head restraint
down to the desired position.
3
Ease of use and comfort
Page 62 of 308

60
F With the engine running, use the adjustment knob to switch on and choose the heating
level desired:
0 : Of f.
1 : Low.
2 : Medium.
3 : High.
The front seats can be heated individually.
Do not use the function when the seat is
not occupied.
Reduce the intensity of the heating as
soon as possible.
When the seat and passenger
compartment have reached an
adequate temperature, you can stop
the function; reducing the consumption
of electrical current reduces fuel
consumption. Prolonged use at the highest setting is
not recommended for those with sensitive
skin.
There is a risk of burns for people whose
perception of heat is impaired (illness,
taking medication, etc.).
There is a risk of overheating the system if
material with insulating properties is used,
such as cushions or seat covers.
Do not use the system:
-
i
f wearing damp clothing,
-
i
f child seats are fitted.
To avoid breaking the heating element in
the seat:
-
d
o not place heavy objects on the seat,
-
d
o not kneel or stand on the seat,
-
d
o not place sharp objects on the seat,
-
d
o not spill liquids onto the seat.
To avoid the risk of short-circuit:
-
d
o not use liquid products for cleaning
the seat,
-
n
ever use the heating function when
the seat is damp.Rear seats
Bench seat with a fixed cushion or on rails
(depending on version) and split folding
backrests (2/3 -1/3) to adapt the boot loading
space.
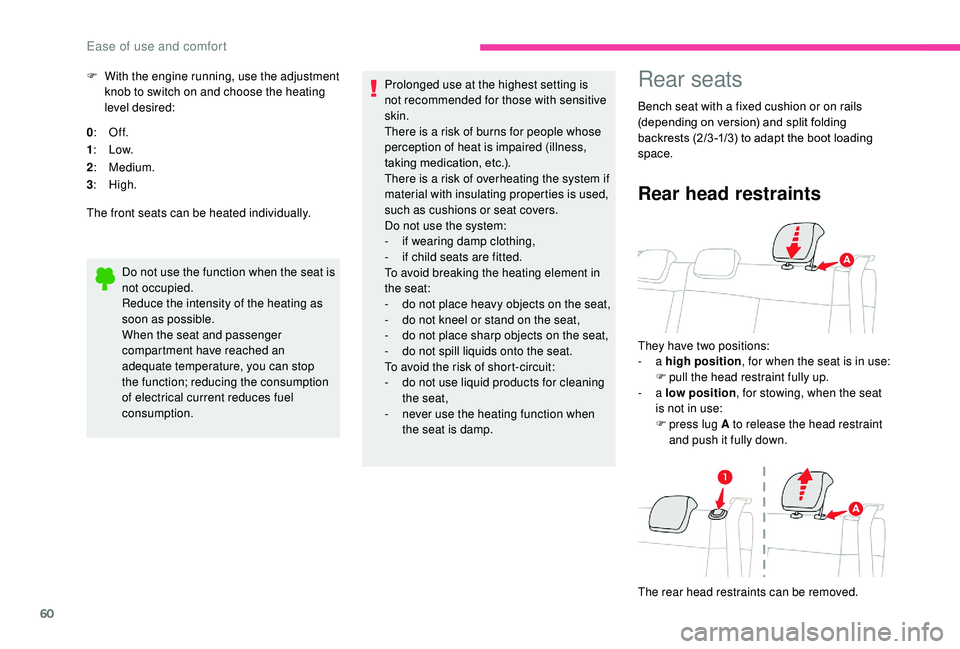
Rear head restraints
They have two positions:
- a high position , for when the seat is in use:
F
p
ull the head restraint fully up.
-
a low position , for stowing, when the seat
is not in use:
F
press lug A to release the head restraint
and push it fully down.
The rear head restraints can be removed.
Ease of use and comfort
Page 63 of 308

61
To remove a head restraint:
F r elease the backrest using the control 1 ,
F
t
ilt the backrest slightly for wards,
F
p
ull the head restraint as far up as it will go,
F
p
ress lug A to release the head restraint
and remove it completely,
F
s
tow the head restraint.
To refit a head restraint:
F
i
ntroduce the head restraint rods into the
guides in the corresponding seat backrest,
F
p
ush the head restraint down as far as it will
go,
F
p
ress lug A to release the head restraint
and then push the head restraint fully down.
Never drive with passengers seated at
the rear when the head restraints are
removed; they must be in place and in the
high position.
The head restraint for the centre seat
and those for the outer seats are not
interchangeable.
Longitudinal seat adjustment
(depending on version)
Adjusting the seats must only be done
with the vehicle stationary.
Each 2/3 -1/3 part can be adjusted individually. F
Ra
ise the control and slide the bench seat
forwards or backwards.
Adjusting the seat backrest
angle (depending on version)
Several adjustment positions are available.
F
M
ove the seat for ward.
F
P
ull the strap for ward then tilt the backrest
to the desired position. Sit in the seat to per form the adjustments.
Folding the backrests
Adjusting the seat backrests must only be
done with the vehicle stationary.
First steps:
F
l
ower the head restraints,
F
i
f necessary, move the front seats for ward,
F
p
ull the seats fully back (depending on
version),
F
c
heck that nothing and no-one might
inter fere with the folding of the backrests
(clothing, luggage, etc.),
F
c
heck that the outer seat belts are lying
flat against the backrests and placed in the
retaining hook.
3
Ease of use and comfort
Page 64 of 308

62
Depending on version, if you use the
strap, you do not need to guide backrest 3.
When the backrest is released, the red
indicator is visible in the release grip
(depending on version).
Returning the backrests to
their original position
First check that the outer seat belts are
lying vertically alongside the backrest
latching rings. Caution, a backrest that has not latched
correctly compromises the safety of
passengers in the event of sudden braking
or an accident.
The contents of the boot may be thrown
forward – Risk of serious injury!
F
O
perate backrest release grip 1 or pull strap
2 (depending on version).
F
G
uide backrest 3 down to the horizontal
position. F
P
ut backrest 3 in the upright position and
push firmly to latch it home.
F
C
heck that release grip 1 has properly
returned to its position and that the red
indicator is no longer visible (depending on
ve r s i o n).
F
E
nsure that the outer seat belts are not
trapped during the manoeuvre.
Steering wheel adjustment
F When stationary , pull the control lever to
release the adjustment mechanism.
F
A
djust the height and reach to suit your
driving position.
F
P
ush the control lever to lock the adjustment
mechanism.
As a safety measure, these adjustments
should only be carried out with the vehicle
stationary.
Ease of use and comfort
Page 76 of 308

74
Front armrest
Height adjustment
Clothes hooks
They are located above each rear door.
Card holder
F Lower the armrest as far as it will go.
F L ift it and bring it to the desired position
(low, intermediate or high).
F
W
hen in the high position, lift it to release it
and return it to the low position. This allows the storage of a toll ticket or a
parking card for example.
Mats
Fitting
When fitting the mat for the first time, on the
driver's side, use only the fixings provided.
The other mats are simply placed on the
carpet.
Removing
To remove the mat on the driver's side:
F
m ove the seat as far back as possible,
F
un
clip the fixings,
F
r
emove the mat.
Refitting
To refit the mat on the driver's side:
F p osition the mat correctly,
F
r
efit the fixings by pressing,
F
c
heck that the mat is secured correctly.
Ease of use and comfort
Page 100 of 308

98
Switching off
Malfunction
If a fault occurs with the system,
this warning lamp comes on,
accompanied by the display of a
message in the instrument panel.
F
P
ress this button until its indicator lamp
goes off; the indicator lamp goes off in the
instrument panel.
Above 45
mph (70 km/h), the system is
automatically deactivated; the indicator lamp in
the button goes off.
Have it checked by a CITROËN dealer or a
qualified workshop.
Seat belts
Front seat belts
The front seat belts are fitted with a
pretensioning and force limiting system.
This system improves safety in the front
seats in the event of a front or side impact.
Depending on the severity of the impact, the
pretensioning system instantly tightens the seat
belts against the body of the passengers.
The pretensioning seat belts are active when
the ignition is on.
The force limiter reduces the pressure of
the seat belt on the passenger’s chest, thus
improving their protection.
Fastening
F Pull the strap then insert the tongue in the buckle.
F
C
heck that the seat belt is fastened
correctly by pulling the strap.
Unfastening
F Press the red button on the buckle.
F G uide the seat belt as it is reeled in.
Height adjustment
F To adjust the height of the anchorage point, squeeze the control A and slide it to the
notch desired.
Safety
Page 103 of 308

101
The driver must ensure that passengers use
the seat belts correctly and that they are all
fastened before setting off.
Wherever you are seated in the vehicle,
always fasten your seat belt, even for short
journeys.
Do not interchange the seat belt buckles as
they will not fulfil their role fully.
The seat belts are fitted with an inertia reel
permitting automatic adjustment of the length
of the strap to your size. The seat belt is
stowed automatically when not in use.
Before and after use, ensure that the seat belt
is reeled in correctly.
The lower part of the strap must be positioned
as low as possible on the pelvis.
The upper part must be positioned in the
hollow of the shoulder.
The inertia reels have an automatic locking
device at the time of a collision, during
sudden braking or if the vehicle turns over.
You can release the device by pulling the
strap firmly and then releasing it so that it
reels in slightly.In order to be effective, a seat belt must:
-
b e tightened as close to the body as
possible,
-
b
e pulled in front of you with a smooth
movement, checking that it does not twist,
-
b
e used to restrain only one person,
-
n
ot show any signs of cuts or fraying,
-
n
ot be converted or modified to avoid
affecting its performance.
In accordance with current safety regulations,
for all repairs on your vehicle's seat belts, go
to a qualified workshop with the skills and
equipment needed, which a CITROËN dealer
is able to provide.
Have your seat belts checked regularly by
a CITROËN dealer or a qualified workshop,
particularly if the straps show signs of
damage.
Clean the seat belt straps with soapy water or
a textile cleaning product, sold by CITROËN
dealers.
After folding or moving a seat or rear bench
seat, ensure that the seat belt is positioned
and reeled in correctly. Recommendations for children
Use a suitable child seat if the passenger is
less than 12
years old or shorter than one
and a half metres.
Never use the same seat belt to secure more
than one person.
Never allow a child to travel on your lap.
For more information on Child seats , refer
to the corresponding section.
Advice
In the event of an impact
Depending on the nature and seriousness
of the impact , the pyrotechnic pretensioner
device may be deployed before and
independently of the airbags. Deployment
of the pretensioners is accompanied by a
slight discharge of harmless smoke and a
noise, due to the activation of the pyrotechnic
cartridge incorporated in the system.
In all cases, the airbag warning lamp comes
on.
Following an impact, have the seat belts
system checked and, if necessary, replaced,
by a CITROËN dealer or a qualified
workshop.
5
Safety