ECU CITROEN C3 AIRCROSS 2022 User Guide
[x] Cancel search | Manufacturer: CITROEN, Model Year: 2022, Model line: C3 AIRCROSS, Model: CITROEN C3 AIRCROSS 2022Pages: 308, PDF Size: 9.13 MB
Page 114 of 308
112
"ISOFIX" mountings
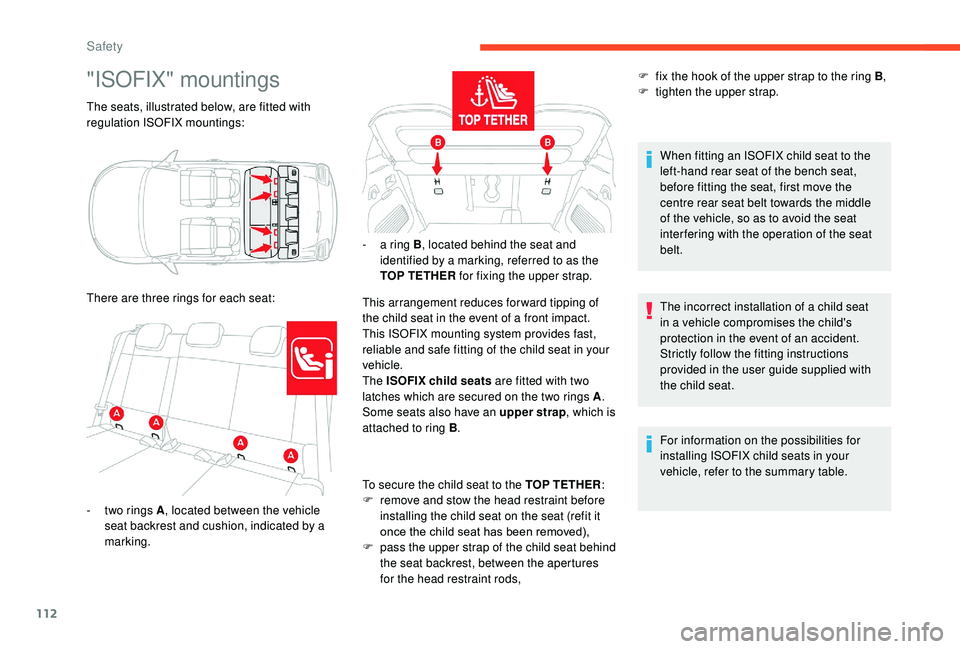
The seats, illustrated below, are fitted with
regulation ISOFIX mountings:
There are three rings for each seat:This arrangement reduces forward tipping of
the child seat in the event of a front impact.
This ISOFIX mounting system provides fast,
reliable and safe fitting of the child seat in your
vehicle.
The ISOFIX child seats are fitted with two
latches which are secured on the two rings A.
Some seats also have an upper strap , which is
attached to ring B . F
f
ix the hook of the upper strap to the ring B
,
F t ighten the upper strap.
When fitting an ISOFIX child seat to the
left-hand rear seat of the bench seat,
before fitting the seat, first move the
centre rear seat belt towards the middle
of the vehicle, so as to avoid the seat
interfering with the operation of the seat
belt.
The incorrect installation of a child seat
in a vehicle compromises the child's
protection in the event of an accident.
Strictly follow the fitting instructions
provided in the user guide supplied with
the child seat.
For information on the possibilities for
installing ISOFIX child seats in your
vehicle, refer to the summary table.
-
t
wo rings A , located between the vehicle
seat backrest and cushion, indicated by a
marking. -
a r
ing B, located behind the seat and
identified by a marking, referred to as the
TOP TETHER for fixing the upper strap.
To secure the child seat to the TOP TETHER :
F
r
emove and stow the head restraint before
installing the child seat on the seat (refit it
once the child seat has been removed),
F
p
ass the upper strap of the child seat behind
the seat backrest, between the apertures
for the head restraint rods,
Safety
Page 115 of 308
113
Recommended ISOFIX
child seats
Also consult the user guide from the child
seat’s manufacturer to find out how to
install and remove the seat.
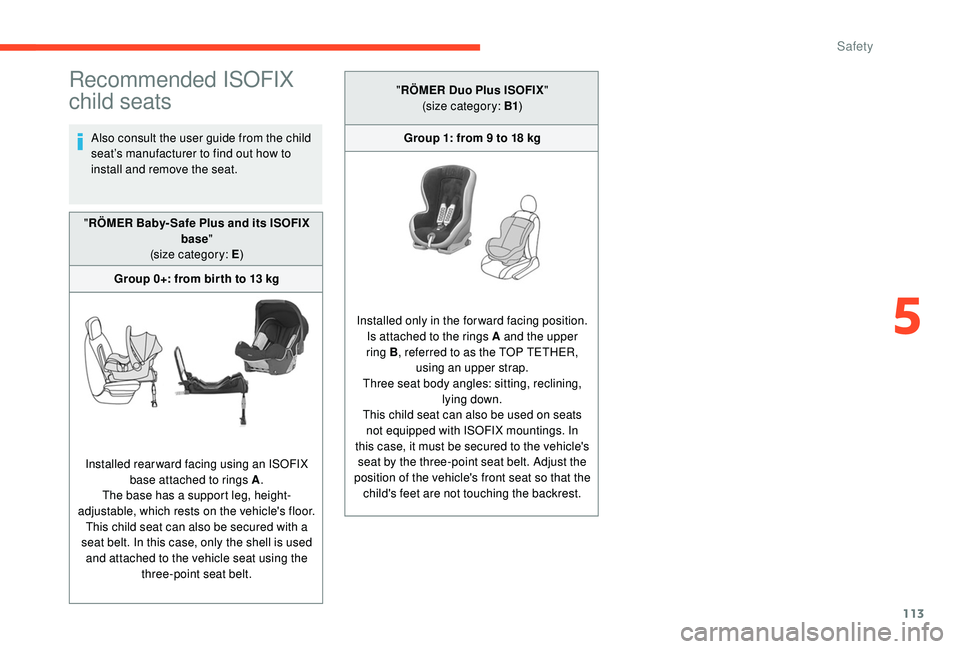
" RÖMER Baby- Safe Plus and its ISOFIX
base"
(size category: E )
Group 0+: from bir th to 13
kg
Installed rearward facing using an ISOFIX base attached to rings A .
The base has a support leg, height-
adjustable, which rests on the vehicle's floor. This child seat can also be secured with a
seat belt. In this case, only the shell is used and attached to the vehicle seat using the three-point seat belt. "
RÖMER Duo Plus ISOFIX "
(size category: B1 )
Group 1: from 9 to 18 kg
Installed only in the forward facing position. Is attached to the rings A and the upper
ring
B, referred to as the TOP TETHER,
using an upper strap.
Three seat body angles: sitting, reclining, lying down.
This child seat can also be used on seats not equipped with ISOFIX mountings. In
this case, it must be secured to the vehicle's seat by the three-point seat belt. Adjust the
position of the vehicle's front seat so that the child's feet are not touching the backrest.
5
Safety
Page 117 of 308
115
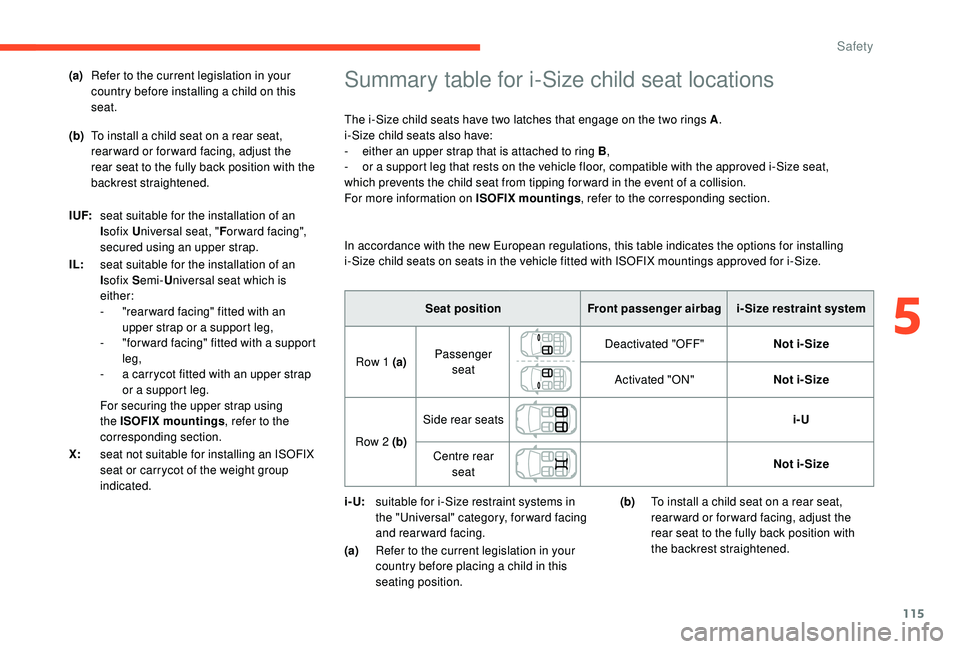
Summary table for i-Size child seat locations
The i-Size child seats have two latches that engage on the two rings A.
i-Size child seats also have:
-
e
ither an upper strap that is attached to ring B ,
-
o
r a support leg that rests on the vehicle floor, compatible with the approved i-Size seat,
which prevents the child seat from tipping for ward in the event of a collision.
For more information on ISOFIX mountings , refer to the corresponding section.
Seat position Front passenger airbagi- Size restraint system
Row 1 (a) Passenger
seat Deactivated "OFF"
Not i- Size
Activated "ON" Not i- Size
Row 2 (b) Side rear seats
i-U
Centre rear seat Not i- Size
i- U: suitable for i-Size restraint systems in
the "Universal" category, forward facing
and rearward facing.
(a) Refer to the current legislation in your
country before placing a child in this
seating position.
(a)
Refer to the current legislation in your
country before installing a child on this
seat.
(b) To install a child seat on a rear seat,
rearward or forward facing, adjust the
rear seat to the fully back position with the
backrest straightened.
I UF: seat suitable for the installation of an
Isofix U niversal seat, " For ward facing",
secured using an upper strap.
IL: seat suitable for the installation of an
Isofix S emi-Universal seat which is
either:
-
"
rear ward facing" fitted with an
upper strap or a support leg,
-
"
for ward facing" fitted with a support
leg,
-
a c
arrycot fitted with an upper strap
or a support leg.
For securing the upper strap using
the ISOFIX mountings , refer to the
corresponding section.
X: seat not suitable for installing an ISOFIX
seat or carrycot of the weight group
indicated. In accordance with the new European regulations, this table indicates the options for installing
i-Size child seats on seats in the vehicle fitted with ISOFIX mountings approved for i-Size.
(b)To install a child seat on a rear seat,
rearward or forward facing, adjust the
rear seat to the fully back position with
the backrest straightened.
5
Safety
Page 118 of 308
116
Advice
The incorrect installation of a child seat in a
vehicle compromises the child's protection in
the event of an accident.
Ensure that there is no seat belt or seat belt
buckle under the child seat, as this could
destabilise it.
Remember to fasten the seat belts or the
child seat harness keeping the slack relative
to the child's body to a minimum, even for
short journeys.
When installing a child seat using the seat
belt, ensure that the seat belt is tightened
correctly on the child seat and that it secures
the child seat firmly on the seat of your
vehicle. If your passenger seat is adjustable,
move it for wards if necessary.
At rear seating positions, always leave
sufficient space between the front seat and:
-
a "
rear ward facing" child seat,
-
t
he child's feet for a child seat fitted
"forward facing".
To do this, move the front seat for wards
and, if necessary, move its backrest into the
upright position.
For optimal installation of the "forward facing"
child seat, verify that its backrest is as close
as possible to the backrest of the vehicle
seat, if possible in contact with it. The head restraint must be removed
before installing a child seat with a
backrest on a passenger seat.
Ensure that the head restraint is stored or
attached securely to prevent it from being
thrown around the vehicle in the event of
sharp braking. Refit the head restraint when
the child seat is removed.
Children in the front
The legislation on carrying children on the
front passenger seat is specific to each
country. Refer to the legislation in force in
your country.
Deactivate the front passenger airbag when a
"rear ward facing" child seat is installed on the
front passenger seat.
Otherwise, the child risks being seriously
injured or killed if the airbag is deployed.
Installing a booster seat
The chest part of the seat belt must be
positioned on the child's shoulder without
touching the neck.
Ensure that the lap part of the seat belt
passes correctly over the child's thighs.
We recommend using a booster seat with
a backrest equipped with a belt guide at
shoulder level.As a safety precaution, do not leave:
-
a c hild or children alone and unattended in
a vehicle,
-
a c
hild or an animal in a vehicle under the
sun, with the windows closed,
-
t
he keys within the reach of children inside
the vehicle.
To prevent accidental opening of the doors
and rear windows, use the child lock.
Take care not to open the rear windows by
more than one third.
To protect young children from the rays of the
sun, fit side blinds on the rear windows.
Safety
Page 137 of 308
135
It is necessary to update your navigation
mapping regularly in order to receive
accurate information on speed limits from
the system.
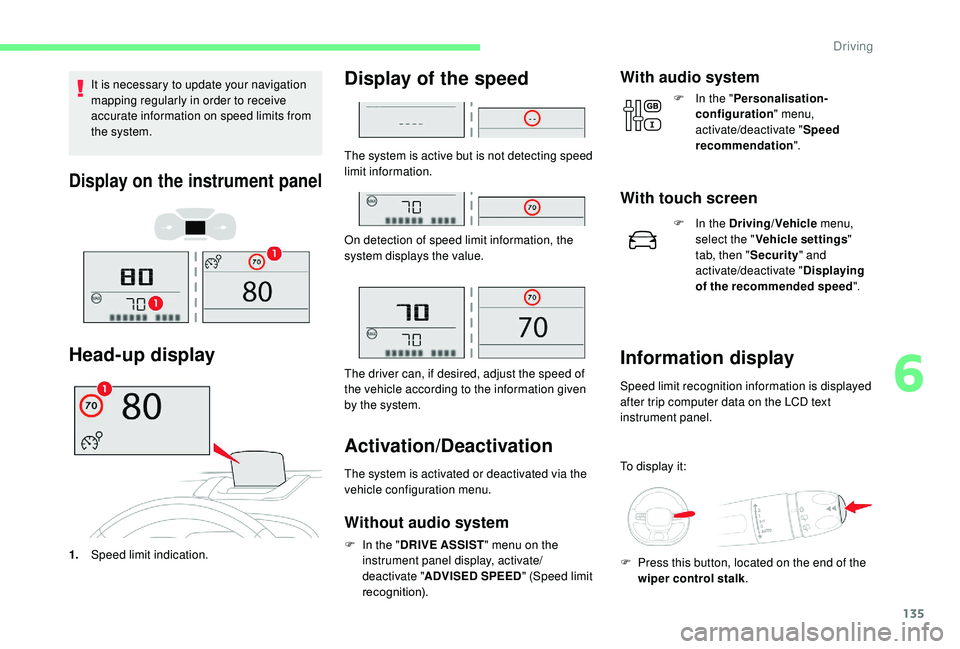
Display on the instrument panel
Head-up display
1.Speed limit indication.
Display of the speed
The system is active but is not detecting speed
limit information.
On detection of speed limit information, the
system displays the value.
The driver can, if desired, adjust the speed of
the vehicle according to the information given
by the system.
Activation/Deactivation
The system is activated or deactivated via the
vehicle configuration menu.
Without audio system
F In the " DRIVE ASSIST " menu on the
instrument panel display, activate/
deactivate " ADVISED SPEED " (Speed limit
recognition).
With audio system
F In the " Personalisation-
configuration " menu,
activate/deactivate " Speed
recommendation ".
With touch screen
F In the Driving/Vehicle menu,
select the " Vehicle settings "
tab, then " Security" and
activate/deactivate " Displaying
of the recommended speed ".
Information display
Speed limit recognition information is displayed
after trip computer data on the LCD text
instrument panel.
To display it:
F
P
ress this button, located on the end of the
wiper control stalk .
6
Driving
Page 146 of 308
144
Where the speed of your vehicle is too
high approaching another vehicle, the first
level of alert may not be displayed: the
level 2 alert may be displayed directly.
Important: the level 1 alert is never
displayed when the " Close" trigger
threshold has been selected.
Modifying the alert trigger
threshold
This threshold determines how you wish
to be alerted of the presence of a moving
or stationary vehicle in front of you, or a
pedestrian present in your traffic lane.
The current threshold can be modified via the
vehicle configuration menu.
You can select one of three predefined
thresholds:
-
"Distant ",
-
"Normal ",
-
"Close ".
The last threshold selected is kept in memory
when the ignition is switched off.
Without audio system
With audio systemIntelligent emergency
braking assistance
If the driver brakes, but not sufficiently to avoid
a collision, this system will supplement the
braking, within the limits of the laws of physics.
This assistance will only be provided if you
press the brake pedal.
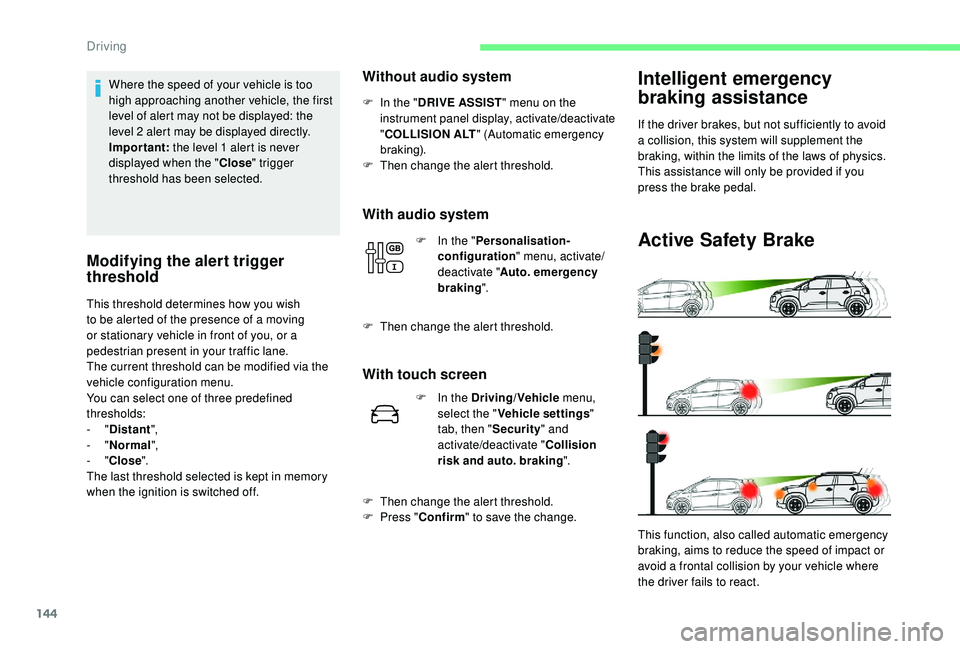
Active Safety Brake
This function, also called automatic emergency
braking, aims to reduce the speed of impact or
avoid a frontal collision by your vehicle where
the driver fails to react.
F
I
n the "
DRIVE ASSIST " menu on the
instrument panel display, activate/deactivate
" COLLISION ALT " (Automatic emergency
b r ak ing).
F
T
hen change the alert threshold.
F
I
n the "
Personalisation-
configuration " menu, activate/
deactivate " Auto. emergency
braking ".
F
T
hen change the alert threshold.
With touch screen
F In the Driving/Vehicle
menu,
select the " Vehicle settings "
tab, then " Security" and
activate/deactivate " Collision
risk and auto. braking ".
F
T
hen change the alert threshold.
F
P
ress " Confirm " to save the change.
Driving
Page 147 of 308

145
If the camera has confirmed
the presence of a vehicle or a
pedestrian, this warning lamp
flashes once the function is acting
on the vehicle's brakes.
Using the camera, this function acts on the
vehicle's braking system.
Important : if operation of the
automatic emergency braking is
triggered, you should take back
control of your vehicle and brake
with the pedal to add to or finish the
automatic braking action.
The driver can take back control of the vehicle
at any time by sharply turning the steering
wheel and/or pressing the accelerator pedal.
The point at which braking is triggered
may be adjusted according to the driving
actions from the driver, such as movement
of the steering wheel or pressing the
accelerator pedal.
Operation of the function may be felt by
slight vibration in the brake pedal.
If the vehicle comes to a complete stop,
the automatic braking is maintained for 1
to 2
seconds. With a manual gearbox, in the event of
automatic emergency braking until the
vehicle comes to a complete stop, the
engine may stall.
With an automatic gearbox, in the event
of automatic emergency braking until the
vehicle comes to a complete stop, keep
the brake pedal down to stop the vehicle
from starting off again.
Specific conditions for operation
The vehicle's speed must be between 3 mph
a nd 53 mph (5 km/h and 85 km/h) when a
moving vehicle is detected.
The vehicle's speed must not exceed 50
mph
(80 km/h) when a stopped vehicle is detected.
The vehicle's speed must not exceed 37
mph
(60
km/h) when a pedestrian is detected.
The ESC system must not be defective.
The ASR system must not be deactivated.
All passenger seat belts must be fastened.
Driving at a steady speed on roads with few
bends is required.
After an impact, the function automatically
stops operating. Consult a CITROËN
dealer or a qualified workshop to have the
system checked.
Deactivation/Activation
By default, the system is automatically
activated at every engine start-up.
The system can be deactivated or activated via
the vehicle settings menu. Deactivation of the system is
signalled by the illumination of this
indicator lamp, accompanied by the
display of a message.
Without audio system
F In the " DRIVE ASSIST " menu on the
instrument panel display, activate/deactivate
" COLLISION ALT " (Automatic emergency
b r ak ing).
With audio system
F In the " Personalisation-
configuration " menu, activate/
deactivate " Auto. emergency
braking ".
With touch screen
F In the Driving/Vehicle menu,
select the " Vehicle settings "
tab, then " Security" and
activate/deactivate " Automatic
emergency braking ".
6
Driving
Page 148 of 308

146
Malfunction
There may be interference in the operation
of the camera or it may not work at all in
the following situations:
-
p
oor visibility (inadequate street
lighting, falling snow, heavy rain, dense
fog, etc.),
-
d
azzle (headlamps of an oncoming
vehicle, low sun, reflections on a damp
road, leaving a tunnel, alternating shade
and light, etc.),
-
c
amera masked (mud, frost, snow,
condensation, etc.).
In these situations, detection performance
may be reduced.
Clean the windscreen regularly,
particularly the area in front of the camera.
The internal sur face of the windscreen can
also become misted around the camera.
In humid and cold weather, demist the
windscreen regularly.
Do not allow snow to accumulate on the
bonnet or roof of the vehicle as this could
mask the camera's view.
Fatigue detection system
Take a break as soon as you feel tired or at
least every two hours. The system cannot in any circumstances
replace the need for vigilance on the part
of the driver.
Do not take the wheel if you are tired.
Activation/Deactivation
The system is activated or deactivated via the
vehicle configuration menu.
Without audio system
F In the " DRIVE ASSIST " menu on the
instrument panel display, activate/deactivate
" VIGILANCE ALT " (Fatigue Detection
S yste m).
With audio system
F In the " Personalisation-
configuration " menu, activate/
deactivate " Fatigue Detection
System ".
With touch screen
F In the Driving/Vehicle menu,
select the " Vehicle settings "
tab, then " Security" and
activate/deactivate " Fatigue
Detection System ".
Driving time warning
The system triggers an alert once it
detects that the driver has not taken
a break after two hours of driving at
a speed above 40
mph (65 km/h).
In the event of a fault with the
system, you are alerted by the
illumination of this warning lamp,
accompanied by the display of a
message and an audible signal.
This alert takes the form of a display message
encouraging you to take a break, accompanied
by an audible signal.
Contact a CITROËN dealer or a qualified
workshop to have the system checked.
Driving
Page 151 of 308
149
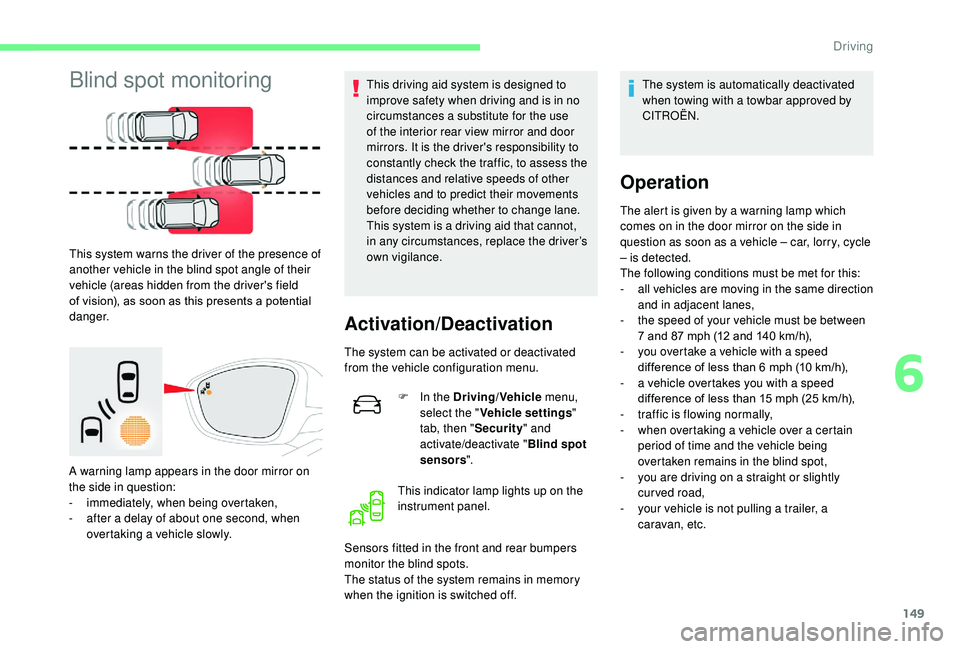
Blind spot monitoring
This system warns the driver of the presence of
another vehicle in the blind spot angle of their
vehicle (areas hidden from the driver's field
of vision), as soon as this presents a potential
danger.
A warning lamp appears in the door mirror on
the side in question:
-
i
mmediately, when being overtaken,
-
a
fter a delay of about one second, when
overtaking a vehicle slowly. This driving aid system is designed to
improve safety when driving and is in no
circumstances a substitute for the use
of the interior rear view mirror and door
mirrors. It is the driver's responsibility to
constantly check the traffic, to assess the
distances and relative speeds of other
vehicles and to predict their movements
before deciding whether to change lane.
This system is a driving aid that cannot,
in any circumstances, replace the driver’s
own vigilance.
Activation/Deactivation
The system can be activated or deactivated
from the vehicle configuration menu.
F
I
n the Driving/Vehicle menu,
select the " Vehicle settings "
tab, then " Security" and
activate/deactivate " Blind spot
sensors ".
This indicator lamp lights up on the
instrument panel.
Sensors fitted in the front and rear bumpers
monitor the blind spots.
The status of the system remains in memory
when the ignition is switched off. The system is automatically deactivated
when towing with a towbar approved by
CITROËN.
Operation
The alert is given by a warning lamp which
comes on in the door mirror on the side in
question as soon as a vehicle – car, lorry, cycle
– is detected.
The following conditions must be met for this:
-
a
ll vehicles are moving in the same direction
and in adjacent lanes,
-
t
he speed of your vehicle must be between
7 and 87
mph (12 and 140 km/h),
-
y
ou overtake a vehicle with a speed
difference of less than 6
mph (10 km/h),
-
a v
ehicle overtakes you with a speed
difference of less than 15
mph (25 km/h),
-
t
raffic is flowing normally,
-
w
hen overtaking a vehicle over a certain
period of time and the vehicle being
overtaken remains in the blind spot,
-
y
ou are driving on a straight or slightly
curved road,
-
y
our vehicle is not pulling a trailer, a
caravan, etc.
6
Driving
Page 171 of 308
169
Before each use
Check that the ball joint is correctly fitted,
verifying the follow points:
- the green mark on the star wheel is in
line with the white mark on the towball,
-
t
he star wheel is in contact with the
towball (position A ),
-
t
he security key lock is on and the key
removed; the star wheel can no longer
be operated,
-
t
he towball must not be able to move in
its carrier; test by shaking it with your
hand.
If the towball is not locked, the trailer can
detach – Risk of accident! During use
Never release the locking system with a
trailer or load carrier on the towball.
Never exceed the maximum authorised
weight for the vehicle – the Gross Train
Weight or GTW.
It is essential that the maximum
authorised load be complied with on the
towing device: if it is exceeded, this device
may detach from the vehicle - Risk of
accident!
Check that the trailer lamps work
c o r r e c t l y.
Before setting off, check the adjustment of
the headlamp beam height.
For more information on Headlamp
adjustment
, refer to the corresponding
section.
Following use
When travelling without a trailer or load
on a towbar-mounted carrier, the towball
must be removed and the protective plug
inserted in the carrier. This measure
applies particularly where the towball
might obscure visibility of the number
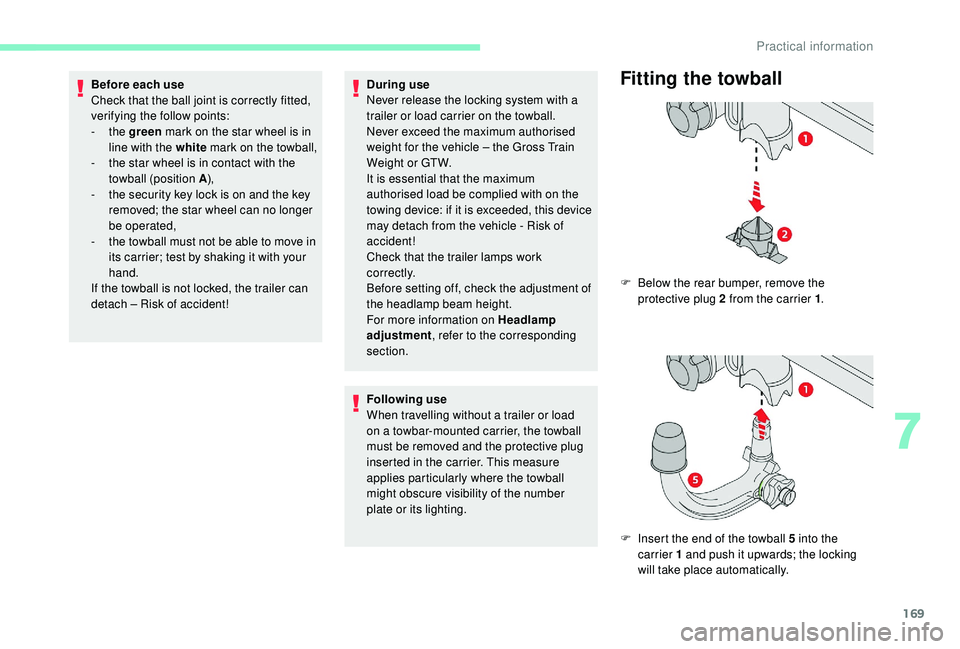
plate or its lighting.Fitting the towball
F Below the rear bumper, remove the protective plug 2 from the carrier 1 .
F
I
nsert the end of the towball 5 into the
carrier 1 and push it upwards; the locking
will take place automatically.
7
Practical information