light CITROEN C3 AIRCROSS 2023 User Guide
[x] Cancel search | Manufacturer: CITROEN, Model Year: 2023, Model line: C3 AIRCROSS, Model: CITROEN C3 AIRCROSS 2023Pages: 244, PDF Size: 7.09 MB
Page 22 of 244
20
Instruments
Workflow
Use the buttons on each side of the touch screen
to access the menus, then use the buttons that
appear on the touch screen.
Certain functions may be displayed over 1 or 2
pages.
To deactivate / activate a function, press OFF/
ON.
To modify a setting (lighting duration, etc.) or
access additional information, press the symbol
for the function.
After a few moments with no action on the secondary page, the primary page is
displayed automatically.
Use this button to confirm.
Use this button to return to the previous
page.
Menus
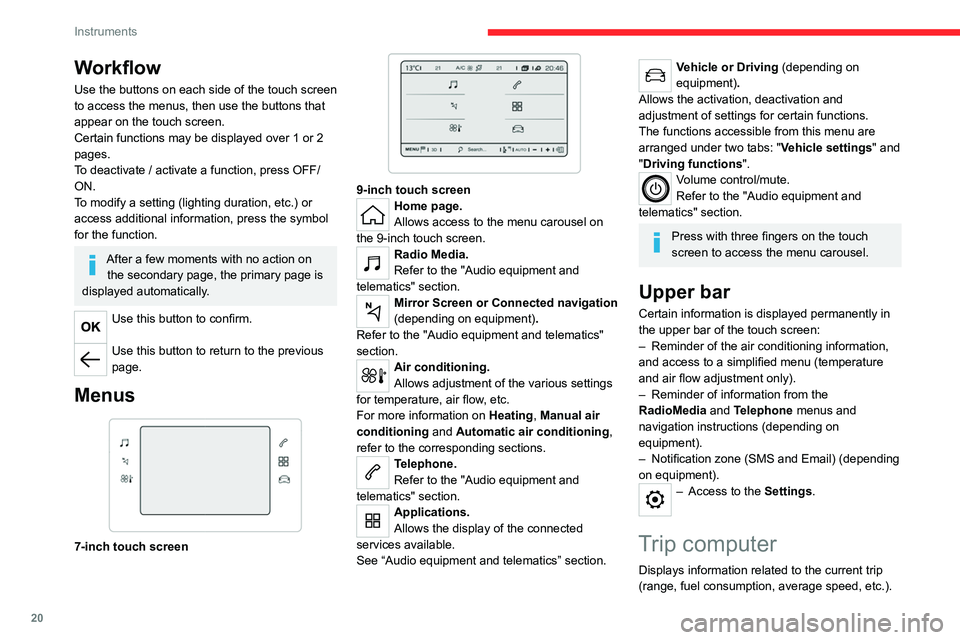
7-inch touch screen
9-inch touch screenHome page.
Allows access to the menu carousel on
the 9-inch touch screen.
Radio Media.
Refer to the "Audio equipment and
telematics" section.
Mirror Screen or Connected navigation
(depending on equipment) .
Refer to the "Audio equipment and telematics"
section.
Air conditioning.
Allows adjustment of the various settings
for temperature, air flow, etc.
For more information on Heating, Manual air
conditioning and Automatic air conditioning ,
refer to the corresponding sections.
Telephone.
Refer to the "Audio equipment and
telematics" section.
Applications.
Allows the display of the connected
services available.
See “Audio equipment and telematics” section.
Vehicle or Driving (depending on
equipment) .
Allows the activation, deactivation and
adjustment of settings for certain functions.
The functions accessible from this menu are
arranged under two tabs: " Vehicle settings" and
"Driving functions ".
Volume control/mute.
Refer to the "Audio equipment and
telematics" section.
Press with three fingers on the touch
screen to access the menu carousel.
Upper bar
Certain information is displayed permanently in
the upper bar of the touch screen:
–
Reminder of the air conditioning information,
and access to a simplified menu (temperature
and air flow adjustment only).
–
Reminder of information from the
RadioMedia
and Telephone menus and
navigation instructions (depending on
equipment).
–
Notification zone (SMS and Email) (depending
on equipment).
– Access to the Settings.
Trip computer
Displays information related to the current trip
(range, fuel consumption, average speed, etc.).
Information display
Details are displayed successively.
– The current information tab with:
• trip mileage.
• range.
• current fuel consumption.
• the Stop & Start time counter.
• information on the speed limit recognition
system (depending on version).
– Trip 1 with:
• average speed.
• average fuel consumption.
• distance travelled for the first trip.
Depending on your vehicle's equipment, a 2
nd trip
is available.
– Trip 2 with:
• average speed.
• average fuel consumption.
• distance travelled. for the second trip.
Trips 1 and 2 are independent and are used
identically.
For example, trip 1 can be used for daily figures
and trip 2 for monthly figures.
Page 24 of 244
22
Instruments
Distance that can still be travelled with the
fuel remaining in the tank (based on the
average fuel consumption over the last few miles
(kilometres) travelled).
This value may vary following a change in driving
style or terrain, leading to a significant change in
current fuel consumption.
When the range falls below 19 miles (30
km),
dashes are displayed.
After filling with at least 5 litres of fuel, the range
is recalculated and is displayed if it exceeds 62
miles (100
km).
Dashes appearing permanently in place of
numbers while driving indicates a malfunction.
Contact a CITROËN dealer or a qualified
workshop.
Current consumption
(mpg or l/100 km or km/l)Calculated during the last few seconds.
This function is only displayed at speeds above
19 mph (30
km/h).
Average consumption
(mpg or l/100 km or km/l)Calculated since the last trip computer
reset.
Average speed
(mph or km/h)Calculated since the last trip computer
reset.
Distance travelled
(miles or km)Calculated since the last trip computer
reset.
Stop & Start time counter
(minutes/seconds or hours/minutes)
If your vehicle is fitted with the Stop & Start
function, a time counter calculates the time spent
in STOP mode during a journey.
The time counter is reset each time the ignition is
switched on.
Lighting dimmer
This control lets you manually adjust the
brightness of the instrument panel and touch
screen according to the exterior light level.
It only works when the vehicle’s lamps (other
than daytime running lamps) are on, and in night
mode.
Two buttons
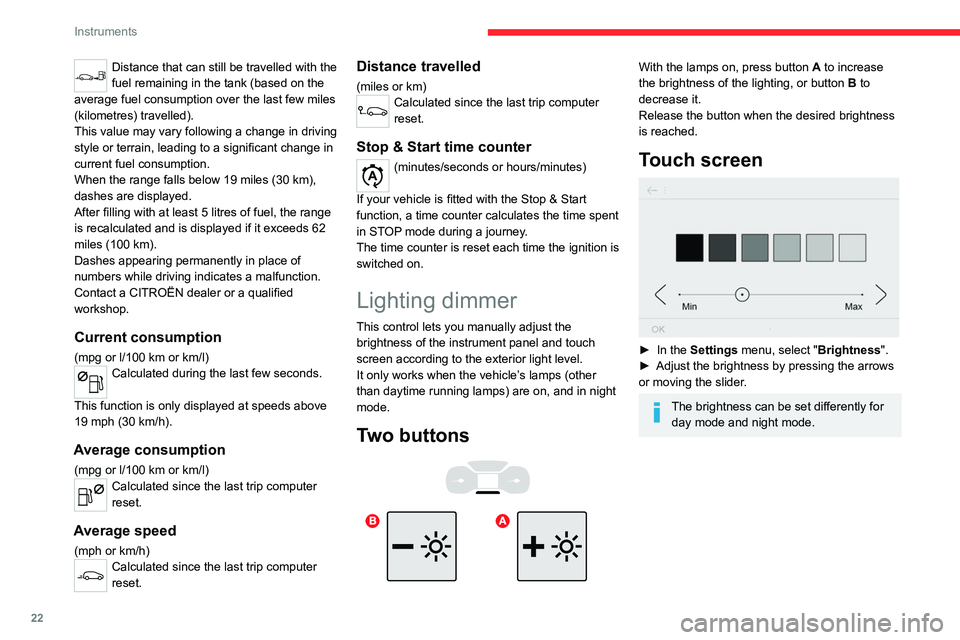
With the lamps on, press button A to increase
the brightness of the lighting, or button B to
decrease it.
Release the button when the desired brightness
is reached.
Touch screen
► In the Settings menu, select "Brightness".
► Adjust the brightness by pressing the arrows
or moving the slider
.
The brightness can be set differently for day mode and night mode.
Setting the date and time
Without audio system
Set the date and time via the instrument panel
display.
► Press and hold this button.
► Press one of these buttons to select
the setting to be changed.
► Briefly press this button to confirm.
► Press one of these buttons to change
the setting and confirm again to record
the change.
Page 26 of 244
24
Access
Remote control / Key
Remote control function
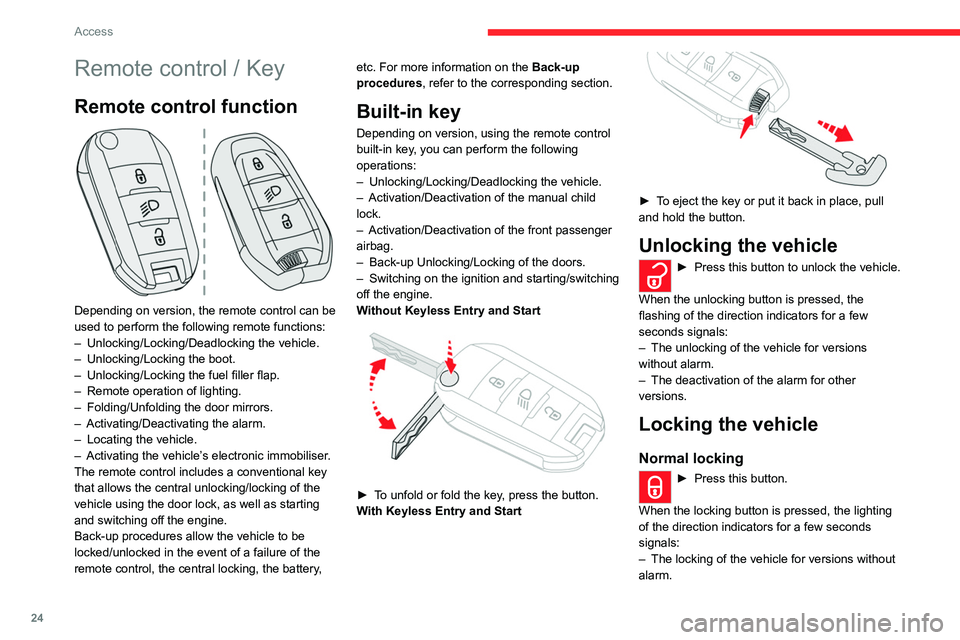
Depending on version, the remote control can be
used to perform the following remote functions:
–
Unlocking/Locking/Deadlocking the vehicle.
–
Unlocking/Locking the boot.
–
Unlocking/Locking the fuel filler flap.
–
Remote operation of lighting.
–
Folding/Unfolding the door mirrors.
–
Activating/Deactivating the alarm.
–
Locating the vehicle.
–
Activating the vehicle’
s electronic immobiliser.
The remote control includes a conventional key
that allows the central unlocking/locking of the
vehicle using the door lock, as well as starting
and switching off the engine.
Back-up procedures allow the vehicle to be
locked/unlocked in the event of a failure of the
remote control, the central locking, the battery, etc. For more information on the Back-up
procedures, refer to the corresponding section.
Built-in key
Depending on version, using the remote control
built-in key, you can perform the following
operations:
–
Unlocking/Locking/Deadlocking the vehicle.
–
Activation/Deactivation of the manual child
lock.
–
Activation/Deactivation of the front passenger
airbag.
–
Back-up Unlocking/Locking of the doors.
–
Switching on the ignition and starting/switching
off the engine.
W
ithout Keyless Entry and Start
► To unfold or fold the key, press the button.
With Keyless Entry and Start
► To eject the key or put it back in place, pull
and hold the button.
Unlocking the vehicle
► Press this button to unlock the vehicle.
When the unlocking button is pressed, the
flashing of the direction indicators for a few
seconds signals:
–
The unlocking of the vehicle for versions
without alarm.
–
The deactivation of the alarm for other
versions.
Locking the vehicle
Normal locking
► Press this button.
When the locking button is pressed, the lighting
of the direction indicators for a few seconds
signals:
–
The locking of the vehicle for versions without
alarm.
– The activation of the alarm for other versions.
If one of the doors or the boot is not fully
closed, the locking does not take place.
However, if the vehicle is equipped with the
alarm, it is fully activated after about 45
seconds.
If the vehicle is unlocked inadvertently and
there is then no action on the doors or boot,
the vehicle will automatically lock itself again
after about 30 seconds. If the alarm was
activated beforehand, the alarm is reactivated
automatically.
Locking also deactivates the central locking
button, located on the dashboard.
Deadlocking
Deadlocking renders the interior door
controls inoperative. It also disables the
central locking button.
The horn remains operational.
Never leave anyone inside the vehicle
when it is deadlocked.
► Press the locking button again within 5
seconds to deadlock the vehicle (confirmed by
the temporary lighting of the direction indicators
for versions without alarm).
Page 27 of 244
25
Access
2– The activation of the alarm for other versions.
If one of the doors or the boot is not fully
closed, the locking does not take place.
However, if the vehicle is equipped with the
alarm, it is fully activated after about 45
seconds.
If the vehicle is unlocked inadvertently and
there is then no action on the doors or boot,
the vehicle will automatically lock itself again
after about 30 seconds. If the alarm was
activated beforehand, the alarm is reactivated
automatically.
Locking also deactivates the central locking
button, located on the dashboard.
Deadlocking
Deadlocking renders the interior door
controls inoperative. It also disables the
central locking button.
The horn remains operational.
Never leave anyone inside the vehicle
when it is deadlocked.
►
Press the locking button again within 5
seconds to deadlock the vehicle (confirmed by
the temporary lighting of the direction indicators
for versions without alarm).
Locating the vehicle
This function helps you to spot your vehicle from
a distance, with the vehicle locked:
–
The sidelamps and dipped beam headlamps
come on for 30 seconds.
► Press this button.
Pressing again before the end of the timed
period switches off the lamps immediately.
Advice
Remote control
The remote control is a sensitive, high-
frequency device; avoid handling it in your
pocket, due to the risk of unintentionally
unlocking the vehicle.
Avoid pressing the remote control buttons
while out of range of the vehicle, due to
the risk of rendering the remote control
inoperative. It would then be necessary to
reset it.
The remote control does not work
when the
key is in the ignition switch, even when the
ignition is switched off.
Anti-theft protection
Do not modify the electronic vehicle
immobiliser, as this might result in
malfunctions.
For vehicles with a key ignition switch,
remember to remove the key and turn the
steering wheel to engage the steering lock.
Locking the vehicle
Driving with the doors locked could make
it more difficult for the emergency services
to enter the passenger compartment in an
emergency.
As a safety precaution, remove the key from
the ignition or take the electronic key with you
when leaving the vehicle, even for a short
time.
Purchasing a second-hand vehicle
Have the key codes memorised by a
CITROËN dealer, to ensure that the keys in
your possession are the only ones able to
start the vehicle.
Keyless Entry and Start
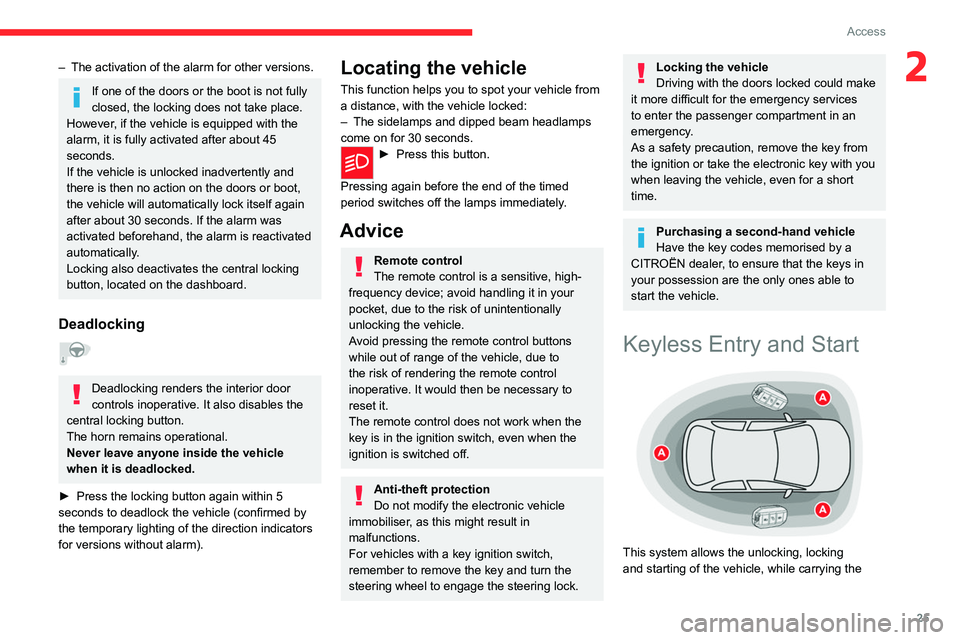
This system allows the unlocking, locking
and starting of the vehicle, while carrying the
Page 34 of 244
32
Access
but the exterior perimeter monitoring will be
activated after 45 seconds, at the same time
as the interior volumetric and anti-tilt
monitoring.
Locking the vehicle
with exterior perimeter
monitoring only
Deactivate the interior volumetric and anti-tilt
monitoring to avoid the unwanted triggering of
the alarm, in certain cases such as:
–
Slightly open window
.
–
W
ashing the vehicle.
–
Changing a wheel.
–
T
owing the vehicle.
–
T
ransport on a ship or ferry.
Deactivating the interior volumetric
and anti-tilt monitoring
► Switch off the ignition and within 10 seconds
press the alarm button until its red indicator lamp
is on fixed.
►
Get out of the vehicle.
►
Immediately lock the vehicle using the remote
control or the Keyless Entry and Start system.
Only the exterior perimeter monitoring is
activated; the button's red indicator lamp flashes
once every second.
To take effect, this deactivation must be carried out after each time the ignition is
switched off.
Reactivating the interior volumetric
and anti-tilt monitoring
► Deactivate the exterior perimeter monitoring
by unlocking the vehicle using the remote control
or the Keyless Entry and Start system.
The indicator lamp in the button goes off.
►
Reactivate all monitoring by locking the
vehicle using the remote control or the Keyless
Entry and Start system.
The red indicator lamp in the button once again
flashes every second.
Triggering of the alarm
This is indicated by sounding of the siren
and flashing of the direction indicators for 30
seconds.
The interior volumetric and anti-tilt monitoring
functions remain active until the alarm has been
triggered ten times in succession.
When the vehicle is unlocked, rapid flashing of
the indicator lamp in the button indicates that the
alarm was triggered during your absence. When
the ignition is switched on, this flashing stops
immediately.
Failure of the remote control
To deactivate the monitoring functions:
► Unlock the vehicle using the key in the
driver's door lock.
►
Open the door; the alarm is triggered.
►
Switch on the ignition; this stops the alarm.
The indicator lamp in the button goes off.
Locking the vehicle without
activating the alarm
► Lock or deadlock the vehicle using the key
(built-in the remote control) in the driver's door
lock.
Malfunction
When the ignition is switched on, the fixed
lighting of the red indicator lamp in the button
indicates a system malfunction.
Have it checked by a CITROËN dealer or a
qualified workshop.
Panoramic sunroof
The panoramic sunroof consists of a movable
glass panel that slides over the roof and a blind
that can be opened independently. Opening the
sunroof automatically opens the blind.
►
T
o operate the panoramic sunroof or the
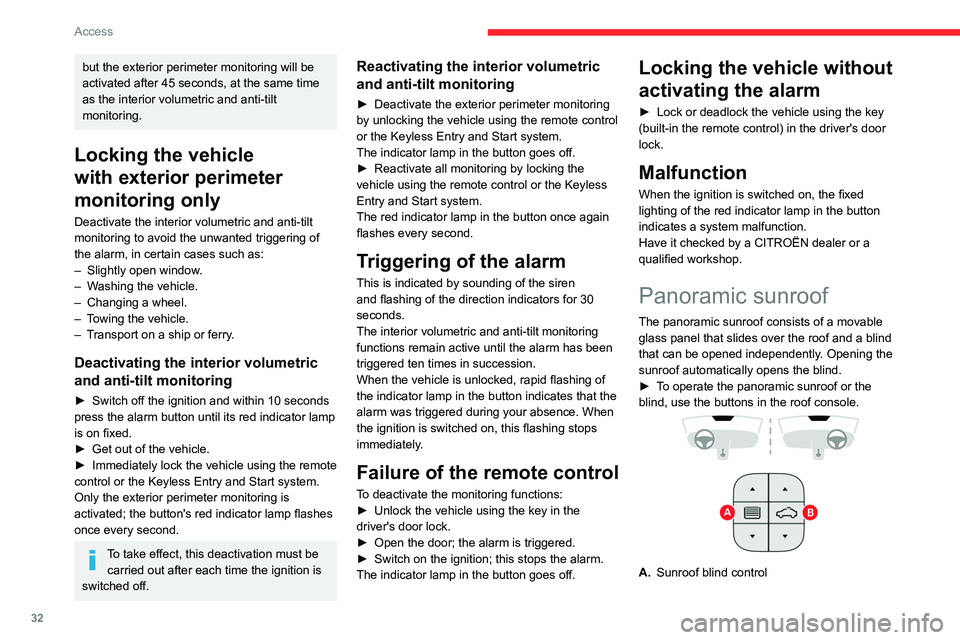
blind, use the buttons in the roof console.
A. Sunroof blind control
B.Sunroof control
The sunroof or blind can be operated when the
ignition is turned on (if the battery is charged
enough), with the engine running, in STOP mode
of Stop & Start, and up to 45 seconds after
turning off the ignition or after locking the vehicle.
Precautions
Do not put your head or arms through the
sunroof while the vehicle is moving - risk
of serious injury!
Ensure that any luggage or accessories
carried on the roof bars do not interfere
with the movement of the sunroof.
Do not place heavy loads on the movable
glass panel of the sunroof.
If the sunroof is wet, following a rain
shower or washing the vehicle, wait until
it is completely dry before operating it.
Do not operate the sunroof if it is covered by
snow or ice - risk of damage!
Use only plastic scrapers to remove snow or
ice from the sunroof.
Page 36 of 244
34
Access
locking control. The manoeuvre stops as soon
as the locking control is released.
Closing of the blind is limited by the
position of the sunroof: the blind cannot
go further than the front of the movable glass.
During simultaneous movements of the
sunroof and blind, the blind automatically
stops or resumes movement depending on
the position of the sunroof.
Reinitialisation
Following reconnection of the battery or in the
event of a fault or jerky movement of the sunroof
or blind, reinitialisation is required.
►
Check that nothing is interfering with the
sunroof or blind and that the seals are clean.
►
With the ignition on, fully close the sunroof
and blind.
►
Press and hold the front part of button
B, until
the sunroof and blind move slightly, then hold for
a further 1 second before releasing.
►
W
ait 2 seconds and then press and hold the
front part of button B. The blind and the sunroof
will open and close, one after the other. When
both are completely closed again, hold for a
further 2 seconds and release.
If there is an operating fault, restart the
whole procedure.
Electric windows
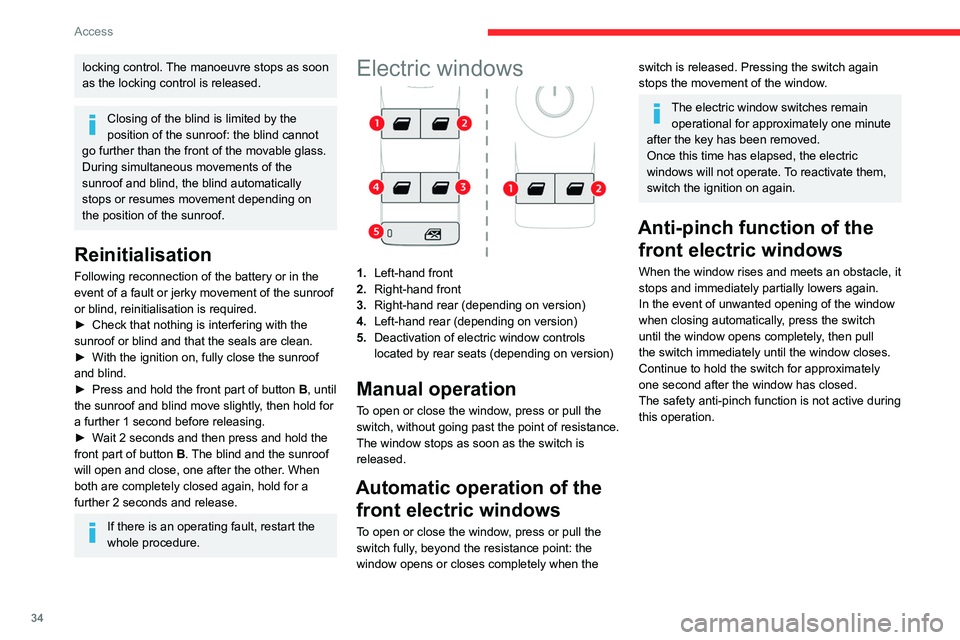
1. Left-hand front
2. Right-hand front
3. Right-hand rear (depending on version)
4. Left-hand rear (depending on version)
5. Deactivation of electric window controls
located by rear seats (depending on version)
Manual operation
To open or close the window, press or pull the
switch, without going past the point of resistance.
The window stops as soon as the switch is
released.
Automatic operation of the
front electric windows
To open or close the window, press or pull the
switch fully, beyond the resistance point: the
window opens or closes completely when the
switch is released. Pressing the switch again
stops the movement of the window.
The electric window switches remain
operational for approximately one minute
after the key has been removed.
Once this time has elapsed, the electric
windows will not operate. To reactivate them,
switch the ignition on again.
Anti-pinch function of the front electric windows
When the window rises and meets an obstacle, it
stops and immediately partially lowers again.
In the event of unwanted opening of the window
when closing automatically, press the switch
until the window opens completely, then pull
the switch immediately until the window closes.
Continue to hold the switch for approximately
one second after the window has closed.
The safety anti-pinch function is not active during
this operation.
Deactivating the rear
window controls (depending
on version)
For the safety of your children, press switch 5
to prevent operation of the windows of the rear
doors, irrespective of their position.
When the indicator is on, the rear controls are
inhibited. When the indicator is off, the rear
controls are active.
Reinitialising the electric
windows
After reconnecting the battery, or in the event
of abnormal window movement, the anti-pinch
function must be reinitialised.
The anti-pinch function is disabled during the
following sequence of operations.
For each window:
► Lower the window fully, then raise it; it will
rise in steps of a few centimetres each time the
control is pressed. Repeat the operation until the
window is fully closed.
► Continue to pull the control for at least one
second after the window reaches the closed
position.
Page 41 of 244
39
Ease of use and comfort
3Removing a head restraint
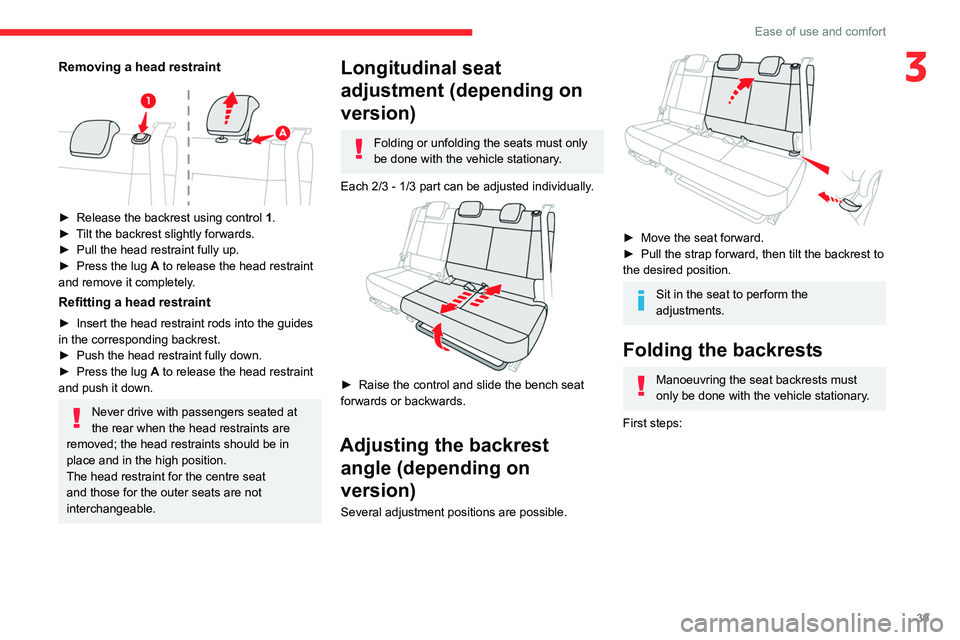
► Release the backrest using control 1 .
► T ilt the backrest slightly forwards.
►
Pull the head restraint fully up.
►
Press the lug
A to release the head restraint
and remove it completely.
Refitting a head restraint
► Insert the head restraint rods into the guides
in the corresponding backrest.
►
Push the head restraint fully down.
►
Press the lug
A to release the head restraint
and push it down.
Never drive with passengers seated at
the rear when the head restraints are
removed; the head restraints should be in
place and in the high position.
The head restraint for the centre seat
and those for the outer seats are not
interchangeable.
Longitudinal seat
adjustment (depending on
version)
Folding or unfolding the seats must only
be done with the vehicle stationary.
Each 2/3 - 1/3 part can be adjusted individually.
► Raise the control and slide the bench seat
forwards or backwards.
Adjusting the backrest angle (depending on
version)
Several adjustment positions are possible.
► Move the seat forward.
► Pull the strap forward, then tilt the backrest to
the desired position.
Sit in the seat to perform the
adjustments.
Folding the backrests
Manoeuvring the seat backrests must
only be done with the vehicle stationary.
First steps:
Page 44 of 244
42
Ease of use and comfort
Electric folding
Depending on equipment, the door mirrors can
be folded electrically.
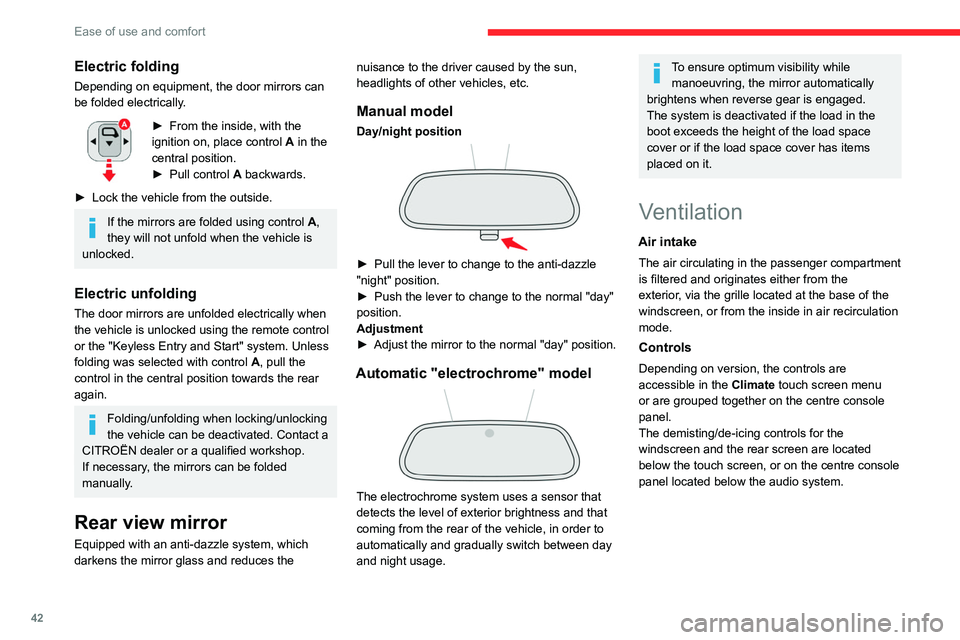
► From the inside, with the
ignition on, place control A
in the
central position.
►
Pull control A
backwards.
►
Lock the vehicle from the outside.
If the mirrors are folded using control A,
they will not unfold when the vehicle is
unlocked.
Electric unfolding
The door mirrors are unfolded electrically when
the vehicle is unlocked using the remote control
or the "Keyless Entry and Start" system. Unless
folding was selected with control A, pull the
control in the central position towards the rear
again.
Folding/unfolding when locking/unlocking
the vehicle can be deactivated. Contact a
CITROËN dealer or a qualified workshop.
If necessary, the mirrors can be folded
manually.
Rear view mirror
Equipped with an anti-dazzle system, which
darkens the mirror glass and reduces the nuisance to the driver caused by the sun,
headlights of other vehicles, etc.
Manual model
Day/night position
► Pull the lever to change to the anti-dazzle
"night" position.
►
Push the lever to change to the normal "day"
position.
Adjustment
►
Adjust the mirror to the normal "day" position.
Automatic "electrochrome" model
The electrochrome system uses a sensor that
detects the level of exterior brightness and that
coming from the rear of the vehicle, in order to
automatically and gradually switch between day
and night usage.
To ensure optimum visibility while manoeuvring, the mirror automatically
brightens when reverse gear is engaged.
The system is deactivated if the load in the
boot exceeds the height of the load space
cover or if the load space cover has items
placed on it.
Ventilation
Air intake
The air circulating in the passenger compartment
is filtered and originates either from the
exterior, via the grille located at the base of the
windscreen, or from the inside in air recirculation
mode.
Controls
Depending on version, the controls are
accessible in the Climate touch screen menu
or are grouped together on the centre console
panel.
The demisting/de-icing controls for the
windscreen and the rear screen are located
below the touch screen, or on the centre console
panel located below the audio system.
Air distribution
1. Windscreen demisting/de-icing vents
2. Front side window demisting/de-icing vents
3. Adjustable and closable side air vents
4. Adjustable and closable central air vents
5. Air outlets to the front footwells
6. Air outlets to the rear footwells
Advice
Using the ventilation and air
conditioning system
► To ensure that air is distributed evenly,
keep the external air intake grilles at the base
of the windscreen, the nozzles, the vents, the
air outlets and the air extractor in the boot
free from obstructions.
► Do not cover the sunshine sensor located
on the dashboard; this sensor is used to
regulate the automatic air conditioning
system.
Page 50 of 244
48
Ease of use and comfort
Sun visor
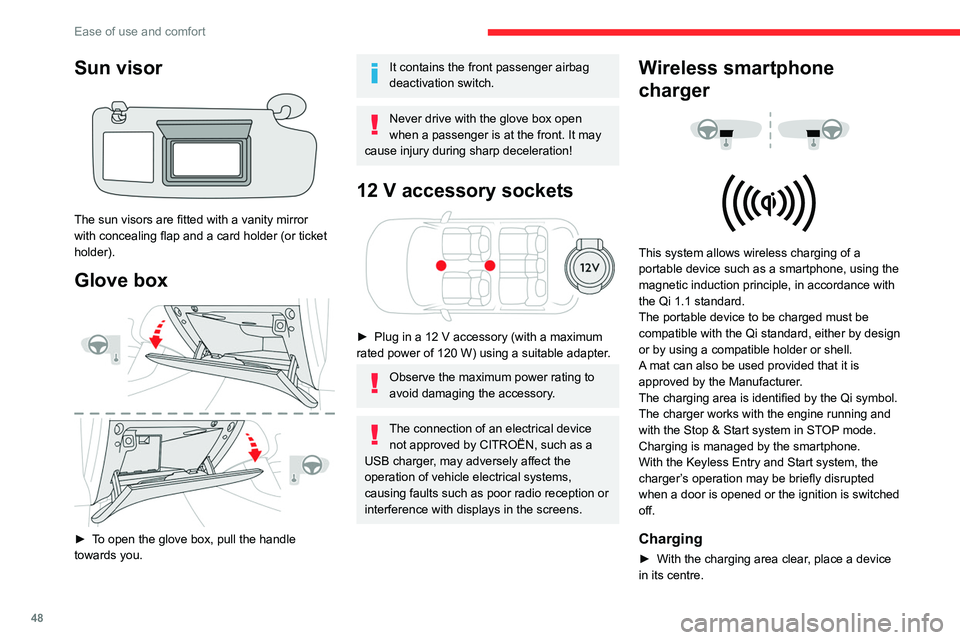
The sun visors are fitted with a vanity mirror
with concealing flap and a card holder (or ticket
holder).
Glove box
► To open the glove box, pull the handle
towards you.
It contains the front passenger airbag
deactivation switch.
Never drive with the glove box open
when a passenger is at the front. It may
cause injury during sharp deceleration!
12 V accessory sockets
► Plug in a 12 V accessory (with a maximum
rated power of 120 W) using a suitable adapter.
Observe the maximum power rating to
avoid damaging the accessory.
The connection of an electrical device not approved by CITROËN, such as a
USB charger, may adversely affect the
operation of vehicle electrical systems,
causing faults such as poor radio reception or
interference with displays in the screens.
Wireless smartphone
charger
This system allows wireless charging of a
portable device such as a smartphone, using the
magnetic induction principle, in accordance with
the Qi 1.1 standard.
The portable device to be charged must be
compatible with the Qi standard, either by design
or by using a compatible holder or shell.
A mat can also be used provided that it is
approved by the Manufacturer.
The charging area is identified by the Qi symbol.
The charger works with the engine running and
with the Stop & Start system in STOP mode.
Charging is managed by the smartphone.
With the Keyless Entry and Start system, the
charger’s operation may be briefly disrupted
when a door is opened or the ignition is switched
off.
Charging
► With the charging area clear , place a device
in its centre.
When the portable device is detected, the
charger’s indicator lamp lights up green. It
remains lit for the whole time that the battery is
being charged.
The system is not designed to charge multiple devices simultaneously.
Do not leave metal objects (e.g. coins,
keys, vehicle remote control) in the
charging area while a device is being charged
- risk of overheating or interrupting the
charging!
Checking operation
The state of the indicator lamp allows the
operation of the charger to be monitored.
State of the
indicator lamp Meaning
Off Engine switched off.
No compatible devices
detected.
Charging complete.
Fixed green Compatible portable device detected.
Charging.
Page 51 of 244
49
Ease of use and comfort
3
When the portable device is detected, the
charger’s indicator lamp lights up green. It
remains lit for the whole time that the battery is
being charged.
The system is not designed to charge multiple devices simultaneously.
Do not leave metal objects (e.g. coins,
keys, vehicle remote control) in the
charging area while a device is being charged
- risk of overheating or interrupting the
charging!
Checking operation
The state of the indicator lamp allows the
operation of the charger to be monitored.
State of the
indicator lamp Meaning
Off Engine switched off.
No compatible devices
detected.
Charging complete.
Fixed green Compatible portable device detected.
Charging.
State of the
indicator lampMeaning
Flashing orange Foreign object detected in the charging zone.
Portable device not well
centred in the charging
zone.
Fixed orange Malfunction of the
portable device's battery
meter.
Device battery
temperature too high.
Charger malfunction.
If the indicator lamp is fixed orange:
–
remove the device, then place it back in the
centre of the charging zone.
or
–
remove the device and try again in a quarter
of an hour
.
If the problem persists, have the system checked
by a CITROËN dealer or a qualified workshop.
USB socket
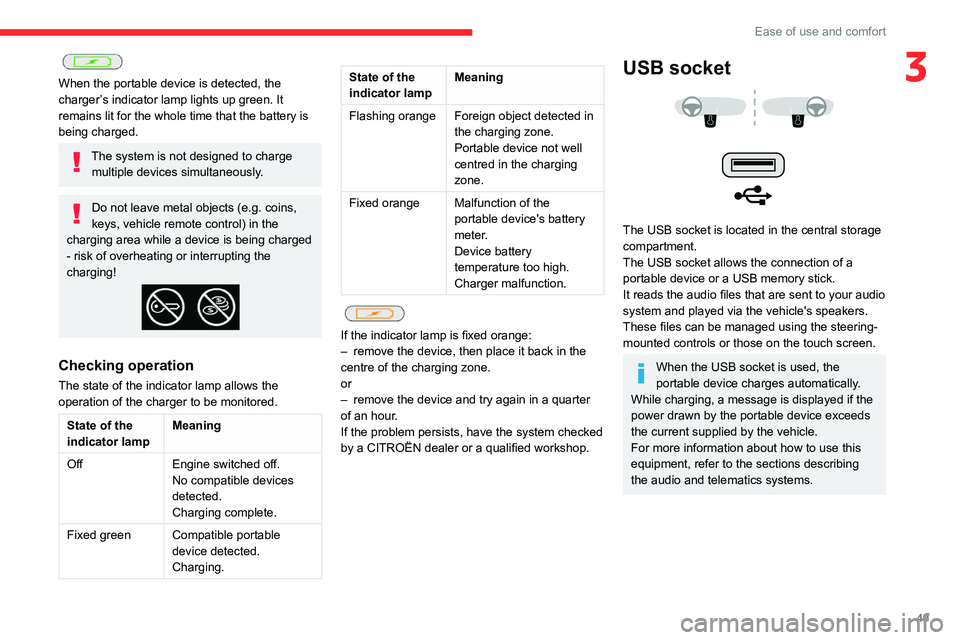
The USB socket is located in the central storage
compartment.
The USB socket allows the connection of a
portable device or a USB memory stick.
It reads the audio files that are sent to your audio
system and played via the vehicle's speakers.
These files can be managed using the steering-
mounted controls or those on the touch screen.
When the USB socket is used, the
portable device charges automatically.
While charging, a message is displayed if the
power drawn by the portable device exceeds
the current supplied by the vehicle.
For more information about how to use this
equipment, refer to the sections describing
the audio and telematics systems.