ECO mode CITROEN C3 AIRCROSS 2023 Owner's Guide
[x] Cancel search | Manufacturer: CITROEN, Model Year: 2023, Model line: C3 AIRCROSS, Model: CITROEN C3 AIRCROSS 2023Pages: 244, PDF Size: 7.09 MB
Page 98 of 244
96
Driving
Snow chains
The system does not have to be
reinitialised after fitting or removing snow
chains.
Under-inflation alert
This is signalled by the fixed illumination of this warning lamp, accompanied by an
audible signal and, depending on equipment, the
display of a message.
►
Reduce speed immediately
, avoid excessive
steering movements and avoid sudden braking.
►
Stop the vehicle as soon as it is safe to do
so.
The loss of pressure detected may not always cause visible deformation of the
tyre.
Do not rely on just a visual check.
►
Using a compressor
, such as the one in
the temporary puncture repair kit, check the
pressures of all four tyres when cold.
►
If it is not possible to carry out this check
immediately
, drive carefully at reduced speed.
►
In the event of a puncture, use the
temporary puncture repair kit or the spare wheel
(depending on equipment).
Driving too slowly may not ensure
optimum monitoring.
The alert is not immediately triggered in the
event of a sudden loss of pressure or tyre
blow-out. This is because analysis of the
values read by the wheel's speed sensors
can take several minutes.
The alert may be delayed at speeds below
25 mph (40 km/h), or when adopting a sporty
driving mode.
The alert is kept active until the system is reinitialised.
Reinitialisation
► The system must be reinitialised after any
adjustment to the pressure of one or more tyres,
and after changing one or more wheels.
Before reinitialising the system, make
sure that the pressures of the four tyres
are correct for the conditions of use of the
vehicle and conform to the values written on
the tyre pressure label.
Check the pressures of the four tyres before
performing the reinitialisation.
The system does not advise if a pressure is
incorrect at the time of reinitialisation.
The reinitialisation of the system is done with the
ignition on and the vehicle stationary:
–
V
ia the vehicle configuration menu for vehicles
fitted with a touch screen.
–
V
ia the button on the dashboard for vehicles
without a touch screen.
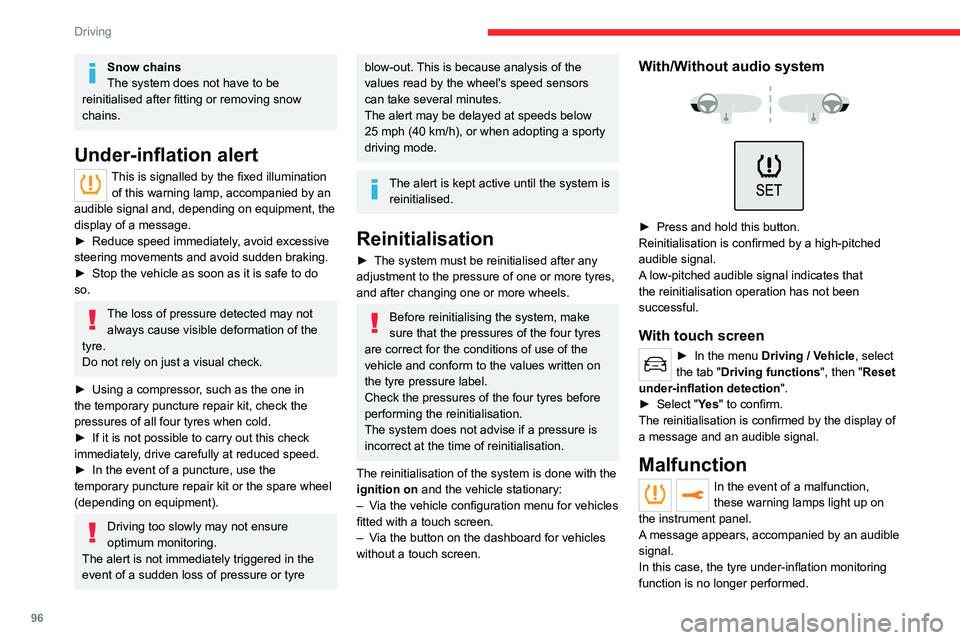
With/Without audio system
► Press and hold this button.
Reinitialisation is confirmed by a high-pitched
audible signal.
A
low-pitched audible signal indicates that
the reinitialisation operation has not been
successful.
With touch screen
► In the menu Driving / Vehicle, select
the tab "Driving functions ", then "Reset
under-inflation detection ".
►
Select "
Ye s" to confirm.
The reinitialisation is confirmed by the display of
a message and an audible signal.
Malfunction
In the event of a malfunction,
these warning lamps light up on
the instrument panel.
A message appears, accompanied by an audible
signal.
In this case, the tyre under-inflation monitoring
function is no longer performed.
Have it checked by a CITROËN dealer or a
qualified workshop.
"Space-saver" type spare wheel
The use of this type of spare wheel may
suspend tyre pressure monitoring.
In this case, the malfunction warning lamp
comes on and disappears once the wheel
has been replaced by one of uniform size (the
same as the others), the pressure readjusted
and the reinitialisation carried out.
Driving and manoeuvring
aids - General
recommendations
Driving and manoeuvring aids cannot, in
any circumstances, replace the need for
vigilance on the part of the driver.
The driver must comply with the Highway
Code, must remain in control of the vehicle in
all circumstances and must be able to retake
control of it at all times. The driver must adapt
the speed to climatic conditions, traffic and
the state of the road.
It is the driver's responsibility to constantly
monitor traffic conditions, assess the distance
and relative speed of other vehicles, and
anticipate their manoeuvres before using the
direction indicator and changing lanes.
Page 103 of 244
101
Driving
6The driver can adjust the vehicle’s speed
according to the information given by the system.
Activation/Deactivation
By default, the system is automatically activated
at every engine start.
The settings are changed via the vehicle configuration menu.
Information display
With an LCD text instrument panel, the speed
limit recognition information is displayed after the
trip computer information.
To display it:
► Press the button located on the end of the
wiper control stalk .
► Or, depending on equipment, press the knob
located on the steering wheel.
Operating limits
The system does not take account of reduced
speed limits, especially those imposed in the
following cases:
– Poor weather (rain, snow).
– Atmospheric pollution.
–
T
owing.
–
Driving with a space-saver type spare wheel
or snow chains fitted.
–
T
yre repaired using the temporary puncture
repair kit.
–
Y
oung drivers.
The system may not display the speed limit if it
does not detect a speed limit sign within a preset
period and in the following situations:
–
Road signs that are obstructed, non-standard,
damaged or bent.
–
Obsolete or incorrect maps.
Storing the speed setting
In addition to Road signs recognition , the
driver can select the speed displayed as a speed
setting for the speed limiter or cruise control
using the speed limiter or cruise control 'store'
button.
For more information on the Speed
limiter or Cruise control, refer to the
corresponding sections.
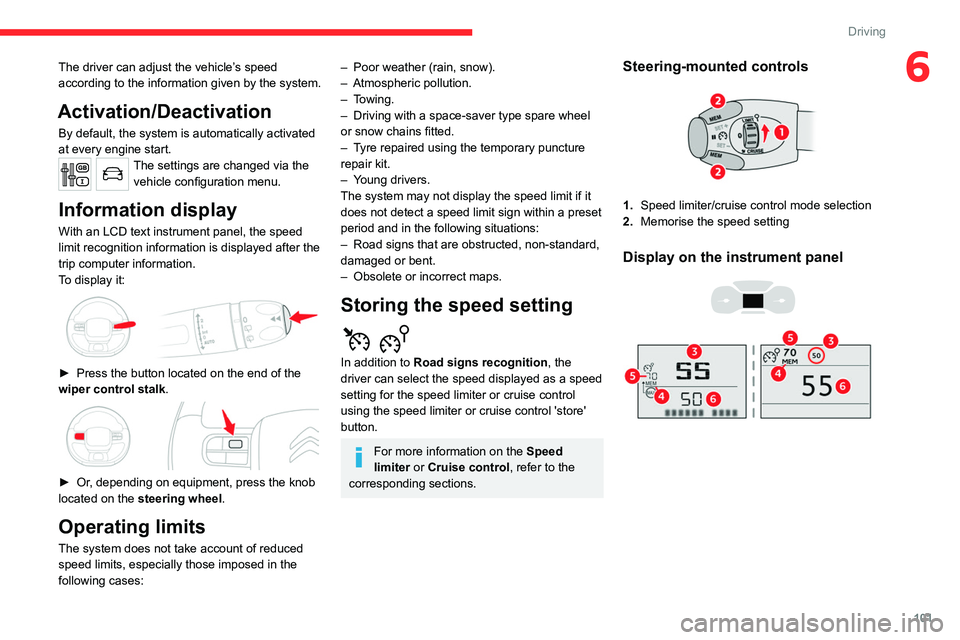
Steering-mounted controls
1. Speed limiter/cruise control mode selection
2. Memorise the speed setting
Display on the instrument panel
Page 104 of 244

102
Driving
Head-up display
3.Speed limit indication.
4. Request to memorise the speed.
5. Current speed of the vehicle.
6. Current speed setting.
Storing the speed setting
► Switch on the speed limiter/cruise control.
The speed limiter/cruise control information is
displayed.
Upon detecting a sign suggesting a new speed
setting, the system displays the value and a
message prompting you to save it as a new
speed setting. "MEM" flashes for a few seconds
on the display.
If there is a difference of less than 6 mph
(9 km/h) between the speed setting and
the speed displayed by the Road signs
recognition, the " MEM" symbol is not
displayed.
► Press button 2once to save the suggested
speed value.
A message is displayed, confirming the request.
► Press button 2again to confirm and save the
new speed setting.
The display then reverts to its previous state.
Speed limiter
For more information, refer to the
General recommendations on the use
of driving and manoeuvring aids .
This system prevents the vehicle from
exceeding the speed programmed by the
driver (speed setting).
The speed limiter is switched on manually.
The minimum speed setting is 19 mph (30
km/h).
The speed setting remains in the system
memory when the ignition is switched off.
Steering-mounted control
1. ON (LIMIT position)/OFF (position 0)
2. Reduce the speed setting
3. Increase the speed setting
4. Pause/resume speed limiter with the speed
setting previously stored
5. Depending on version:
Display the speed thresholds saved using the
Memorising speeds function
or
Use the speed suggested by the Road signs
recognition ( MEM display)
For more information on Memorising speeds
or the Road signs recognition , refer to the
corresponding sections.
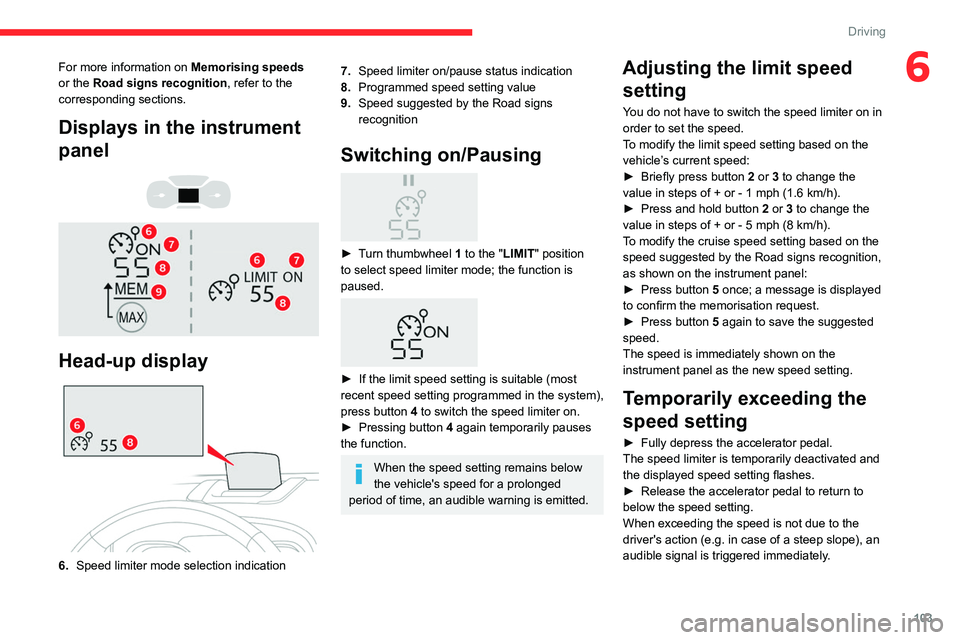
Displays in the instrument
panel
Head-up display
6. Speed limiter mode selection indication
Page 105 of 244
103
Driving
6For more information on Memorising speeds
or the Road signs recognition , refer to the
corresponding sections.
Displays in the instrument
panel
Head-up display
6. Speed limiter mode selection indication
7.Speed limiter on/pause status indication
8. Programmed speed setting value
9. Speed suggested by the Road signs
recognition
Switching on/Pausing
► Turn thumbwheel 1 to the "LIMIT" position
to select speed limiter mode; the function is
paused.
► If the limit speed setting is suitable (most
recent speed setting programmed in the system),
press button
4 to switch the speed limiter on.
►
Pressing button 4
again temporarily pauses
the function.
When the speed setting remains below
the vehicle's speed for a prolonged
period of time, an audible warning is emitted.
Adjusting the limit speed setting
You do not have to switch the speed limiter on in
order to set the speed.
To modify the limit speed setting based on the
vehicle’s current speed:
►
Briefly press button
2 or 3 to change the
value in steps of +
or - 1 mph (1.6 km/h).
►
Press and hold button
2
or 3 to change the
value in steps of +
or - 5 mph (8 km/h).
To modify the cruise speed setting based on the speed suggested by the Road signs recognition,
as shown on the instrument panel:
►
Press button
5 once; a message is displayed
to confirm the memorisation request.
►
Press button
5 again to save the suggested
speed.
The speed is immediately shown on the
instrument panel as the new speed setting.
Temporarily exceeding the
speed setting
► Fully depress the accelerator pedal.
The speed limiter is temporarily deactivated and
the displayed speed setting flashes.
►
Release the accelerator pedal to return to
below the speed setting.
When exceeding the speed is not due to the
driver's action (e.g.
in case of a steep slope), an
audible signal is triggered immediately.
Page 106 of 244
104
Driving
On a steep descent or in the event of
sharp acceleration, the speed limiter will
not be able to prevent the vehicle from
exceeding the speed setting.
If necessary, apply the brakes to control your
vehicle’s speed.
When the vehicle speed returns to the speed
setting level, the speed limiter operates again:
the speed setting display becomes fixed again.
Switching off
► Turn the thumbwheel 1 to the "OFF" position:
speed limiter information is no longer displayed.
Malfunction
In the event of a malfunction, dashes are
displayed flashing and then fixed instead of the
speed setting.
Have it checked by a CITROËN dealer or a
qualified workshop.
Cruise control - Specific
recommendations
The cruise control function does not guarantee compliance with the maximum
authorised speed and the safety distance
between vehicles, the driver remains
responsible for their driving.
In the interest of public safety, only use cruise
control if the traffic conditions enable vehicles
to drive at a steady speed and maintain an
adequate safety distance.
Remain vigilant while cruise control is
activated. If you press and hold one of the
speed setting modification buttons, your
vehicle may change speed very abruptly.
When descending a steep hill , the cruise
control system cannot prevent the vehicle
from exceeding the set speed. Brake if
necessary to control the vehicle speed.
On steep climbs or when towing, the set
speed may not be reached or maintained.
Exceeding the programmed speed
setting
You can temporarily exceed the speed
setting by pressing the accelerator pedal (the
programmed speed flashes).
To return to the speed setting, release the
accelerator pedal (when the set speed is
reached again, the displayed speed stops
flashing).
Operating limits
Never use the system in the following
situations:
–
In an urban area with the risk of
pedestrians crossing the road.
– In heavy traffic.
– On winding or steep roads.
–
On slippery or flooded roads.
–
In poor weather conditions.
–
In the event of restricted visibility for the
driver
.
–
Driving on a speed circuit.
–
Driving on a rolling road.
–
When using a ‘space-saver
’ type spare
wheel.
–
When using snow chains, non-slip covers
or studded tyres.
Cruise control
For more information, refer to the
General recommendations on the use
of driving and manoeuvring aids and the
Cruise control - particular
recommendations.
This system automatically maintains the vehicle’s speed at the value programmed
by the driver (speed setting), without the use of
the accelerator pedal.
Cruise control is switched on manually.
It requires a minimum vehicle speed of 25 mph
(40
km/h).
With a manual gearbox, third gear or higher must
be engaged.
With an automatic gearbox, mode
D
or second
gear or higher in mode
M
must be engaged.
Cruise control remains active after
changing gear, regardless of the gearbox
type, on engines fitted with the Stop & Start
function.
Switching off the ignition cancels any
speed setting.
Steering-mounted control
1. ON (CRUISE position)/OFF
2. Activate cruise control at the current speed/
decrease speed setting
3. Activate cruise control at the current speed/
increase speed setting
4. Pause/resume cruise control with the speed
setting previously saved
Page 107 of 244

105
Driving
6Cruise control remains active after
changing gear, regardless of the gearbox
type, on engines fitted with the Stop & Start
function.
Switching off the ignition cancels any
speed setting.
Steering-mounted control
1. ON (CRUISE position)/OFF
2. Activate cruise control at the current speed/
decrease speed setting
3. Activate cruise control at the current speed/
increase speed setting
4. Pause/resume cruise control with the speed
setting previously saved 5.
Depending on version:
Display the speed thresholds saved using the
Memorising speeds function
or
Use the speed suggested by the Road signs
recognition ( MEM display)
For more information on Memorising speeds
or the Road signs recognition , refer to the
corresponding sections.
Information displayed on
the instrument panel
Head-up display
6. Cruise control mode selection indication
7. Cruise control pause/resume status indication
8. Programmed speed setting value
9. Speed suggested by the Road signs
recognition
Switching on/pausing
► Turn thumbwheel 1 to the "CRUISE" position
to select cruise control mode; the function is
paused.
►
Press button
2 or 3 to activate cruise control
and save a speed setting when the vehicle has
reached the desired speed; the vehicle’s current
speed is saved as the speed setting.
►
Release the accelerator pedal.
►
Pressing button 4
temporarily pauses the
function.
►
Pressing button 4
again restores operation of
the cruise control (ON).
Page 116 of 244
11 4
Driving
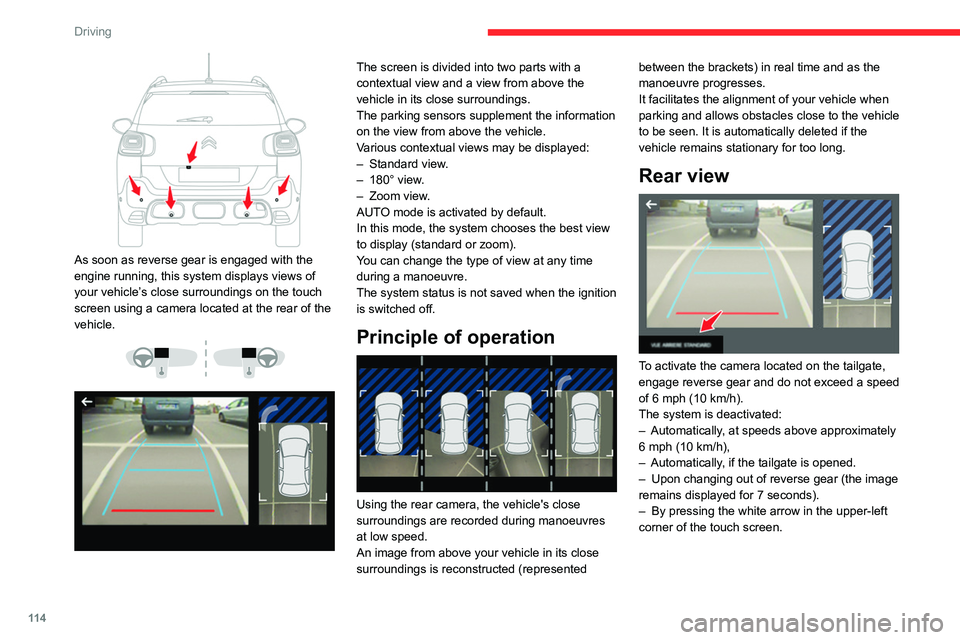
As soon as reverse gear is engaged with the
engine running, this system displays views of
your vehicle’s close surroundings on the touch
screen using a camera located at the rear of the
vehicle.
The screen is divided into two parts with a
contextual view and a view from above the
vehicle in its close surroundings.
The parking sensors supplement the information
on the view from above the vehicle.
Various contextual views may be displayed:
–
Standard view
.
–
180° view
.
–
Zoom view
.
AUTO mode is activated by default.
In this mode, the system chooses the best view
to display
(standard or zoom).
You can change the type of view at any time
during a manoeuvre.
The system status is not saved when the ignition
is switched off.
Principle of operation
Using the rear camera, the vehicle's close
surroundings are recorded during manoeuvres
at low speed.
An image from above your vehicle in its close
surroundings is reconstructed (represented between the brackets) in real time and as the
manoeuvre progresses.
It facilitates the alignment of your vehicle when
parking and allows obstacles close to the vehicle
to be seen. It is automatically deleted if the
vehicle remains stationary for too long.
Rear view
To activate the camera located on the tailgate,
engage reverse gear and do not exceed a speed
of 6 mph (10
km/h).
The system is deactivated:
–
Automatically
, at speeds above approximately
6 mph (10
km/h),
–
Automatically
, if the tailgate is opened.
–
Upon changing out of reverse gear (the image
remains displayed for 7
seconds).
–
By pressing the white arrow in the upper-left
corner of the touch screen.
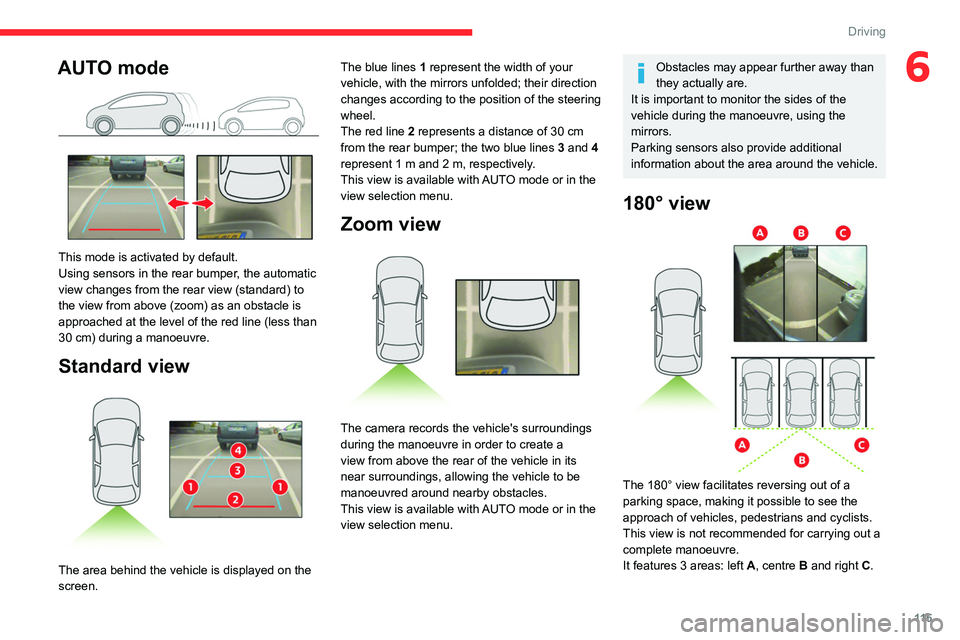
AUTO mode
This mode is activated by default.
Using sensors in the rear bumper, the automatic
view changes from the rear view (standard) to
the view from above (zoom) as an obstacle is
approached at the level of the red line (less than
30 cm) during a manoeuvre.
Standard view
The area behind the vehicle is displayed on the
screen.
Page 117 of 244
11 5
Driving
6AUTO mode
This mode is activated by default.
Using sensors in the rear bumper, the automatic
view changes from the rear view (standard) to
the view from above (zoom) as an obstacle is
approached at the level of the red line (less than
30 cm) during a manoeuvre.
Standard view
The area behind the vehicle is displayed on the
screen. The blue lines
1 represent the width of your
vehicle, with the mirrors unfolded; their direction
changes according to the position of the steering
wheel.
The red line 2 represents a distance of 30 cm
from the rear bumper; the two blue lines 3 and 4
represent 1 m and 2 m, respectively.
This view is available with AUTO mode or in the
view selection menu.
Zoom view
The camera records the vehicle's surroundings
during the manoeuvre in order to create a
view from above the rear of the vehicle in its
near surroundings, allowing the vehicle to be
manoeuvred around nearby obstacles.
This view is available with AUTO mode or in the
view selection menu.
Obstacles may appear further away than
they actually are.
It is important to monitor the sides of the
vehicle during the manoeuvre, using the
mirrors.
Parking sensors also provide additional
information about the area around the vehicle.
180° view
The 180° view facilitates reversing out of a
parking space, making it possible to see the
approach of vehicles, pedestrians and cyclists.
This view is not recommended for carrying out a
complete manoeuvre.
It features 3 areas: left A, centre B and right C.
Page 118 of 244
11 6
Driving
This view is only available via the view selection
menu.
Quick start mode
This mode displays, as quickly as possible, the
contextual view (left-hand part) and the overhead
view of the vehicle.
A message is displayed advising you to check
your vehicle's surroundings before starting the
manoeuvre.
Park Assist
For more information, refer to the
General recommendations on the use
of driving and manoeuvring aids .
This system provides active parking assistance:
it detects a parking space and then steers in the
appropriate direction to park in the space while
the driver controls the driving direction, gear
changes, acceleration and braking. To help the driver monitor the manoeuvre, the
system automatically triggers the display from
the
T
op Rear Vision function and activates the
parking sensors.
The system measures the available parking
spaces and calculates the distances to obstacles
using ultrasonic sensors built into the front and
rear bumpers of the vehicle.
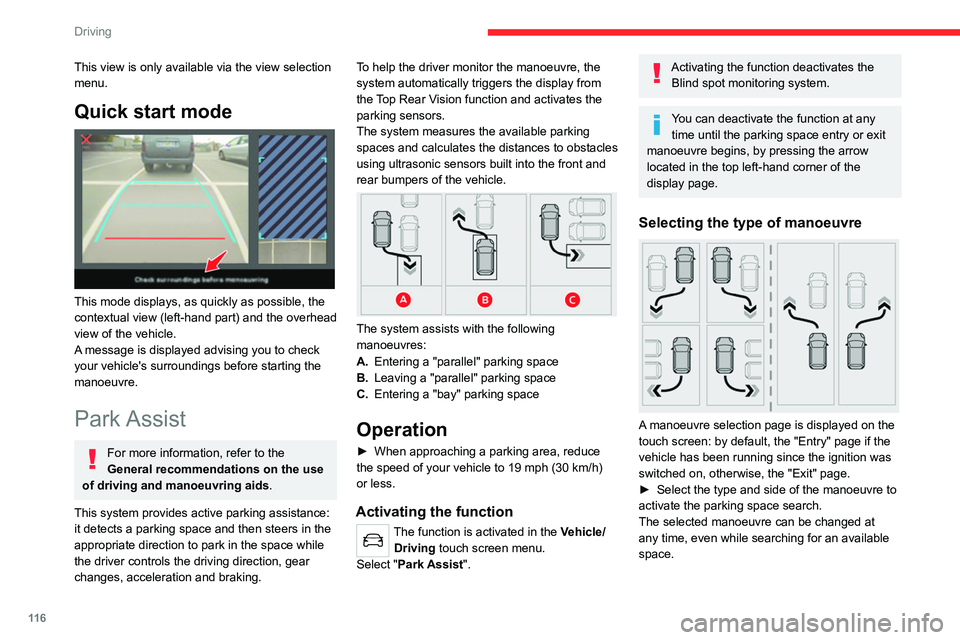
The system assists with the following
manoeuvres:
A. Entering a "parallel" parking space
B. Leaving a "parallel" parking space
C. Entering a "bay" parking space
Operation
► When approaching a parking area, reduce
the speed of your vehicle to 19 mph (30 km/h)
or less.
Activating the function
The function is activated in the Vehicle/ Driving touch screen menu.
Select "Park Assist".
Activating the function deactivates the Blind spot monitoring system.
You can deactivate the function at any time until the parking space entry or exit
manoeuvre begins, by pressing the arrow
located in the top left-hand corner of the
display page.
Selecting the type of manoeuvre
A manoeuvre selection page is displayed on the
touch screen: by default, the "Entry" page if the
vehicle has been running since the ignition was
switched on, otherwise, the "Exit" page.
►
Select the type and side of the manoeuvre to
activate the parking space search.
The selected manoeuvre can be changed at
any time, even while searching for an available
space.
Parking space search
► You should drive at a distance of between
0.50 m and 1.50 m from the row of parked
vehicles, without ever exceeding 19 mph
(30 km/h), until the system finds an available
space.
The parking space search stops over this limit.
The function automatically deactivates once the
vehicle speed exceeds 31 mph (50 km/h).
For ''parallel'' parking, the space must at
a minimum be equal to the length of your
vehicle plus 0.60 m.
For ''bay'' parking, the width of the space
must be equal to the width of your vehicle
plus 0.70 m.
If the parking sensors function has been
deactivated in the Driving/Vehicle menu
of the touch screen, it will be automatically
reactivated when the system is activated.
Page 128 of 244
126
Practical information
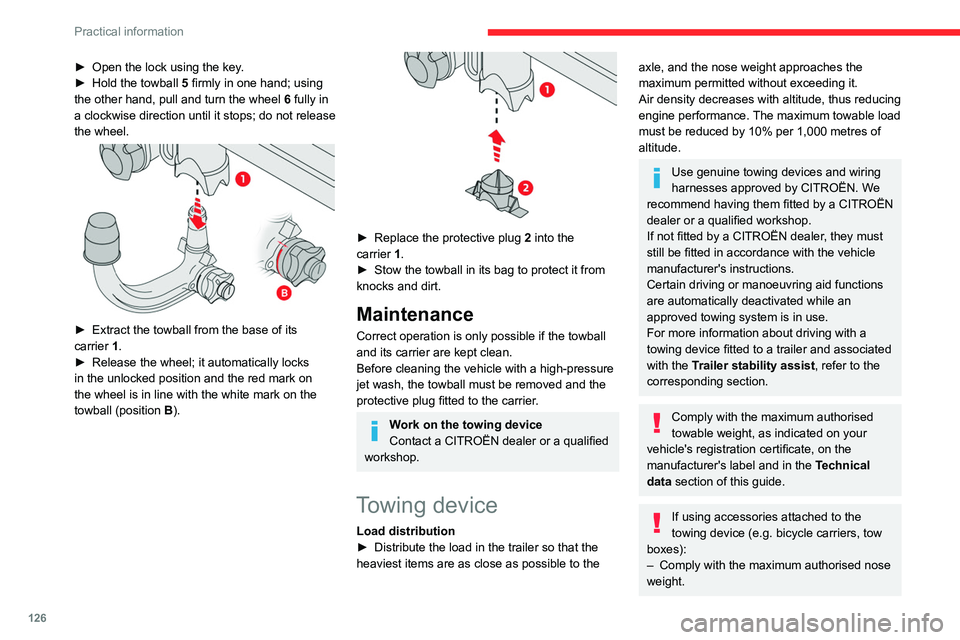
► Open the lock using the key.
► Hold the towball 5
firmly in one hand; using
the other hand, pull and turn the wheel 6 fully in
a clockwise direction until it stops; do not release
the wheel.
► Extract the towball from the base of its
carrier 1.
►
Release the wheel; it automatically locks
in the unlocked position and the red mark on
the wheel is in line with the white mark on the
towball (position B
).
► Replace the protective plug 2 into the
carrier 1.
►
Stow the towball in its bag to protect it from
knocks and dirt.
Maintenance
Correct operation is only possible if the towball
and its carrier are kept clean.
Before cleaning the vehicle with a high-pressure
jet wash, the towball must be removed and the
protective plug fitted to the carrier.
Work on the towing device
Contact a CITROËN dealer or a qualified
workshop.
Towing device
Load distribution
► Distribute the load in the trailer so that the
heaviest items are as close as possible to the
axle, and the nose weight approaches the
maximum permitted without exceeding it.
Air density decreases with altitude, thus reducing
engine performance. The maximum towable load
must be reduced by 10% per 1,000
metres of
altitude.
Use genuine towing devices and wiring
harnesses approved by CITROËN. We
recommend having them fitted by a CITROËN
dealer or a qualified workshop.
If not fitted by a CITROËN dealer, they must
still be fitted in accordance with the vehicle
manufacturer's instructions.
Certain driving or manoeuvring aid functions
are automatically deactivated while an
approved towing system is in use.
For more information about driving with a
towing device fitted to a trailer and associated
with the Trailer stability assist, refer to the
corresponding section.
Comply with the maximum authorised
towable weight, as indicated on your
vehicle's registration certificate, on the
manufacturer's label and in the Technical
data section of this guide.
If using accessories attached to the
towing device (e.g. bicycle carriers, tow
boxes):
–
Comply with the maximum authorised nose
weight.
– Do not transport more than 4 conventional
bicycles or 2 electric bicycles.
When loading bicycles onto a bicycle carrier
on a towball, be sure to place the heaviest
bicycles as close as possible to the vehicle.
Observe the legislation in force in the
country where you are driving.
Load reduction mode
This system manages the use of certain
functions according to the level of charge
remaining in the battery.
When the vehicle is being driven, the load
reduction function temporarily deactivates certain
functions, such as the air conditioning and the
heated rear screen.
The deactivated functions are reactivated
automatically as soon as conditions permit.
Energy economy mode
This system manages the duration of use of
certain functions, in order to conserve a sufficient
level of charge in the battery with the ignition off.
After switching off the engine and for a maximum
cumulative period of around 30 minutes, you can
continue to use functions such as the audio and
telematics system, dipped beam headlamps or
courtesy lamps.