parking CITROEN C3 AIRCROSS 2023 Owners Manual
[x] Cancel search | Manufacturer: CITROEN, Model Year: 2023, Model line: C3 AIRCROSS, Model: CITROEN C3 AIRCROSS 2023Pages: 244, PDF Size: 7.09 MB
Page 4 of 244
2
Contents
■
Overview
■
Eco-driving
1InstrumentsInstrument panels 8
Warning and indicator lamps 9
Indicators 14
Distance recorders 17
Equipment configuration for vehicles without
screen
17
Monochrome screen C 18
Touch screen 19
Trip computer 20
Setting the date and time 23
2AccessRemote control / Key 24
Keyless Entry and Start 25
Back-up procedures 27
Doors 29
Boot 30
Central locking 30
Alarm 31
Panoramic sunroof 32
Electric windows 34
3Ease of use and comfortFront seats 36
Rear seats 38
Steering wheel adjustment 41
Mirrors 41
Ventilation 42
Heating/Manual air conditioning 44
Automatic air conditioning 44
Front demist - defrost 46
Heated windscreen 46
Rear screen demist - defrost 47
Front fittings 47
Rear fittings 50
Boot fittings 51
Courtesy lamps 53
Interior ambient lighting 54
4Lighting and visibilityLighting control stalk 55
Direction indicators 56
Automatic illumination of headlamps 57
Guide-me-home and welcome lighting 57
Automatic lighting systems - General
recommendations
58
Automatic headlamp dipping 58
Headlamp beam height adjustment 59
Cornering lighting 59
Wiper control stalk 60
Changing a wiper blade 62
Automatic wipers 62
5SafetyGeneral safety recommendations 64
Hazard warning lamps 64
Horn 65
Emergency or assistance 65
Electronic stability control (ESC) 67
Grip control 68
Hill Assist Descent Control 69
Seat belts 70
Airbags 73
Child seats 75
Deactivating the front passenger airbag 77
ISOFIX child seats 78
i-Size child seats 80
Installing child seats 80
Child lock 83
6DrivingDriving recommendations 84
Starting / Switching off the engine with the key 86
Starting/Switching off the engine with
Keyless Entry and Start
87
Parking brake 89
5-speed manual gearbox 89
6-speed manual gearbox 90
Automatic gearbox (EAT6) 90
Gear shift indicator 92
Hill start assist 93
Stop & Start 93
Tyre under-inflation detection 95
Driving and manoeuvring aids - General
recommendations
97
Head-up display 98
Memorising speeds 99
Road signs recognition 100
Speed limiter 102
Cruise control - Specific recommendations 104
Cruise control 104
Active Safety Brake with Collision Risk Alert and
Intelligent emergency braking assistance
106
Distraction detection 109
Lane departure warning system 11 0
Blind spot monitoring 111
Page 5 of 244
3
Contents
Parking sensors 11 2
Top Rear Vision 11 3
Park Assist 11 6
7Practical informationCompatibility of fuels 121
Refuelling 121
Misfuel prevention (Diesel) 122
Snow chains 123
Towing device with quickly detachable
towball
123
Towing device 126
Energy economy mode 127
Roof bars 127
Bonnet 128
Engine compartment 129
Checking levels 130
Checks 132
AdBlue® (BlueHDi) 133
Advice on care and maintenance 135
8In the event of a breakdownRunning out of fuel (Diesel) 137
Tool kit 137
Temporary puncture repair kit 138
Spare wheel 141
Changing a bulb 144
Fuses 147
12
V battery 147
Towing 150
9Technical dataEngine technical data and towed loads 153
Petrol engines 154
Diesel engines 156
Dimensions 157
Identification markings 157
10Bluetooth® audio systemFirst steps 159
Steering mounted controls 160
Menus 160
Radio 161
DAB (Digital Audio Broadcasting) radio 162
Media 163
Telephone 165
Frequently asked questions 168
11CITROËN Connect RadioFirst steps 171
Steering mounted controls 172
Menus 173
Applications 174
Radio 174
DAB (Digital Audio Broadcasting) radio 176
Media 176
Telephone 178
Settings 181
Frequently asked questions 182
12CITROËN Connect NavFirst steps 184
Steering mounted controls 185
Menus 185
Voice commands 187
Navigation 190
Connected navigation 193
Applications 195
Radio 198
DAB (Digital Audio Broadcasting) radio 199
Media 199
Telephone 201
Settings 203
Frequently asked questions 205
13Event data recorders
■
Alphabetical index
bit.ly/helpPSA
Access to additional videos
Page 6 of 244
4
Overview
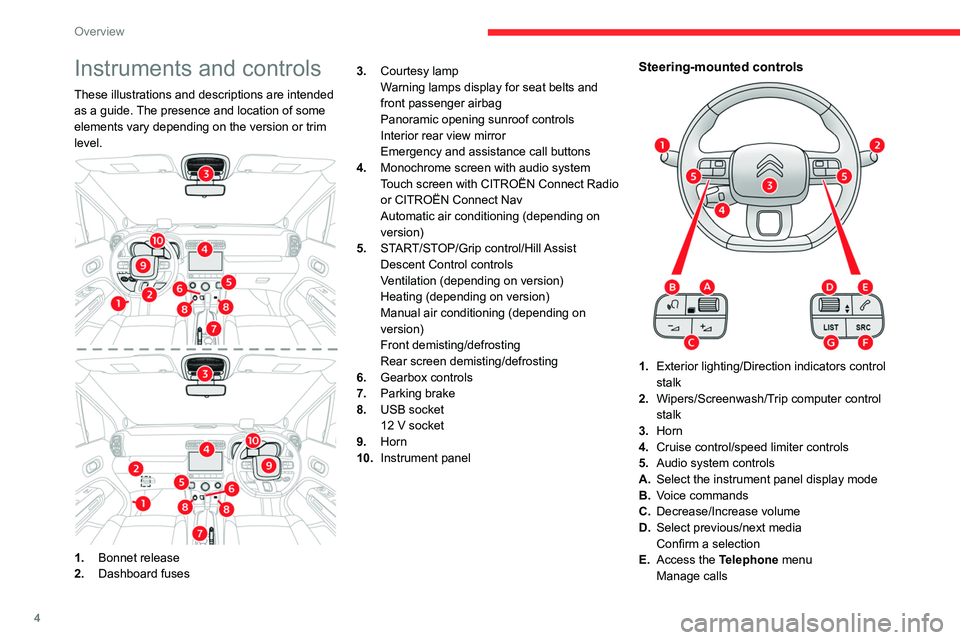
Instruments and controls
These illustrations and descriptions are intended
as a guide. The presence and location of some
elements vary depending on the version or trim
level.
1.Bonnet release
2. Dashboard fuses 3.
Courtesy lamp
Warning lamps display for seat belts and
front passenger airbag
Panoramic opening sunroof controls
Interior rear view mirror
Emergency and assistance call buttons
4. Monochrome screen with audio system
Touch screen with CITROËN Connect Radio
or CITROËN Connect Nav
Automatic air conditioning (depending on
version)
5. START/STOP/Grip control/Hill Assist
Descent Control controls
Ventilation (depending on version)
Heating (depending on version)
Manual air conditioning (depending on
version)
Front demisting/defrosting
Rear screen demisting/defrosting
6. Gearbox controls
7. Parking brake
8. USB socket
12 V socket
9. Horn
10. Instrument panel
Steering-mounted controls
1.Exterior lighting/Direction indicators control
stalk
2. Wipers/Screenwash/Trip computer control
stalk
3. Horn
4. Cruise control/speed limiter controls
5. Audio system controls
A. Select the instrument panel display mode
B. Voice commands
C. Decrease/Increase volume
D. Select previous/next media
Confirm a selection
E. Access the Telephone menu
Manage calls
Page 7 of 244
5
Overview
F.Select an audio source
G. Display the list of radio stations/audio tracks
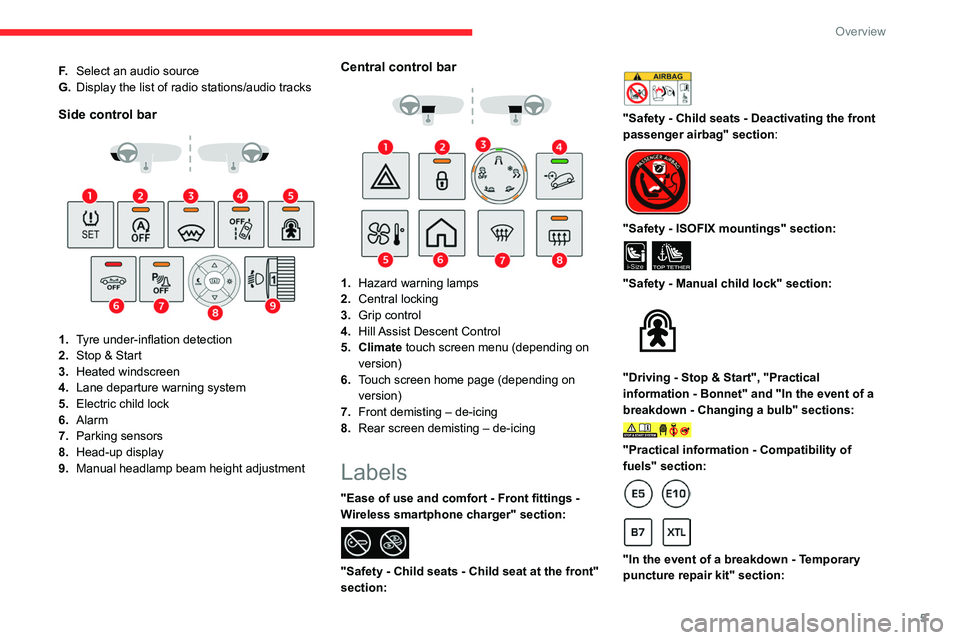
Side control bar
1.Tyre under-inflation detection
2. Stop & Start
3. Heated windscreen
4. Lane departure warning system
5. Electric child lock
6. Alarm
7. Parking sensors
8. Head-up display
9. Manual headlamp beam height adjustment
Central control bar
1.Hazard warning lamps
2. Central locking
3. Grip control
4. Hill Assist Descent Control
5. Climate touch screen menu (depending on version)
6. Touch screen home page (depending on
version)
7. Front demisting – de-icing
8. Rear screen demisting – de-icing
Labels
"Ease of use and comfort - Front fittings -
Wireless smartphone charger" section:
"Safety - Child seats - Child seat at the front"
section:
"Safety - Child seats - Deactivating the front
passenger airbag" section:
"Safety - ISOFIX mountings" section:
i-SizeTOP TETHER
"Safety - Manual child lock" section:
"Driving - Stop & Start", "Practical
information - Bonnet" and "In the event of a
breakdown - Changing a bulb" sections:
"Practical information - Compatibility of
fuels" section:
"In the event of a breakdown - Temporary
puncture repair kit" section:
Page 12 of 244
10
Instruments
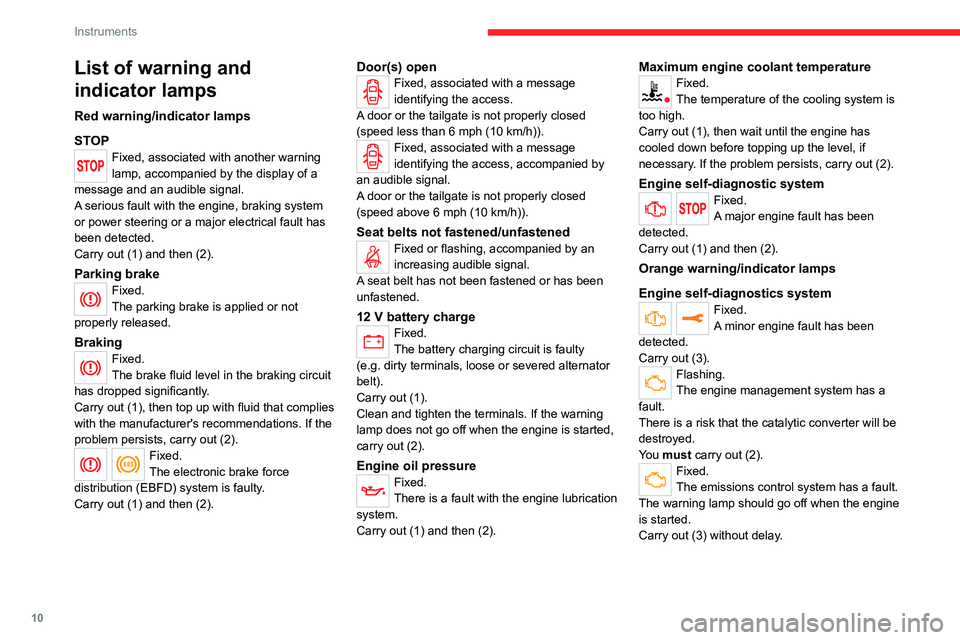
List of warning and
indicator lamps
Red warning/indicator lamps
STOP
Fixed, associated with another warning
lamp, accompanied by the display of a
message and an audible signal.
A serious fault with the engine, braking system
or power steering or a major electrical fault has
been detected.
Carry out (1) and then (2).
Parking brakeFixed.
The parking brake is applied or not
properly released.
BrakingFixed.
The brake fluid level in the braking circuit
has dropped significantly.
Carry out (1), then top up with fluid that complies
with the manufacturer's recommendations. If the
problem persists, carry out (2).
Fixed.
The electronic brake force
distribution
(EBFD) system is faulty.
Carry out (1) and then (2).
Door(s) openFixed, associated with a message
identifying the access.
A door or the tailgate is not properly closed
(speed less than 6 mph (10 km/h)).
Fixed, associated with a message
identifying the access, accompanied by
an audible signal.
A door or the tailgate is not properly closed
(speed above 6 mph (10 km/h)).
Seat belts not fastened/unfastenedFixed or flashing, accompanied by an
increasing audible signal.
A seat belt has not been fastened or has been
unfastened.
12 V battery chargeFixed.
The battery charging circuit is faulty
(e.g.
dirty terminals, loose or severed alternator
belt).
Carry out (1).
Clean and tighten the terminals. If the warning
lamp does not go off when the engine is started,
carry out (2).
Engine oil pressureFixed.
There is a fault with the engine lubrication
system.
Carry out (1) and then (2).
Maximum engine coolant temperatureFixed.
The temperature of the cooling system is
too high.
Carry out (1), then wait until the engine has
cooled down before topping up the level, if
necessary. If the problem persists, carry out (2).
Engine self-diagnostic systemFixed.
A major engine fault has been
detected.
Carry out (1) and then (2).
Orange warning/indicator lamps
Engine self-diagnostics system
Fixed.
A minor engine fault has been
detected.
Carry out (3).
Flashing.
The engine management system has a
fault.
There is a risk that the catalytic converter will be
destroyed.
You must carry out (2).
Fixed.
The emissions control system has a fault.
The warning lamp should go off when the engine
is started.
Carry out (3) without delay.
Page 16 of 244
14
Instruments
Black/white warning lamps
Foot on the brake
Fixed.
Insufficient or no pressure on the brake
pedal.
With an automatic gearbox, with the engine
running, before releasing the parking brake, to
move out of position P.
Automatic wipingFixed.
Automatic front wiping is activated.
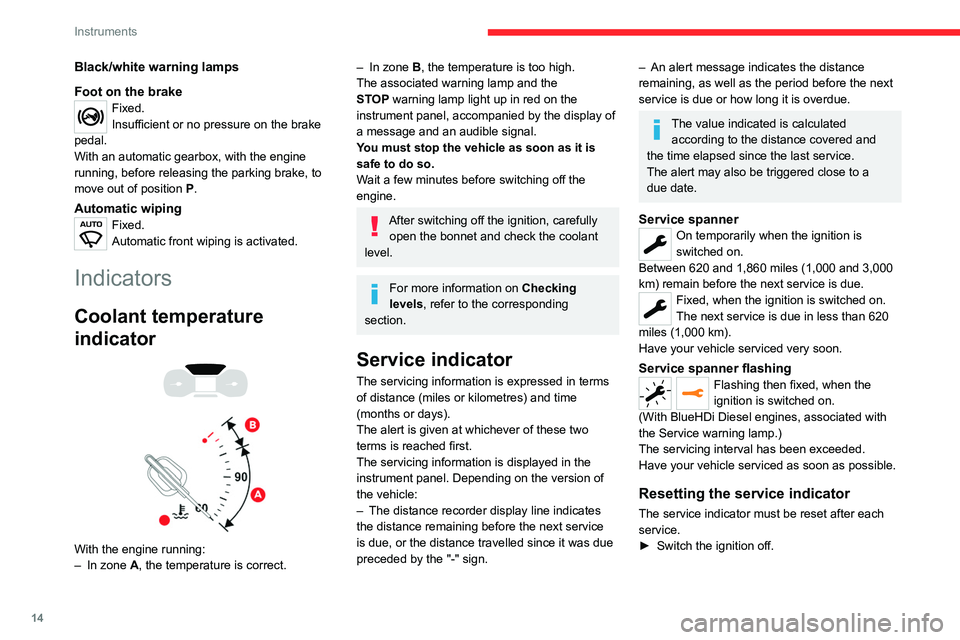
Indicators
Coolant temperature indicator
With the engine running:
– In zone A, the temperature is correct.
– In zone B, the temperature is too high.
The associated warning lamp and the
STOP
warning lamp light up in red on the
instrument panel, accompanied by the display of
a message and an audible signal.
You must stop the vehicle as soon as it is
safe to do so.
Wait a few minutes before switching off the
engine.
After switching off the ignition, carefully open the bonnet and check the coolant
level.
For more information on Checking
levels, refer to the corresponding
section.
Service indicator
The servicing information is expressed in terms
of distance (miles or kilometres) and time
(months or days).
The alert is given at whichever of these two
terms is reached first.
The servicing information is displayed in the
instrument panel. Depending on the version of
the vehicle:
–
The distance recorder display line indicates
the distance remaining before the next service
is due, or the distance travelled since it was due
preceded by the "-" sign.
– An alert message indicates the distance
remaining, as well as the period before the next
service is due or how long it is overdue.
The value indicated is calculated according to the distance covered and
the time elapsed since the last service.
The alert may also be triggered close to a
due date.
Service spannerOn temporarily when the ignition is
switched on.
Between 620 and 1,860 miles (1,000 and 3,000
km) remain before the next service is due.
Fixed, when the ignition is switched on.
The next service is due in less than 620
miles (1,000 km).
Have your vehicle serviced very soon.
Service spanner flashingFlashing then fixed, when the
ignition is switched on.
(With
BlueHDi Diesel engines, associated with
the Service warning lamp.)
The servicing interval has been exceeded.
Have your vehicle serviced as soon as possible.
Resetting the service indicator
The service indicator must be reset after each
service.
►
Switch the ignition off.
CHECK
► Press and hold this button.
► Switch on the ignition; the distance recorder
display begins a countdown.
► Release the button when =0 is displayed; the
spanner disappears.
If you have to disconnect the battery
following this operation, lock the vehicle
and wait at least 5 minutes for the reset to be
registered.
Reminder of the servicing information
You can access the servicing information at any
time.
► Press the trip distance recorder reset button.
The servicing information is displayed for a few
seconds, then disappears.
Engine oil level indicator
(Depending on version)
On versions fitted with an electric gauge, the
engine oil level status is displayed on the
instrument panel for a few seconds when
Page 20 of 244
18
Instruments
Pressing this button takes you back up a
level or cancels the current operation.
Display screen menus
– LIGHTING :
• GUIDE LAMPS (Guide-me-home lighting),
•
DIR HEADLAMPS (Directional headlamps).
–
DRIVE ASSIST
:
•
COLLISION
ALT (Automatic emergency
braking),
•
VIGILANCE
ALT (Fatigue Detection System),
•
ADVISED SPEED (Speed limit recognition).
–
COMFOR
T :
•
REAR WIPE REV (Automatic windscreen
wiper when reversing).
For more information on one of these functions,
refer to the corresponding section.
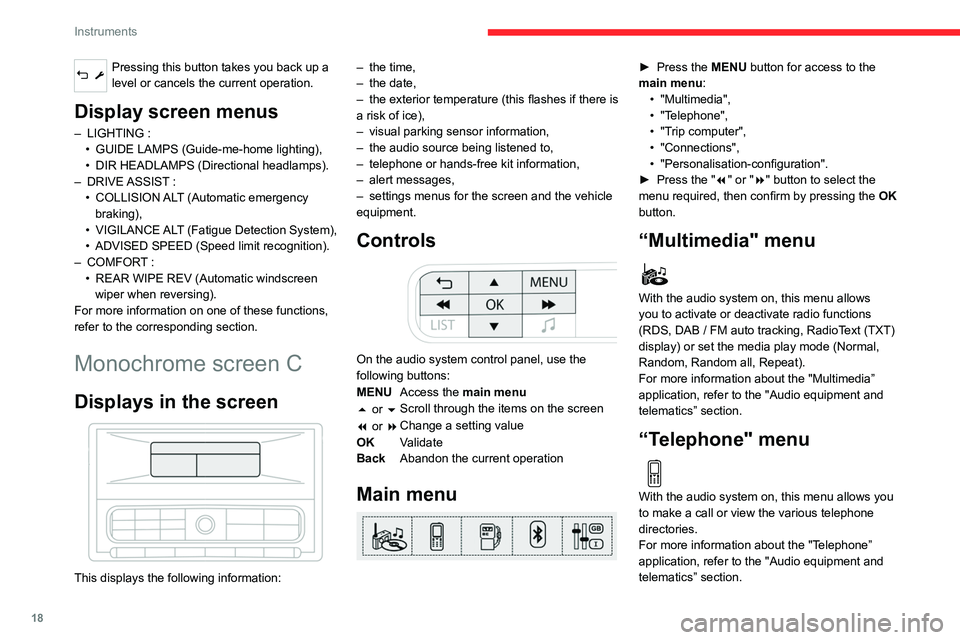
Monochrome screen C
Displays in the screen
This displays the following information: –
the time,
–
the date,
–
the exterior temperature (this flashes if there is
a risk of ice),
–
visual parking sensor information,
–
the audio source being listened to,
–
telephone or hands-free kit information,
–
alert messages,
–
settings menus for the screen and the vehicle
equipment.
Controls
On the audio system control panel, use the
following buttons:
MENU Access the main menu
5 or 6 Scroll through the items on the screen
7 or 8 Change a setting value
OK Validate
Back Abandon the current operation
Main menu
► Press the MENU button for access to the
main menu: •
"Multimedia",
•
"T
elephone",
•
"T
rip computer",
•
"Connections",
•
"Personalisation-configuration".
►
Press the "
7" or "8" button to select the
menu required, then confirm by pressing the OK
button.
“Multimedia" menu
With the audio system on, this menu allows
you to activate or deactivate radio functions
(RDS, DAB
/ FM auto tracking, RadioText (TXT)
display) or set the media play mode (Normal,
Random, Random all, Repeat).
For more information about the "Multimedia”
application, refer to the "Audio equipment and
telematics” section.
“Telephone" menu
With the audio system on, this menu allows you
to make a call or view the various telephone
directories.
For more information about the "Telephone”
application, refer to the "Audio equipment and
telematics” section.
“Trip computer" menu
This menu allows you to consult information
concerning the status of the vehicle.
Warning log
It summarises the alert messages of the
functions, displaying them on the screen.
“Connections" menu
With the audio system on, this menu allows a
Bluetooth device (telephone, media player) to be
paired and the connection mode to be defined
(hands-free kit, playing of audio files).
For more information about the "Connections”
application, refer to the "Audio equipment and
telematics” section.
“Personalisation-
configuration" menu
This menu gives access to the following
functions:
– “Define the vehicle parameters".
– “Display configuration".
Page 21 of 244
19
Instruments
1“Trip computer" menu
This menu allows you to consult information
concerning the status of the vehicle.
Warning log
It summarises the alert messages of the
functions, displaying them on the screen.
“Connections" menu
With the audio system on, this menu allows a
Bluetooth device (telephone, media player) to be
paired and the connection mode to be defined
(hands-free kit, playing of audio files).
For more information about the "Connections”
application, refer to the "Audio equipment and
telematics” section.
“Personalisation-
configuration" menu
This menu gives access to the following
functions:
–
“Define the vehicle parameters".
–
“Display configuration".
Define the vehicle parameters
This menu allows the following equipment to be
activated / deactivated, depending on the version
and/or country of sale:
"Lighting "
–
"Directional headlamps",
–
"Follow-me-home headlamps",
–
"W
elcome lighting".
"Comfort"
–
"Rear wipe in reverse gear".
"
Driving assistance"
–
Auto. emergency braking,
–
Fatigue Detection System,
–
Speed recommendation.
For more information on the different equipment,
refer to the corresponding sections.
Display configuration
This menu allows you to change the language
used by the display from a defined list.
This menu gives access to the following settings:
–
“Choice of units".
–
“Date and time adjustment".
–
“Display personalisation".
–
“Choice of language".
As a safety measure, the driver must only carry out operations that require
sustained attention when stationary.
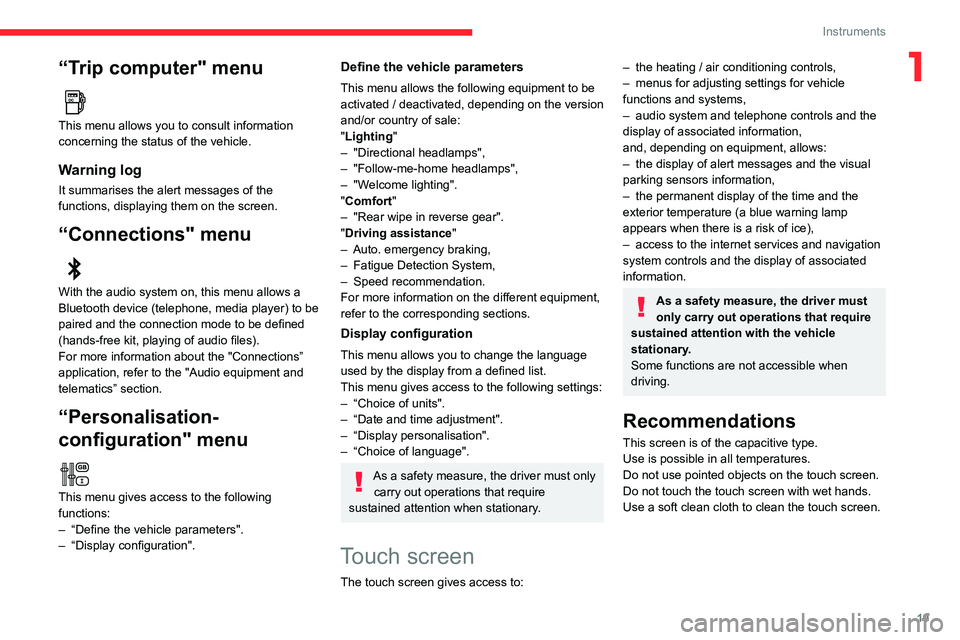
Touch screen
The touch screen gives access to:
– the heating / air conditioning controls,
– menus for adjusting settings for vehicle
functions and systems,
–
audio system and telephone controls and the
display of associated information,
and, depending on equipment, allows:
–
the display of alert messages and the visual
parking sensors information,
–
the permanent display of the time and the
exterior temperature (a blue warning lamp
appears when there is a risk of ice),
–
access to the internet services and navigation
system controls and the display of associated
information.
As a safety measure, the driver must
only carry out operations that require
sustained attention with the vehicle
stationary.
Some functions are not accessible when
driving.
Recommendations
This screen is of the capacitive type.
Use is possible in all temperatures.
Do not use pointed objects on the touch screen.
Do not touch the touch screen with wet hands.
Use a soft clean cloth to clean the touch screen.
Page 43 of 244
41
Ease of use and comfort
3Steering wheel
adjustment
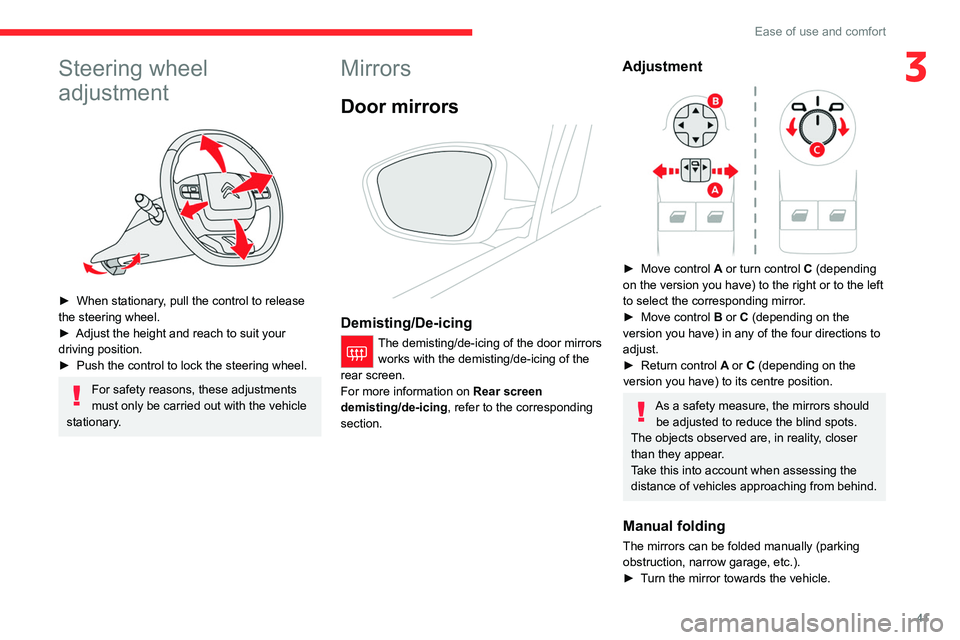
► When stationary, pull the control to release
the steering wheel.
►
Adjust the height and reach to suit your
driving position.
►
Push the control to lock the steering wheel.
For safety reasons, these adjustments
must only be carried out with the vehicle
stationary.
Mirrors
Door mirrors
Demisting/De-icing
The demisting/de-icing of the door mirrors works with the demisting/de-icing of the
rear screen.
For more information on Rear screen
demisting/de-icing , refer to the corresponding
section.
Adjustment
► Move control A or turn control C (depending
on the version you have) to the right or to the left
to select the corresponding mirror.
►
Move control
B or C (depending on the
version you have) in any of the four directions to
adjust.
►
Return control A
or C (depending on the
version you have) to its centre position.
As a safety measure, the mirrors should be adjusted to reduce the blind spots.
The objects observed are, in reality, closer
than they appear.
Take this into account when assessing the
distance of vehicles approaching from behind.
Manual folding
The mirrors can be folded manually (parking
obstruction, narrow garage, etc.).
►
T
urn the mirror towards the vehicle.
Page 52 of 244
50
Ease of use and comfort
Front armrest
Height adjustment
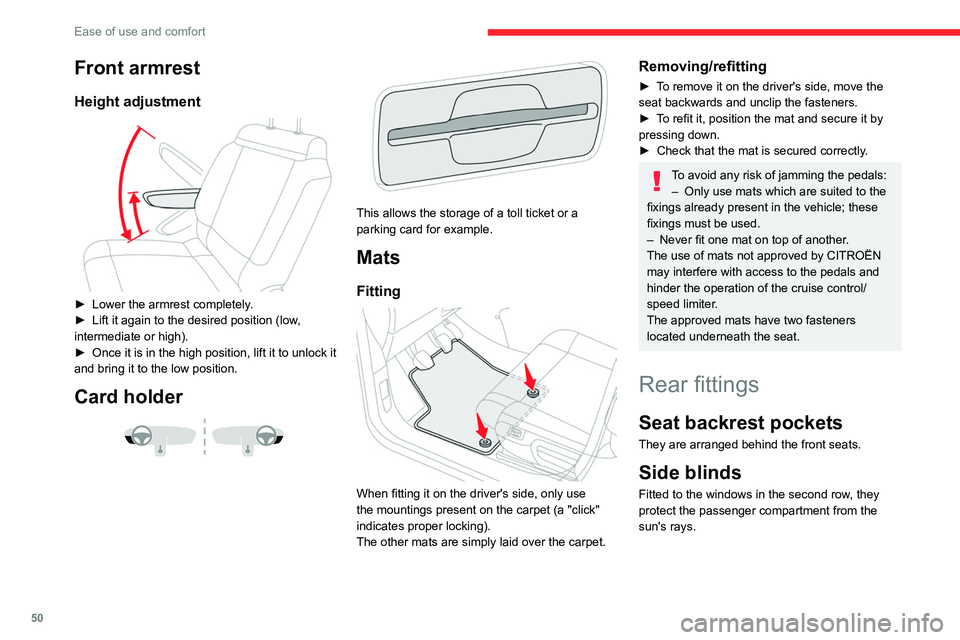
► Lower the armrest completely.
► Lift it again to the desired position (low ,
intermediate or high).
►
Once it is in the high position, lift it to unlock it
and bring it to the low position.
Card holder
This allows the storage of a toll ticket or a
parking card for example.
Mats
Fitting
When fitting it on the driver's side, only use
the mountings present on the carpet (a "click"
indicates proper locking).
The other mats are simply laid over the carpet.
Removing/refitting
► To remove it on the driver's side, move the
seat backwards and unclip the fasteners.
►
T
o refit it, position the mat and secure it by
pressing down.
►
Check that the mat is secured correctly
.
To avoid any risk of jamming the pedals:– Only use mats which are suited to the
fixings already present in the vehicle; these
fixings must be used.
–
Never fit one mat on top of another
.
The use of mats not approved by CITROËN
may interfere with access to the pedals and
hinder the operation of the cruise control/
speed limiter.
The approved mats have two fasteners
located underneath the seat.
Rear fittings
Seat backrest pockets
They are arranged behind the front seats.
Side blinds
Fitted to the windows in the second row, they
protect the passenger compartment from the
sun's rays.
► Pull the tab A and anchor the blind on the
hook B.
Always guide the blind slowly using the tab, both up and down.
Clothes hooks
They are located above each rear door.
Rear armrest and ski flap
It gives direct access to the boot for transporting
long objects.