parking sensors CITROEN C3 AIRCROSS 2023 Owners Manual
[x] Cancel search | Manufacturer: CITROEN, Model Year: 2023, Model line: C3 AIRCROSS, Model: CITROEN C3 AIRCROSS 2023Pages: 244, PDF Size: 7.09 MB
Page 5 of 244
3
Contents
Parking sensors 11 2
Top Rear Vision 11 3
Park Assist 11 6
7Practical informationCompatibility of fuels 121
Refuelling 121
Misfuel prevention (Diesel) 122
Snow chains 123
Towing device with quickly detachable
towball
123
Towing device 126
Energy economy mode 127
Roof bars 127
Bonnet 128
Engine compartment 129
Checking levels 130
Checks 132
AdBlue® (BlueHDi) 133
Advice on care and maintenance 135
8In the event of a breakdownRunning out of fuel (Diesel) 137
Tool kit 137
Temporary puncture repair kit 138
Spare wheel 141
Changing a bulb 144
Fuses 147
12
V battery 147
Towing 150
9Technical dataEngine technical data and towed loads 153
Petrol engines 154
Diesel engines 156
Dimensions 157
Identification markings 157
10Bluetooth® audio systemFirst steps 159
Steering mounted controls 160
Menus 160
Radio 161
DAB (Digital Audio Broadcasting) radio 162
Media 163
Telephone 165
Frequently asked questions 168
11CITROËN Connect RadioFirst steps 171
Steering mounted controls 172
Menus 173
Applications 174
Radio 174
DAB (Digital Audio Broadcasting) radio 176
Media 176
Telephone 178
Settings 181
Frequently asked questions 182
12CITROËN Connect NavFirst steps 184
Steering mounted controls 185
Menus 185
Voice commands 187
Navigation 190
Connected navigation 193
Applications 195
Radio 198
DAB (Digital Audio Broadcasting) radio 199
Media 199
Telephone 201
Settings 203
Frequently asked questions 205
13Event data recorders
■
Alphabetical index
bit.ly/helpPSA
Access to additional videos
Page 7 of 244
5
Overview
F.Select an audio source
G. Display the list of radio stations/audio tracks
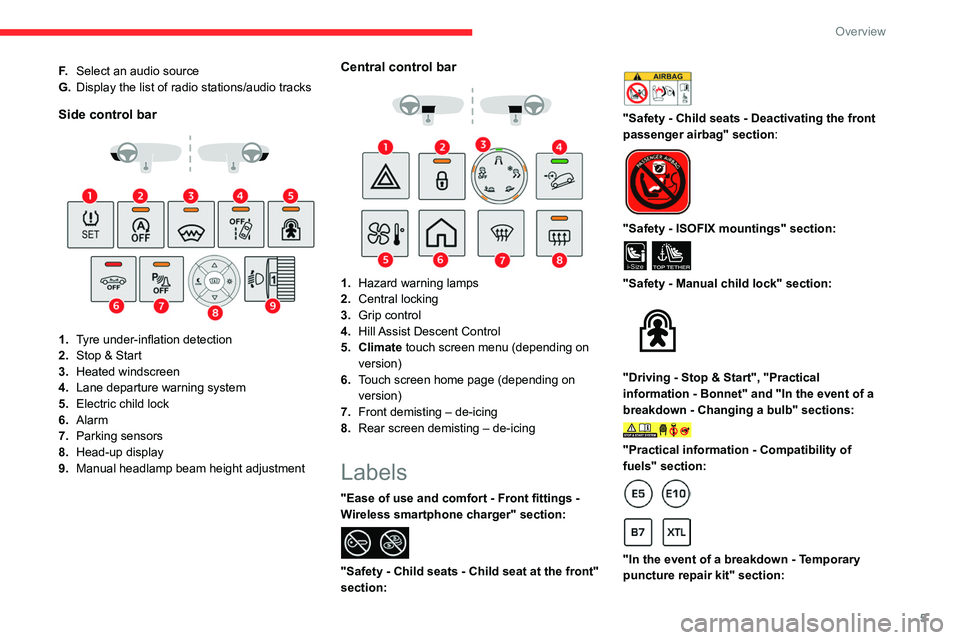
Side control bar
1.Tyre under-inflation detection
2. Stop & Start
3. Heated windscreen
4. Lane departure warning system
5. Electric child lock
6. Alarm
7. Parking sensors
8. Head-up display
9. Manual headlamp beam height adjustment
Central control bar
1.Hazard warning lamps
2. Central locking
3. Grip control
4. Hill Assist Descent Control
5. Climate touch screen menu (depending on version)
6. Touch screen home page (depending on
version)
7. Front demisting – de-icing
8. Rear screen demisting – de-icing
Labels
"Ease of use and comfort - Front fittings -
Wireless smartphone charger" section:
"Safety - Child seats - Child seat at the front"
section:
"Safety - Child seats - Deactivating the front
passenger airbag" section:
"Safety - ISOFIX mountings" section:
i-SizeTOP TETHER
"Safety - Manual child lock" section:
"Driving - Stop & Start", "Practical
information - Bonnet" and "In the event of a
breakdown - Changing a bulb" sections:
"Practical information - Compatibility of
fuels" section:
"In the event of a breakdown - Temporary
puncture repair kit" section:
Page 21 of 244
19
Instruments
1“Trip computer" menu
This menu allows you to consult information
concerning the status of the vehicle.
Warning log
It summarises the alert messages of the
functions, displaying them on the screen.
“Connections" menu
With the audio system on, this menu allows a
Bluetooth device (telephone, media player) to be
paired and the connection mode to be defined
(hands-free kit, playing of audio files).
For more information about the "Connections”
application, refer to the "Audio equipment and
telematics” section.
“Personalisation-
configuration" menu
This menu gives access to the following
functions:
–
“Define the vehicle parameters".
–
“Display configuration".
Define the vehicle parameters
This menu allows the following equipment to be
activated / deactivated, depending on the version
and/or country of sale:
"Lighting "
–
"Directional headlamps",
–
"Follow-me-home headlamps",
–
"W
elcome lighting".
"Comfort"
–
"Rear wipe in reverse gear".
"
Driving assistance"
–
Auto. emergency braking,
–
Fatigue Detection System,
–
Speed recommendation.
For more information on the different equipment,
refer to the corresponding sections.
Display configuration
This menu allows you to change the language
used by the display from a defined list.
This menu gives access to the following settings:
–
“Choice of units".
–
“Date and time adjustment".
–
“Display personalisation".
–
“Choice of language".
As a safety measure, the driver must only carry out operations that require
sustained attention when stationary.
Touch screen
The touch screen gives access to:
– the heating / air conditioning controls,
– menus for adjusting settings for vehicle
functions and systems,
–
audio system and telephone controls and the
display of associated information,
and, depending on equipment, allows:
–
the display of alert messages and the visual
parking sensors information,
–
the permanent display of the time and the
exterior temperature (a blue warning lamp
appears when there is a risk of ice),
–
access to the internet services and navigation
system controls and the display of associated
information.
As a safety measure, the driver must
only carry out operations that require
sustained attention with the vehicle
stationary.
Some functions are not accessible when
driving.
Recommendations
This screen is of the capacitive type.
Use is possible in all temperatures.
Do not use pointed objects on the touch screen.
Do not touch the touch screen with wet hands.
Use a soft clean cloth to clean the touch screen.
Page 87 of 244
85
Driving
6Towing
Driving with a trailer places greater
demands on the towing vehicle and
particular care must be taken.
Do not exceed the maximum towable
weights.
At altitude: reduce the maximum load by
10% per 1,000 metres of altitude; the lower
air density at high altitudes decreases engine
performance.
New vehicle: do not tow a trailer until the
vehicle has driven at least 620 miles
(1,000 kilometres).
If the outside temperature is high, let the
engine idle for 1 to 2 minutes after the
vehicle comes to a stop, to help it to cool.
Before setting off
Nose weight
► Distribute the load in the trailer so that the
heaviest items are as close as possible to the
axle and the nose weight (at the point where it
joins your vehicle) approaches the maximum
permitted without exceeding it.
Tyres
► Check the tyre pressures of the towing
vehicle and of the trailer , observing the
recommended pressures.
Lighting
► Check the electrical signalling on the trailer
and the headlamp beam height of your vehicle.
If a genuine CITROËN towing device is
used, the rear parking sensors will be
deactivated automatically to avoid the audible
signal.
When driving
Cooling
Towing a trailer uphill causes the coolant
temperature to increase. The maximum towable
load depends on the gradient and the exterior
temperature. The fan’s cooling capacity does not
increase with engine speed.
►
Reduce speed and lower the engine speed to
limit the amount of heating produced.
►
Pay constant attention to the coolant
temperature.
If this warning lamp and the STOP
warning lamp come on, stop the vehicle
and switch off the engine as soon as possible.
Brakes
Using the engine brake is recommended to limit
the overheating of the brakes. Braking distances
are increased when towing a trailer.
Side wind
Bear in mind that the vehicle will be more
susceptible to wind when towing.
Anti-theft protection
Electronic immobiliser
The keys contain a code, which must be
recognised by the vehicle before starting is
possible.
If the system malfunctions, indicated by the
display of a message, the engine will not start.
Contact a CITROËN dealer.
For safety and theft protection reasons,
never leave the electronic key in the
vehicle, even when you are close to it.
Page 114 of 244
11 2
Driving
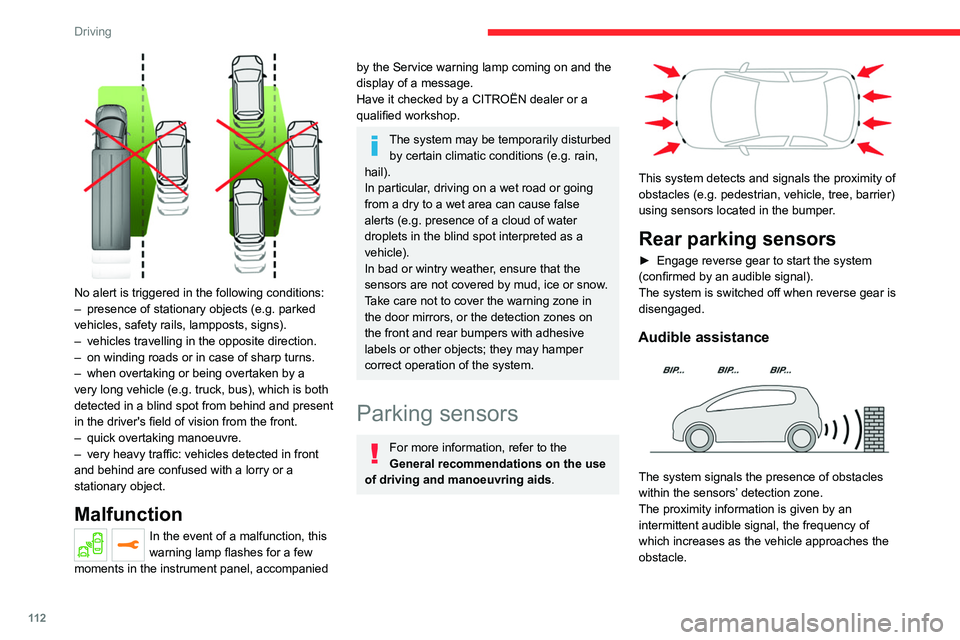
No alert is triggered in the following conditions:
– presence of stationary objects (e.g. parked
vehicles, safety rails, lampposts, signs).
–
vehicles travelling in the opposite direction.
–
on winding roads or in case of sharp turns.
–
when overtaking or being overtaken by a
very long vehicle (e.g.
truck, bus), which is both
detected in a blind spot from behind and present
in the driver's field of vision from the front.
–
quick overtaking manoeuvre.
–
very heavy traffic: vehicles detected in front
and behind are confused with a lorry or a
stationary object.
Malfunction
In the event of a malfunction, this
warning lamp flashes for a few
moments in the instrument panel, accompanied
by the Service warning lamp coming on and the
display of a message.
Have it checked by a CITROËN dealer or a
qualified workshop.
The system may be temporarily disturbed by certain climatic conditions (e.g. rain,
hail).
In particular, driving on a wet road or going
from a dry to a wet area can cause false
alerts (e.g.
presence of a cloud of water
droplets in the blind spot interpreted as a
vehicle).
In bad or wintry weather, ensure that the
sensors are not covered by mud, ice or snow.
Take care not to cover the warning zone in
the door mirrors, or the detection zones on
the front and rear bumpers with adhesive
labels or other objects; they may hamper
correct operation of the system.
Parking sensors
For more information, refer to the
General recommendations on the use
of driving and manoeuvring aids .
This system detects and signals the proximity of
obstacles (e.g.
pedestrian, vehicle, tree, barrier)
using sensors located in the bumper.
Rear parking sensors
► Engage reverse gear to start the system
(confirmed by an audible signal).
The system is switched off when reverse gear is
disengaged.
Audible assistance
The system signals the presence of obstacles
within the sensors’ detection zone.
The proximity information is given by an
intermittent audible signal, the frequency of
which increases as the vehicle approaches the
obstacle.
When the distance between the vehicle and
the obstacle becomes less than about thirty
centimetres, the audible signal becomes
continuous.
The sound emitted by the speaker (right or
left) indicates the side on which the obstacle is
located.
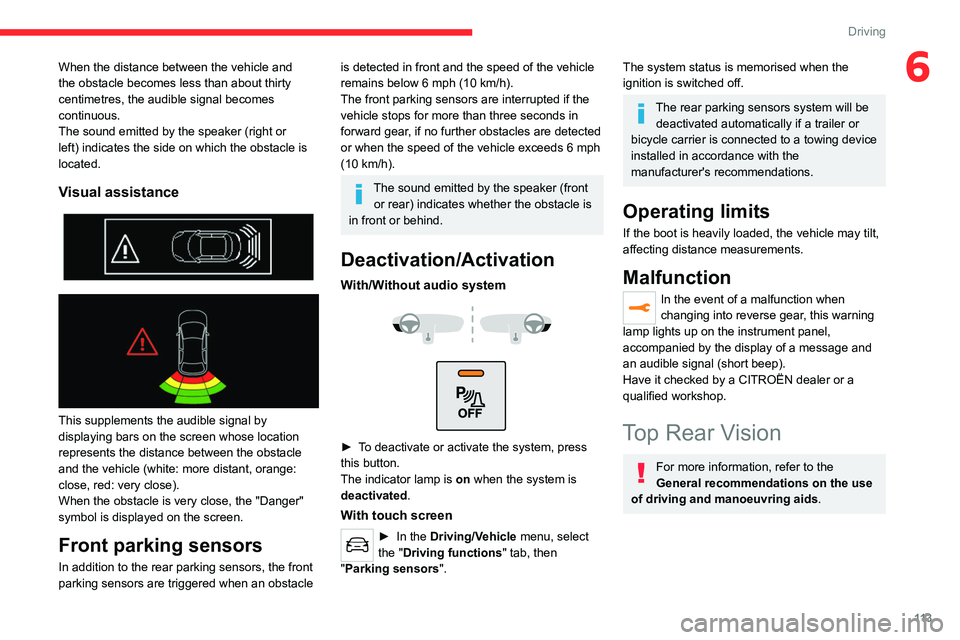
Visual assistance
This supplements the audible signal by
displaying bars on the screen whose location
represents the distance between the obstacle
and the vehicle (white: more distant, orange:
close, red: very close).
When the obstacle is very close, the "Danger"
symbol is displayed on the screen.
Front parking sensors
In addition to the rear parking sensors, the front
parking sensors are triggered when an obstacle
Page 115 of 244
11 3
Driving
6When the distance between the vehicle and
the obstacle becomes less than about thirty
centimetres, the audible signal becomes
continuous.
The sound emitted by the speaker (right or
left) indicates the side on which the obstacle is
located.
Visual assistance
This supplements the audible signal by
displaying bars on the screen whose location
represents the distance between the obstacle
and the vehicle (white: more distant, orange:
close, red: very close).
When the obstacle is very close, the "Danger"
symbol is displayed on the screen.
Front parking sensors
In addition to the rear parking sensors, the front
parking sensors are triggered when an obstacle
is detected in front and the speed of the vehicle
remains below 6 mph (10 km/h).
The front parking sensors are interrupted if the
vehicle stops for more than three seconds in
forward gear, if no further obstacles are detected
or when the speed of the vehicle exceeds 6 mph
(10 km/h).
The sound emitted by the speaker (front or rear) indicates whether the obstacle is
in front or behind.
Deactivation/Activation
With/Without audio system
► To deactivate or activate the system, press
this button.
The indicator lamp is on when the system is
deactivated.
With touch screen
► In the Driving/Vehicle menu, select
the "Driving functions " tab, then
"Parking sensors".
The system status is memorised when the
ignition is switched off.
The rear parking sensors system will be deactivated automatically if a trailer or
bicycle carrier is connected to a towing device
installed in accordance with the
manufacturer's recommendations.
Operating limits
If the boot is heavily loaded, the vehicle may tilt,
affecting distance measurements.
Malfunction
In the event of a malfunction when
changing into reverse gear, this warning
lamp lights up on the instrument panel,
accompanied by the display of a message and
an audible signal (short beep).
Have it checked by a CITROËN dealer or a
qualified workshop.
Top Rear Vision
For more information, refer to the
General recommendations on the use
of driving and manoeuvring aids .
Page 116 of 244
11 4
Driving
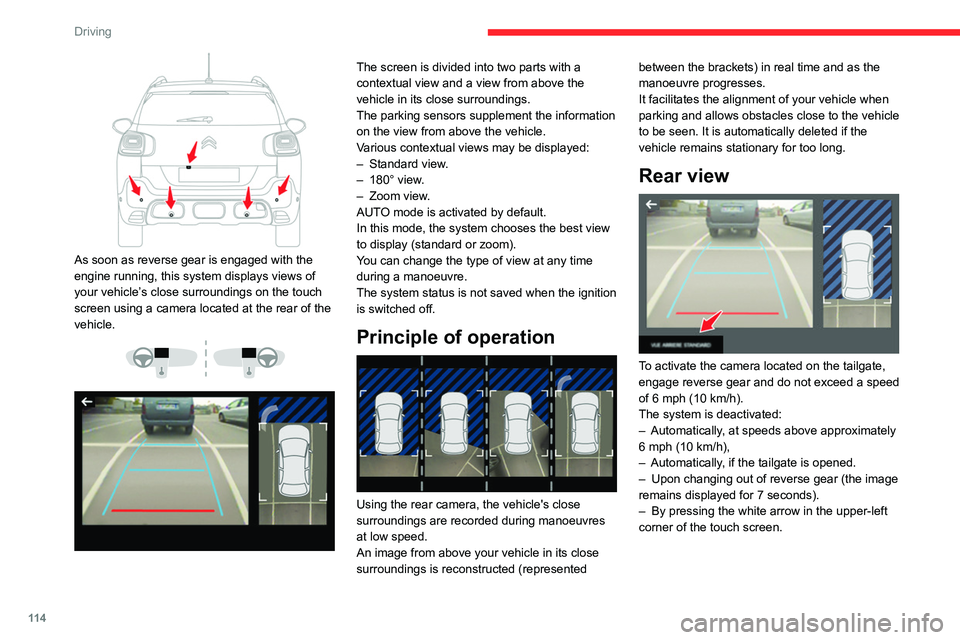
As soon as reverse gear is engaged with the
engine running, this system displays views of
your vehicle’s close surroundings on the touch
screen using a camera located at the rear of the
vehicle.
The screen is divided into two parts with a
contextual view and a view from above the
vehicle in its close surroundings.
The parking sensors supplement the information
on the view from above the vehicle.
Various contextual views may be displayed:
–
Standard view
.
–
180° view
.
–
Zoom view
.
AUTO mode is activated by default.
In this mode, the system chooses the best view
to display
(standard or zoom).
You can change the type of view at any time
during a manoeuvre.
The system status is not saved when the ignition
is switched off.
Principle of operation
Using the rear camera, the vehicle's close
surroundings are recorded during manoeuvres
at low speed.
An image from above your vehicle in its close
surroundings is reconstructed (represented between the brackets) in real time and as the
manoeuvre progresses.
It facilitates the alignment of your vehicle when
parking and allows obstacles close to the vehicle
to be seen. It is automatically deleted if the
vehicle remains stationary for too long.
Rear view
To activate the camera located on the tailgate,
engage reverse gear and do not exceed a speed
of 6 mph (10
km/h).
The system is deactivated:
–
Automatically
, at speeds above approximately
6 mph (10
km/h),
–
Automatically
, if the tailgate is opened.
–
Upon changing out of reverse gear (the image
remains displayed for 7
seconds).
–
By pressing the white arrow in the upper-left
corner of the touch screen.
AUTO mode
This mode is activated by default.
Using sensors in the rear bumper, the automatic
view changes from the rear view (standard) to
the view from above (zoom) as an obstacle is
approached at the level of the red line (less than
30 cm) during a manoeuvre.
Standard view
The area behind the vehicle is displayed on the
screen.
Page 117 of 244
11 5
Driving
6AUTO mode
This mode is activated by default.
Using sensors in the rear bumper, the automatic
view changes from the rear view (standard) to
the view from above (zoom) as an obstacle is
approached at the level of the red line (less than
30 cm) during a manoeuvre.
Standard view
The area behind the vehicle is displayed on the
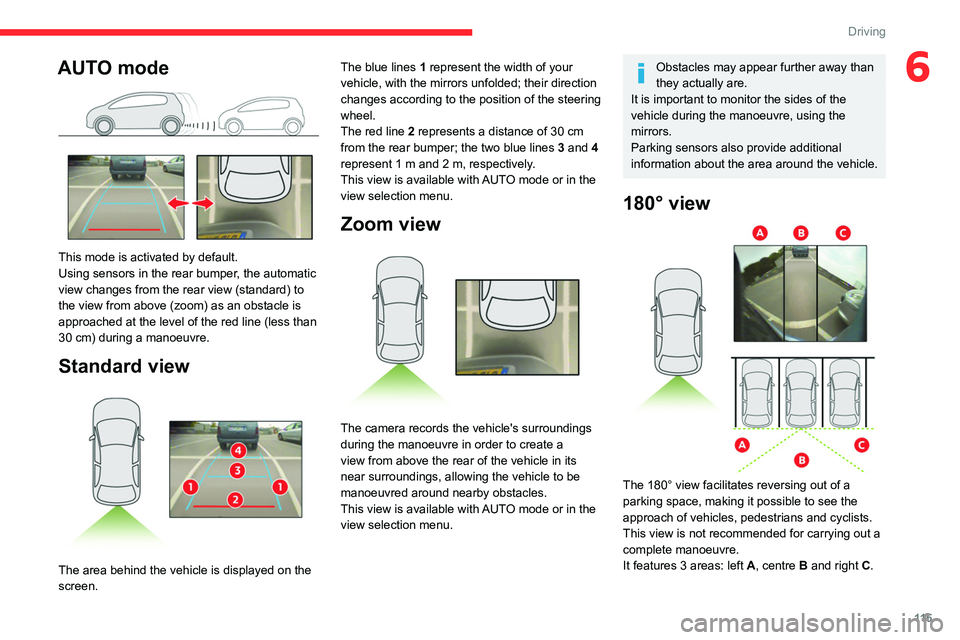
screen. The blue lines
1 represent the width of your
vehicle, with the mirrors unfolded; their direction
changes according to the position of the steering
wheel.
The red line 2 represents a distance of 30 cm
from the rear bumper; the two blue lines 3 and 4
represent 1 m and 2 m, respectively.
This view is available with AUTO mode or in the
view selection menu.
Zoom view
The camera records the vehicle's surroundings
during the manoeuvre in order to create a
view from above the rear of the vehicle in its
near surroundings, allowing the vehicle to be
manoeuvred around nearby obstacles.
This view is available with AUTO mode or in the
view selection menu.
Obstacles may appear further away than
they actually are.
It is important to monitor the sides of the
vehicle during the manoeuvre, using the
mirrors.
Parking sensors also provide additional
information about the area around the vehicle.
180° view
The 180° view facilitates reversing out of a
parking space, making it possible to see the
approach of vehicles, pedestrians and cyclists.
This view is not recommended for carrying out a
complete manoeuvre.
It features 3 areas: left A, centre B and right C.
Page 118 of 244
11 6
Driving
This view is only available via the view selection
menu.
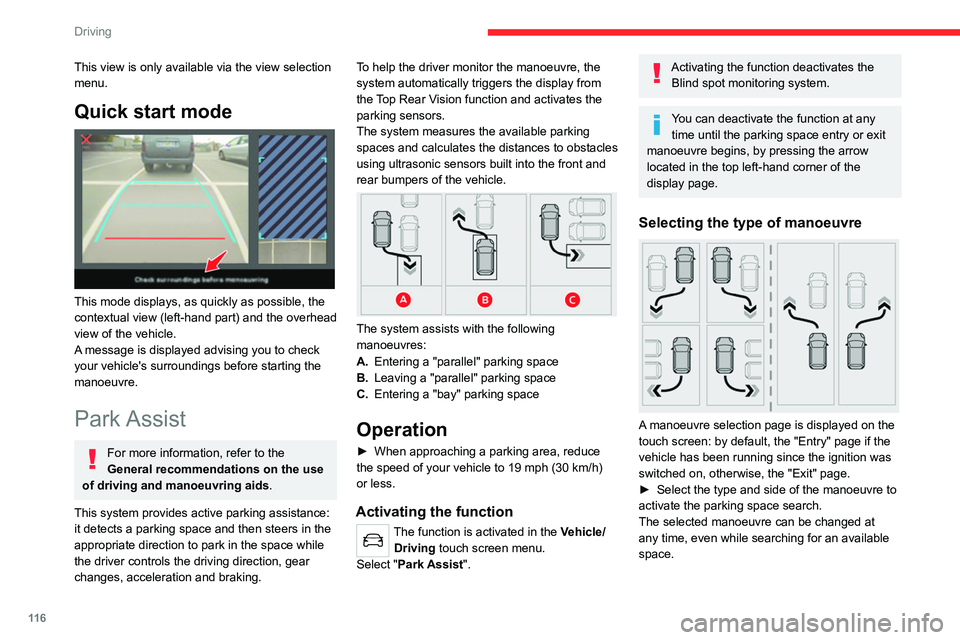
Quick start mode
This mode displays, as quickly as possible, the
contextual view (left-hand part) and the overhead
view of the vehicle.
A message is displayed advising you to check
your vehicle's surroundings before starting the
manoeuvre.
Park Assist
For more information, refer to the
General recommendations on the use
of driving and manoeuvring aids .
This system provides active parking assistance:
it detects a parking space and then steers in the
appropriate direction to park in the space while
the driver controls the driving direction, gear
changes, acceleration and braking. To help the driver monitor the manoeuvre, the
system automatically triggers the display from
the
T
op Rear Vision function and activates the
parking sensors.
The system measures the available parking
spaces and calculates the distances to obstacles
using ultrasonic sensors built into the front and
rear bumpers of the vehicle.
The system assists with the following
manoeuvres:
A. Entering a "parallel" parking space
B. Leaving a "parallel" parking space
C. Entering a "bay" parking space
Operation
► When approaching a parking area, reduce
the speed of your vehicle to 19 mph (30 km/h)
or less.
Activating the function
The function is activated in the Vehicle/ Driving touch screen menu.
Select "Park Assist".
Activating the function deactivates the Blind spot monitoring system.
You can deactivate the function at any time until the parking space entry or exit
manoeuvre begins, by pressing the arrow
located in the top left-hand corner of the
display page.
Selecting the type of manoeuvre
A manoeuvre selection page is displayed on the
touch screen: by default, the "Entry" page if the
vehicle has been running since the ignition was
switched on, otherwise, the "Exit" page.
►
Select the type and side of the manoeuvre to
activate the parking space search.
The selected manoeuvre can be changed at
any time, even while searching for an available
space.
Parking space search
► You should drive at a distance of between
0.50 m and 1.50 m from the row of parked
vehicles, without ever exceeding 19 mph
(30 km/h), until the system finds an available
space.
The parking space search stops over this limit.
The function automatically deactivates once the
vehicle speed exceeds 31 mph (50 km/h).
For ''parallel'' parking, the space must at
a minimum be equal to the length of your
vehicle plus 0.60 m.
For ''bay'' parking, the width of the space
must be equal to the width of your vehicle
plus 0.70 m.
If the parking sensors function has been
deactivated in the Driving/Vehicle menu
of the touch screen, it will be automatically
reactivated when the system is activated.
Page 119 of 244
11 7
Driving
6Parking space search
► You should drive at a distance of between
0.50 m and 1.50 m from the row of parked
vehicles, without ever exceeding 19
mph
(30
km/h), until the system finds an available
space.
The parking space search stops over this limit.
The function automatically deactivates once the
vehicle speed exceeds 31 mph (50
km/h).
For ''parallel'' parking, the space must at
a minimum be equal to the length of your
vehicle plus 0.60 m.
For ''bay'' parking, the width of the space
must be equal to the width of your vehicle
plus 0.70 m.
If the parking sensors function has been
deactivated in the Driving/Vehicle menu
of the touch screen, it will be automatically
reactivated when the system is activated.
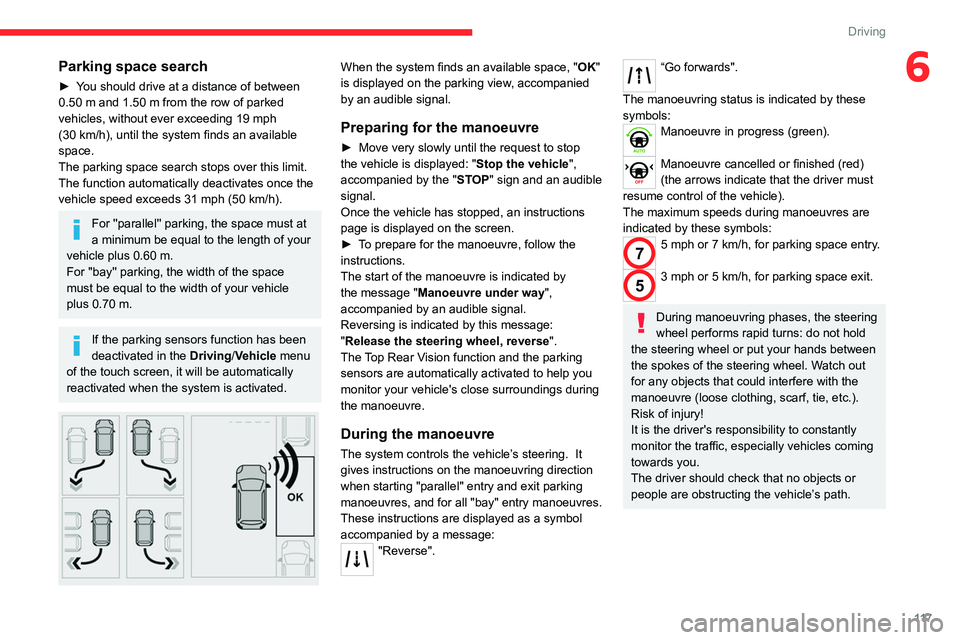
When the system finds an available space, " OK"
is displayed on the parking view, accompanied
by an audible signal.
Preparing for the manoeuvre
► Move very slowly until the request to stop
the vehicle is displayed: " Stop the vehicle",
accompanied by the " ST
OP" sign and an audible
signal.
Once the vehicle has stopped, an instructions
page is displayed on the screen.
►
T
o prepare for the manoeuvre, follow the
instructions.
The start of the manoeuvre is indicated by
the message
"Manoeuvre under way",
accompanied by an audible signal.
Reversing is indicated by this message:
"Release the steering wheel, reverse ".
The Top Rear Vision function and the parking
sensors are automatically activated to help you
monitor your vehicle's close surroundings during
the manoeuvre.
During the manoeuvre
The system controls the vehicle’s steering. It
gives instructions on the manoeuvring direction
when starting "parallel" entry and exit parking
manoeuvres, and for all "bay" entry manoeuvres.
These instructions are displayed as a symbol
accompanied by a message:
"Reverse".
“Go forwards".
The manoeuvring status is indicated by these
symbols:
Manoeuvre in progress (green).
Manoeuvre cancelled or finished (red)
(the arrows indicate that the driver must
resume control of the vehicle).
The maximum speeds during manoeuvres are
indicated by these symbols:
75 mph or 7 km/h, for parking space entry.
53 mph or 5 km/h, for parking space exit.
During manoeuvring phases, the steering
wheel performs rapid turns: do not hold
the steering wheel or put your hands between
the spokes of the steering wheel. Watch out
for any objects that could interfere with the
manoeuvre (loose clothing, scarf, tie, etc.).
Risk of injury!
It is the driver's responsibility to constantly
monitor the traffic, especially vehicles coming
towards you.
The driver should check that no objects or
people are obstructing the vehicle’s path.