phone CITROEN C3 AIRCROSS 2023 Owners Manual
[x] Cancel search | Manufacturer: CITROEN, Model Year: 2023, Model line: C3 AIRCROSS, Model: CITROEN C3 AIRCROSS 2023Pages: 244, PDF Size: 7.09 MB
Page 5 of 244
3
Contents
Parking sensors 11 2
Top Rear Vision 11 3
Park Assist 11 6
7Practical informationCompatibility of fuels 121
Refuelling 121
Misfuel prevention (Diesel) 122
Snow chains 123
Towing device with quickly detachable
towball
123
Towing device 126
Energy economy mode 127
Roof bars 127
Bonnet 128
Engine compartment 129
Checking levels 130
Checks 132
AdBlue® (BlueHDi) 133
Advice on care and maintenance 135
8In the event of a breakdownRunning out of fuel (Diesel) 137
Tool kit 137
Temporary puncture repair kit 138
Spare wheel 141
Changing a bulb 144
Fuses 147
12
V battery 147
Towing 150
9Technical dataEngine technical data and towed loads 153
Petrol engines 154
Diesel engines 156
Dimensions 157
Identification markings 157
10Bluetooth® audio systemFirst steps 159
Steering mounted controls 160
Menus 160
Radio 161
DAB (Digital Audio Broadcasting) radio 162
Media 163
Telephone 165
Frequently asked questions 168
11CITROËN Connect RadioFirst steps 171
Steering mounted controls 172
Menus 173
Applications 174
Radio 174
DAB (Digital Audio Broadcasting) radio 176
Media 176
Telephone 178
Settings 181
Frequently asked questions 182
12CITROËN Connect NavFirst steps 184
Steering mounted controls 185
Menus 185
Voice commands 187
Navigation 190
Connected navigation 193
Applications 195
Radio 198
DAB (Digital Audio Broadcasting) radio 199
Media 199
Telephone 201
Settings 203
Frequently asked questions 205
13Event data recorders
■
Alphabetical index
bit.ly/helpPSA
Access to additional videos
Page 6 of 244
4
Overview
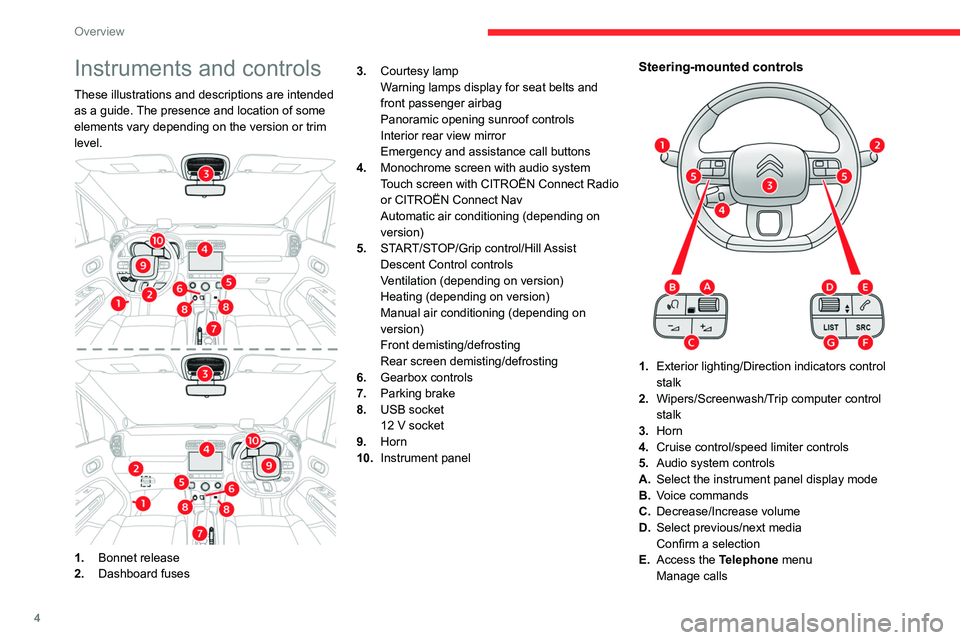
Instruments and controls
These illustrations and descriptions are intended
as a guide. The presence and location of some
elements vary depending on the version or trim
level.
1.Bonnet release
2. Dashboard fuses 3.
Courtesy lamp
Warning lamps display for seat belts and
front passenger airbag
Panoramic opening sunroof controls
Interior rear view mirror
Emergency and assistance call buttons
4. Monochrome screen with audio system
Touch screen with CITROËN Connect Radio
or CITROËN Connect Nav
Automatic air conditioning (depending on
version)
5. START/STOP/Grip control/Hill Assist
Descent Control controls
Ventilation (depending on version)
Heating (depending on version)
Manual air conditioning (depending on
version)
Front demisting/defrosting
Rear screen demisting/defrosting
6. Gearbox controls
7. Parking brake
8. USB socket
12 V socket
9. Horn
10. Instrument panel
Steering-mounted controls
1.Exterior lighting/Direction indicators control
stalk
2. Wipers/Screenwash/Trip computer control
stalk
3. Horn
4. Cruise control/speed limiter controls
5. Audio system controls
A. Select the instrument panel display mode
B. Voice commands
C. Decrease/Increase volume
D. Select previous/next media
Confirm a selection
E. Access the Telephone menu
Manage calls
Page 7 of 244
5
Overview
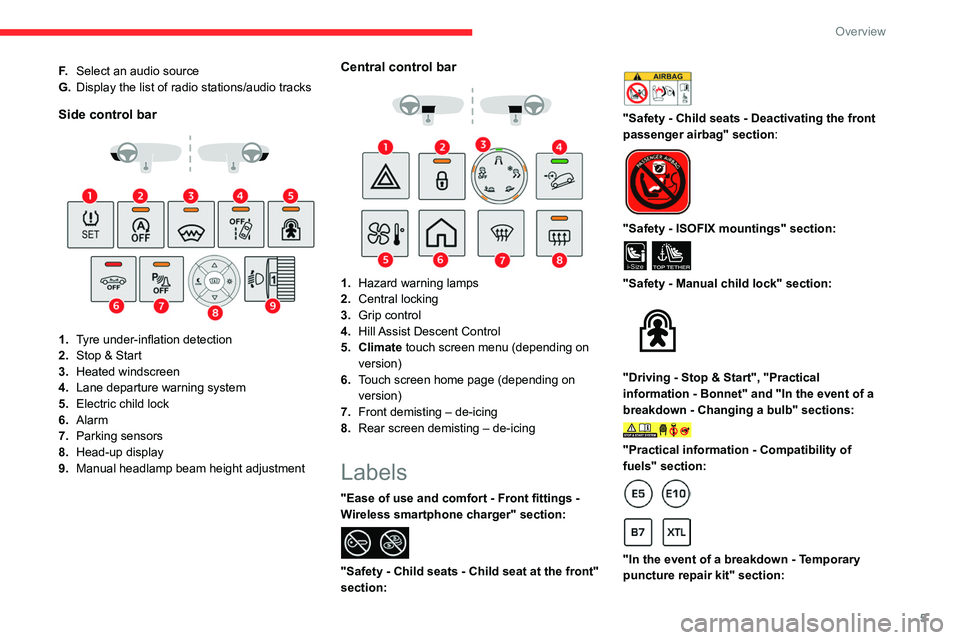
F.Select an audio source
G. Display the list of radio stations/audio tracks
Side control bar
1.Tyre under-inflation detection
2. Stop & Start
3. Heated windscreen
4. Lane departure warning system
5. Electric child lock
6. Alarm
7. Parking sensors
8. Head-up display
9. Manual headlamp beam height adjustment
Central control bar
1.Hazard warning lamps
2. Central locking
3. Grip control
4. Hill Assist Descent Control
5. Climate touch screen menu (depending on version)
6. Touch screen home page (depending on
version)
7. Front demisting – de-icing
8. Rear screen demisting – de-icing
Labels
"Ease of use and comfort - Front fittings -
Wireless smartphone charger" section:
"Safety - Child seats - Child seat at the front"
section:
"Safety - Child seats - Deactivating the front
passenger airbag" section:
"Safety - ISOFIX mountings" section:
i-SizeTOP TETHER
"Safety - Manual child lock" section:
"Driving - Stop & Start", "Practical
information - Bonnet" and "In the event of a
breakdown - Changing a bulb" sections:
"Practical information - Compatibility of
fuels" section:
"In the event of a breakdown - Temporary
puncture repair kit" section:
Page 20 of 244
18
Instruments
Pressing this button takes you back up a
level or cancels the current operation.
Display screen menus
– LIGHTING :
• GUIDE LAMPS (Guide-me-home lighting),
•
DIR HEADLAMPS (Directional headlamps).
–
DRIVE ASSIST
:
•
COLLISION
ALT (Automatic emergency
braking),
•
VIGILANCE
ALT (Fatigue Detection System),
•
ADVISED SPEED (Speed limit recognition).
–
COMFOR
T :
•
REAR WIPE REV (Automatic windscreen
wiper when reversing).
For more information on one of these functions,
refer to the corresponding section.
Monochrome screen C
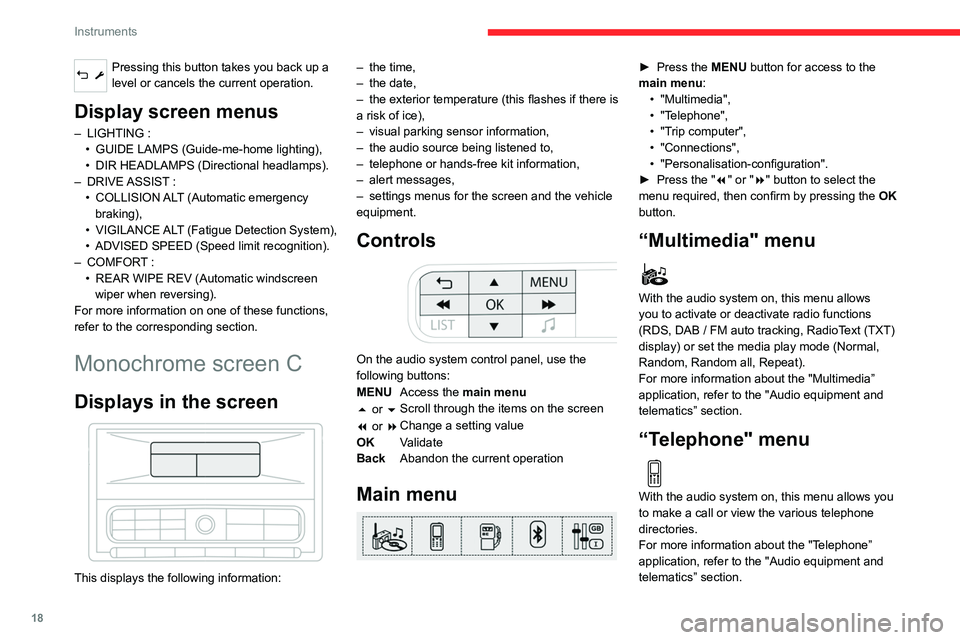
Displays in the screen
This displays the following information: –
the time,
–
the date,
–
the exterior temperature (this flashes if there is
a risk of ice),
–
visual parking sensor information,
–
the audio source being listened to,
–
telephone or hands-free kit information,
–
alert messages,
–
settings menus for the screen and the vehicle
equipment.
Controls
On the audio system control panel, use the
following buttons:
MENU Access the main menu
5 or 6 Scroll through the items on the screen
7 or 8 Change a setting value
OK Validate
Back Abandon the current operation
Main menu
► Press the MENU button for access to the
main menu: •
"Multimedia",
•
"T
elephone",
•
"T
rip computer",
•
"Connections",
•
"Personalisation-configuration".
►
Press the "
7" or "8" button to select the
menu required, then confirm by pressing the OK
button.
“Multimedia" menu
With the audio system on, this menu allows
you to activate or deactivate radio functions
(RDS, DAB
/ FM auto tracking, RadioText (TXT)
display) or set the media play mode (Normal,
Random, Random all, Repeat).
For more information about the "Multimedia”
application, refer to the "Audio equipment and
telematics” section.
“Telephone" menu
With the audio system on, this menu allows you
to make a call or view the various telephone
directories.
For more information about the "Telephone”
application, refer to the "Audio equipment and
telematics” section.
“Trip computer" menu
This menu allows you to consult information
concerning the status of the vehicle.
Warning log
It summarises the alert messages of the
functions, displaying them on the screen.
“Connections" menu
With the audio system on, this menu allows a
Bluetooth device (telephone, media player) to be
paired and the connection mode to be defined
(hands-free kit, playing of audio files).
For more information about the "Connections”
application, refer to the "Audio equipment and
telematics” section.
“Personalisation-
configuration" menu
This menu gives access to the following
functions:
– “Define the vehicle parameters".
– “Display configuration".
Page 21 of 244
19
Instruments
1“Trip computer" menu
This menu allows you to consult information
concerning the status of the vehicle.
Warning log
It summarises the alert messages of the
functions, displaying them on the screen.
“Connections" menu
With the audio system on, this menu allows a
Bluetooth device (telephone, media player) to be
paired and the connection mode to be defined
(hands-free kit, playing of audio files).
For more information about the "Connections”
application, refer to the "Audio equipment and
telematics” section.
“Personalisation-
configuration" menu
This menu gives access to the following
functions:
–
“Define the vehicle parameters".
–
“Display configuration".
Define the vehicle parameters
This menu allows the following equipment to be
activated / deactivated, depending on the version
and/or country of sale:
"Lighting "
–
"Directional headlamps",
–
"Follow-me-home headlamps",
–
"W
elcome lighting".
"Comfort"
–
"Rear wipe in reverse gear".
"
Driving assistance"
–
Auto. emergency braking,
–
Fatigue Detection System,
–
Speed recommendation.
For more information on the different equipment,
refer to the corresponding sections.
Display configuration
This menu allows you to change the language
used by the display from a defined list.
This menu gives access to the following settings:
–
“Choice of units".
–
“Date and time adjustment".
–
“Display personalisation".
–
“Choice of language".
As a safety measure, the driver must only carry out operations that require
sustained attention when stationary.
Touch screen
The touch screen gives access to:
– the heating / air conditioning controls,
– menus for adjusting settings for vehicle
functions and systems,
–
audio system and telephone controls and the
display of associated information,
and, depending on equipment, allows:
–
the display of alert messages and the visual
parking sensors information,
–
the permanent display of the time and the
exterior temperature (a blue warning lamp
appears when there is a risk of ice),
–
access to the internet services and navigation
system controls and the display of associated
information.
As a safety measure, the driver must
only carry out operations that require
sustained attention with the vehicle
stationary.
Some functions are not accessible when
driving.
Recommendations
This screen is of the capacitive type.
Use is possible in all temperatures.
Do not use pointed objects on the touch screen.
Do not touch the touch screen with wet hands.
Use a soft clean cloth to clean the touch screen.
Page 22 of 244
20
Instruments
Workflow
Use the buttons on each side of the touch screen
to access the menus, then use the buttons that
appear on the touch screen.
Certain functions may be displayed over 1 or 2
pages.
To deactivate / activate a function, press OFF/
ON.
To modify a setting (lighting duration, etc.) or
access additional information, press the symbol
for the function.
After a few moments with no action on the secondary page, the primary page is
displayed automatically.
Use this button to confirm.
Use this button to return to the previous
page.
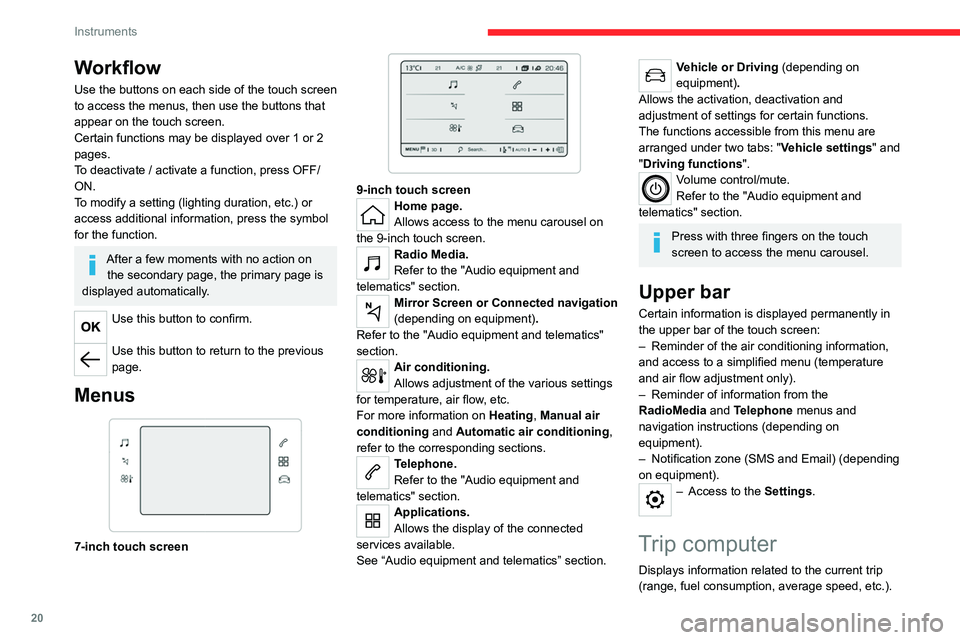
Menus
7-inch touch screen
9-inch touch screenHome page.
Allows access to the menu carousel on
the 9-inch touch screen.
Radio Media.
Refer to the "Audio equipment and
telematics" section.
Mirror Screen or Connected navigation
(depending on equipment) .
Refer to the "Audio equipment and telematics"
section.
Air conditioning.
Allows adjustment of the various settings
for temperature, air flow, etc.
For more information on Heating, Manual air
conditioning and Automatic air conditioning ,
refer to the corresponding sections.
Telephone.
Refer to the "Audio equipment and
telematics" section.
Applications.
Allows the display of the connected
services available.
See “Audio equipment and telematics” section.
Vehicle or Driving (depending on
equipment) .
Allows the activation, deactivation and
adjustment of settings for certain functions.
The functions accessible from this menu are
arranged under two tabs: " Vehicle settings" and
"Driving functions ".
Volume control/mute.
Refer to the "Audio equipment and
telematics" section.
Press with three fingers on the touch
screen to access the menu carousel.
Upper bar
Certain information is displayed permanently in
the upper bar of the touch screen:
–
Reminder of the air conditioning information,
and access to a simplified menu (temperature
and air flow adjustment only).
–
Reminder of information from the
RadioMedia
and Telephone menus and
navigation instructions (depending on
equipment).
–
Notification zone (SMS and Email) (depending
on equipment).
– Access to the Settings.
Trip computer
Displays information related to the current trip
(range, fuel consumption, average speed, etc.).
Information display
Details are displayed successively.
– The current information tab with:
• trip mileage.
• range.
• current fuel consumption.
• the Stop & Start time counter.
• information on the speed limit recognition
system (depending on version).
– Trip 1 with:
• average speed.
• average fuel consumption.
• distance travelled for the first trip.
Depending on your vehicle's equipment, a 2
nd trip
is available.
– Trip 2 with:
• average speed.
• average fuel consumption.
• distance travelled. for the second trip.
Trips 1 and 2 are independent and are used
identically.
For example, trip 1 can be used for daily figures
and trip 2 for monthly figures.
Page 28 of 244
26
Access
electronic key on your person in the recognition
zone A.
Unlocking the vehicle
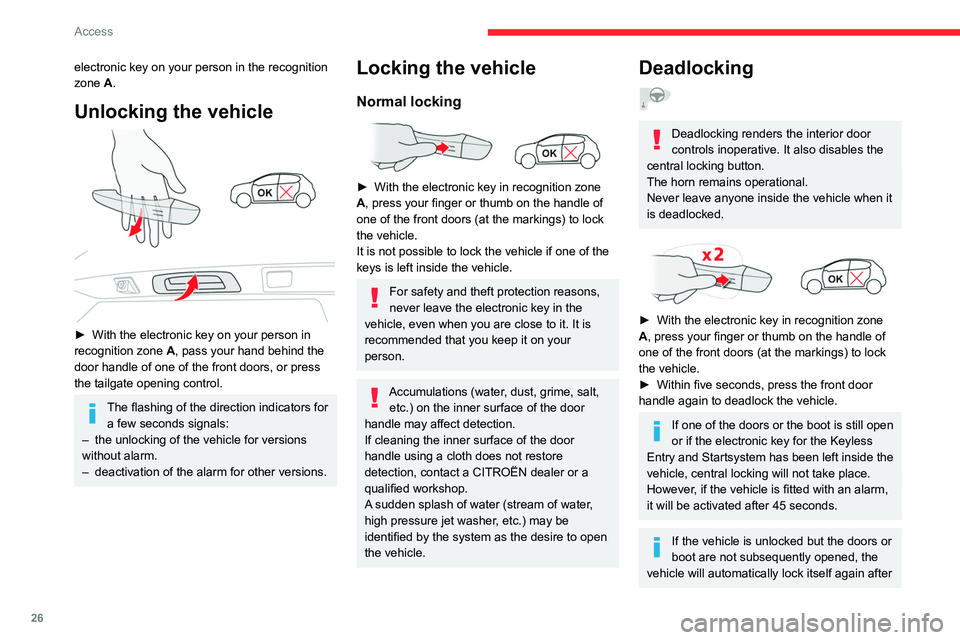
► With the electronic key on your person in
recognition zone A
, pass your hand behind the
door handle of one of the front doors, or press
the tailgate opening control.
The flashing of the direction indicators for a few seconds signals:
–
the unlocking of the vehicle for versions
without alarm.
–
deactivation of the alarm for other versions.
Locking the vehicle
Normal locking
► With the electronic key in recognition zone
A , press your finger or thumb on the handle of
one of the front doors (at the markings) to lock
the vehicle.
It is not possible to lock the vehicle if one of the
keys is left inside the vehicle.
For safety and theft protection reasons,
never leave the electronic key in the
vehicle, even when you are close to it. It is
recommended that you keep it on your
person.
Accumulations (water, dust, grime, salt, etc.) on the inner surface of the door
handle may affect detection.
If cleaning the inner surface of the door
handle using a cloth does not restore
detection, contact a CITROËN dealer or a
qualified workshop.
A sudden splash of water (stream of water,
high pressure jet washer, etc.) may be
identified by the system as the desire to open
the vehicle.
Deadlocking
Deadlocking renders the interior door
controls inoperative. It also disables the
central locking button.
The horn remains operational.
Never leave anyone inside the vehicle when it
is deadlocked.
► With the electronic key in recognition zone
A , press your finger or thumb on the handle of
one of the front doors (at the markings) to lock
the vehicle.
►
Within five seconds, press the front door
handle again to deadlock the vehicle.
If one of the doors or the boot is still open
or if the electronic key for the Keyless
Entry and Start
system has been left inside the
vehicle, central locking will not take place.
However
, if the vehicle is fitted with an alarm,
it will be activated after 45
seconds.
If the vehicle is unlocked but the doors or
boot are not subsequently opened, the
vehicle will automatically lock itself again after
about 30 seconds. If the vehicle is fitted with
an alarm, it will be reactivated automatically.
As a safety measure, never leave the vehicle, even for a short time, without
taking the Keyless Entry and Start system’s
electronic key with you.
Be aware of the risk of theft of the vehicle if
the key is present in one of the defined areas
while the vehicle is unlocked.
To preserve the battery charge in the electronic key and the vehicle's battery,
the "hands-free" functions are set to
hibernation mode after 21 days without use.
To restore these functions, press one of the
remote control buttons or start the engine with
the electronic key in the reader.
For more information on starting with the
Keyless Entry and Start system, refer to the
corresponding section.
Electrical interference
The electronic key may not operate if
close to certain electronic devices such as
telephones (switched on or on standby) or
laptop computers, strong magnetic fields, etc.
Page 29 of 244
27
Access
2about 30 seconds. If the vehicle is fitted with
an alarm, it will be reactivated automatically .
As a safety measure, never leave the vehicle, even for a short time, without
taking the Keyless Entry and Start system’s
electronic key with you.
Be aware of the risk of theft of the vehicle if
the key is present in one of the defined areas
while the vehicle is unlocked.
To preserve the battery charge in the electronic key and the vehicle's battery,
the "hands-free" functions are set to
hibernation mode after 21 days without use.
To restore these functions, press one of the
remote control buttons or start the engine with
the electronic key in the reader.
For more information on starting with the
Keyless Entry and Start system, refer to the
corresponding section.
Electrical interference
The electronic key may not operate if
close to certain electronic devices such as
telephones (switched on or on standby) or
laptop computers, strong magnetic fields, etc.
Back-up procedures
Lost keys, remote control,
electronic key
Go to a CITROËN dealer with the vehicle's
registration certificate, your personal
identification documents and if possible, the label
bearing the key code.
The CITROËN dealer will be able to retrieve the
key code and the transponder code, enabling a
new key to be ordered.
Complete unlocking/locking
of the vehicle with the key
Use this procedure in the following situations:
– Remote control battery discharged.
–
Remote control malfunction.
–
V
ehicle battery discharged.
–
V
ehicle in an area subject to strong
electromagnetic interference.
In the first case, change the remote control
battery.
In the second case, reinitialise
the remote
control.
Refer to the corresponding sections.
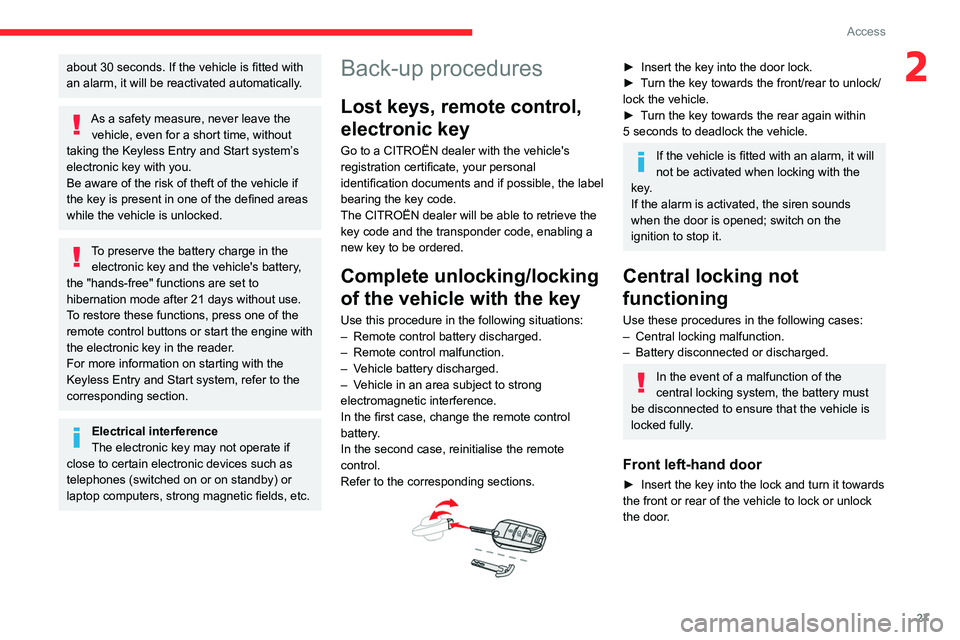
► Insert the key into the door lock.
► T urn the key towards the front/rear to unlock/
lock the vehicle.
►
T
urn the key towards the rear again within
5
seconds to deadlock the vehicle.
If the vehicle is fitted with an alarm, it will
not be activated when locking with the
key.
If the alarm is activated, the siren sounds
when the door is opened; switch on the
ignition to stop it.
Central locking not
functioning
Use these procedures in the following cases:
– Central locking malfunction.
–
Battery disconnected or discharged.
In the event of a malfunction of the
central locking system, the battery must
be disconnected to ensure that the vehicle is
locked fully.
Front left-hand door
► Insert the key into the lock and turn it towards
the front or rear of the vehicle to lock or unlock
the door
.
Page 50 of 244
48
Ease of use and comfort
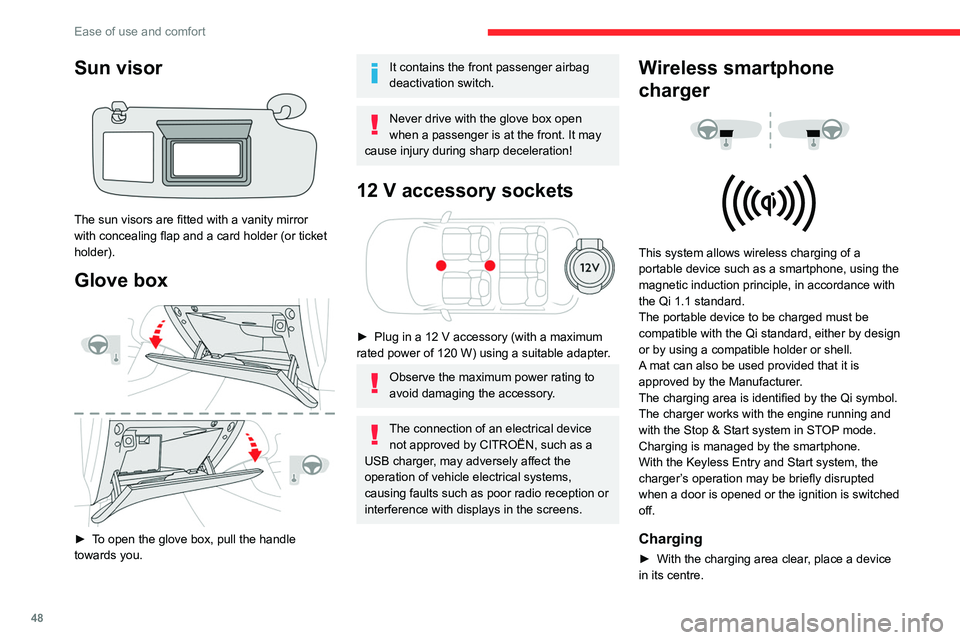
Sun visor
The sun visors are fitted with a vanity mirror
with concealing flap and a card holder (or ticket
holder).
Glove box
► To open the glove box, pull the handle
towards you.
It contains the front passenger airbag
deactivation switch.
Never drive with the glove box open
when a passenger is at the front. It may
cause injury during sharp deceleration!
12 V accessory sockets
► Plug in a 12 V accessory (with a maximum
rated power of 120 W) using a suitable adapter.
Observe the maximum power rating to
avoid damaging the accessory.
The connection of an electrical device not approved by CITROËN, such as a
USB charger, may adversely affect the
operation of vehicle electrical systems,
causing faults such as poor radio reception or
interference with displays in the screens.
Wireless smartphone
charger
This system allows wireless charging of a
portable device such as a smartphone, using the
magnetic induction principle, in accordance with
the Qi 1.1 standard.
The portable device to be charged must be
compatible with the Qi standard, either by design
or by using a compatible holder or shell.
A mat can also be used provided that it is
approved by the Manufacturer.
The charging area is identified by the Qi symbol.
The charger works with the engine running and
with the Stop & Start system in STOP mode.
Charging is managed by the smartphone.
With the Keyless Entry and Start system, the
charger’s operation may be briefly disrupted
when a door is opened or the ignition is switched
off.
Charging
► With the charging area clear , place a device
in its centre.
When the portable device is detected, the
charger’s indicator lamp lights up green. It
remains lit for the whole time that the battery is
being charged.
The system is not designed to charge multiple devices simultaneously.
Do not leave metal objects (e.g. coins,
keys, vehicle remote control) in the
charging area while a device is being charged
- risk of overheating or interrupting the
charging!
Checking operation
The state of the indicator lamp allows the
operation of the charger to be monitored.
State of the
indicator lamp Meaning
Off Engine switched off.
No compatible devices
detected.
Charging complete.
Fixed green Compatible portable device detected.
Charging.
Page 129 of 244

127
Practical information
7– Do not transport more than 4 conventional
bicycles or 2 electric bicycles.
When loading bicycles onto a bicycle carrier
on a towball, be sure to place the heaviest
bicycles as close as possible to the vehicle.
Observe the legislation in force in the
country where you are driving.
Load reduction mode
This system manages the use of certain
functions according to the level of charge
remaining in the battery.
When the vehicle is being driven, the load
reduction function temporarily deactivates certain
functions, such as the air conditioning and the
heated rear screen.
The deactivated functions are reactivated
automatically as soon as conditions permit.
Energy economy mode
This system manages the duration of use of
certain functions, in order to conserve a sufficient
level of charge in the battery with the ignition off.
After switching off the engine and for a maximum
cumulative period of around 30 minutes, you can
continue to use functions such as the audio and
telematics system, dipped beam headlamps or
courtesy lamps.
Selecting the mode
A confirmation message is displayed when
energy economy mode is entered, and the active
functions are placed on standby.
If a telephone call is in progress at the
time, it will be maintained for around 10
minutes via the audio system’s hands-free
system.
Exiting the mode
These functions are automatically reactivated the
next time the vehicle is used.
To restore the use of these functions
immediately, start the engine and let it run:
–
For less than 10 minutes, to use the
equipment for approximately 5 minutes.
–
For more than 10 minutes, to use the
equipment for approximately 30 minutes.
Let the engine run for the specified duration to
ensure that the battery charge is sufficient.
T
o recharge the battery, avoid repeatedly or
continuously restarting the engine.
A flat battery prevents the engine from starting.
For more information on the 12
V battery,
refer to the corresponding section.
Roof bars
As a safety measure and to avoid damaging the roof, it is essential to use
transverse roof bars approved for your
vehicle.
Observe the instructions on fitting and use
contained in the guide supplied with the roof
bars.
Fitting directly to the roof
You must only attach the transverse bars to
the four fixing points located on the roof frame.
These points are concealed by the vehicle doors
when the doors are closed.
The roof bar fixings have a stud which must be
inserted into the opening of each fixing point.