Citroen C3 PICASSO RHD 2012 1.G Owner's Manual
Manufacturer: CITROEN, Model Year: 2012, Model line: C3 PICASSO RHD, Model: Citroen C3 PICASSO RHD 2012 1.GPages: 244, PDF Size: 8.31 MB
Page 211 of 244
209
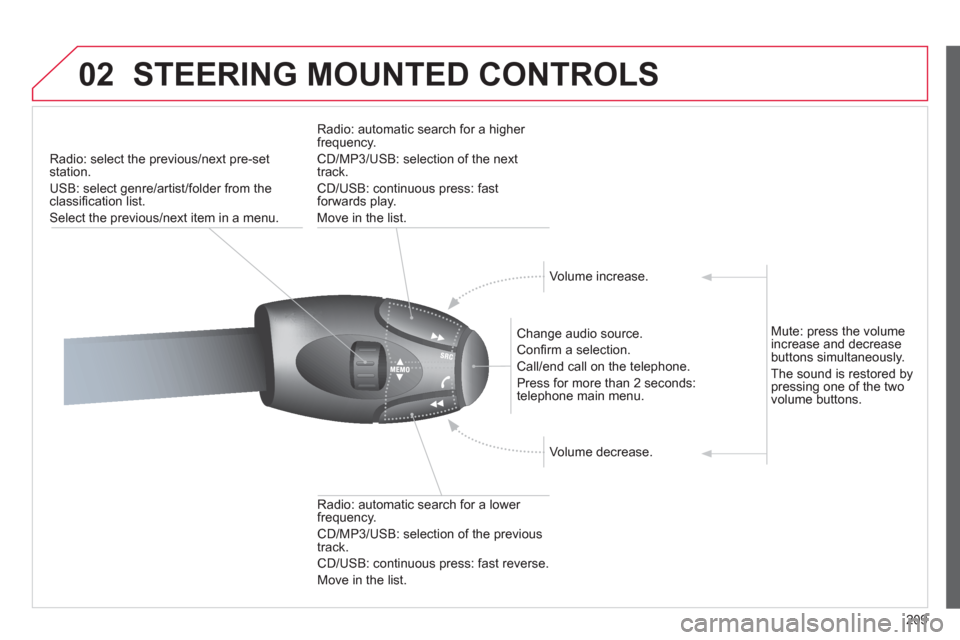
02STEERING MOUNTED CONTROLS
Radio: select the previous/next pre-setstation.
U
SB: select genre/artist/folder from the classifi cation list.
Select the previous/next item in a menu.
Chan
ge audio source.
Confi rm a selection.
Call/end call on the telephone.
Pr
ess for more than 2 seconds:
telephone main menu.
R
adio: automatic search for a lower
frequency.
CD/MP3/USB: selection of the previous
tr
ack.
CD/USB: continuous press: fast reverse.
Move in the list.
Radio: automatic search for a hi
gher
frequency.
CD/MP3/USB: selection of the next
track.
CD/USB: continuous press: fastforwards play.
M
ove in the list.
V
olume increase.
V
olume decrease.
Mute: press the volume increase and decrease buttons simultaneously.
The sound is restored by
pressing one of the two
volume buttons.
Page 212 of 244
210
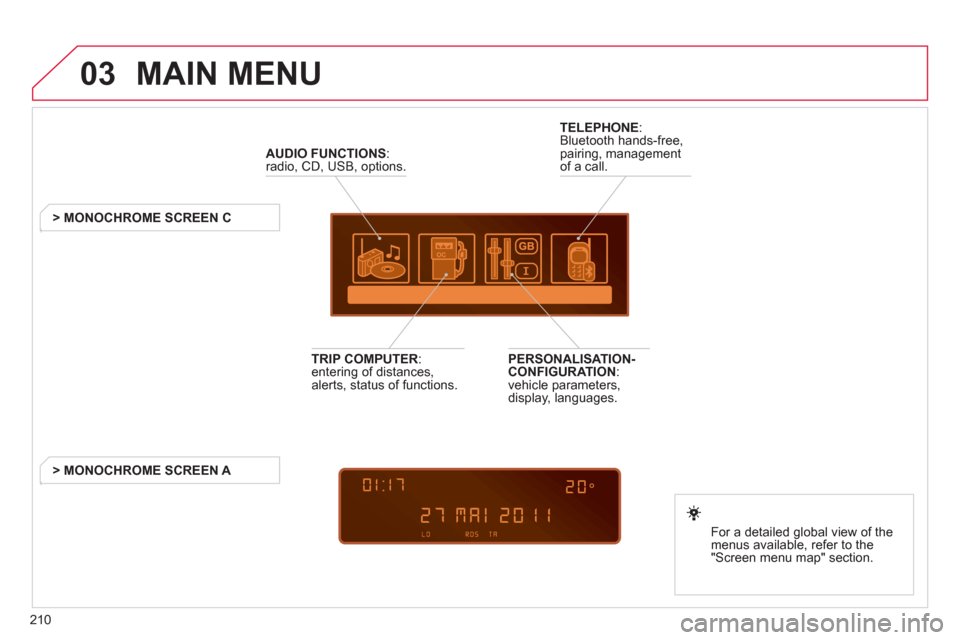
03 MAIN MENU
AUDIO FUNCTIONS
:radio, CD, USB, options.
> MONOCHROME SCREEN C
For a detailed
global view of the
menus available, refer to the
"Screen menu ma
p" section.
TELEPHONE
:
Bluetooth hands-free,
pairing, managementof a call.
PERSONALISATION-
CONFIGURATION:
vehicle parameters,
display, languages.
TRIP COMPUTER: entering of distances,alerts, status of functions.
> MONOCHROME
SCREEN A
Page 213 of 244
211
04
1
2
3
4
1
2
3
4
SOURCE
BANDAST
LISTREFRESH
MENU
AUDIO
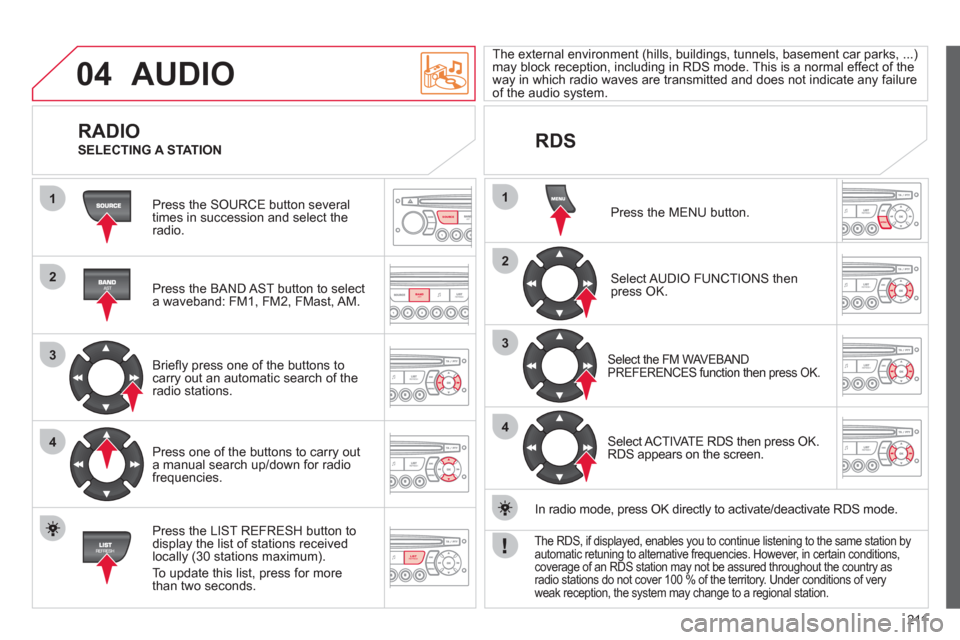
Press the SOURCE button several
times in succession and select theradio.
Press the BAND A
ST button to select
a waveband: FM1, FM2, FMast, AM.
Briefl
y press one of the buttons tocarry out an automatic search of theradio stations.
Press one o
f the buttons to carry out
a manual search up/down for radiofrequencies.
Press the LI
ST REFRESH button to
display the list of stations received
locally (30 stations maximum).
To update this list, press for more
t
han two seconds.
The external environment
(hills, buildings, tunnels, basement car parks, ...)may block reception, including in RDS mode. This is a normal effect of the
way in which radio waves are transmitted and does not indicate any failure of the audio system.
RDS
RADIO
SELECTING A STATION
Press the MENU button.
Select AUDIO FUNCTIONS thenpress OK.
Select the FM WAVEBAND
PREFERENCES function then press OK.
Select ACTIVATE RDS then press OK.
RDS appears on the screen.
In radio mode, press
OK directly to activate/deactivate RDS mode.
The RDS, if displayed, enables you to continue listening to the same station by automatic retuning to alternative frequencies. However, in certain conditions, coverage of an RDS station may not be assured throughout the country asradio stations do not cover 100 % of the territory. Under conditions of very
weak reception, the system may change to a regional station.
Page 214 of 244
212
04
1
2
3
SOURCE
AUDIO
Insert circular compact discs only.
Some anti-pirating systems, on original discs or CDs copied using a
personal recorder, may cause faults which are no refl ection on the quality of the original player.
Without pressin
g the EJECT button, insert a CD in the player,
play begins automatically.
CD
PLAYING A CD
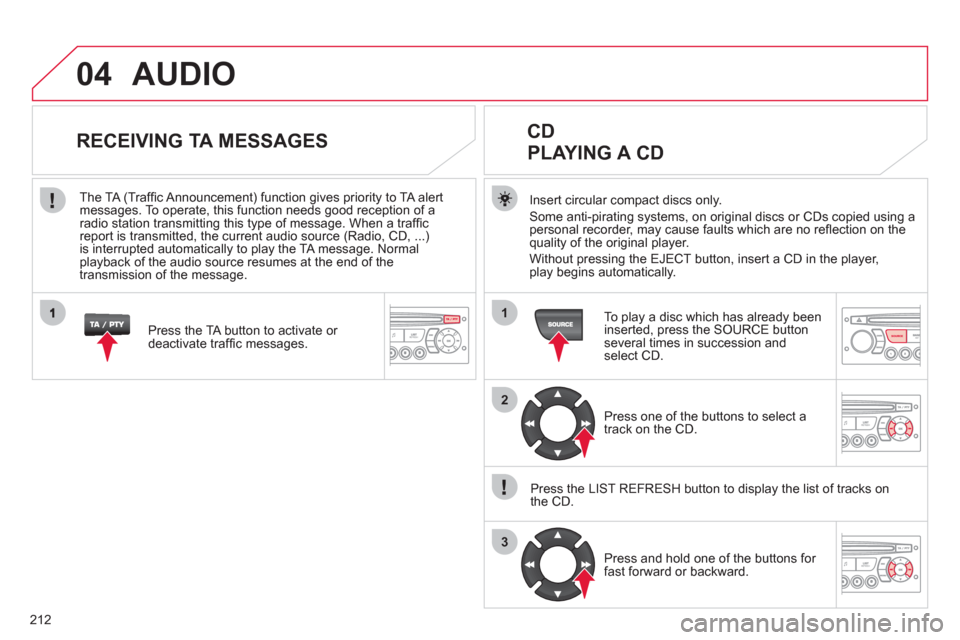
To play a disc which has already been
inserted, press the SOURCE buttonseveral times in succession andselect CD.
Pr
ess one of the buttons to select a
track on the CD.
Press the LI
ST REFRESH button to display the list of tracks on
the CD.
Pr
ess and hold one of the buttons for
fast forward or backward.
RECEIVING TA MESSAGES
Press the TA button to activate or
deactivate traffi c messages.
The TA
(Traffi c Announcement) function gives priority to TA alert messages. To operate, this function needs good reception of a
radio station transmitting this type of message. When a traffi c
report is transmitted, the current audio source (Radio, CD, ...)is interrupted automatically to play the TA message. Normal playback of the audio source resumes at the end of the
transmission of the message.
Page 215 of 244
213
04
1
2
3
SOURCE
The MP3 format, an abbreviation of MPEG 1.2 & 2.5 Audio Layer 3,
is an audio compression standard which permits the recording of several tens of music fi les on a single disc.
In order to be able to play a recorded
CDR or CDRW, when recording, the ISO 9660 level 1.2 or Joliet fi le format isrecommended.
If the disc is recorded in another format, it ma
y not be playedcorrectly.
It is recommended that the same recordin
g format is always used for an individual disc, with as low a speed as possible(4x maximum) for optimum sound quality.
In the particular case o
f a multi-session CD, the Joliet format is recommended.
The audio s
ystem will only play fi les with the extension ".mp3" with
a sampling rate of 22.05 KHz or 44.1 KHz. No other type of fi le(.wma, .mp4, .m3u...) can be played.
It is advisable to restrict fi le names to 20 characters without usin
gspecial characters (e.g. " ? ; ù) to avoid any playing or displaying problems.
MP3 CD
INFORMATION AND ADVICE
AUDIO
Empty CDs are not recognised and may damage the system.
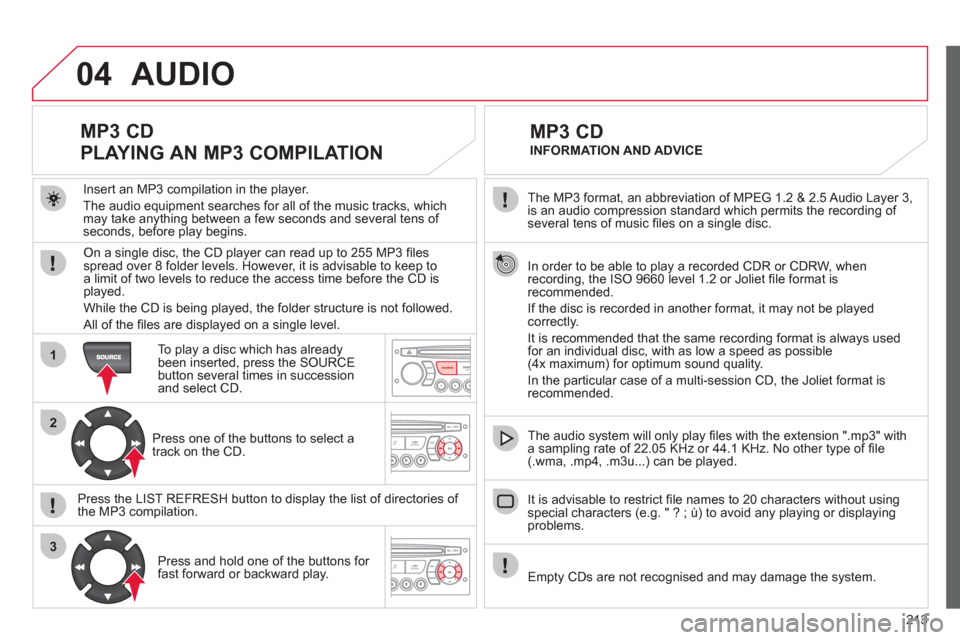
Insert an MP3 compilation in the pla
yer.
The audio equipment searches
for all of the music tracks, which
may take anything between a few seconds and several tens of seconds, before play begins.
MP3 CD
PLAYING AN MP3 COMPILATION
On a single disc, the CD player can read up to 255 MP3 fi lesspread over 8 folder levels. However, it is advisable to keep to
a limit of two levels to reduce the access time before the CD isplayed.
While the CD is bein
g played, the folder structure is not followed.
All of the fi les are displayed on a single level.
To play a disc which has already
been inserted, press the SOURCE button several times in successionand select CD.
Pr
ess one of the buttons to select atrack on the CD.
Press the LI
ST REFRESH button to display the list of directories of
the MP3 compilation.
Pr
ess and hold one of the buttons for fast forward or backward play.
Page 216 of 244
214
05
1
1
2
3
USB BOX
The system puts together playlists (temporary memory) createdover a period which depends on the capacity of the USB device.
The other sources are available durin
g this time.
The pla
ylists are updated each time the ignition is switched off or each time a USB memory stick is connected.
When connectin
g for the fi rst time, the classifi cation suggested
is by folder. When you reconnect, the classifi cation selected
previously is retained.
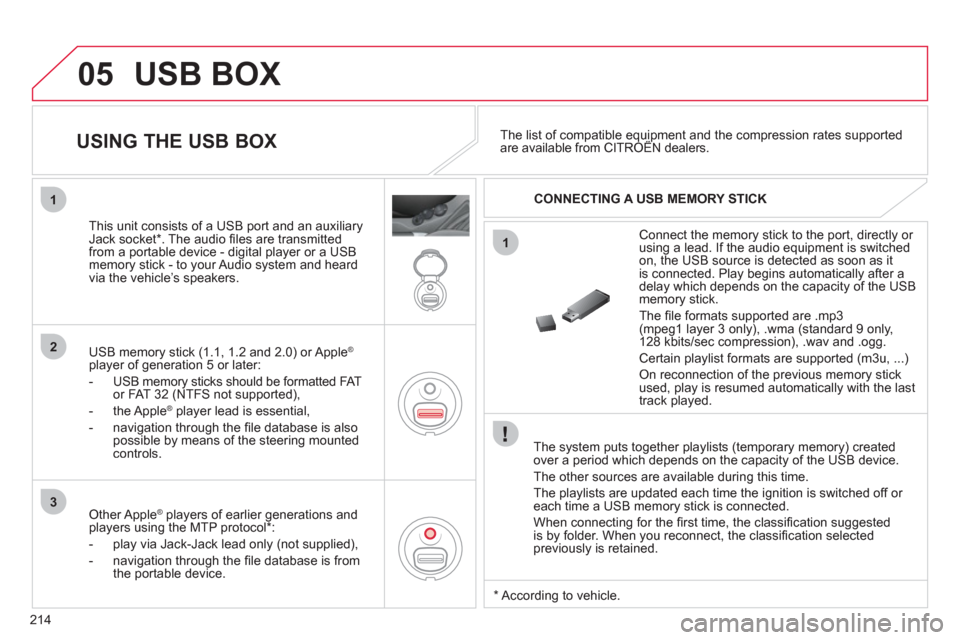
Connect the memory stick to the port, directly or using a lead. If the audio equipment is switched
on, the USB source is detected as soon as it
is connected. Pla
y begins automatically after a
delay which depends on the capacity of the USB memory stick.
The
fi le formats supported are .mp3 (mpeg1 layer 3 only), .wma (standard 9 only,
128 kbits/sec compression), .wav and .ogg.
Certain playlist formats are supported (m3u, ...)
On reconnection of the previous memory stickused, play is resumed automatically with the last
track played.
This unit consists o
f a USB port and an auxiliaryJack socket * . The audio fi les are transmitted
from a portable device - digital player or a USBmemory stick - to your Audio system and heard
via the vehicle’s speakers.
USB memor
y stick (1.1, 1.2 and 2.0) or Apple®
player of generation 5 or later:
- U
SB memory sticks should be formatted FAT
or FAT 32 (NTFS not supported),
- the Apple ®player lead is essential,
- navi
gation through the fi le database is also
possible by means of the steering mountedcontrols.
The list of compatible equipment and the compression rates supported are available from CITROËN dealers. pqp
USING THE USB BOX
CONNECTING A USB MEMORY STICK
Other Apple®
players of earlier generations and®
players using the MTP protocol * :
- pla
y via Jack-Jack lead only (not supplied),
- navi
gation through the fi le database is from
the portable device.
* Accordin
g to vehicle.
Page 217 of 244
215
3
4
05
2
1
LISTREFRESH
LISTREFRESH
USING THE USB BOX
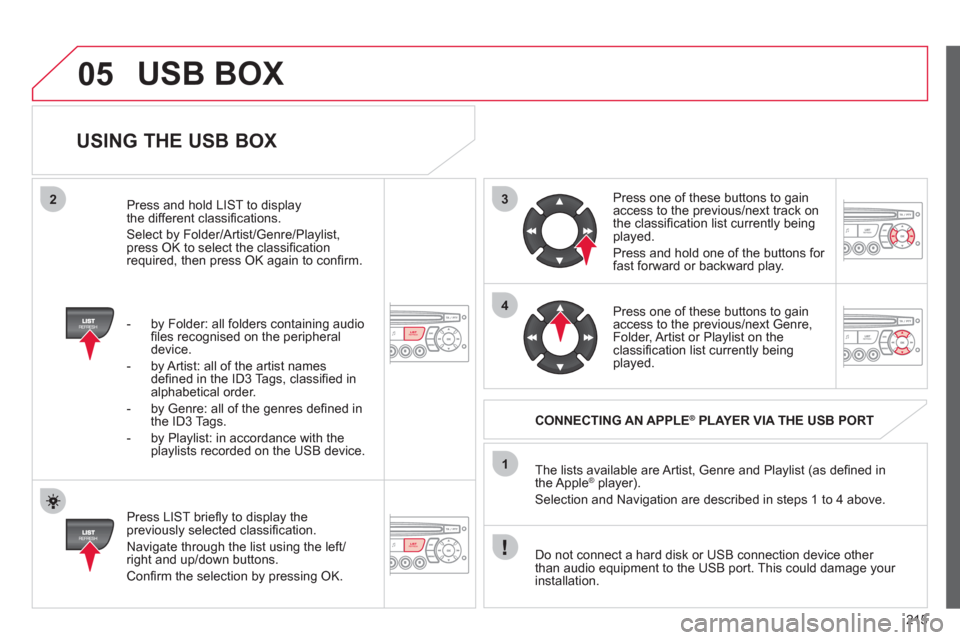
Press LIST briefl y to display thepreviously selected classifi cation.
Navi
gate through the list using the left/right and up/down buttons.
Confi rm the selection by pressing OK. The lists available are Artist, Genre and Pla
ylist (as defi ned in
the Apple® player).®
Selection and Navigation are described in steps 1 to 4 above.
Do not connect a hard disk or
USB connection device other
than audio equipment to the USB port. This could damage your
installation.
CONNECTING AN APPLE®PLAYER VIA THE USB PORT®
Press one of these buttons to gain
access to the previous/next track on
the classifi cation list currently beingplayed.
Pr
ess and hold one of the buttons for fast forward or backward play.
Press one of these buttons to
gain
access to the previous/next Genre,
Folder, Artist or Playlist on theclassifi cation list currently being played.
Press and hold LI
ST to displaythe different classifi cations.
Select b
y Folder/Artist/Genre/Playlist, press OK to select the classifi cation required, then press OK again to confi rm.
- b
y Folder: all folders containing audio fi les recognised on the peripheraldevice.
- by Artist: all o
f the artist names
defi ned in the ID3 Tags, classifi ed in alphabetical order.
- b
y Genre: all of the genres defi ned in
the ID3 Tags.
- b
y Playlist: in accordance with the
playlists recorded on the USB device.
USB BOX
Page 218 of 244
216
05
1
21
2
SOURCE
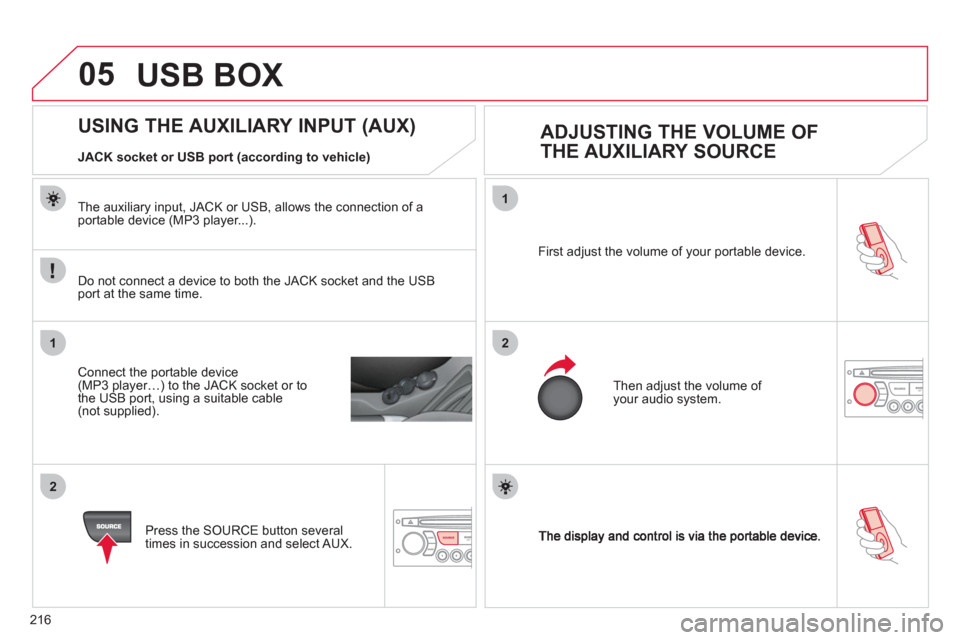
First adjust the volume of your portable device.
Then ad
just the volume of your audio system.
USING THE AUXILIARY INPUT (AUX)
ADJUSTING THE VOLUME OF
THE AUXILIARY SOURCE
JACK socket or USB port (according to vehicle)
Do not connect a device to both the
JACK socket and the USB port at the same time.
Connect the portable device(MP3 player…) to the JACK socket or to
the USB port, using a suitable cable(not supplied).
Pr
ess the SOURCE button several
times in succession and select AUX.
The auxiliar
y input, JACK or USB, allows the connection of a portable device (MP3 player...).
USB BOX
Page 219 of 244
217
06
1
2
3
4
5
6
7
8
9
MENU
OK
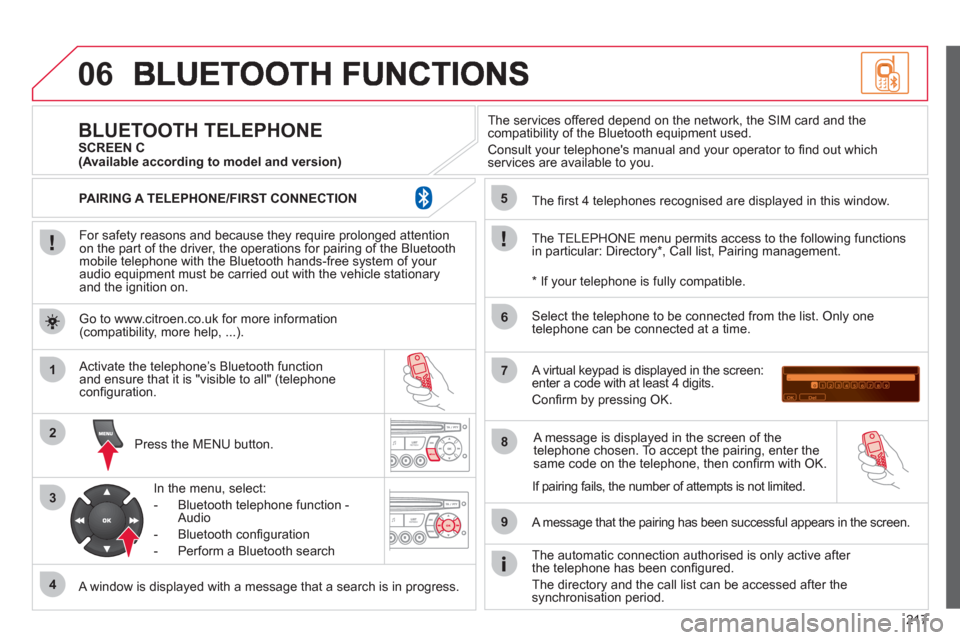
For safety reasons and because they require prolonged attentionon the part of the driver, the operations for pairing of the Bluetooth mobile telephone with the Bluetooth hands-free system of your
audio equipment must be carried out with the vehicle stationary
and the ignition on.
Pr
ess the MENU button.
A window is displayed with a message that a search is in progress.
Activate the telephone’s Bluetooth
function
and ensure that it is "visible to all" (telephone confi guration.
In the menu, select:
- Bluetooth telephone
function -
Audio
- Bluetooth confi
guration
- P
erform a Bluetooth search
The services o
ffered depend on the network, the SIM card and thecompatibility of the Bluetooth equipment used.
Consult your telephone's manual and your operator to fi nd out which
services are available to you.
BLUETOOTH TELEPHONE SCREEN C
The TELEPH
ONE menu permits access to the following functions
in particular: Directory * , Call list, Pairing management.
The
fi rst 4 telephones recognised are displayed in this window.
A virtual ke
ypad is displayed in the screen: enter a code with at least 4 digits.
Confi rm by pressing OK.
A messa
ge that the pairing has been successful appears in the screen.
Select the telephone to be connected from the list. Only one
telephone can be connected at a time.
A messa
ge is displayed in the screen of the
telephone chosen. To accept the pairing, enter the same code on the telephone, then confi rm with OK.
The automatic connection authorised is onl
y active after
the telephone has been confi gured.
The directory and the call list can be accessed a
fter thesynchronisation period.
(Available according to model and version)
*
If your telephone is fully compatible.
I
f pairing fails, the number of attempts is not limited.
Go to www.citroen.co.uk for more information(compatibility, more help, ...).
PAIRING A TELEPHONE/FIR
ST CONNECTION
Page 220 of 244
218
06
1
2
1
2
1
OK
RECEIVING A CALL
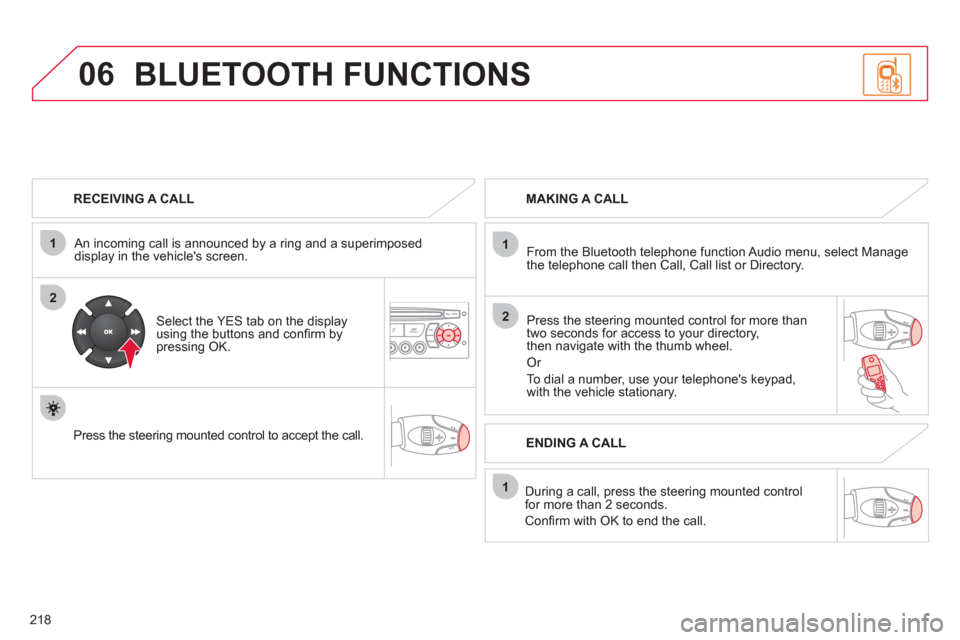
An incomin
g call is announced by a ring and a superimposed
display in the vehicle's screen.
Select the YES tab on the display
using the buttons and confi rm bypressing OK.
Press the steerin
g mounted control to accept the call.
MAKING A CALL
From the Bluetooth telephone
function Audio menu, select Manage
the telephone call then Call, Call list or Directory.
Press the steerin
g mounted control for more than
two seconds for access to your directory,
then navigate with the thumb wheel.
Or
To dial a number, use your telephone's keypad,with the vehicle stationary.
Durin
g a call, press the steering mounted control
for more than 2 seconds.
Confi rm with OK to end the call.
BLUETOOTH FUNCTIONS
ENDING A CALL