ESP Citroen C3 PICASSO RHD 2014 1.G Owner's Guide
[x] Cancel search | Manufacturer: CITROEN, Model Year: 2014, Model line: C3 PICASSO RHD, Model: Citroen C3 PICASSO RHD 2014 1.GPages: 288, PDF Size: 8.38 MB
Page 134 of 288

132
Speed limiter
The controls of this system are grouped
together on stalk A.
1.
S
peed limiter mode selection thumb wheel.
2.
V
alue decrease button.
3.
V
alue increase button.
4.
S
peed limiter on / off button. The programmed information is grouped
together in the instrument panel screen.
5.
S
peed limiter on / off indication.
6.
Spe
ed limiter mode selection indication.
7.
P
rogrammed speed value.
Steering mounted controlsDisplays in the instrument panel
The speed limiter is switched on manually:
it requires a programmed speed of at least
20
mph (30 km/h).
The speed limiter is switched off by manual
operation of the control.
The programmed speed can be exceeded
temporarily by pressing the accelerator firmly.
To return to the programmed speed, simply
slow down to a speed below the programmed
speed.
The programmed speed remains in the memory
when the ignition is switched off.
The speed limiter cannot, in any circumstances,
replace the need to respect speed limits, nor can it
replace the need for vigilance on the part of the driver.
System which prevents the vehicle from
exceeding the speed programmed by the driver.
When the programmed speed limit is reached,
pressing the accelerator pedal in the normal
manner no longer has any effect.
driving
Page 136 of 288
134
System which automatically maintains the
speed of the vehicle at the value programmed
by the driver, without any action on the
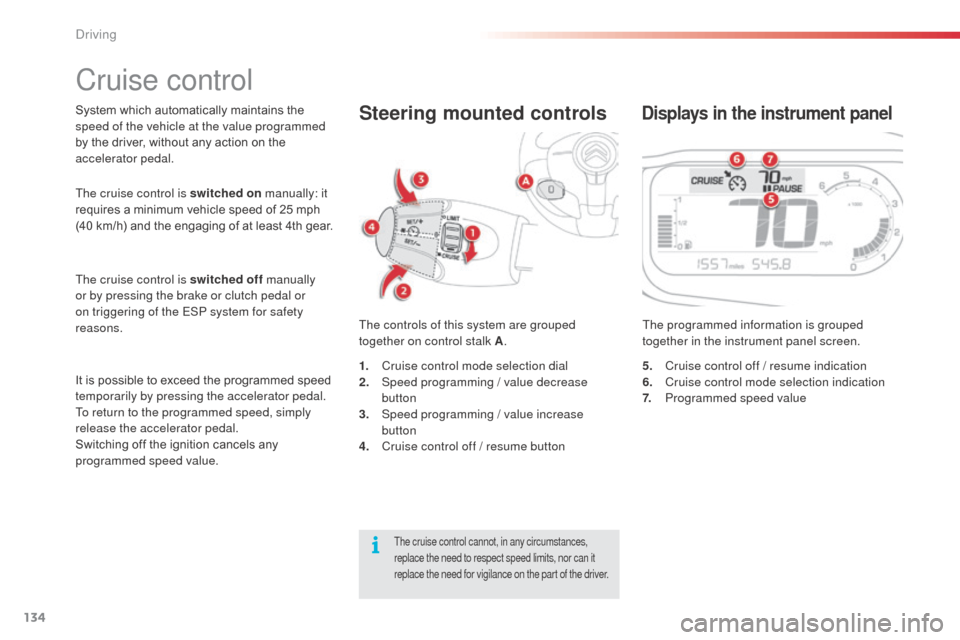
accelerator pedal.The controls of this system are grouped
together on control stalk A.The programmed information is grouped
together in the instrument panel screen.Steering mounted controlsDisplays in the instrument panel
The cruise control is switched on
manually: it
requires a minimum vehicle speed of 25 mph
(40 km/h) and the engaging of at least 4th gear.
The cruise control is switched off manually
or by pressing the brake or clutch pedal or
on triggering of the ESP system for safety
reasons.
It is possible to exceed the programmed speed
temporarily by pressing the accelerator pedal.
To return to the programmed speed, simply
release the accelerator pedal.
Switching off the ignition cancels any
programmed speed value. 1.
C
ruise control mode selection dial
2.
S
peed programming / value decrease
button
3.
S
peed programming / value increase
button
4.
C
ruise control off / resume button5.
C
ruise control off / resume indication
6.
C
ruise control mode selection indication
7.
P
rogrammed speed value
The cruise control cannot, in any circumstances,
replace the need to respect speed limits, nor can it
replace the need for vigilance on the part of the driver.
Cruise control
driving
Page 146 of 288
144
Checking levels
Engine oil level
The check is carried out either when
the ignition is switched on using the
oil level indicator in the instrument
panel for vehicles with an electric oil
level gauge, or using the dipstick.
Checking using the dipstick
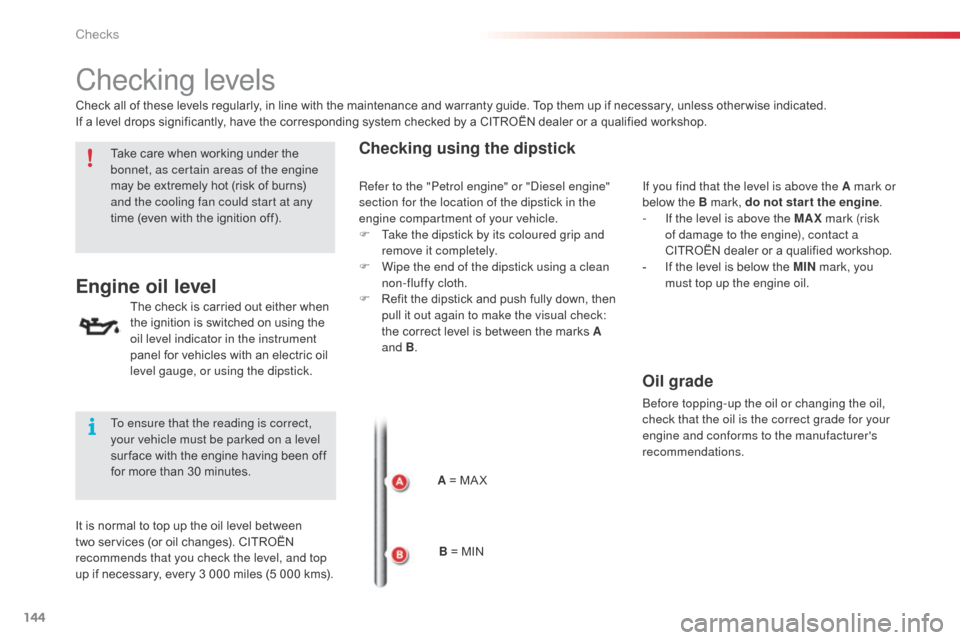
A = MA X
Check all of these levels regularly, in line with the maintenance and warranty guide. Top them up if necessary, unless other wise indicated.
If a level drops significantly, have the corresponding system checked by a CITROËN dealer or a qualified workshop.
Take care when working under the
bonnet, as certain areas of the engine
may be extremely hot (risk of burns)
and the cooling fan could start at any
time (even with the ignition off).
To ensure that the reading is correct,
your vehicle must be parked on a level
sur face with the engine having been off
for more than 30 minutes.
It is normal to top up the oil level between
two services (or oil changes). CITROËN
recommends that you check the level, and top
up if necessary, every 3 000 miles (5 000 kms). B = MINIf you find that the level is above the A mark or
below the B mark, do not star t the engine
.
-
I
f the level is above the MAX
mark (risk
of damage to the engine), contact a
CITROËN dealer or a qualified workshop.
-
I
f the level is below the MIN
mark, you
must top up the engine oil.
Oil grade
before topping-up the oil or changing the oil,
check that the oil is the correct grade for your
engine and conforms to the manufacturer's
recommendations.
Refer to the "Petrol engine" or "
di
esel engine"
section for the location of the dipstick in the
engine compartment of your vehicle.
F
T
ake the dipstick by its coloured grip and
remove it completely.
F
W
ipe the end of the dipstick using a clean
non-fluffy cloth.
F
R
efit the dipstick and push fully down, then
pull it out again to make the visual check:
the correct level is between the marks A
and B .
Checks
Page 170 of 288
168
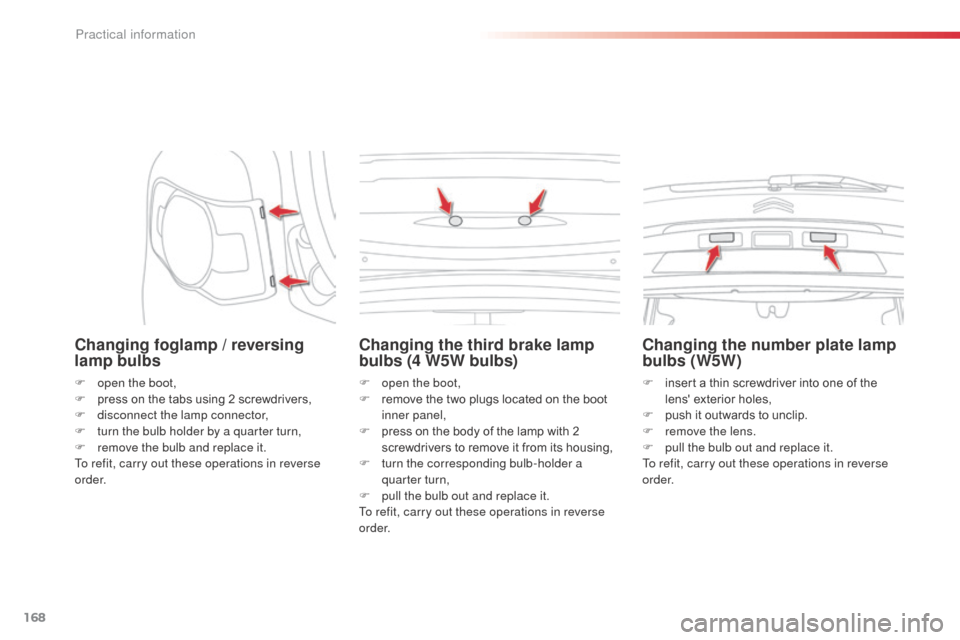
Changing foglamp / reversing
lamp bulbs
F open the boot,
F p ress on the tabs using 2 screwdrivers,
F
d
isconnect the lamp connector,
F
t
urn the bulb holder by a quarter turn,
F
r
emove the bulb and replace it.
To refit, carry out these operations in reverse
o r d e r.
Changing the third brake lamp
bulbs (4 W5W bulbs)
F open the boot,
F r emove the two plugs located on the boot
inner panel,
F
p
ress on the body of the lamp with 2
screwdrivers to remove it from its housing,
F
t
urn the corresponding bulb-holder a
quarter turn,
F
p
ull the bulb out and replace it.
To refit, carry out these operations in reverse
o r d e r.
Changing the number plate lamp
bulbs (W5W)
F insert a thin screwdriver into one of the lens' exterior holes,
F
p
ush it outwards to unclip.
F
r
emove the lens.
F
p
ull the bulb out and replace it.
To refit, carry out these operations in reverse
o r d e r.
Practical information
Page 173 of 288

171
Changing a fuseProcedure for replacing a failed fuse with a new fuse to rectify a failure of the corresponding function.
The extraction tweezer and the spare fuse
storage compartment are installed on the back
of the dashboard fusebox cover.
For access to them:
F
O
pen the glove box,
F
u
nclip the fuse access cover by pulling on
the side,
F
r
emove the cover completely,
F
r
emove the tweezer.
Changing a fuse
before changing a fuse, the cause of the failure
must be identified and rectified.
F
I
dentify the failed fuse by checking the
condition of its filament.
F
U
se the special tweezer to extract the fuse
from its housing.
F
A
lways replace the faulty fuse with a fuse
of the same rating.
F
C
heck that the number marked on the
fusebox, the rating marked on the fuse and
the following tables all agree. Good
FailedCITROËN will not accept responsibility
for the cost incurred in repairing your
vehicle or for rectifying malfunctions
resulting from the installation of
accessories not supplied and not
recommended by CITR
oËn
and
not installed in accordance with its
instructions, in particular when the
combined consumption of all of the
additional equipment connected
exceeds 10 milliamperes.Installing electrical
accessories
Your vehicle's electrical system is
designed to operate with standard or
optional equipment.
be
fore installing other electrical
equipment or accessories on your
vehicle, contact a CITR
oËn
dealer or a
qualified workshop.
Access to the tools
11
Practical information
Page 176 of 288
174
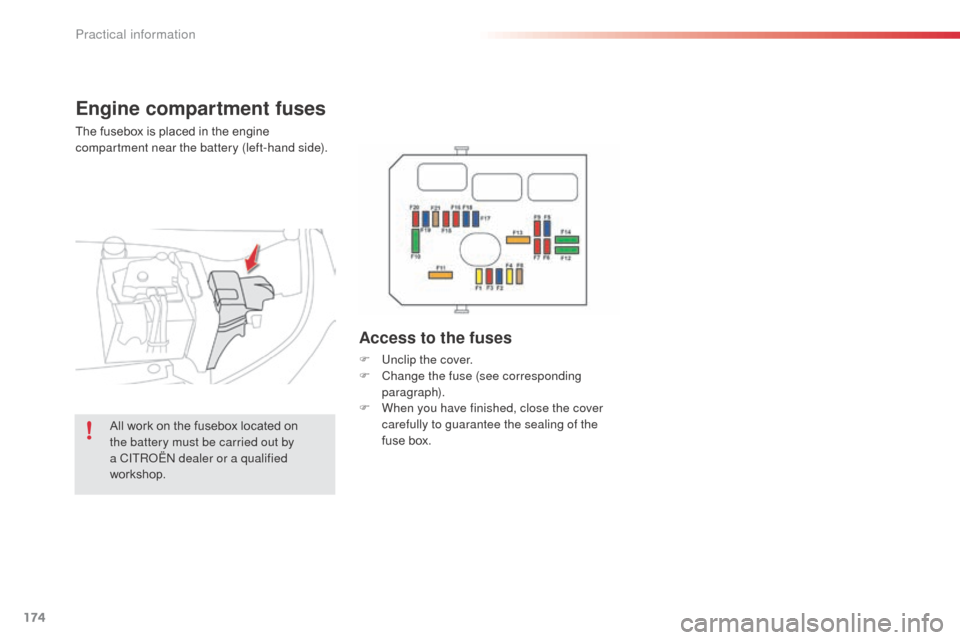
Engine compartment fuses
The fusebox is placed in the engine
compartment near the battery (left-hand side).
Access to the fuses
F Unclip the cover.
F C hange the fuse (see corresponding
paragraph).
F
W
hen you have finished, close the cover
carefully to guarantee the sealing of the
fuse box.
All work on the fusebox located on
the battery must be carried out by
a CITR
oËn
dealer or a qualified
workshop.
Practical information
Page 177 of 288
175
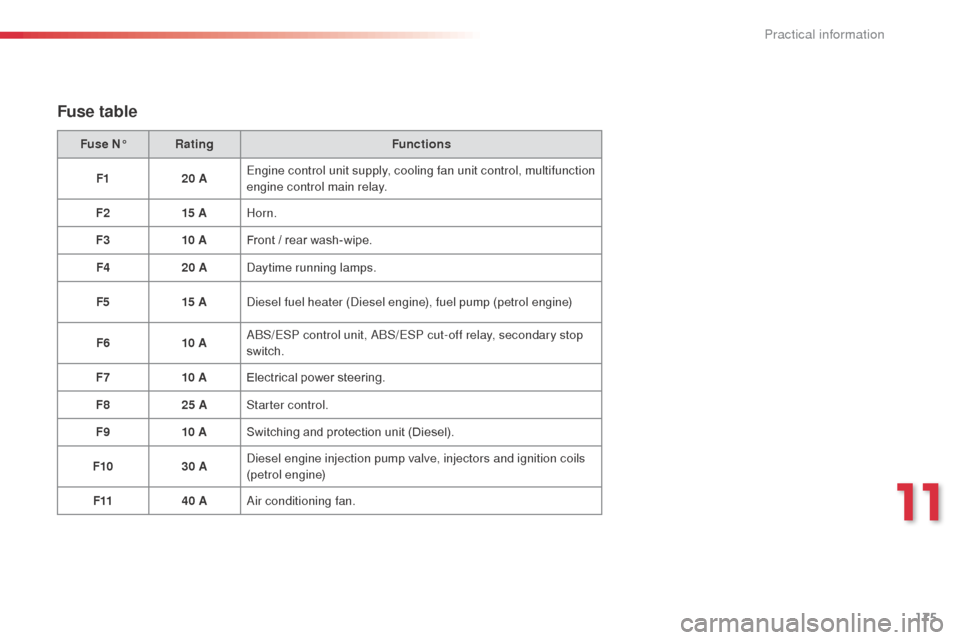
Fuse N°Rating Functions
F1 20 AEngine control unit supply, cooling fan unit control, multifunction
engine control main relay.
F2 15 AHorn.
F3 10 AFront / rear wash-wipe.
F4 20 A
da
ytime running lamps.
F5 15 A
di
esel fuel heater (
di
esel engine), fuel pump (petrol engine)
F6 10 A
a
b
S
/ESP control unit, ab
S
/ESP cut-off relay, secondary stop
switch.
F7 10 AElectrical power steering.
F8 25 AStarter control.
F9 10 ASwitching and protection unit (Diesel).
F10 30 A
di
esel engine injection pump valve, injectors and ignition coils
(petrol engine)
F11 40 A
air
conditioning fan.
Fuse table
11
Practical information
Page 183 of 288
181
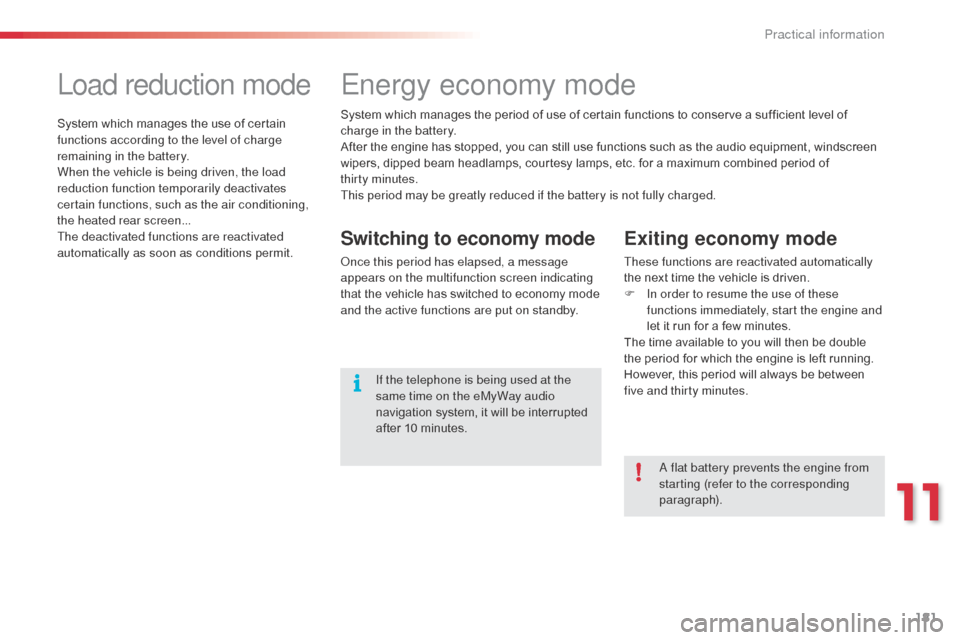
Load reduction mode
System which manages the use of certain
functions according to the level of charge
remaining in the battery.
When the vehicle is being driven, the load
reduction function temporarily deactivates
certain functions, such as the air conditioning,
the heated rear screen...
The deactivated functions are reactivated
automatically as soon as conditions permit.
Energy economy mode
Exiting economy mode
These functions are reactivated automatically
the next time the vehicle is driven.
F
I
n order to resume the use of these
functions immediately, start the engine and
let it run for a few minutes.
The time available to you will then be double
the period for which the engine is left running.
However, this period will always be between
five and thirty minutes.
Switching to economy mode
once this period has elapsed, a message
appears on the multifunction screen indicating
that the vehicle has switched to economy mode
and the active functions are put on standby.
a
flat battery prevents the engine from
starting (refer to the corresponding
paragraph).
If the telephone is being used at the
same time on the eMyWay audio
navigation system, it will be interrupted
after 10 minutes.
System which manages the period of use of certain functions to conserve a sufficient level of
charge in the battery.
After the engine has stopped, you can still use functions such as the audio equipment,
windscreen
wipers, dipped beam headlamps, courtesy lamps, etc. for a maximum combined period of
thirty
minutes.
This period may be greatly reduced if the battery is not fully charged.
11
Practical information
Page 184 of 288
182
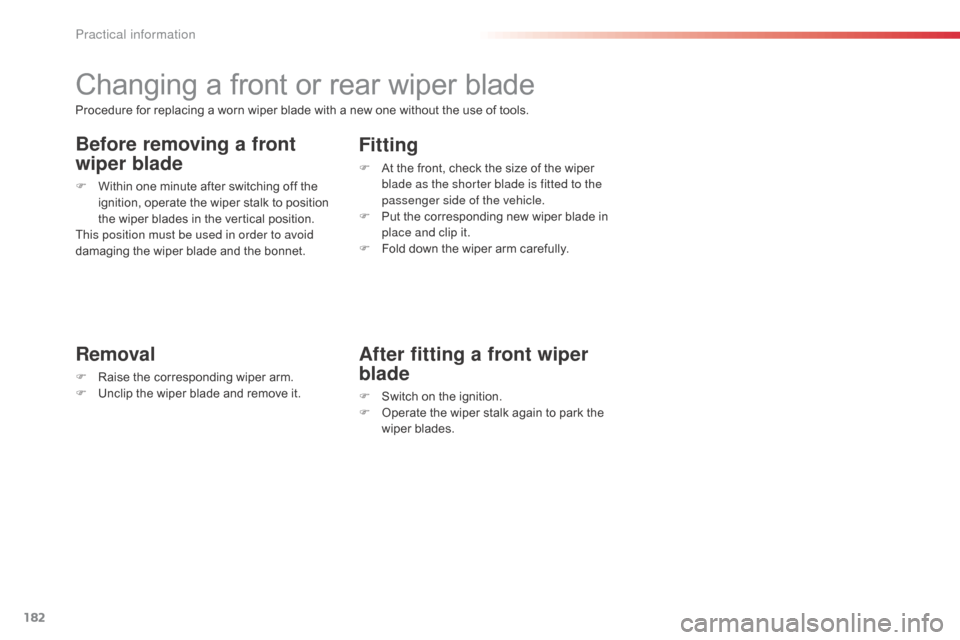
Changing a front or rear wiper blade
Removal
F Raise the corresponding wiper arm.
F U nclip the wiper blade and remove it.
Fitting
F At the front, check the size of the wiper blade as the shorter blade is fitted to the
passenger side of the vehicle.
F
P
ut the corresponding new wiper blade in
place and clip it.
F
F
old down the wiper arm carefully.
Before removing a front
wiper blade
F Within one minute after switching off the ignition, operate the wiper stalk to position
the wiper blades in the vertical position.
This position must be used in order to avoid
damaging the wiper blade and the bonnet.
After fitting a front wiper
blade
F Switch on the ignition.
F O perate the wiper stalk again to park the
wiper blades.
Procedure for replacing a worn wiper blade with a new one without the use of tools.
Practical information
Page 240 of 288
08
238
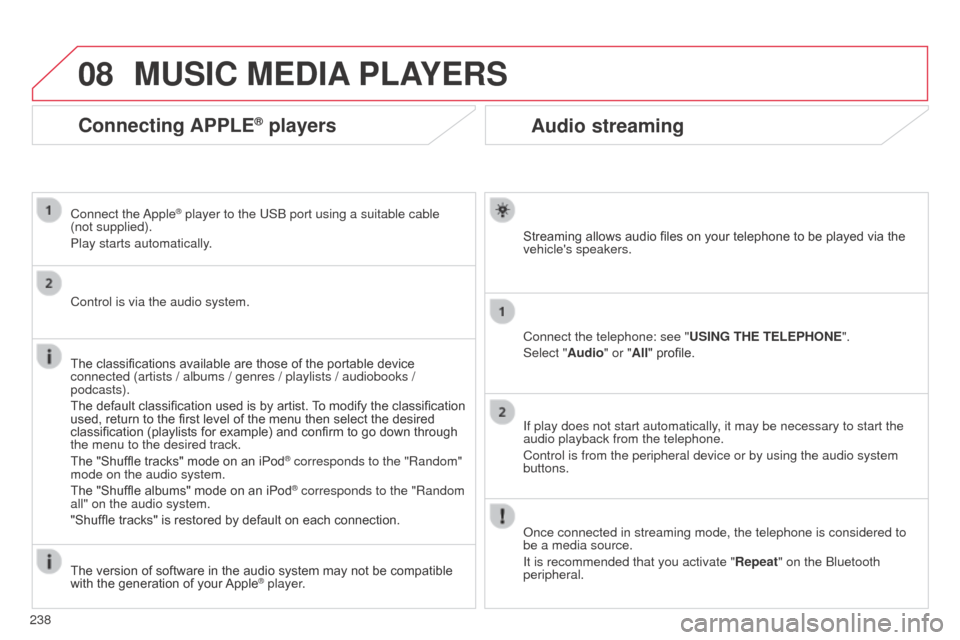
Audio streaming
Streaming allows audio files on your telephone to be played via the
vehicle's speakers.
Connect the telephone: see "USING THE TELEPHONE".
Select "Audio" or "All" profile.
If play does not start automatically, it may be necessary to start the
audio playback from the telephone.
Control is from the peripheral device or by using the audio system
buttons.
o
nce connected in streaming mode, the telephone is considered to
be a media source.
It is recommended that you activate "Repeat" on the
b luetooth
peripheral.
MUSIC MEDIA PLAYERS
Connecting APPLE® players
Connect the apple® player to the USb port using a suitable cable
(not supplied).
Play starts automatically
.
Control is via the audio system.
The classifications available are those of the portable device
connected (artists / albums / genres / playlists / audiobooks /
podcasts).
The default classification used is by artist. To modify the classification
used, return to the first level of the menu then select the desired
classification (playlists for example) and confirm to go down through
the menu to the desired track.
The "Shuffle tracks" mode on an iPod
® corresponds to the "Random"
mode on the audio system.
The "Shuffle albums" mode on an iPod
® corresponds to the "Random
all" on the audio system.
"Shuffle tracks" is restored by default on each connection.
The version of software in the audio system may not be compatible
with the generation of your Apple
® player.