boot Citroen C3 RHD 2014 2.G Owner's Guide
[x] Cancel search | Manufacturer: CITROEN, Model Year: 2014, Model line: C3 RHD, Model: Citroen C3 RHD 2014 2.GPages: 284, PDF Size: 8.99 MB
Page 152 of 284
150
Wheel with trim
When removing the wheel, first
detach the trim using the wheelbrace 1
pulling at the valve passage hole.
When refitting the wheel , refit the
trim starting by placing its cut-out at the
valve and press around its edge with
the palm of your hand.
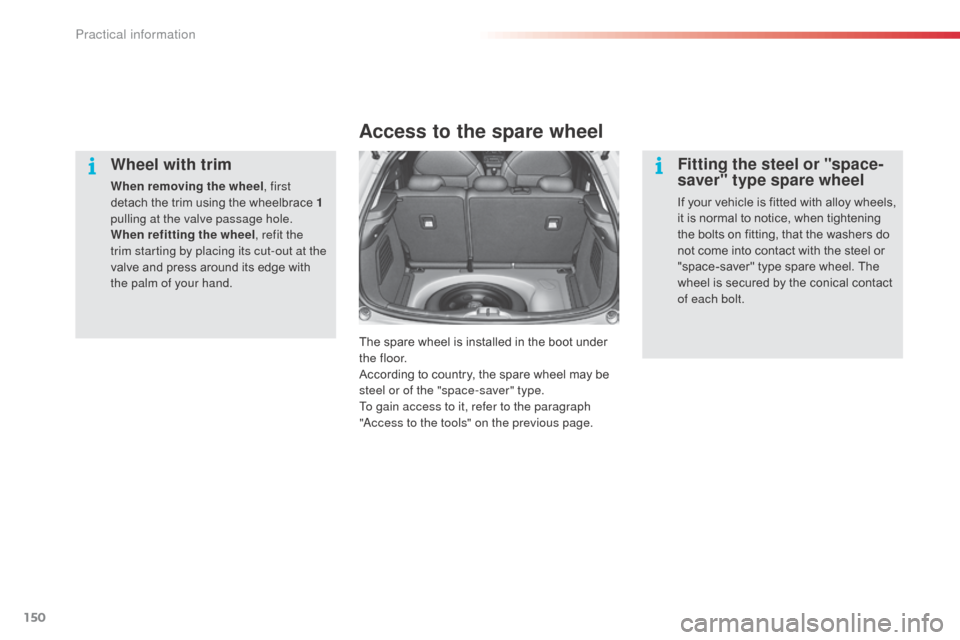
Access to the spare wheel
The spare wheel is installed in the boot under
t h e f l o o r.
According to country, the spare wheel may be
steel or of the "space-saver" type.
To gain access to it, refer to the paragraph
"
ac
cess to the tools" on the previous page.
Fitting the steel or "space-
saver" type spare wheel
If your vehicle is fitted with alloy wheels,
it is normal to notice, when tightening
the bolts on fitting, that the washers do
not come into contact with the steel or
"space-saver" type spare wheel. The
wheel is secured by the conical contact
of each bolt.
Practical information
Page 153 of 284
151
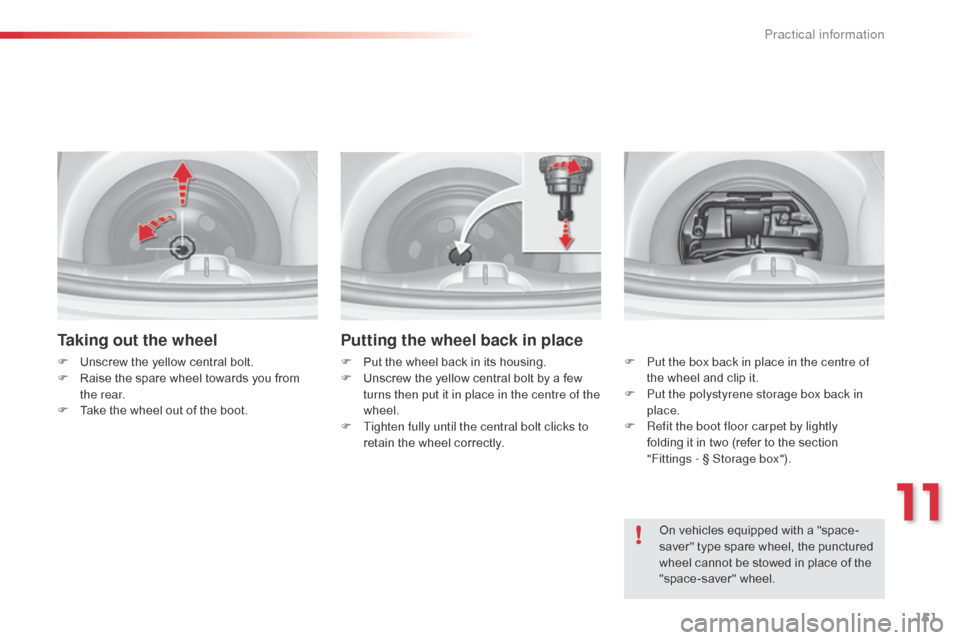
Taking out the wheel
F Unscrew the yellow central bolt.
F R aise the spare wheel towards you from
the rear.
F
T
ake the wheel out of the boot.
Putting the wheel back in place
F Put the wheel back in its housing.
F U nscrew the yellow central bolt by a few
turns then put it in place in the centre of the
wheel.
F
T
ighten fully until the central bolt clicks to
retain the wheel correctly. F
P ut the box back in place in the centre of
the wheel and clip it.
F
P
ut the polystyrene storage box back in
place.
F
R
efit the boot floor carpet by lightly
folding it in two (refer to the section
"Fittings
- § Storage box").
On vehicles equipped with a "space-
saver" type spare wheel, the punctured
wheel cannot be stowed in place of the
"space-saver" wheel.
11
Practical information
Page 156 of 284
154
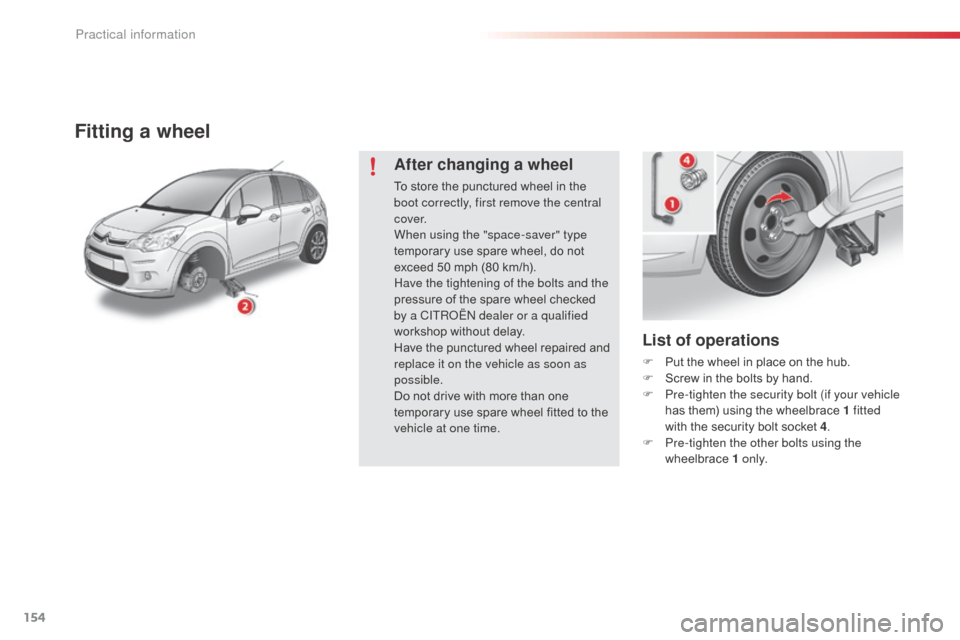
List of operations
F Put the wheel in place on the hub.
F S crew in the bolts by hand.
F
P
re-tighten the security bolt (if your vehicle
has them) using the wheelbrace 1 fitted
with the security bolt socket 4 .
F
P
re-tighten the other bolts using the
wheelbrace 1 o n l y.
Fitting a wheel
After changing a wheel
To store the punctured wheel in the
boot correctly, first remove the central
c ove r.
When using the "space-saver" type
temporary use spare wheel, do not
exceed 50 mph (80 km/h).
Have the tightening of the bolts and the
pressure of the spare wheel checked
by a CITR
oËn
dealer or a qualified
workshop without delay.
Have the punctured wheel repaired and
replace it on the vehicle as soon as
possible.
Do not drive with more than one
temporary use spare wheel fitted to the
vehicle at one time.
Practical information
Page 163 of 284
161
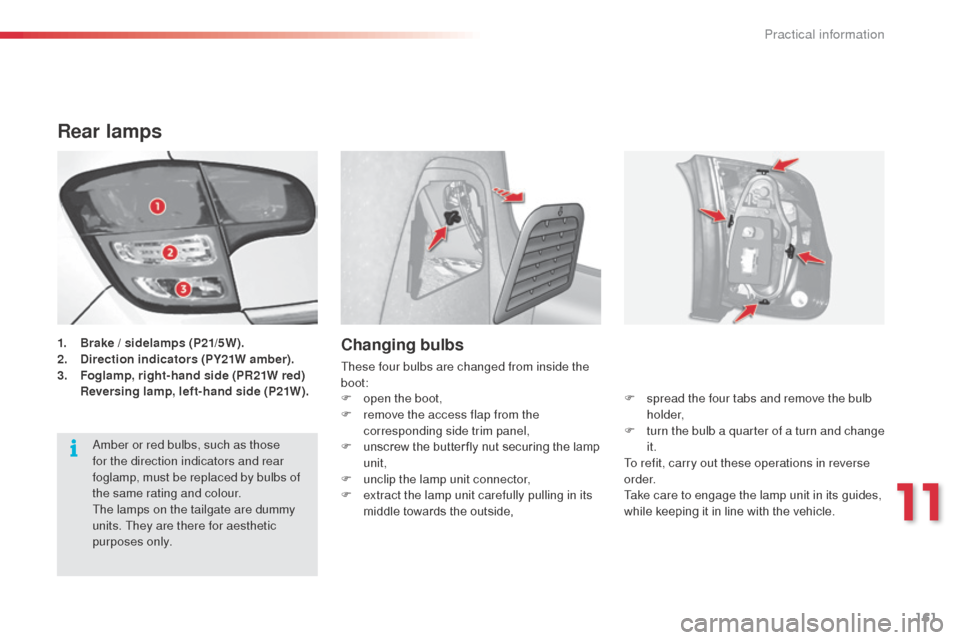
Rear lamps
1. Brake / sidelamps (P21/5W).
2. Direction indicators (PY21W amber) .
3.
F
oglamp, right-hand side (PR21W red)
R
eversing lamp, left-hand side (P21W).Changing bulbs
These four bulbs are changed from inside the
boot: F
s
pread the four tabs and remove the bulb
h o l d e r,
F
t
urn the bulb a quarter of a turn and change
it.
To refit, carry out these operations in reverse
o r d e r.
Take care to engage the lamp unit in its guides,
while keeping it in line with the vehicle.
F
o
pen the boot,
F
r
emove the access flap from the
corresponding side trim panel,
F
u
nscrew the butter fly nut securing the lamp
unit,
F
u
nclip the lamp unit connector,
F
e
xtract the lamp unit carefully pulling in its
middle towards the outside,
am
ber or red bulbs, such as those
for the direction indicators and rear
foglamp, must be replaced by bulbs of
the same rating and colour.
The lamps on the tailgate are dummy
units. They are there for aesthetic
purposes only.
11
Practical information
Page 164 of 284
162
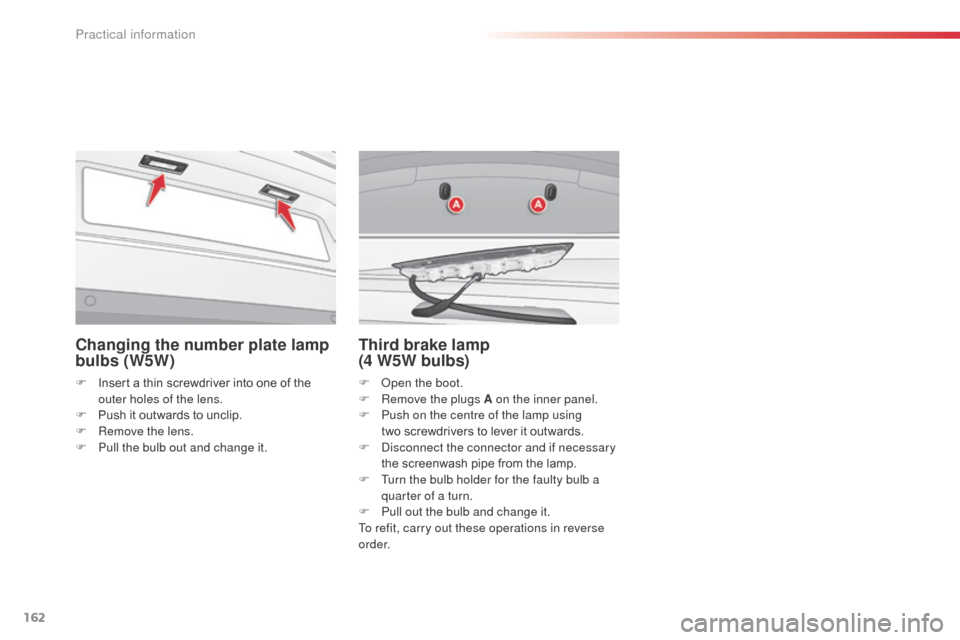
Changing the number plate lamp
bulbs (W5W)
F Insert a thin screwdriver into one of the outer holes of the lens.
F
P
ush it outwards to unclip.
F
R
emove the lens.
F
P
ull the bulb out and change it.
Third brake lamp
(4 W5W bulbs)
F open the boot.
F R emove the plugs A on the inner panel.
F
P
ush on the centre of the lamp using
two
screwdrivers to lever it outwards.
F
d
i
sconnect the connector and if necessary
the screenwash pipe from the lamp.
F
T
urn the bulb holder for the faulty bulb a
quarter of a turn.
F
P
ull out the bulb and change it.
To refit, carry out these operations in reverse
o r d e r.
Practical information
Page 165 of 284
163
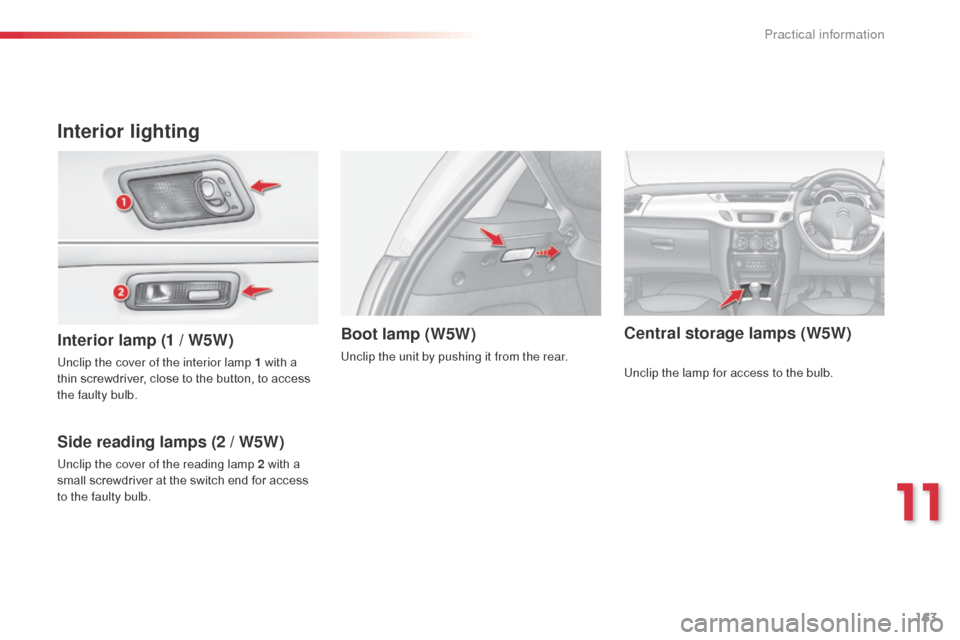
Interior lighting
Interior lamp (1 / W5W)
Side reading lamps (2 / W5W)Boot lamp (W5W)
Unclip the cover of the interior lamp 1 with a
thin screwdriver, close to the button, to access
the faulty bulb.
Unclip the cover of the reading lamp 2 with a
small screwdriver at the switch end for access
to the faulty bulb. Unclip the unit by pushing it from the rear.
Central storage lamps (W5W)
Unclip the lamp for access to the bulb.
11
Practical information
Page 178 of 284
176
Towing the vehicle
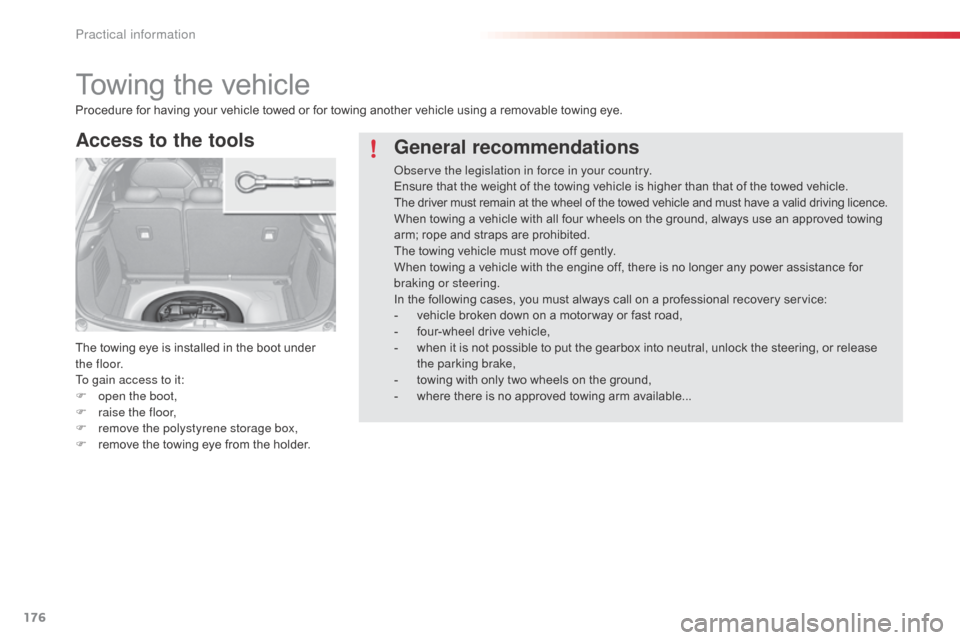
Access to the tools
The towing eye is installed in the boot under
t h e f l o o r.
To gain access to it:
F
o
pen the boot,
F
r
aise the floor,
F
r
emove the polystyrene storage box,
F
r
emove the towing eye from the holder.
Procedure for having your vehicle towed or for towing another vehicle using a removable towing eye.
General recommendations
observe the legislation in force in your country.
Ensure that the weight of the towing vehicle is higher than that of the towed vehicle.
The driver must remain at the wheel of the towed vehicle and must have a valid driving licence.
When towing a vehicle with all four wheels on the ground, always use an approved towing
arm; rope and straps are prohibited.
The towing vehicle must move off gently.
When towing a vehicle with the engine off, there is no longer any power assistance for
braking or steering.
In the following cases, you must always call on a professional recovery service:
-
v
ehicle broken down on a motor way or fast road,
-
f
our-wheel drive vehicle,
-
w
hen it is not possible to put the gearbox into neutral, unlock the steering, or release
the parking brake,
-
t
owing with only two wheels on the ground,
-
w
here there is no approved towing arm available...
Practical information
Page 184 of 284

182
"Comfort"
sun blinds, door deflectors, insulated module,
smoking kit, fragrance cartridges, front centre
armrest, moveable mirror, reading lamp,
front and rear parking sensors, cup holder,
coat hanger for head restraint, solar film for
windows, security film for windows... "Security and safety":
anti-theft alarm, wheel security bolts, stolen
vehicle tracking system, breathalyser, first aid
kit, warning triangle, high visibility vest, dog
guard, snow chains, non-slip covers, foglamps
kit, child seats and booster cushions, pet
transpor t protectors...
Conversion kits
You can obtain an "Enterprise" kit to convert a
trade vehicle to a private car and vice-versa.
"Style":
leather steering wheel, gear lever knobs,
front spoiler, rear diffuser, bumper trims, front
foglamp trims, parking brake lever trims,
aluminium footrest, alloy wheels, wheel trims,
chrome tailgate finisher, chrome tailpipe
finisher, chrome mirror shells, chrome door
handles... "Transport solutions":
boot tray, boot carpet, boot net, boot
containers, transverse roof bars, bicycle
carrier, ski carrier, roof boxes, towbars, towbar
wiring harnesses...
accessoriesA wide range of accessories and genuine parts is available from the CITROËN dealer network.
These accessories and parts are all suitable for your vehicle and benefit from CITROËN's recommendation and warranty.
*
T
o avoid any risk of jamming of the pedals:
-
e
nsure that the mat is positioned and
secured correctly,
-
n
ever fit one mat on top of another.
"Protection":
mats*, mudflaps, seat covers, door sill
protectors, bumper protection strips, vehicle
protective cover, side protectors, boot mat, boot
liner...
If a towbar and wiring are fitted outside
the CITROËN
dealer network, this must
be done making use of the vehicle's
electrical pre-equipment and following
the manufacturer's recommendations.
Practical information
Page 274 of 284

272
Remote control key 53 -57
- opening/closing
-
a
nti-theft protection
-
starting
-
battery
Exterior
Lighting controls 6 9 -73
Headlamp adjustment 7 3
Changing bulbs
1
57-160
-
f
ront lamps
-
foglamps
-
d
irection indicator repeaters
Door mirrors
5
1
Doors
6
2- 64
-
opening/closing
-
c
entral locking
-
em
ergency control
Alarm
5
8-59
Electric child lock
9
8
Electric windows
6
0 - 61Accessories
1
82-183
Wiper controls
7
4-76
Changing a wiper blade
1
75
Boot
6
5
Temporary puncture repair kit
1
44-148
Changing a wheel
1
49 -155
- tools
-
removing/refitting
Changing bulbs
1
61-162
-
r
ear lamps
-
3
rd brake lamp
-
n
umber plate lamps
Rear parking sensors
1
31-132
Reversing camera
1
33
To w b a r
17
8 -179
To w i n g
17
6 -17 7
Hill start assist
1
26
Braking assistance
1
05
Trajectory control
1
06
Tyre pressures
1
94
Fuel tank
6
6 - 67
Misfuel prevention
6
8
Visual search
Page 275 of 284
273
Boot fittings 84- 85
- r ear parcel shelf
-
hooks
-
s
towing rings
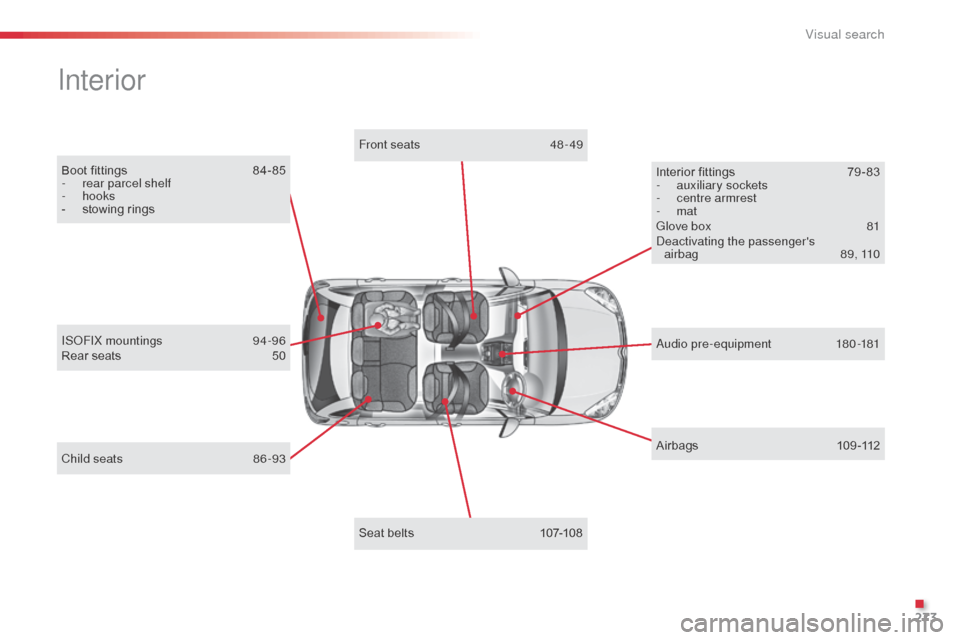
Interior
Child seats 8 6 -93
IS
oF
IX mountings
9
4-96
Rear seats
5
0
Airbags 1 09-112
Interior fittings
7
9 - 83
-
a
uxiliary sockets
-
c
entre armrest
- mat
Glove box
8
1
dea
ctivating the passenger's
airbag
8
9, 110
Seat belts
1
07-108
Front seats
4
8 - 49
a
udio pre-equipment
1
80-181
.
Visual search