ECO mode Citroen C4 2014.5 2.G Owner's Manual
[x] Cancel search | Manufacturer: CITROEN, Model Year: 2014.5, Model line: C4, Model: Citroen C4 2014.5 2.GPages: 494, PDF Size: 21.47 MB
Page 5 of 494
Technical data
Checks
Practical
i
nformation
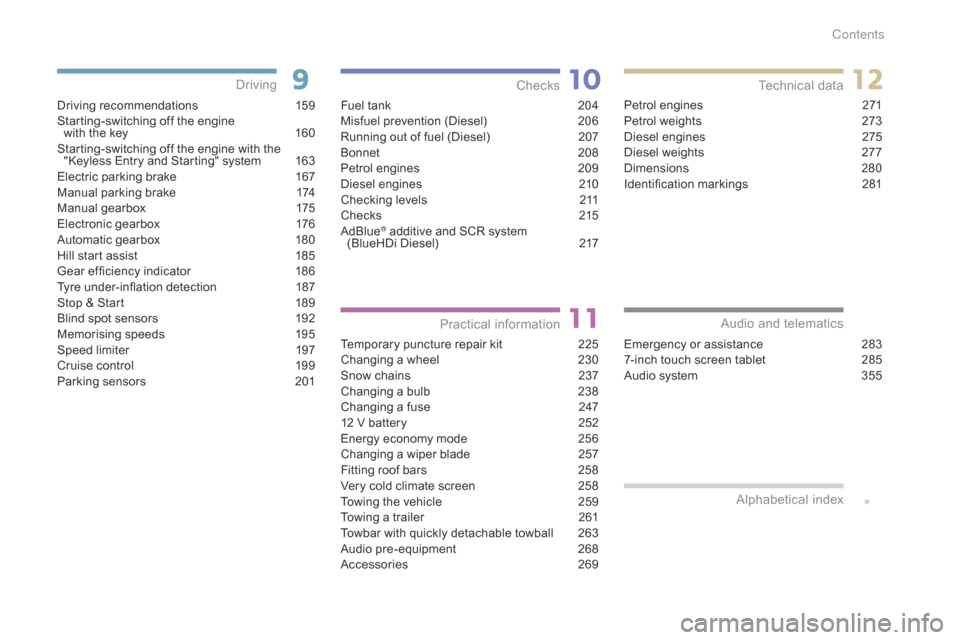
Driving recommendations 1 59
Starting-switching off the engine
with
the key
1
60
Starting-switching
off the engine with the
"
Keyless Entry and Starting" system
1
63
Electric
parking brake
1
67
Manual
par
king
b
rake
1
74
Manual
g
earbox
1
75
Electronic
gearbox
1
76
Automatic
gearbox
1
80
Hill
start assist
1
85
Gear
ef ficiency indicator
1
86
Tyre
under-inflation detection
1
87
Stop
& Start
1
89
Blind
spot sensors
1
92
Memorising
speeds
1
95
Speed
limiter
1
97
Cruise
control
1
99
Parking
sensors
2
01
Driving
Emergency or assistance 283
7-inch touch screen tablet 2 85
Audio
system
3
55
Audio and telematics
Alphabetical
in
dex
Fuel tank 2 04
Misfuel prevention (Diesel) 2 06
Running
out of fuel (Diesel)
2
07
Bonnet
20
8
Petrol
engines
2
09
Diesel
engines
2
10
Checking
levels
2
11
Checks
2
15
AdBlue
® additive and SCR system (
BlueHDi Diesel) 2 17
Temporary
puncture repair kit
2
25
Changing
a wheel
2
30
Snow
chains
2
37
Changing
a bulb
2
38
Changing
a fuse
2
47
12
V
battery
2
52
Energy
economy mode
2
56
Changing
a wiper blade
2
57
Fitting
roof bars
2
58
Very
cold climate screen
2
58
Towing
the vehicle
2
59
Towing
a trailer
2
61
Towbar
with quickly detachable towball
2
63
Audio
pre-equipment
2
68
Accessories
2
69Petrol
engines
2
71
Petrol weights
2
73
Diesel engines
2
75
Diesel weights
2
77
Dimensions
2
80
Identification
ma
rkings
2
81
Contents
Page 11 of 494
9
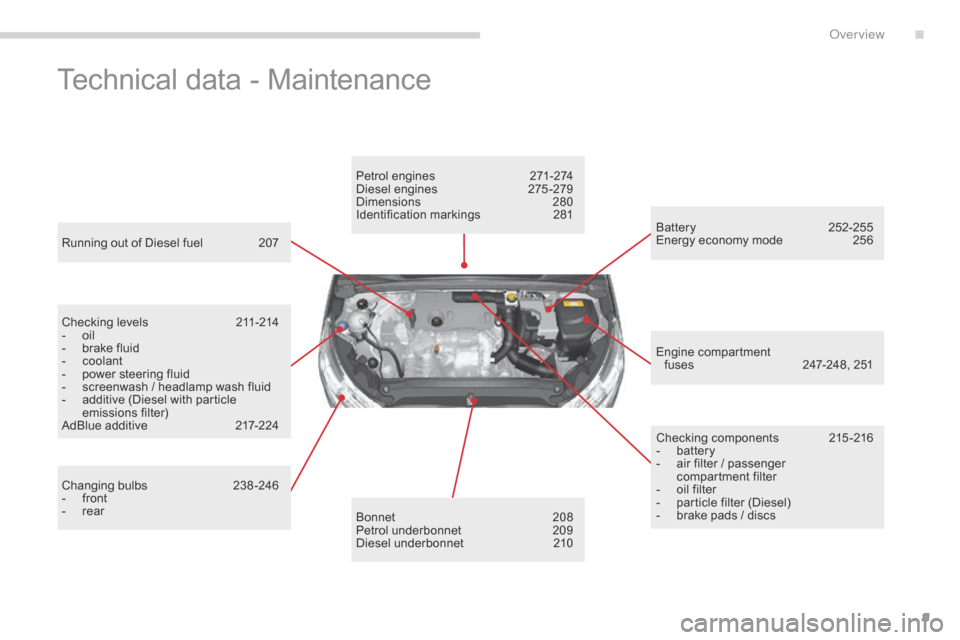
Technical data - Maintenance
Running out of Diesel fuel 207
Checking levels
2
11-214
-
o
il
-
b
rake fluid
-
c
oolant
-
p
ower steering fluid
-
s
creenwash / headlamp wash fluid
-
a
dditive (Diesel with particle
e
missions
f
ilter)
AdBlue
additive
2
17-224
Changing
bu
lbs
2
38-246
-
f
ront
-
r
ear Petrol
engines
2
71-274
Diesel engines
2
75 -279
Dimensions
2
80
Identification
ma
rkings
2
81
Bonnet
20
8
Petrol
underbonnet
2
09
Diesel
underbonnet
2
10Checking
components
2
15 -216
-
b
attery
-
a
ir filter / passenger
c
ompartment filter
-
o
il filter
-
p
article filter (Diesel)
-
b
rake pads / discs
Battery 2
52-255
Energy economy mode 2 56
Engine
c
ompartment
f
uses
2
47-248, 251
.
over view
Page 12 of 494
10
Eco-driving is a range of everyday practices that allow the motorist to optimise their fuel consumption and CO2 emissions.
Optimise the use of your
gearbox
With a manual gearbox, move off gently and change up without waiting. During acceleration change up early.
With
an automatic or electronic gearbox, give preference to automatic
m
ode and avoid pressing the accelerator pedal heavily or suddenly.
Drive smoothly
Maintain a safe distance between vehicles, use engine braking rather than the brake pedal, and press the accelerator progressively. These
p
ractices contribute towards a reduction in fuel consumption and
C
o
2 emissions and also helps reduce the background traffic noise.
I
f
your vehicle has cruise control, make use of the system at speeds
a
bove 25 mph (40 km/h) when the traffic is flowing well.
Control the use of your electrical
equipment
Before moving off, if the passenger compartment is too warm, ventilate it by opening the windows and air vents before using the air conditioning.
Above
30 mph (50 km/h), close the windows and leave the air vents
ope
n.
Remember
to make use of equipment that can help keep the
t
emperature in the passenger compartment down (sunroof and window
b
linds...).
Switch
off the air conditioning, unless it has automatic regulation, as
s
oon as the desired temperature is attained.
Switch
off the demisting and defrosting controls, if not automatic.
Switch
off the heated seat as soon as possible.
Switch
off the headlamps and front foglamps when the level of light
d
oes not require their use.
Avoid
running the engine before moving off, particularly in winter; your
v
ehicle will warm up much faster while driving.
As
a passenger, if you avoid connecting your multimedia devices
(
film, music, video game...), you will contribute towards limiting the
c
onsumption of electrical energy, and so of fuel.
Disconnect
your portable devices before leaving the vehicle.
Eco-driving
The gear efficiency indicator invites you engage the most suitable gear: as soon as the indication is displayed in the instrument panel, follow it
s
traight away.
For
vehicles fitted with an electronic or automatic gearbox, this
i
ndicator appears only in manual mode.
Eco-driving
Page 14 of 494
12
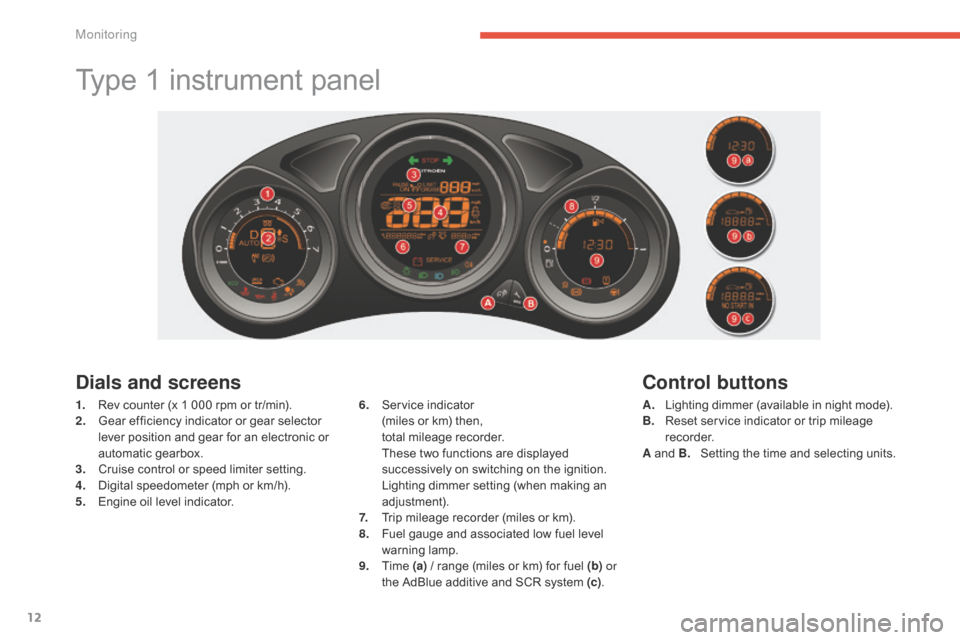
Type 1 instrument panel
Dials and screens
1. Rev counter (x 1 000 rpm or tr/min).
2. G ear efficiency indicator or gear selector
l
ever position and gear for an electronic or
a
utomatic gearbox.
3.
C
ruise control or speed limiter setting.
4.
D
igital speedometer (mph or km/h).
5.
E
ngine oil level indicator. 6. S
ervice i ndicator (
miles or km) then,
t
otal mileage recorder.
T
hese two functions are displayed
s
uccessively on switching on the ignition.
L
ighting dimmer setting (when making an
adj
ustment).
7.
T
rip mileage recorder (miles or km).
8.
F
uel gauge and associated low fuel level
w
arning
lam
p.
9.
T
ime (a)
/ range (miles or km) for fuel (b) or
the
AdBlue additive and SCR system (c).
Control buttons
A. Lighting dimmer (available in night mode).
B. R eset service indicator or trip mileage
re
corder.
A
and B.
S
etting the time and selecting units.
Monitoring
Page 15 of 494
13
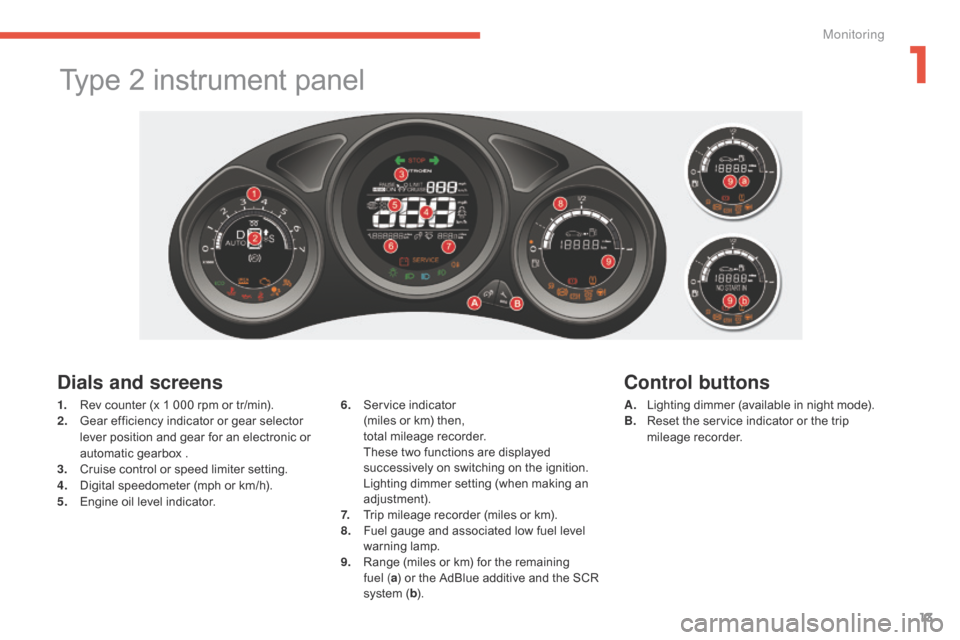
Type 2 instrument panel
Dials and screens
A. Lighting dimmer (available in night mode).
B. R eset the service indicator or the trip
mil
eage
re
corder.
6. S
ervice i
ndicator (
miles
or
km)
then,
t
otal
mileage
recorder.
T
hese
two
functions
are
displayed
s
uccessively
on
switching
on
the
ignition.
L
ighting
dimmer
setting
(when
making
an
adj
ustment).
7.
T
rip
mileage
recorder
(miles
or
km).
8.
F
uel
gauge
and
associated
low
fuel
level
w
arning
lam
p.
9.
R
ange
(miles
or
km)
for
the
remaining
f
uel
( a )
or
the
AdBlue
additive
and
the
SCR
s
ystem
( b ).
Control buttons
1. Rev counter (x 1 000 rpm or tr/min).
2. G ear efficiency indicator or gear selector
l
ever position and gear for an electronic or
a
utomatic gearbox .
3.
C
ruise control or speed limiter setting.
4.
D
igital speedometer (mph or km/h).
5.
E
ngine oil level indicator.
1
Monitoring
Page 16 of 494
14
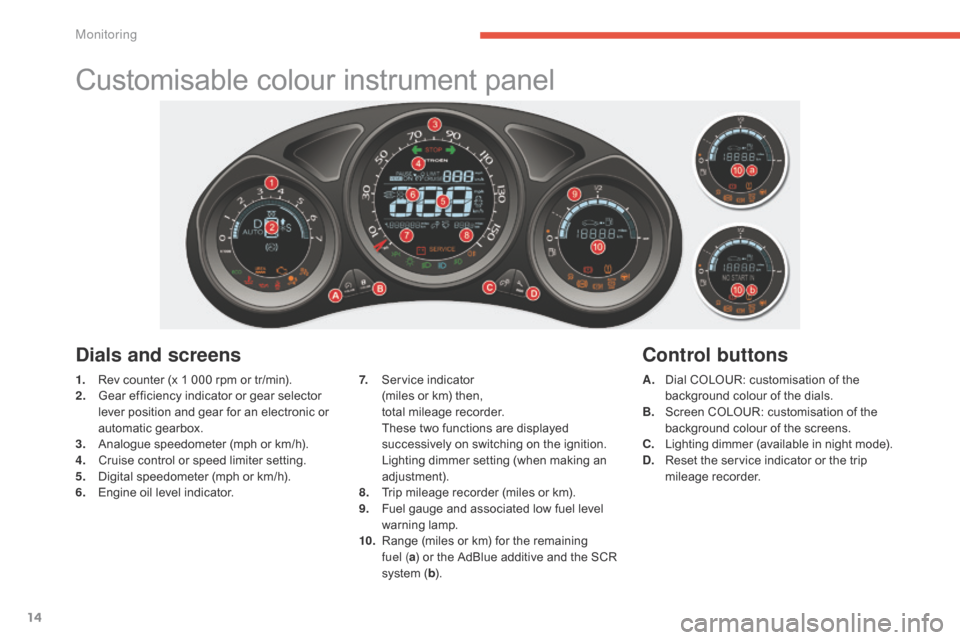
Customisable colour instrument panel
1. Rev counter (x 1 000 rpm or tr/min).
2. G ear efficiency indicator or gear selector
l
ever position and gear for an electronic or
a
utomatic gearbox.
3.
A
nalogue speedometer (mph or km/h).
4.
C
ruise control or speed limiter setting.
5.
D
igital speedometer (mph or km/h).
6.
E
ngine oil level indicator. A. D
ial COLOUR: customisation of the b
ackground colour of the dials.
B.
S
creen COLOUR: customisation of the
b
ackground colour of the screens.
C.
L
ighting dimmer (available in night mode).
D.
R
eset the service indicator or the trip
mil
eage
re
corder.
Dials and screens
7. Service indicator (
miles or km) then,
t
otal mileage recorder.
T
hese two functions are displayed
s
uccessively on switching on the ignition.
L
ighting dimmer setting (when making an
adj
ustment).
8.
T
rip mileage recorder (miles or km).
9.
F
uel gauge and associated low fuel level
w
arning
lam
p.
10.
R
ange (miles or km) for the remaining
f
uel (a )
or the AdBlue additive and the SCR
s
ystem (b ).
Control buttons
Monitoring
Page 29 of 494
27
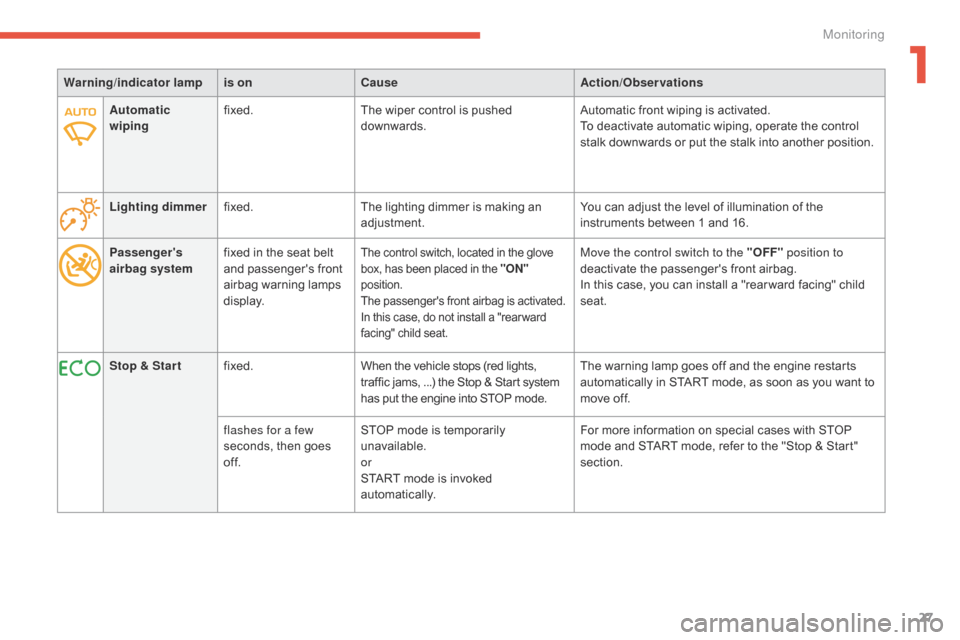
Passenger's
airbag systemfixed
in the seat belt a
nd passenger's front
a
irbag
w
arning
lam
ps
d
isplay.The control switch, located in the glove box, has been placed in the "ON"
position.
The
passenger's front airbag is activated.
In
this case, do not install a "rear ward
f
acing" child seat.Move the control switch to the "OFF" position to
deactivate the passenger's front airbag.
In
this case, you can install a "rear ward facing" child
sea
t.
Warning
/indicator lampis on Cause Action/Observations
Stop & Star t fixed. When
the
vehicle
stops
(red
lights,
t
raffic
jams,
...)
the
Stop
&
Start
system
h
as
put
the
engine
into
STOP
mode. The
warning lamp goes off and the engine restarts
a
utomatically in START mode, as soon as you want to
m
ove off.
flashes for a few
seconds,
then
goes
o
f f. STOP
mode
is
temporarily
u
navailable.
or
START
mode
is
invoked
au
tomatically. For
more information on special cases with STOP
m
ode and START mode, refer to the "Stop & Start"
s
ection.
Automatic
wiping
fixed.
The
wiper
control
is
pushed
d
ownwards.
Automatic front wiping is activated.
To deactivate automatic wiping, operate the control
s
talk downwards or put the stalk into another position.
Lighting dimmer fixed. The
lighting
dimmer
is
making
an
adj
ustment.
You can adjust the level of illumination of the
i
nstruments between 1 and 16.
1
Monitoring
Page 40 of 494
38
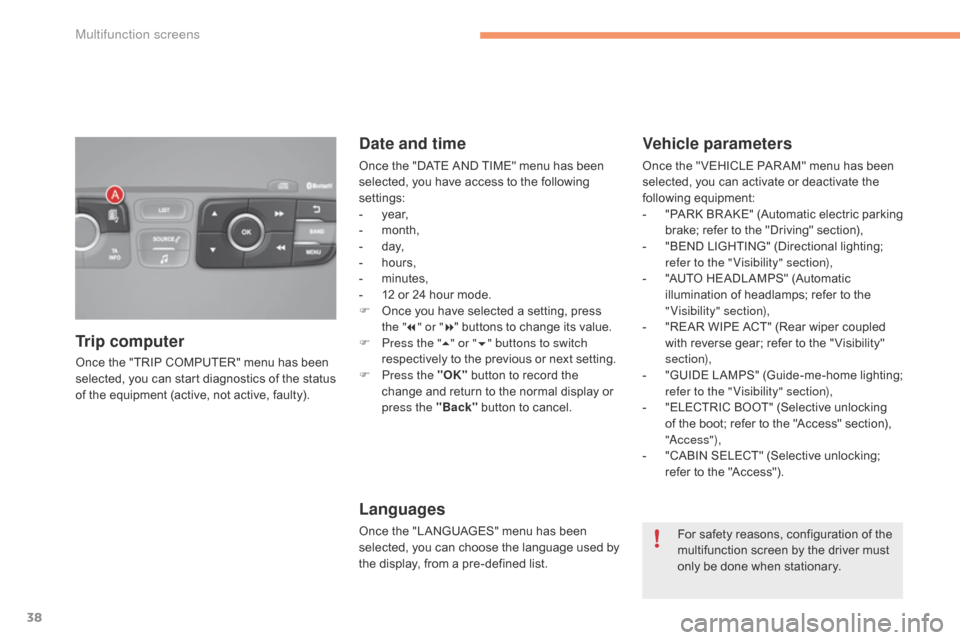
Once the "TRIP COMPUTER" menu has been selected, you can start diagnostics of the status
o
f the equipment (active, not active, faulty).
Trip computer Date and time
Once the "DATE AND TIME" menu has been s
elected, you have access to the following
se
ttings:
-
ye
ar,
-
m
onth,
-
d
ay,
-
h
ours,
-
m
inutes,
-
1
2 or 24 hour mode.
F
O
nce you have selected a setting, press
t
he "7" or " 8"
buttons to change its value.
F
P
ress the " 5" or " 6" buttons to switch
respectively
to the previous or next setting.
F
P
ress the "OK"
button to record the
c
hange and return to the normal display or
p
ress the "Back"
button to cancel.
Languages
Once the "LANGUAGES" menu has been selected, you can choose the language used by
t
he display, from a pre-defined list.
Vehicle parameters
Once the " VEHICLE PAR AM" menu has been selected, you can activate or deactivate the
fo
llowing
e
quipment:
-
"
PARK
B
R AKE"
(
Automatic
e
lectric
p
arking
b
rake; refer to the "Driving" section),
-
"
BEND LIGHTING" (Directional lighting;
r
efer to the " Visibility" section),
-
"
AUTO HEADLAMPS" (Automatic
i
llumination of headlamps; refer to the
"
Visibility" section),
-
"
REAR WIPE ACT" (Rear wiper coupled
w
ith reverse gear; refer to the " Visibility"
s
ection),
-
"
GUIDE
L
AMPS"
(
Guide-me-home
l
ighting;
r
efer to the " Visibility" section),
-
"
ELECTRIC BOOT" (Selective unlocking
o
f the boot; refer to the "Access" section),
"
a
c
c ess"),
-
"
CABIN SELECT" (Selective unlocking;
r
efer to the "Access").
For
safety reasons, configuration of the
m
ultifunction screen by the driver must
o
nly be done when stationary.
Multifunction screens
Page 77 of 494
75
Electric windows
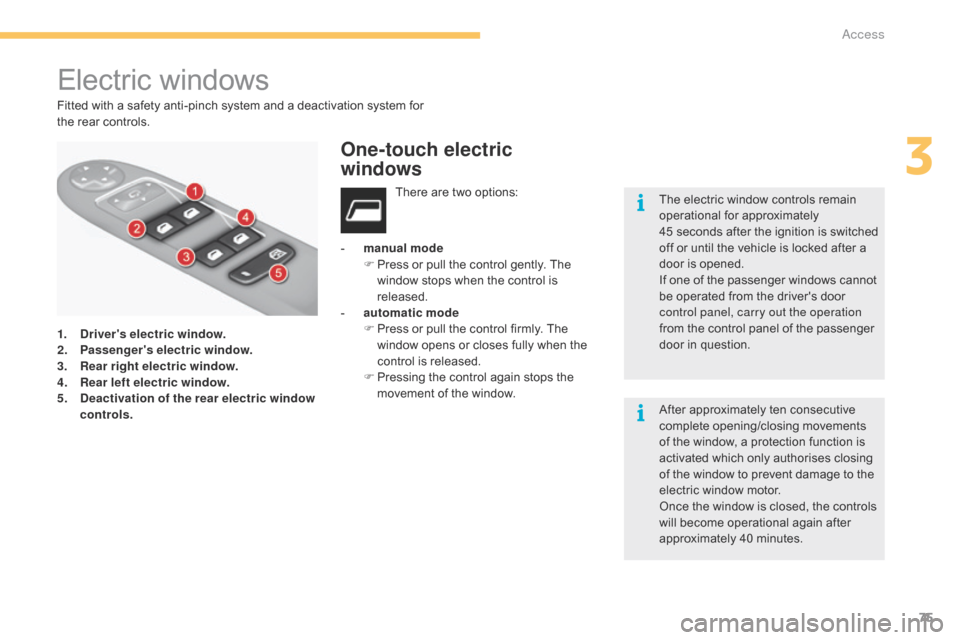
1. Driver's electric window.
2. Passenger's electric window.
3.
R
ear right electric window.
4.
R
ear left electric window.
5.
D
eactivation of the rear electric window
controls. There
are two options:
-
m
anual mode
F
P
ress or pull the control gently. The
w
indow stops when the control is
r
eleased.
-
a
utomatic mode
F P ress or pull the control firmly. The w
indow opens or closes fully when the
c
ontrol is released.
F
P
ressing the control again stops the
m
ovement of the window.
One-touch electric
windows
The electric window controls remain operational for approximately
4
5 seconds after the ignition is switched
o
ff or until the vehicle is locked after a
d
oor is opened.
If
one of the passenger windows cannot
b
e operated from the driver's door
c
ontrol panel, carry out the operation
from
the control panel of the passenger
d
oor in question.
After
approximately ten consecutive
c
omplete opening/closing movements
o
f the window, a protection function is
a
ctivated which only authorises closing
o
f the window to prevent damage to the
e
lectric window motor.
Once
the window is closed, the controls
w
ill become operational again after
a
pproximately 40 minutes.
Fitted
with
a
safety
anti-pinch
system
and
a
deactivation
system
for
the
rear
controls.
3
Access
Page 83 of 494
81
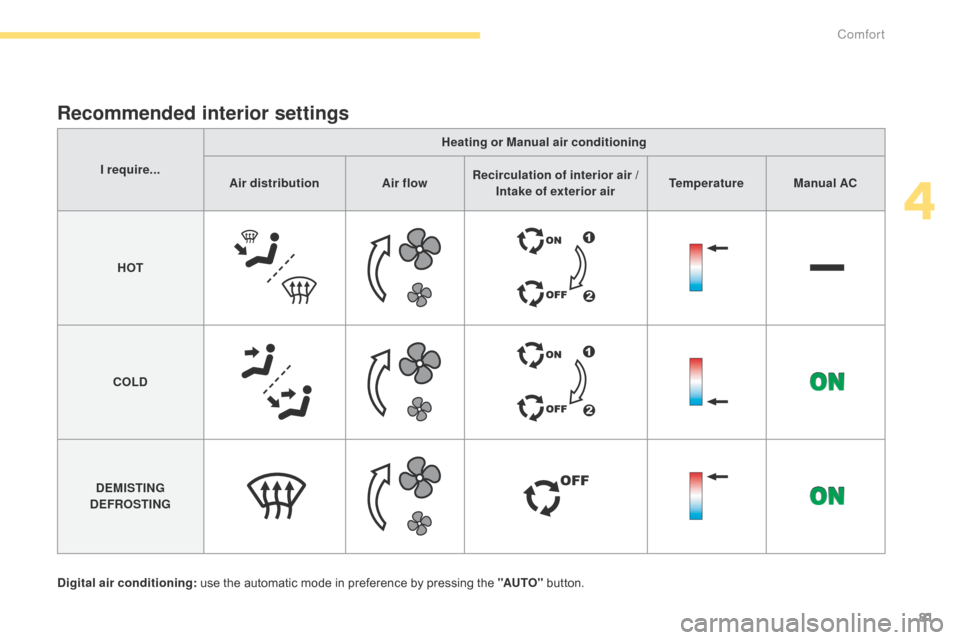
Recommended interior settings
Digital air conditioning: use the automatic mode in preference by pressing the "AUTO" button.
I require...
Heating or Manual air conditioning
Air distribution Air flowRecirculation of interior air /
Intake of exterior air Temperature Manual AC
HOT
COLD
DEMISTING
DEFROSTING
4
Comfort