engine Citroen C4 2015 2.G Manual Online
[x] Cancel search | Manufacturer: CITROEN, Model Year: 2015, Model line: C4, Model: Citroen C4 2015 2.GPages: 494, PDF Size: 20.49 MB
Page 225 of 494
223
C4-2_en_Chap10_verification_ed01-2015
C4-2_en_Chap10_verification_ed01-2015
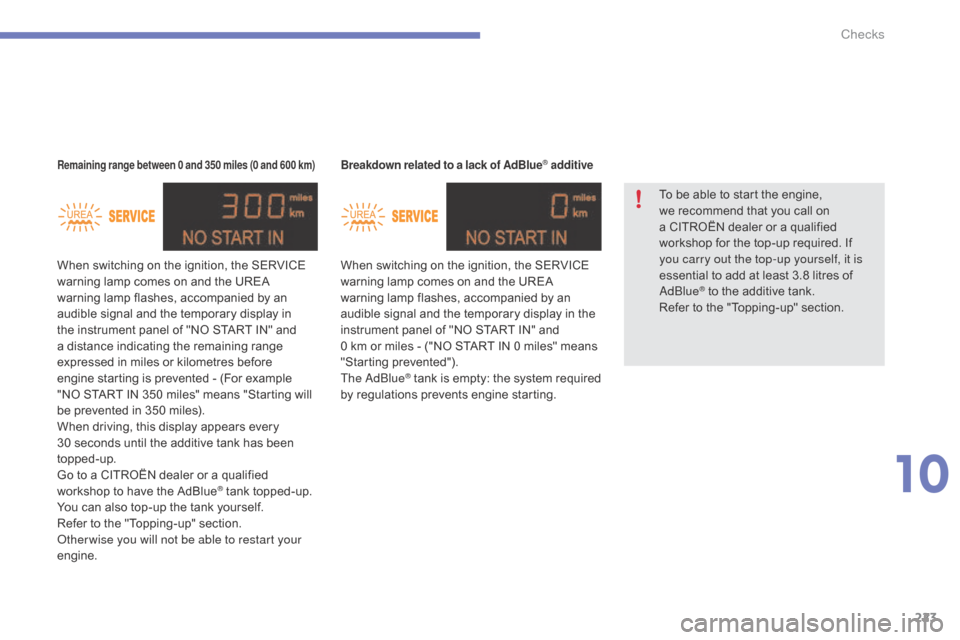
Breakdown related to a lack of AdBlue® additive
When switching on the ignition, the SERVICE warning lamp comes on and the UREA
w
arning lamp flashes, accompanied by an
a
udible signal and the temporary display in the
i
nstrument panel of "NO START IN" and
0
km or miles - ("NO START IN 0 miles" means
"
Starting
p
revented").
The
a d
blu
e
® tank is empty: t he s ystem r equired b
y
regulations prevents engine starting.
Remaining range between 0 and 350 miles (0 and 600 km)
When switching on the ignition, the SERVICE warning lamp comes on and the UREA
w
arning lamp flashes, accompanied by an
a
udible signal and the temporary display in
t
he instrument panel of "NO START IN" and
a
distance indicating the remaining range
e
xpressed in miles or kilometres before
e
ngine starting is prevented - (For example
"
NO START IN 350 miles" means "Starting will
b
e prevented in 350 miles).
When
driving, this display appears every
3
0 seconds until the additive tank has been
t
opped-up.
Go
to a CITROËN dealer or a qualified
w
orkshop to have the AdBlue
® tank topped-up.
Y
ou
can
also
top-up
the
tank
yourself.
Refer
to
the
"Topping-up"
section.
ot
her wise you will not be able to restart your
engine. To
be able to start the engine,
w
e recommend that you call on
a
CITROËN dealer or a qualified
w
orkshop for the top-up required. If
y
ou carry out the top-up yourself, it is
essential to add at least 3.8 litres of
a d
blu
e
® to the additive tank.
R
efer
to
the "Topping-up" section.
10
Checks
Page 226 of 494
224
C4-2_en_Chap10_verification_ed01-2015
C4-2_en_Chap10_verification_ed01-2015
In the event of a fault with the the SCR emissions control system
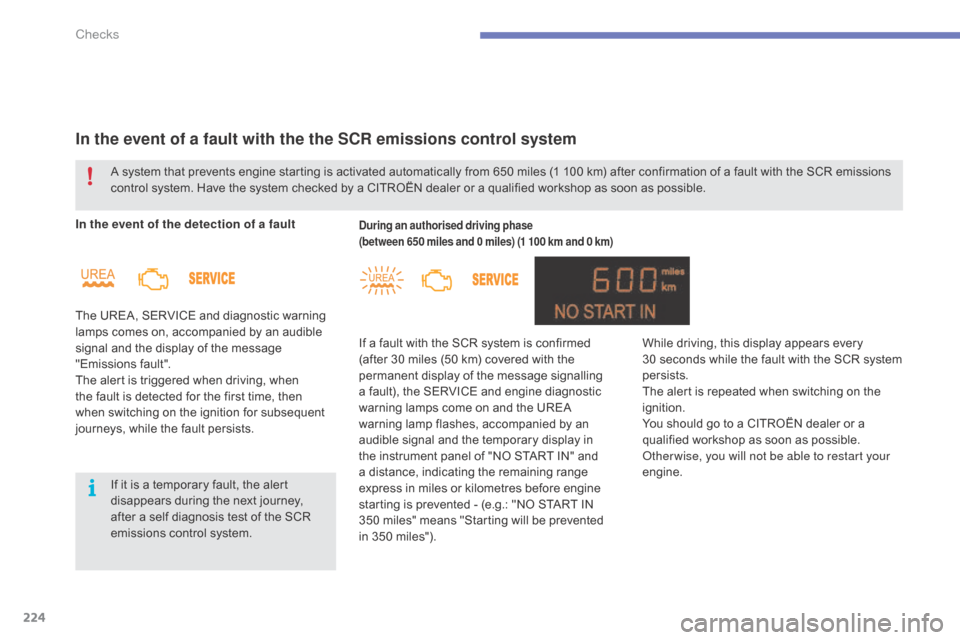
In the event of the detection of a fault
The UREA, SERVICE and diagnostic warning
l
amps comes on, accompanied by an audible
s
ignal and the display of the message
"
Emissions
f
ault".
The
alert is triggered when driving, when
t
he fault is detected for the first time, then
w
hen switching on the ignition for subsequent
j
ourneys, while the fault persists.During an authorised driving phase
(between 650 miles and 0 miles) (1 100 km and 0 km)
If a fault with the SCR system is confirmed ( after 30 miles (50 km) covered with the
p
ermanent display of the message signalling
a
fault), the SERVICE and engine diagnostic
w
arning lamps come on and the UREA
w
arning lamp flashes, accompanied by an
a
udible signal and the temporary display in
t
he instrument panel of "NO START IN" and
a
distance, indicating the remaining range
e
xpress in miles or kilometres before engine
s
tarting is prevented - (e.g.: "NO START IN
350
miles" means "Starting will be prevented
in
350 miles").
A
system
that
prevents
engine
starting
is
activated automatically from 650 miles (1 100 km) after confirmation of a fault with the SCR emissions
c
ontrol
system.
Have
the
system
checked
by
a CITROËN dealer or a qualified workshop as soon as possible.
If
it
is
a
temporary
fault,
the
alert
d
isappears
during
the
next
journey,
a
fter
a
self
diagnosis
test
of
the
SCR
e
missions
control
system. While
driving, this display appears every
30 seconds while the fault with the SCR system
p
ersists.
The
alert is repeated when switching on the
ig
nition.
You
should go to a CITROËN dealer or a
q
ualified workshop as soon as possible.
ot
her wise, you will not be able to restart your
engine.
Checks
Page 227 of 494
225
C4-2_en_Chap10_verification_ed01-2015
C4-2_en_Chap10_verification_ed01-2015
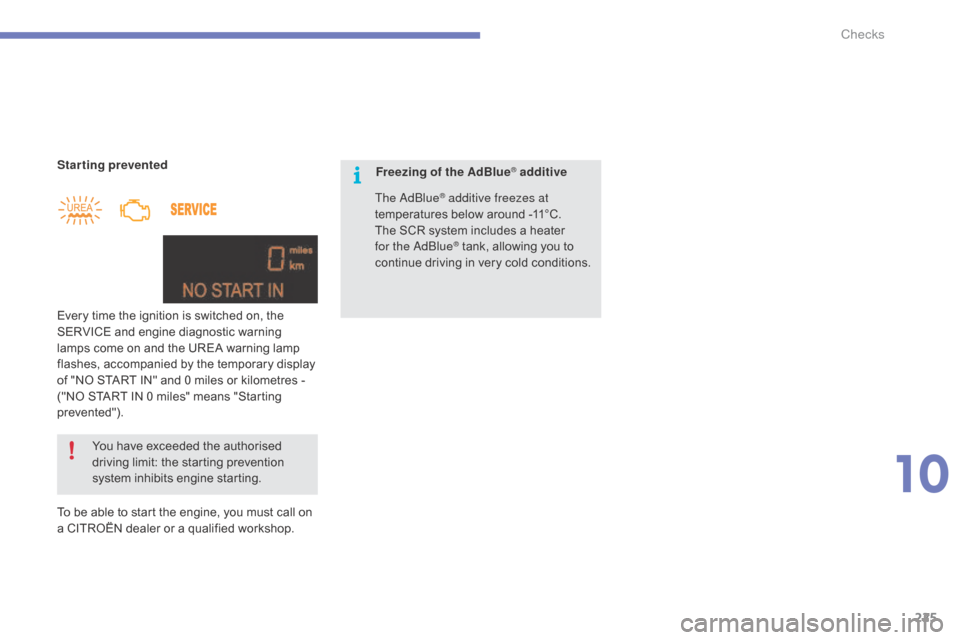
Starting prevented
Every time the ignition is switched on, the
S
ERVICE and engine diagnostic warning
l
amps come on and the UREA warning lamp
f
lashes, accompanied by the temporary display
o
f "NO START IN" and 0 miles or kilometres -
(
"NO START IN 0 miles" means "Starting
p
revented").
To
be able to start the engine, you must call on
a
CITROËN dealer or a qualified workshop.
You
have exceeded the authorised
d
riving limit: the starting prevention
s
ystem inhibits engine starting.Freezing of the AdBlue® additive
The
a
d
blu
e
® additive freezes at
temperatures below around -11°C.
The
SCR
system includes a heater
f
or the
a
dbl
ue
® tank, allowing you to c
ontinue
driving in very cold conditions.
10
Checks
Page 230 of 494
228
C4-2_en_Chap10_verification_ed01-2015
C4-2_en_Chap10_verification_ed01-2015
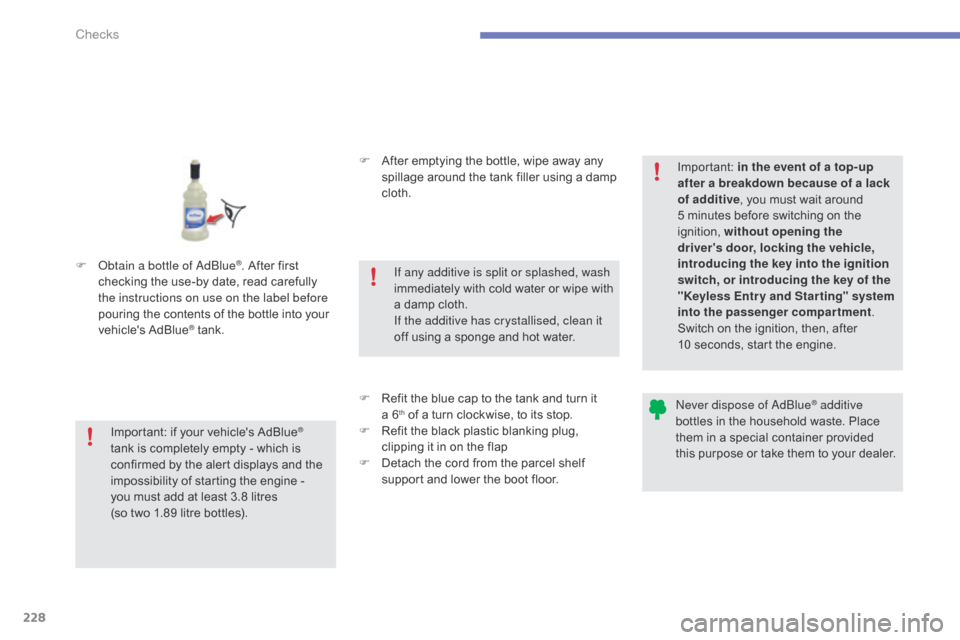
F obtain a bottle of adbl ue®. After first c
hecking
the
use-by
date,
read carefully
t
he instructions on use on the label before
pouring
the
contents
of
the bottle into your
v
ehicle's
Ad
Blue
® tank. F
A
fter emptying the bottle, wipe away any
s
pillage around the tank filler using a damp
c
loth.
F
R
efit the blue cap to the tank and turn it
a
6
th of a turn clockwise, to its stop.
F
R
efit the black plastic blanking plug,
c
lipping it in on the flap
F
D
etach the cord from the parcel shelf
s
upport and lower the boot floor.
Important:
if
your
vehicle's
AdBlue®
tank
is
completely
empty
-
which
is
c
onfirmed
by
the
alert
displays
and
the
i
mpossibility
of
starting
the
engine
-
you
must
add
at
least
3.8 litres
(so
two
1.89
litre
bottles). If any additive is split or splashed, wash
immediately
w
ith
c
old
w
ater
o
r
w
ipe
w
ith
a
damp cloth.
If the additive has crystallised, clean it
off using a sponge and hot water.Important:
i
n the event of a top-up
after a breakdown because of a lack
of additive , you must wait around
5 minutes before switching on the
ig
nition,
w
ithout opening the
driver's door, locking the vehicle,
introducing the key into the ignition
switch, or introducing the key of the
"Keyless Entr y and Star ting" system
into the passenger compartment .
Switch on the ignition, then, after
10 seconds, start the engine.
ne
ver dispose of a
dbl
ue
® additive
bottles
in
the
household
waste. Place
t
hem
in
a
special
container provided
t
his
p
urpose
o
r
t
ake
t
hem
t
o
y
our
d
ealer.
Checks
Page 232 of 494
230
C4-2_en_Chap11_info-pratique_ed01-2015
C4-2_en_Chap11_info-pratique_ed01-2015
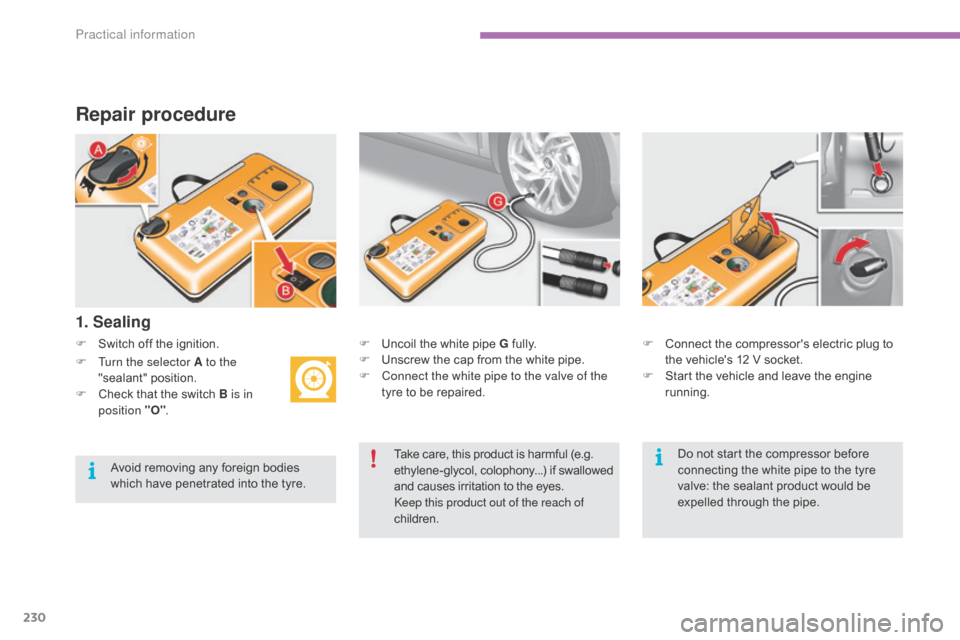
Repair procedure
F Switch off the ignition.
1. Sealing
F Uncoil the white pipe G f ully.
F U nscrew the cap from the white pipe.
F
C
onnect the white pipe to the valve of the
tyre
to be repaired. F
C onnect the compressor's electric plug to t
he vehicle's 12 V socket.
F
S
tart the vehicle and leave the engine
r
unning.
F
T
urn the selector A to the
"sealant"
p
osition.
F
C
heck
that
the
switch
B is in
position "O" .
Take
care, this product is harmful (e.g.
e
thylene-glycol, colophony...) if swallowed
a
nd causes irritation to the eyes.
ke
ep this product out of the reach of
children.
Avoid
removing
any
foreign
bodies
w
hich
have
penetrated
into
the
tyre. Do
not start the compressor before
c
onnecting the white pipe to the tyre
v
alve: the sealant product would be
e
xpelled through the pipe.
Practical information
Page 235 of 494
233
C4-2_en_Chap11_info-pratique_ed01-2015
C4-2_en_Chap11_info-pratique_ed01-2015
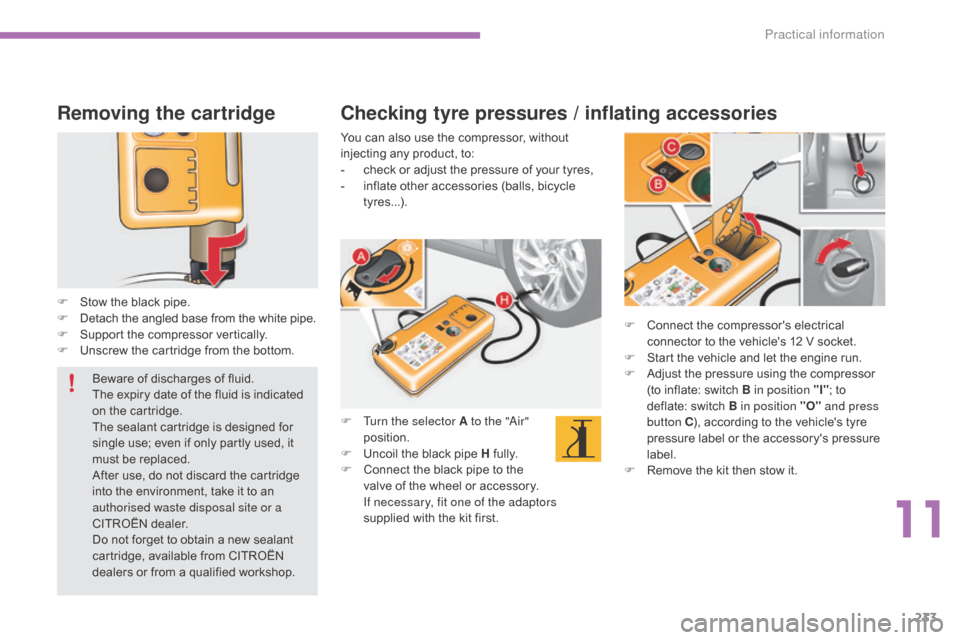
Removing the cartridge
F Stow the black pipe.
F D etach the angled base from the white pipe.
F
S
upport the compressor vertically.
F
U
nscrew the cartridge from the bottom. F
C
onnect the compressor's electrical
c
onnector to the vehicle's 12 V socket.
F
S
tart the vehicle and let the engine run.
F
A
djust the pressure using the compressor
(
to inflate: switch B in position "I";
to
d
eflate: switch B in position "O" and press
button C ),
according to the vehicle's tyre
p
ressure label or the accessory's pressure
lab
el.
F
R
emove the kit then stow it.
Checking tyre pressures / inflating accessories
You can also use the compressor, without injecting any product, to:
-
c
heck or adjust the pressure of your tyres,
-
i
nflate other accessories (balls, bicycle
t
yres...).
F
T
urn the selector A to the "
ai
r"
position.
F
U
ncoil the black pipe H
f
ully.
F
C
onnect the black pipe to the
v
alve of the wheel or accessory.
I
f necessary, fit one of the adaptors
supplied
with the kit first.
Beware
of
discharges
of
fluid.
The
expiry
date
of
the
fluid
is
indicated
o
n
the
cartridge.
The
sealant
cartridge
is
designed
for
s
ingle
use;
even
if
only
partly
used,
it
m
ust
be
replaced.
After
use,
do
not
discard
the
cartridge
i
nto
the
environment,
take
it
to
an
a
uthorised waste disposal site or a
CITROËN
dealer.
Do
not
forget
to
obtain
a
new
sealant
c
artridge,
available
from
CITROËN
d
ealers
or
from
a
qualified
workshop.
11
Practical information
Page 245 of 494
243
C4-2_en_Chap11_info-pratique_ed01-2015
C4-2_en_Chap11_info-pratique_ed01-2015
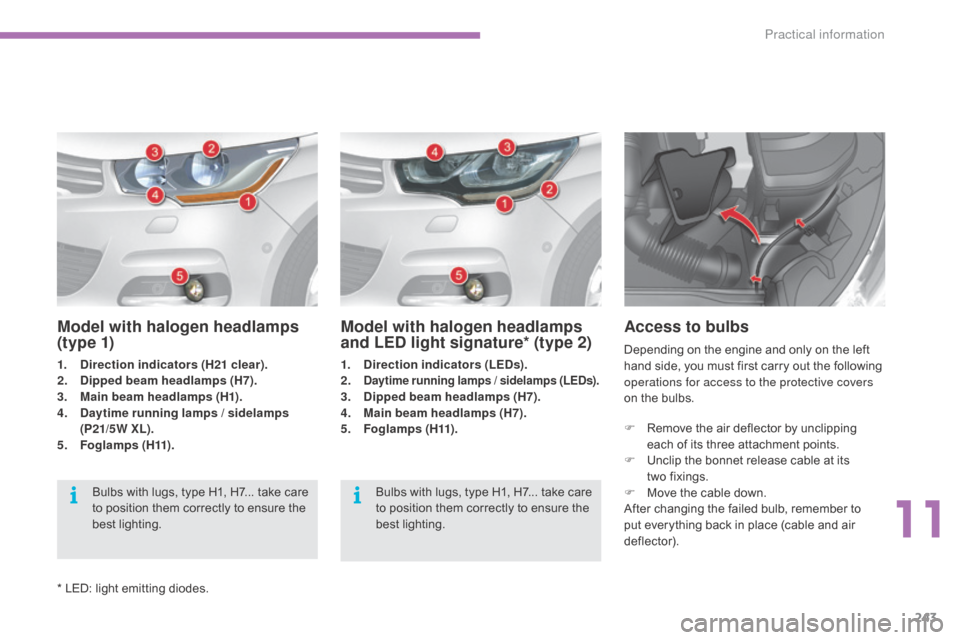
F Remove the air deflector by unclipping e
ach of its three attachment points.
F
U
nclip the bonnet release cable at its
two
fixings.
F
M
ove the cable down.
After
changing the failed bulb, remember to
p
ut everything back in place (cable and air
d
eflector).
Depending
on the engine and only on the left
h
and side, you must first carry out the following
o
perations for access to the protective covers
on the bulbs.
Access to bulbs
Model with halogen headlamps
and LED light signature* (type 2)
1. Direction indicators (LEDs).
2. Daytime running lamps / sidelamps (LEDs).3. Dipped beam headlamps (H7).
4. M
ain beam headlamps (H7).
5.
F
o g l a m p s ( H11) .
Bulbs
with lugs, type H1, H7... take care
t
o position them correctly to ensure the
b
est
l
ighting.
Model with halogen headlamps
(t y p e 1)
1. Direction indicators (H21 clear).
2. Dipped beam headlamps (H7).
3.
M
ain beam headlamps (H1).
4.
D
aytime running lamps / sidelamps
(P21/5W XL).
5.
F
o g l a m p s ( H11) .Bulbs
with lugs, type H1, H7... take care
t
o position them correctly to ensure the
b
est
l
ighting.
*
LED: light emitting diodes.
11
Practical information
Page 257 of 494
255
C4-2_en_Chap11_info-pratique_ed01-2015
C4-2_en_Chap11_info-pratique_ed01-2015
Fuse N°Rating Functions
F19 30 AWindscreen
wipers slow / fast speed.
F20 15 AFront
and rear screenwash pump.
F21 20 AHeadlamp
wash pump.
F22 15 AHorn.
F23 15 ARight-hand
main beam headlamp.
F24 15 ALeft-hand
main beam headlamp.
F27 5 ALeft-hand
d
ipped
h
eadlamp.
F28 5 ARight-hand
d
ipped
h
eadlamp.
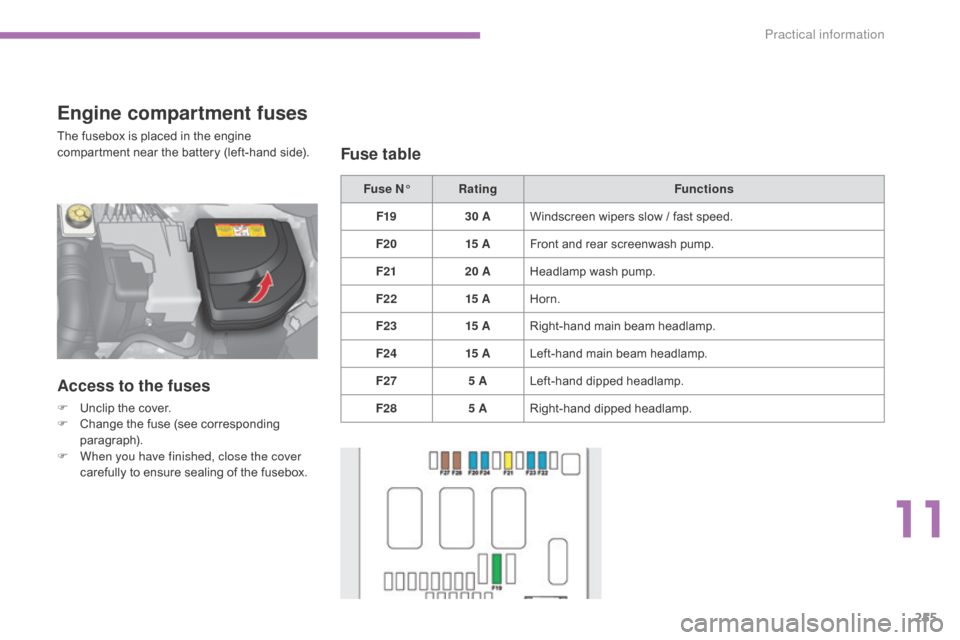
Engine compartment fuses
The fusebox is placed in the engine compartment near the battery (left-hand side).
Access to the fuses
F Unclip the cover.
F C hange the fuse (see corresponding
par
agraph).
F
W
hen you have finished, close the cover
carefully
to ensure sealing of the fusebox.
Fuse table
11
Practical information
Page 258 of 494
256
C4-2_en_Chap11_info-pratique_ed01-2015
C4-2_en_Chap11_info-pratique_ed01-2015
12 V battery
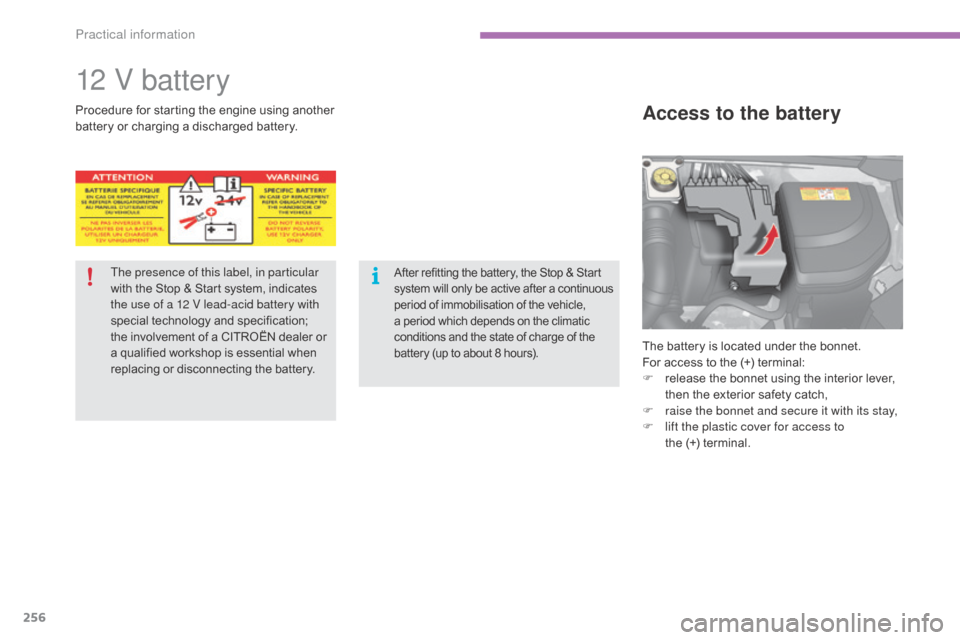
The battery is located under the bonnet.
For access to the (+) terminal:
F
r
elease the bonnet using the interior lever,
t
hen the exterior safety catch,
F
r
aise the bonnet and secure it with its stay,
F
l
ift the plastic cover for access to
the (+)
terminal.
Access to the batteryProcedure for starting the engine u sing another b
attery or charging a discharged battery.
The presence of this label, in particular
with
the Stop & Start system, indicates
t
he use of a 12 V lead-acid battery with
special
t
echnology
a
nd
s
pecification;
t
he involvement of a CITROËN dealer or
a
qualified workshop is essential when
r
eplacing or disconnecting the battery.
After refitting the battery, the Stop & Start system w ill o nly b e a ctive a fter a c ontinuous p
eriod of immobilisation of the vehicle,
a
period which depends on the climatic
c
onditions and the state of charge of the
b
attery (up to about 8 hours).
Practical information
Page 259 of 494
257
C4-2_en_Chap11_info-pratique_ed01-2015
C4-2_en_Chap11_info-pratique_ed01-2015
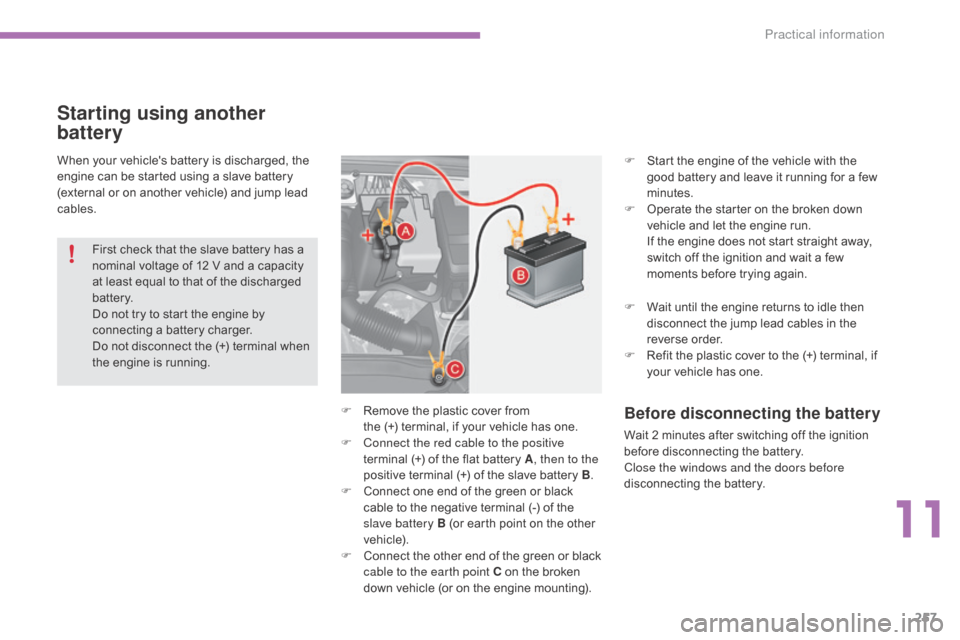
When your vehicle's battery is discharged, the engine can be started using a slave battery
(
external or on another vehicle) and jump lead
c
ables.
Starting using another
battery
First check that the slave battery has a n ominal voltage of 12 V and a capacity
a
t least equal to that of the discharged
b
attery.
Do
not try to start the engine by
c
onnecting a battery charger.
Do
not disconnect the (+) terminal when
t
he engine is running. F
S
tart the engine of the vehicle with the
g
ood battery and leave it running for a few
m
inutes.
F
O
perate the starter on the broken down
v
ehicle and let the engine run. I
f the engine does not start straight away, s
witch off the ignition and wait a few
m
oments before trying again.
Before disconnecting the battery
Wait 2 minutes after switching off the ignition before disconnecting the battery.
Close the windows and the doors before
disconnecting
the battery.
F
R
emove
the
plastic
cover
from
the
(+)
terminal,
if
your
vehicle
has
one.
F
C
onnect the red cable to the positive
terminal
(+)
of
the
flat
battery
A , then to the
positive
terminal
(+)
of
the
slave
battery
B.
F
C
onnect
one
end
of
the
green
or
black
c
able
to
the
negative
terminal
(-)
of
the
s
lave battery B
(or
earth
point
on
the
other
v
ehicle).
F
C
onnect
t
he
o
ther
e
nd
o
f
t
he
g
reen
o
r
b
lack
c
able to the earth point C
on
the
broken
d
own
vehicle
(or
on
the
engine
mounting). F
W
ait until the engine returns to idle then
d
isconnect the jump lead cables in the
r
everse
o
rder.
F
R
efit the plastic cover to the (+) terminal, if
y
our vehicle has one.
11
Practical information