height Citroen C4 2015 2.G Owner's Manual
[x] Cancel search | Manufacturer: CITROEN, Model Year: 2015, Model line: C4, Model: Citroen C4 2015 2.GPages: 494, PDF Size: 20.49 MB
Page 93 of 494
91
C4-2_en_Chap04_confort_ed01-2015
C4-2_en_Chap04_confort_ed01-2015
Front seats
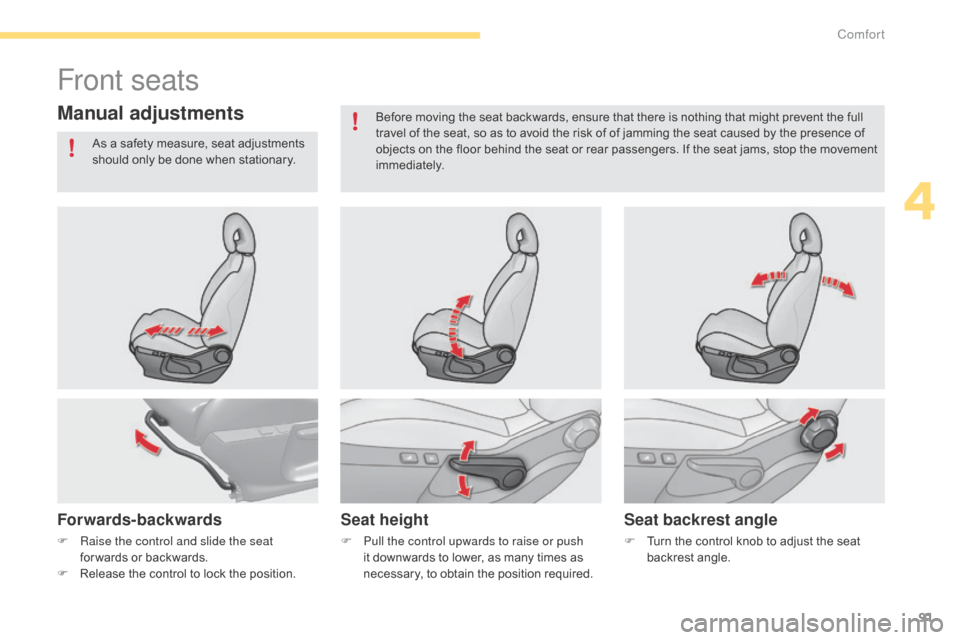
Manual adjustments
Forwards-backwardsSeat heightSeat backrest angle
F Raise the control and slide the seat
for wards   or   backwards.
F
 
R
elease   the   control   to   lock   the   position.F
P ull the control upwards to raise or push
it   downwards   to   lower,   as   many   times   as  
n
ecessary,   to   obtain   the   position   required.F
 T urn   the   control   knob   to   adjust   the   seat  b
ackrest   angle.
As
  a   safety   measure,   seat   adjustments  
s
hould   only   be   done   when   stationary.
Before   moving   the   seat   backwards,   ensure   that   there   is   nothing   that   might   prevent   the   full  
t
ravel   of   the   seat,   so   as   to   avoid   the   risk   of   of   jamming   the   seat   caused   by   the   presence   of  
o
bjects   on   the   floor   behind   the   seat   or   rear   passengers.   If   the   seat   jams,   stop   the   movement  
i
mmediately.
4
Comfort
Page 94 of 494
92
C4-2_en_Chap04_confort_ed01-2015
C4-2_en_Chap04_confort_ed01-2015
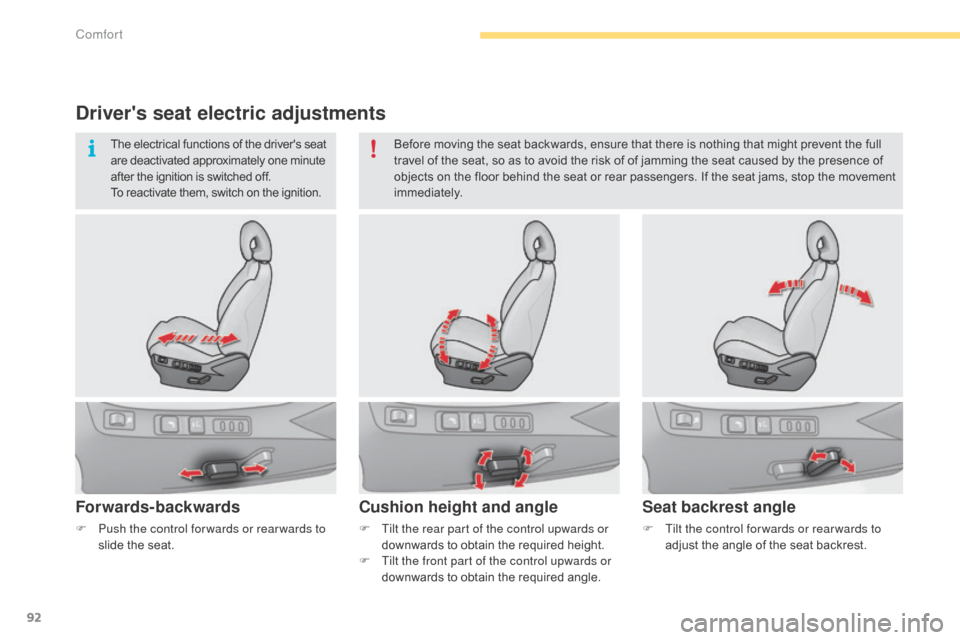
Driver's seat electric adjustments
Forwards-backwards
F Tilt the rear part of the control upwards or downwards   to   obtain   the   required   height.
F
T
ilt the front part of the control upwards or
downwards
  to   obtain   the   required   angle.
Cushion height and angle
F Tilt the control for wards or rear wards to adjust   the   angle   of   the   seat   backrest.
Seat backrest angle
F Push the control for wards or rear wards to slide   the   seat. Before
  moving   the   seat   backwards,   ensure   that   there   is   nothing   that   might   prevent   the   full  
t
ravel   of   the   seat,   so   as   to   avoid   the   risk   of   of   jamming   the   seat   caused   by   the   presence   of  
o
bjects   on   the   floor   behind   the   seat   or   rear   passengers.   If   the   seat   jams,   stop   the   movement  
i
mmediately.
The   electrical   functions   of   the   driver's   seat
 a
re   deactivated   approximately   one   minute
 a
fter   the   ignition   is   switched   off.
To   reactivate   them,   switch   on   the   ignition.
Comfort
Page 95 of 494
93
C4-2_en_Chap04_confort_ed01-2015
C4-2_en_Chap04_confort_ed01-2015
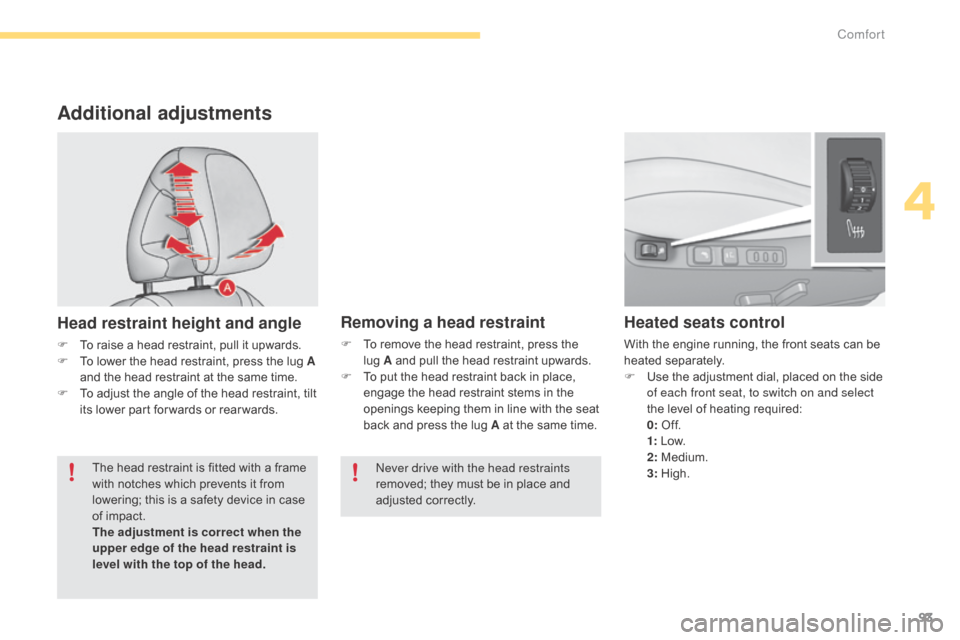
Additional adjustments
Head restraint height and angle
F To  raise   a   head   restraint,   pull   it   upwards.
F  T o   lower   the   head   restraint,   press   the   lug   A
and
  the   head   restraint   at   the   same   time.
F
 
T
o   adjust   the   angle   of   the   head   restraint,   tilt  
i
ts   lower   part   for wards   or   rear wards.
Heated seats control
With the engine running, the front seats can be heated s eparately.
F
 
U
se   the   adjustment   dial,   placed   on   the   side  
o
f each front seat, to switch on and select
the
  level   of   heating   required:
0: O
f f.
1:
 
L
ow.
2:
  Medium.
3:
 
Hig
h.
Removing a head restraint
F To  remove   the   head   restraint,   press   the  l
ug A   and   pull   the   head   restraint   upwards.
F
 
T
o   put   the   head   restraint   back   in   place,  
e
ngage   the   head   restraint   stems   in   the  
o
penings   keeping   them   in   line   with   the   seat  
b
ack   and   press   the   lug   A   at   the   same   time.
The
 
head
 
restraint
 
is
 
fitted
 
with
 
a
 
frame
 
w
ith
 
notches
 
which
 
prevents
 
it
 
from
 
l
owering;
 
this
 
is
 
a
 
safety
 
device
 
in
 
case
 
o
f
 
impact.
The adjustment is correct when the
upper edge of the head restraint is
level with the top of the head.
ne
ver drive with the head restraints
removed;
  they   must   be   in   place   and  
adj
usted
 c
orrectly.
4
Comfort
Page 102 of 494
100
C4-2_en_Chap04_confort_ed01-2015
C4-2_en_Chap04_confort_ed01-2015
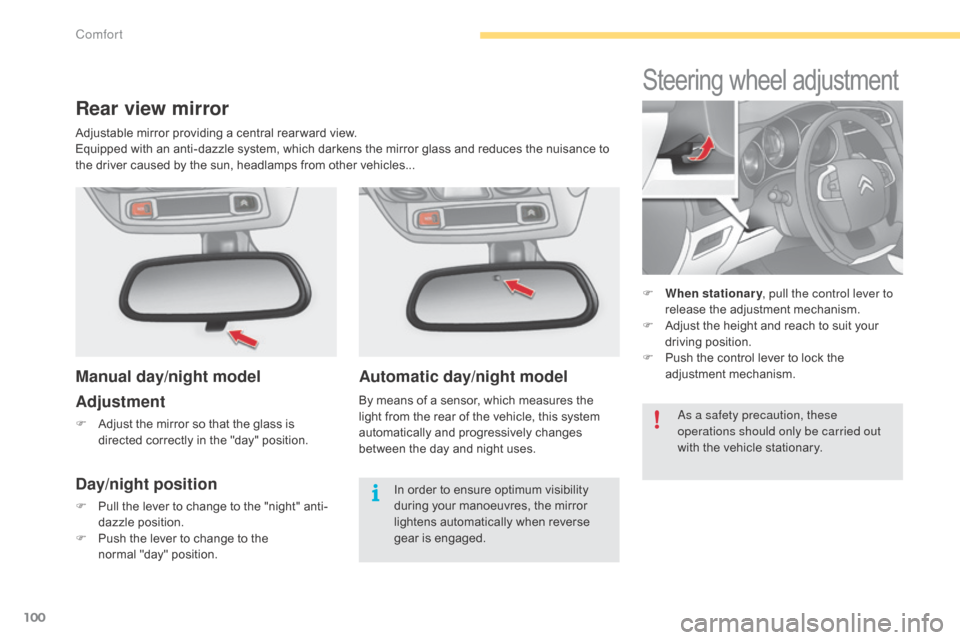
Automatic day/night model
By means of a sensor, which measures the light   from   the   rear   of   the   vehicle,   this   system  
a
utomatically   and   progressively   changes  
b
etween   the   day   and   night   uses.
Steering wheel adjustment
F When stationary , pull the control lever to
release   the   adjustment   mechanism.
F
 
A
djust   the   height   and   reach   to   suit   your  
d
riving   position.
F
 
P
ush   the   control   lever   to   lock   the  
a
djustment
 m
echanism.
Rear view mirror
Manual day/night model
Adjustment
F Adjust  the   mirror   so   that   the   glass   is  
directed   correctly   in   the   "day"   position.
Day/night position
F Pull  the   lever   to   change   to   the   "night"   anti-
dazzle   position.
F
 
P
ush   the   lever   to   change   to   the  
normal
  "day"   position.
as a s
afety precaution, these
operations should only be carried out
with   the   vehicle   stationary.
In   order   to   ensure   optimum   visibility  d
uring   your   manoeuvres,   the   mirror  l
ightens   automatically   when   reverse  
g
ear
 i
s
 enga
ged.
Adjustable
  mirror   providing   a   central   rear ward   view.
Equipped   with   an   anti-dazzle   system,   which   darkens   the   mirror   glass   and   reduces   the   nuisance   to  
t
he   driver   caused   by   the   sun,   headlamps   from   other   vehicles...
Comfort
Page 109 of 494
107
C4-2_en_Chap05_amenagement_ed01-2015
C4-2_en_Chap05_amenagement_ed01-2015
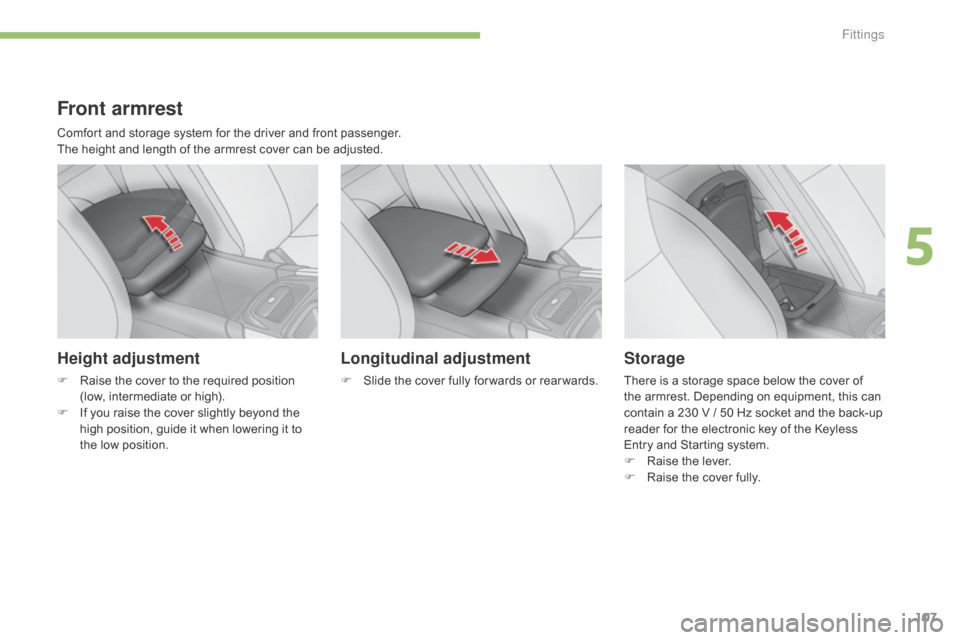
Front armrest
Comfort and storage system for the driver and front passenger.
T he   height   and   length   of   the   armrest   cover   can   be   adjusted.
Height adjustment
F Raise  the   cover   to   the   required   position  (
low,   intermediate   or   high).
F
 
I
f   you   raise   the   cover   slightly   beyond   the  
h
igh   position,   guide   it   when   lowering   it   to  
t
he   low   position.
Longitudinal adjustment
F Slide  the   cover   fully   for wards   or   rear wards.
Storage
There is a storage space below the cover of t
he   armrest.   Depending   on   equipment,   this   can  
c
ontain   a   230   V   /   50   Hz   socket   and   the   back-up  
r
eader   for   the   electronic   key   of   the   Keyless  
E
ntry   and   Starting   system.
F
 
Ra
ise
 t
he
 l
ever.
F
 
R
aise   the   cover   fully.
5
Fittings
Page 127 of 494
125
C4-2_en_Chap06_visibilite_ed01-2015
C4-2_en_Chap06_visibilite_ed01-2015
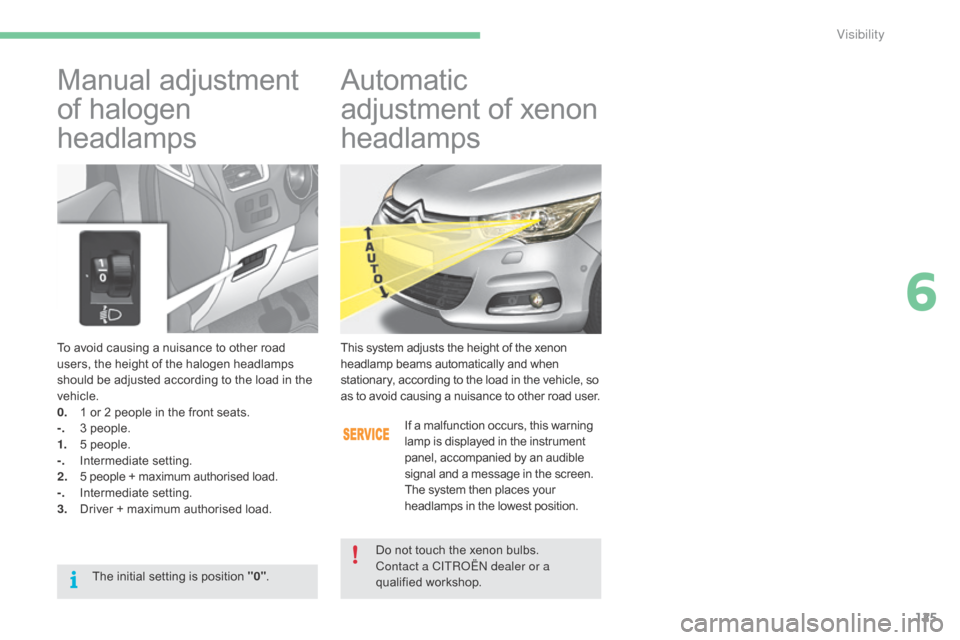
To avoid causing a nuisance to other road users,   the   height   of   the   halogen   headlamps  
s
hould   be   adjusted   according   to   the   load   in   the  
v
ehicle.
0.
 1
  or   2   people   in   the   front   seats.
-.
 3
  people.
1.
 5
  people.
-.
 I
ntermediate
 s
etting.
2.
 5
  people   +   maximum   authorised   load.
-.
 I
ntermediate
 s
etting.
3.
 D
river   +   maximum   authorised   load.
Manual adjustment 
o
f   halogen  
h
eadlamps Automatic 
a djustment   of   xenon  
h
eadlamps
This system adjusts the height of the xenon headlamp   beams   automatically   and   when s
tationary,   according   to   the   load   in   the   vehicle,   so
 a
s   to   avoid   causing   a   nuisance   to   other   road   user.
If
  a   malfunction   occurs,   this   warning
 l
amp   is   displayed   in   the   instrument
 p
anel,   accompanied   by   an   audible
 s
ignal   and   a   message   in   the   screen.
The
  system   then   places   your
 h
eadlamps   in   the   lowest   position.
Do
  not   touch   the   xenon   bulbs.
Contact a CITR
o√čn
dealer or a
qualified
 w
orkshop.
The
 
initial
 
setting
 
is
 
position
 
"0" .
6
Visibility
Page 147 of 494
145
C4-2_en_Chap07_securite-enfants_ed01-2015
C4-2_en_Chap07_securite-enfants_ed01-2015
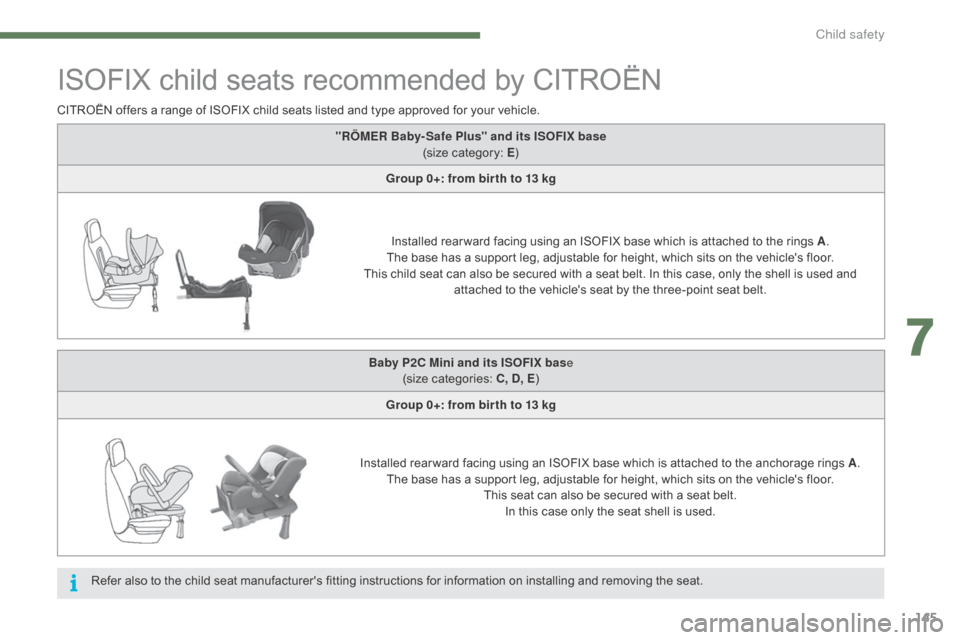
ISOFIX¬†child¬†seats¬†recommended¬†by¬†CITRO√čN
CITRO√čN¬†offers¬†a¬†range¬†of¬†ISOFIX¬†child¬†seats¬†listed¬†and¬†type¬†approved¬†for¬†your¬†vehicle.
R efer   also   to   the   child   seat   manufacturer's   fitting   instructions   for   information   on   installing   and   removing   the   seat.
"R√ĖMER Baby- Safe Plus" and its ISOFIX base
(size
  category:   E)
Group 0+: from bir th to 13 kg
Installed
  rear ward   facing   using   an   ISOFIX   base   which   is   attached   to   the   rings   A.
The
  base   has   a   support   leg,   adjustable   for   height,   which   sits   on   the   vehicle's   floor.
This
  child   seat   can   also   be   secured   with   a   seat   belt.   In   this   case,   only   the   shell   is   used   and  
a
ttached   to   the   vehicle's   seat   by   the   three-point   seat   belt.
Baby P2C Mini and its ISOFIX bas e
(size
 c
ategories:
 C
, D, E)
Group 0+: from bir th to 13 kg
Installed
  rear ward   facing   using   an   ISOFIX   base   which   is   attached   to   the   anchorage   rings   A.
The
  base   has   a   support   leg,   adjustable   for   height,   which   sits   on   the   vehicle's   floor.
This
  seat   can   also   be   secured   with   a   seat   belt.  
In
  this   case   only   the   seat   shell   is   used.
7
Child safety
Page 148 of 494
146
C4-2_en_Chap07_securite-enfants_ed01-2015
C4-2_en_Chap07_securite-enfants_ed01-2015
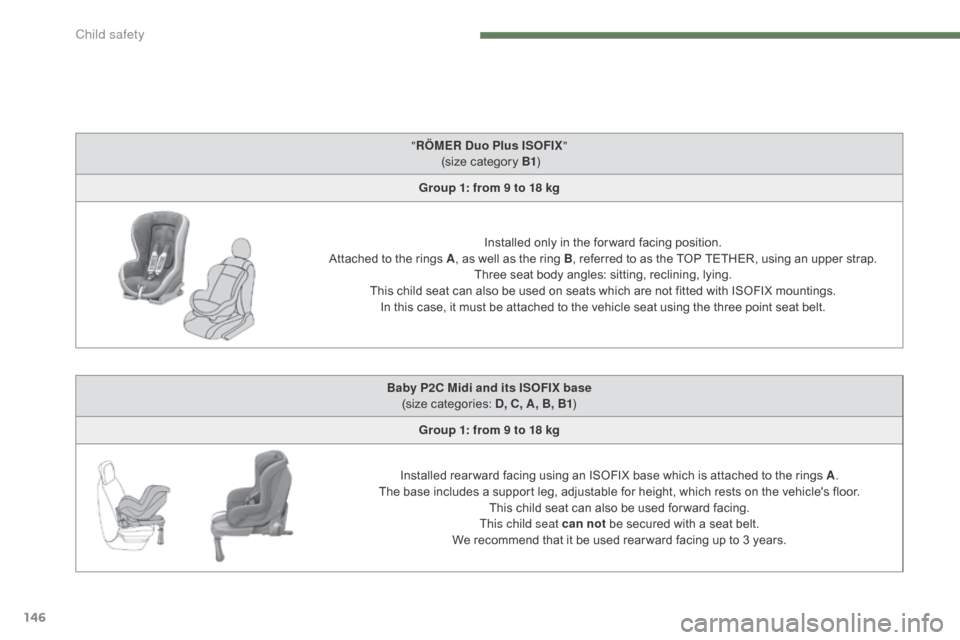
"R√ĖMER Duo Plus ISOFIX "¬†
(size   category   B1)
Group 1: from 9 to 18 kg
Installed
  only   in   the   for ward   facing   position.
Attached
 
to
 
the   rings   A,
  as   well   as   the   ring   B,
  referred   to   as   the   TOP   TETHER,   using   an   upper   strap.
Three
  seat   body   angles:   sitting,   reclining,   lying.
This
 
child   seat   can   also   be   used   on   seats   which   are   not   fitted   with   ISOFIX   mountings.  
In
 
this   case,   it   must   be   attached   to   the   vehicle   seat   using   the   three   point   seat   belt.
Baby P2C Midi and its ISOFIX base (size
 c
ategories:
 D
, C, A, B, B1)
Group 1: from 9 to 18 kg
Installed
  rear ward   facing   using   an   ISOFIX   base   which   is   attached   to   the   rings   A.
The
 
base   includes   a   support   leg,   adjustable   for   height,   which   rests   on   the   vehicle's   floor.
This
  child   seat   can   also   be   used   for ward   facing.
This child seat can not
 
be   secured   with   a   seat   belt.
We
  recommend   that   it   be   used   rear ward   facing   up   to   3   years.
Child safety
Page 156 of 494
154
C4-2_en_Chap08_securite_ed01-2015
C4-2_en_Chap08_securite_ed01-2015
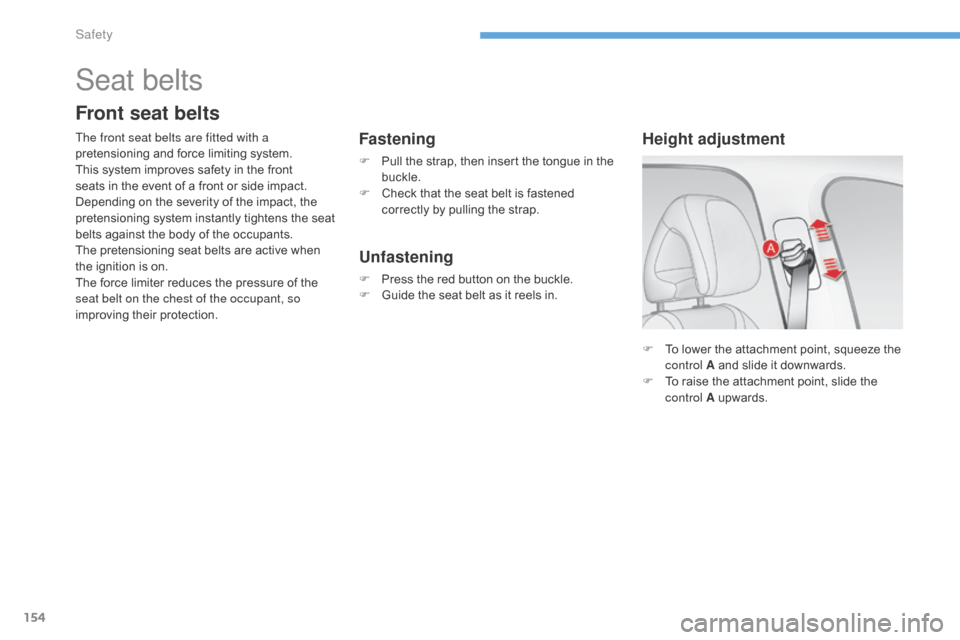
F To  lower   the   attachment   point,   squeeze   the  c
ontrol A   and   slide   it   downwards.
F
 
T
o   raise   the   attachment   point,   slide   the  
c
ontrol A  
up
wards.
Height adjustment
Seat belts
Front seat belts
The front seat belts are fitted with a
pretensioning  and   force   limiting   system.
This
  system   improves   safety   in   the   front  
s
eats   in   the   event   of   a   front   or   side   impact.  
D
epending   on   the   severity   of   the   impact,   the  
p
retensioning   system   instantly   tightens   the   seat  
b
elts   against   the   body   of   the   occupants.
The
  pretensioning   seat   belts   are   active   when  
t
he   ignition   is   on.
The
  force   limiter   reduces   the   pressure   of   the  
s
eat belt on the chest of the occupant, so
improving
  their   protection.Fastening
F Pull  the   strap,   then   insert   the   tongue   in   the  buc
kle.
F
 
C
heck   that   the   seat   belt   is   fastened  
c
orrectly   by   pulling   the   strap.
Unfastening
F Press  the   red   button   on   the   buckle.
F  G uide   the   seat   belt   as   it   reels   in.
Safety
Page 264 of 494
262
C4-2_en_Chap11_info-pratique_ed01-2015
C4-2_en_Chap11_info-pratique_ed01-2015
Very cold climate screen*
* According to country.
Fitting
F Offer  up   the   very   cold   climate   screen   to  t
he front of the lower section of the front
b u m p e r.
F
 
P
ress   around   its   edge   to   engage   its   fixing  
c
lips   one   by   one.
Removal
F Use  a   screwdriver   as   a   lever   to   release  e
ach   fixing   clip   in   turn.
Removable
  protective   screen   which   prevents  
t
he   accumulation   of   snow   at   the   radiator  
c
ooling   fan.
Fitting roof bars
For safety reasons and to avoid damaging the roof, it is essential to use the transverse bars a
pproved   for   your   vehicle.
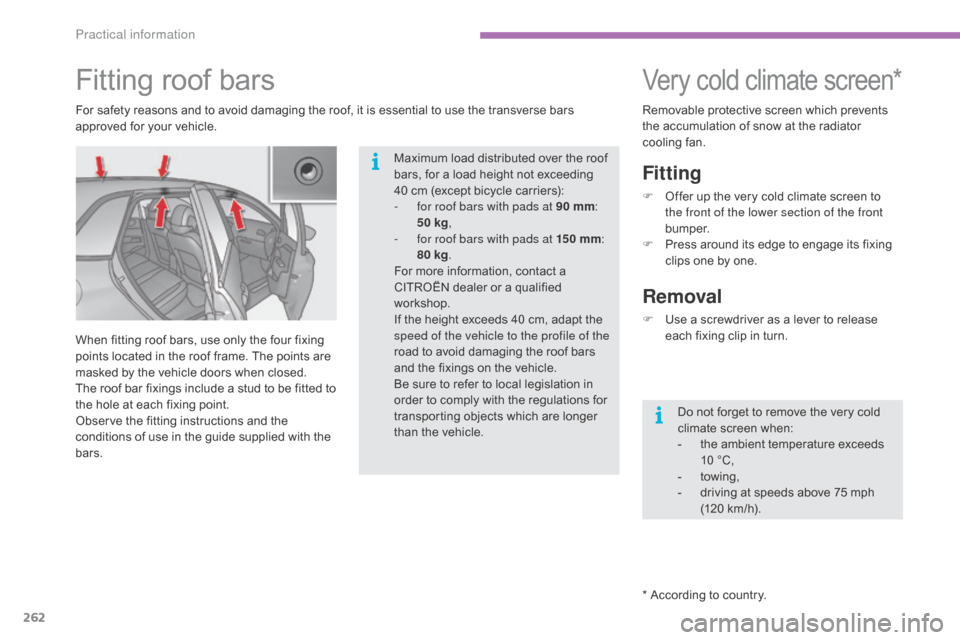
When
  fitting   roof   bars,   use   only   the   four   fixing  
p
oints   located   in   the   roof   frame.   The   points   are  
m
asked   by   the   vehicle   doors   when   closed.
The
  roof   bar   fixings   include   a   stud   to   be   fitted   to  
t
he   hole   at   each   fixing   point.
Observe
  the   fitting   instructions   and   the  
c
onditions   of   use   in   the   guide   supplied   with   the  
b
ars. Do
  not   forget   to   remove   the   very   cold  
c
limate   screen   when:
-
 
t
he   ambient   temperature   exceeds  
1
0 ¬† ¬įC,
-
 tow
ing,
-
 
d
riving   at   speeds   above   75 mph  
(
120   km/h).
Maximum
  load   distributed   over   the   roof  
b
ars,   for   a   load   height   not   exceeding  
4
0 cm   (except   bicycle   carriers):
-
f
or roof bars with pads at 90 mm:
 
5
0 kg,
-
f
or roof bars with pads at 15 0
mm:
 
8
0 kg.
For
  more   information,   contact   a  
C
ITRO√čN ¬† dealer ¬† or ¬† a ¬† qualified ¬†
w
orkshop.
If
  the   height   exceeds   40   cm,   adapt   the  
s
peed of the vehicle to the profile of the
road
  to   avoid   damaging   the   roof   bars  
a
nd   the   fixings   on   the   vehicle.
Be
  sure   to   refer   to   local   legislation   in  
o
rder   to   comply   with   the   regulations   for  
t
ransporting   objects   which   are   longer  
t
han   the   vehicle.
Practical information