seats Citroen C4 2015 2.G Owner's Manual
[x] Cancel search | Manufacturer: CITROEN, Model Year: 2015, Model line: C4, Model: Citroen C4 2015 2.GPages: 494, PDF Size: 20.49 MB
Page 4 of 494
C4-2_en_Chap00a_sommaire_ed01-2015
C4-2_en_Chap00a_sommaire_ed01-2015
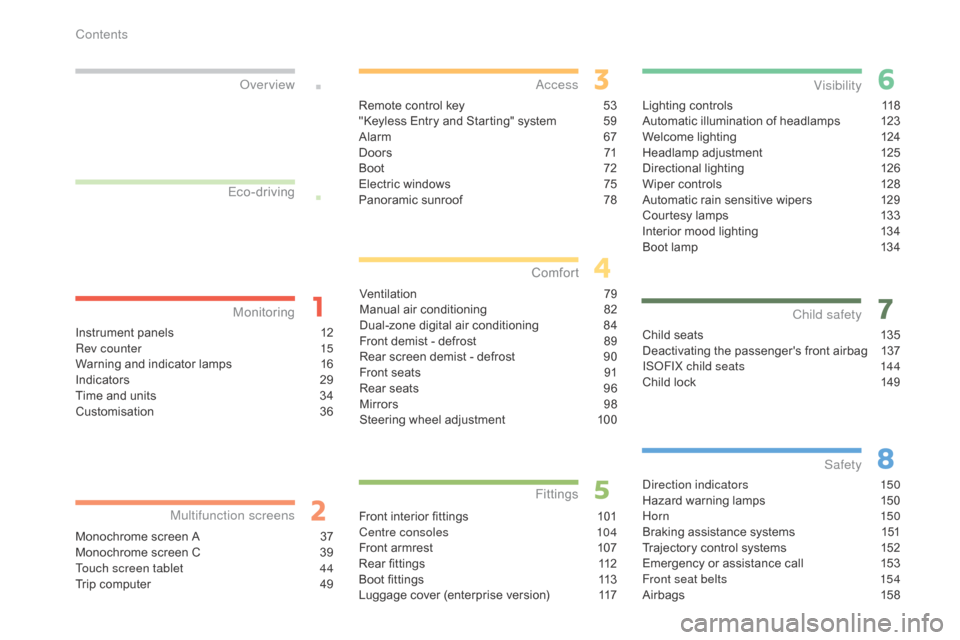
Lighting controls 118
Automatic illumination of headlamps 1 23
Welcome
lighting
1
24
Headlamp
adj
ustment
1
25
Directional
l
ighting
1
26
Wiper
controls
1
28
Automatic
rain sensitive wipers
1
29
Courtesy
lamps
1
33
Interior
mood lighting
1
34
Boot
lamp
1
34
Visibility
Child seats 1 35
Deactivating the passenger's front airbag 1 37
IS
oF
IX child seats
1
44
Child
lock
1
49
Child safety
direction indicators 150
Hazard warning lamps 1 50
Hor n
150
Braking
assistance systems
1
51
Trajectory
control systems
1
52
Emergency
or assistance call
1
53
Front seat belts
1
54
Airbags
1
58
Safety
Instrument panels 1 2
Rev counter 1 5
Warning
and indicator lamps
1
6
Indicators
2
9
Time
and units
3
4
Customisation
3
6
Monitoring
ove
r view
Monochrome screen A 3
7
Monochrome screen C 3 9
Touch screen tablet
4
4
Trip
computer
4
9
Multifunction screens
Remote control key 53
"Keyless Entry and Starting" system 5 9
Alarm
6
7
D o o r s
71
Boo
t
7
2
Electric
windows
7
5
Panoramic
sunroof
7
8
access
Ventilation 7 9
Manual a ir c onditioning 8 2
Dual-zone
d
igital
a
ir
c
onditioning
8
4
Front
demist - defrost
8
9
Rear
screen demist - defrost
9
0
Front
seats
9
1
Rear
seats
9
6
Mirrors
9
8
Steering
wheel adjustment
1
00
Comfort
Front interior fittings 1 01
Centre consoles 1 04
Front
armrest
1
07
Rear
fittings
1
12
Boot
fittings
1
13
Luggage
cover (enterprise version)
1
17
Fittings
Eco-driving
Contents
Page 7 of 494
5
C4-2_en_Chap00b_vue-ensemble_ed01-2015
C4-2_en_Chap00b_vue-ensemble_ed01-2015
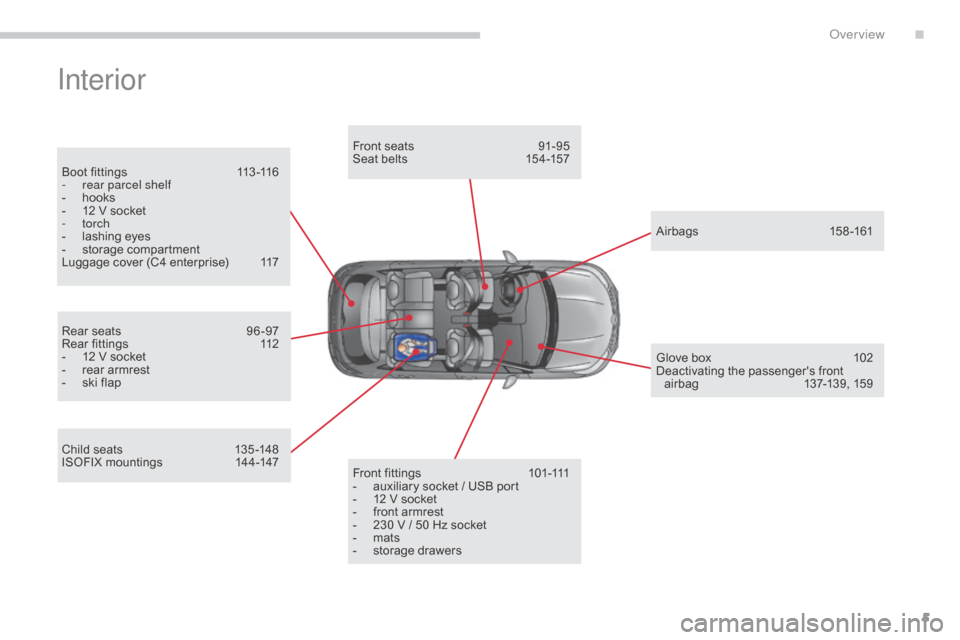
Interior
Boot fittings 113 -116
- r ear parcel shelf
-
h
ooks
-
1
2 V socket
-
torch
-
l
ashing eyes
-
s
torage compartment
Luggage
cover (C4 enterprise)
1
17
Rear
seats
9
6 -97
Rear
fittings
1
12
-
1
2 V socket
-
r
ear armrest
-
s
ki flap
Child
seats
1
35 -148
ISOFIX
mountings
1
44-147Front
seats
9
1-95
Seat belts 1 54-157
Airbags
1
58-161
Front
fittings
1
01-111
-
a
uxiliary socket / USB port
-
1
2 V socket
-
f
ront armrest
-
2
30 V / 50 Hz socket
-
m
ats
-
s
torage drawersGlove
box
1
02
Deactivating
t
he
p
assenger's
f
ront
a
irbag
1
37-139, 159
.
over view
Page 13 of 494
11
C4-2_en_Chap00c_eco-conduite_ed01-2015
C4-2_en_Chap00c_eco-conduite_ed01-2015
Limit the causes of excess consumption
Spread loads throughout the vehicle; place the heaviest items in the bottom of the boot, as close as possible to the rear seats.
Limit
the loads carried in the vehicle and reduce wind resistance (roof
b
ars, roof rack, bicycle carrier, trailer...). Use a roof box in preference.
Remove
roof bars and roof racks after use.
At
the end of winter, remove snow tyres and refit your summer tyres.
Observe the recommendations on maintenance
Check the tyre pressures regularly, when cold, referring to the label in the door aperture, driver's side.
Carry
out this check in particular:
-
b
efore a long journey,
-
a
t each change of season,
-
a
fter a long period out of use.
Don't
forget the spare wheel and the tyres on any trailer or caravan.
Have
your vehicle serviced regularly (engine oil, oil filter, air filter,
p
assenger compartment filter...) and observe the schedule of
o
perations recommended in the manufacturer's service schedule.
With
a BlueHDi Diesel engine, if the SCR system is faulty your vehicle
b
ecomes polluting; go to a CITROËN dealer or a qualified workshop
w
ithout delay to have the emissions of nitrous oxides brought back to
t
he legal level.
When
refuelling, do not continue after the third cut-off of the nozzle to
a
void any over flow.
At
the wheel of your new vehicle, it is only after the first 1 800 miles
(
3 000 kilometres) that you will see the fuel consumption settle down to
a
consistent average.
.
Eco-driving
Page 76 of 494
74
C4-2_en_Chap03_ouvertures_ed01-2015
C4-2_en_Chap03_ouvertures_ed01-2015
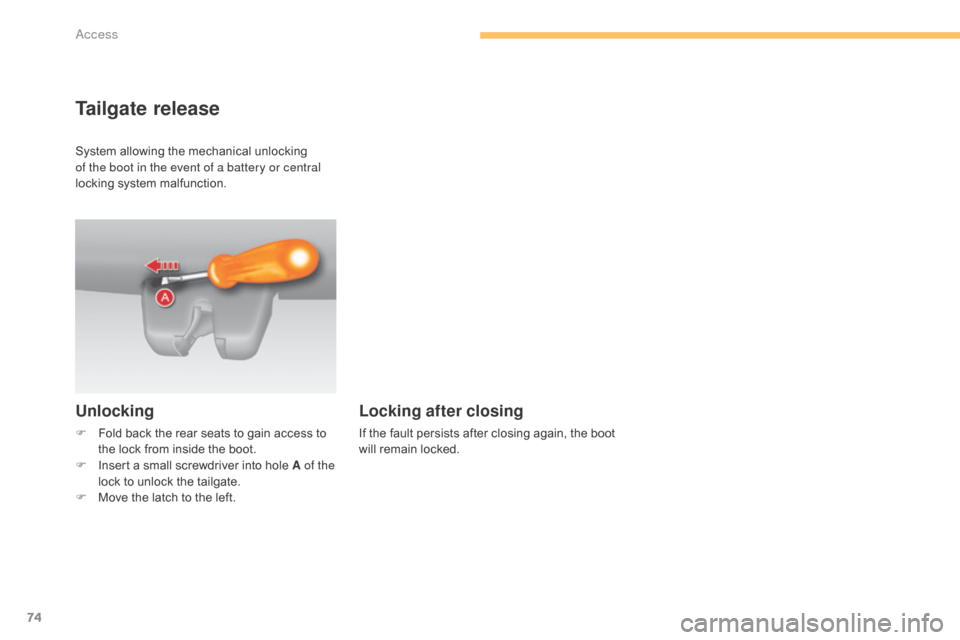
Tailgate release
Unlocking
F Fold back the rear seats to gain access to t
he lock from inside the boot.
F
I
nsert a small screwdriver into hole A of the
lock
to unlock the tailgate.
F
M
ove the latch to the left.
Locking after closing
If the fault persists after closing again, the boot will remain locked.
System
allowing
the
mechanical
unlocking
o
f the boot in the event of a battery or central
locking
system
malfunction.
Access
Page 93 of 494
91
C4-2_en_Chap04_confort_ed01-2015
C4-2_en_Chap04_confort_ed01-2015
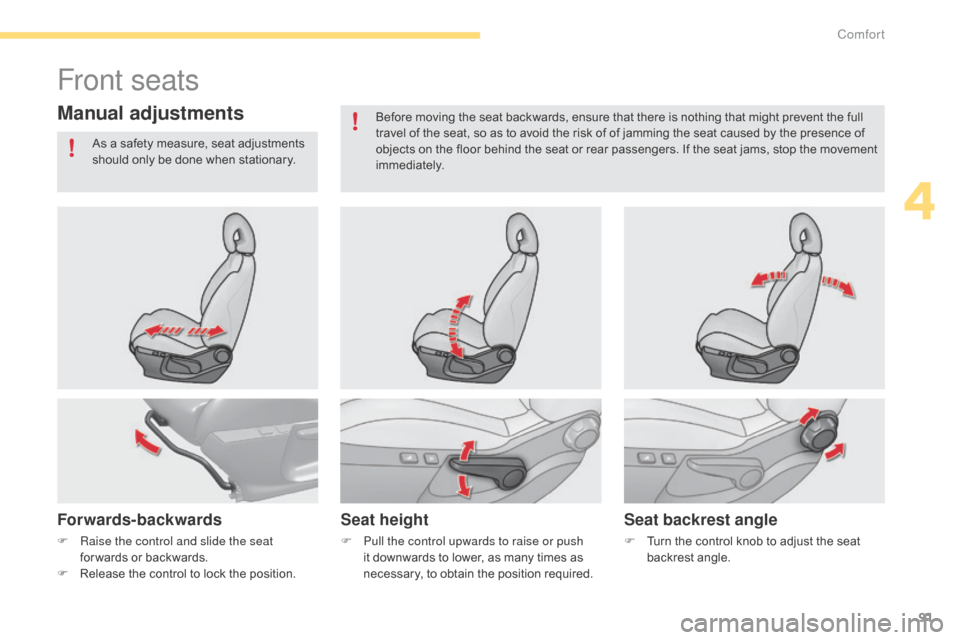
Front seats
Manual adjustments
Forwards-backwardsSeat heightSeat backrest angle
F Raise the control and slide the seat
for wards or backwards.
F
R
elease the control to lock the position.F
P ull the control upwards to raise or push
it downwards to lower, as many times as
n
ecessary, to obtain the position required.F
T urn the control knob to adjust the seat b
ackrest angle.
As
a safety measure, seat adjustments
s
hould only be done when stationary.
Before moving the seat backwards, ensure that there is nothing that might prevent the full
t
ravel of the seat, so as to avoid the risk of of jamming the seat caused by the presence of
o
bjects on the floor behind the seat or rear passengers. If the seat jams, stop the movement
i
mmediately.
4
Comfort
Page 95 of 494
93
C4-2_en_Chap04_confort_ed01-2015
C4-2_en_Chap04_confort_ed01-2015
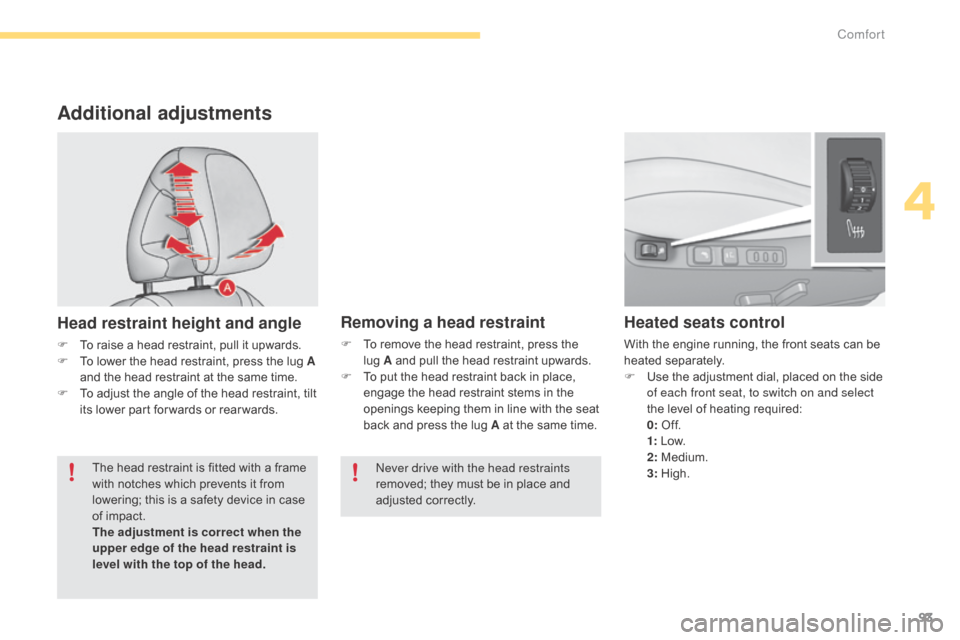
Additional adjustments
Head restraint height and angle
F To raise a head restraint, pull it upwards.
F T o lower the head restraint, press the lug A
and
the head restraint at the same time.
F
T
o adjust the angle of the head restraint, tilt
i
ts lower part for wards or rear wards.
Heated seats control
With the engine running, the front seats can be heated s eparately.
F
U
se the adjustment dial, placed on the side
o
f each front seat, to switch on and select
the
level of heating required:
0: O
f f.
1:
L
ow.
2:
Medium.
3:
Hig
h.
Removing a head restraint
F To remove the head restraint, press the l
ug A and pull the head restraint upwards.
F
T
o put the head restraint back in place,
e
ngage the head restraint stems in the
o
penings keeping them in line with the seat
b
ack and press the lug A at the same time.
The
head
restraint
is
fitted
with
a
frame
w
ith
notches
which
prevents
it
from
l
owering;
this
is
a
safety
device
in
case
o
f
impact.
The adjustment is correct when the
upper edge of the head restraint is
level with the top of the head.
ne
ver drive with the head restraints
removed;
they must be in place and
adj
usted
c
orrectly.
4
Comfort
Page 98 of 494
96
C4-2_en_Chap04_confort_ed01-2015
C4-2_en_Chap04_confort_ed01-2015
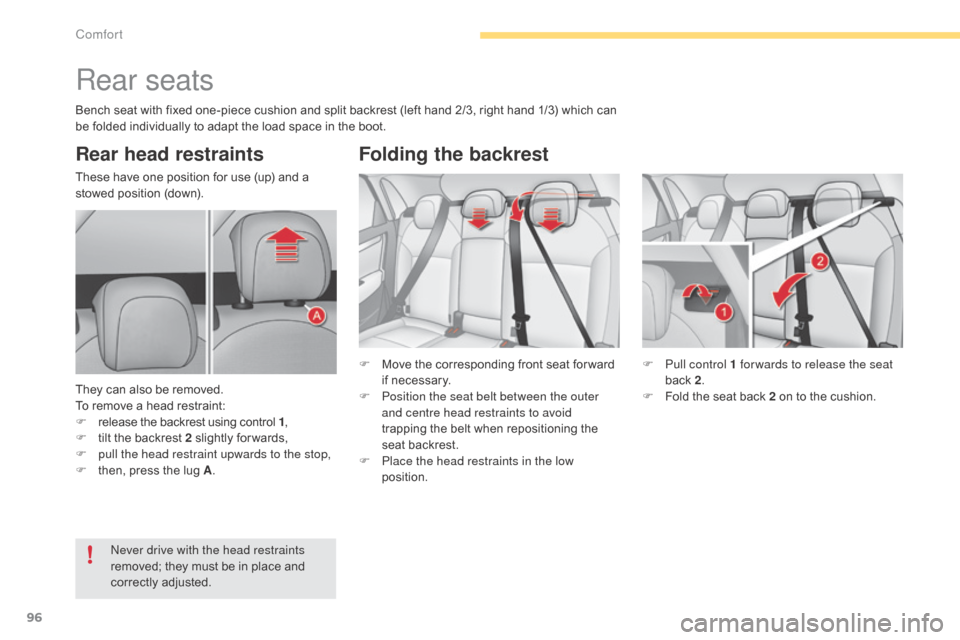
Rear seats
Rear head restraints
These have one position for use (up) and a stowed position (down).
They
can also be removed.
To
remove a head restraint:
F
r
elease the backrest using control 1,
F
t
ilt the backrest 2 slightly for wards,
F
p
ull the head restraint upwards to the stop,
F
t
hen, press the lug A. F
M
ove the corresponding front seat for ward
i
f necessary.
F
P
osition the seat belt between the outer
and centre head restraints to avoid
trapping
the belt when repositioning the
s
eat backrest.
F
P
lace the head restraints in the low
position. F
P
ull control 1 for wards to release the seat
back
2.
F
F
old the seat back 2 on to the cushion.
ne
ver drive with the head restraints
removed;
they must be in place and
c
orrectly
adj
usted.
Folding the backrest
Bench seat with fixed one-piece cushion and split backrest (left hand 2/3, right hand 1/3) which can be folded individually to adapt the load space in the boot.
Comfort
Page 116 of 494
114
C4-2_en_Chap05_amenagement_ed01-2015
C4-2_en_Chap05_amenagement_ed01-2015
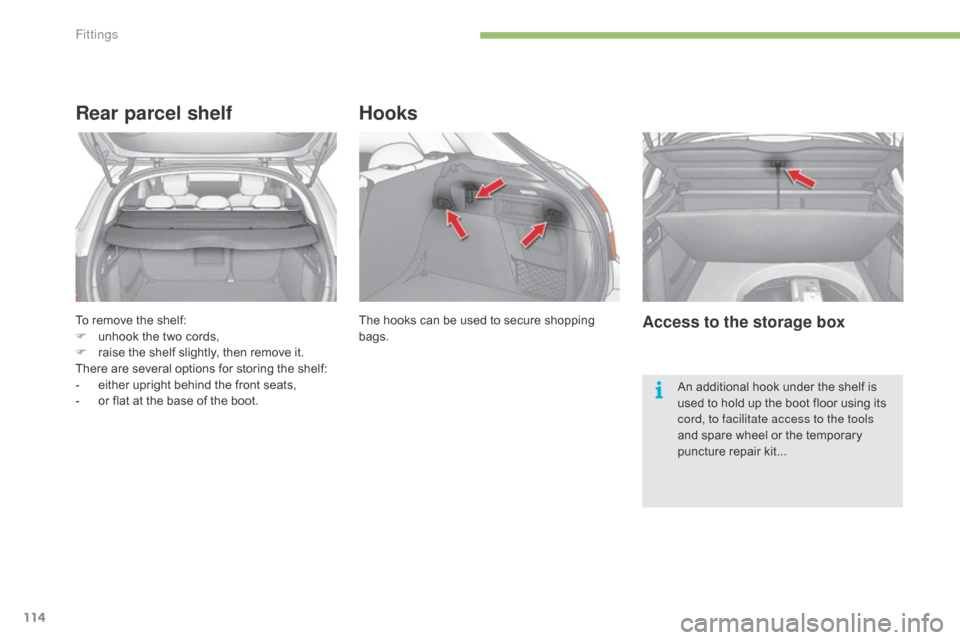
To remove the shelf:
F u nhook the two cords,
F
r
aise the shelf slightly, then remove it.
There
are several options for storing the shelf:
-
e
ither upright behind the front seats,
-
o
r flat at the base of the boot.
Rear parcel shelf
The hooks can be used to secure shopping bags.
Hooks
Access to the storage box
An additional hook under the shelf is u sed to hold up the boot floor using its
c
ord, to facilitate access to the tools
and
spare wheel or the temporary
p
uncture repair kit...
Fittings
Page 127 of 494
125
C4-2_en_Chap06_visibilite_ed01-2015
C4-2_en_Chap06_visibilite_ed01-2015
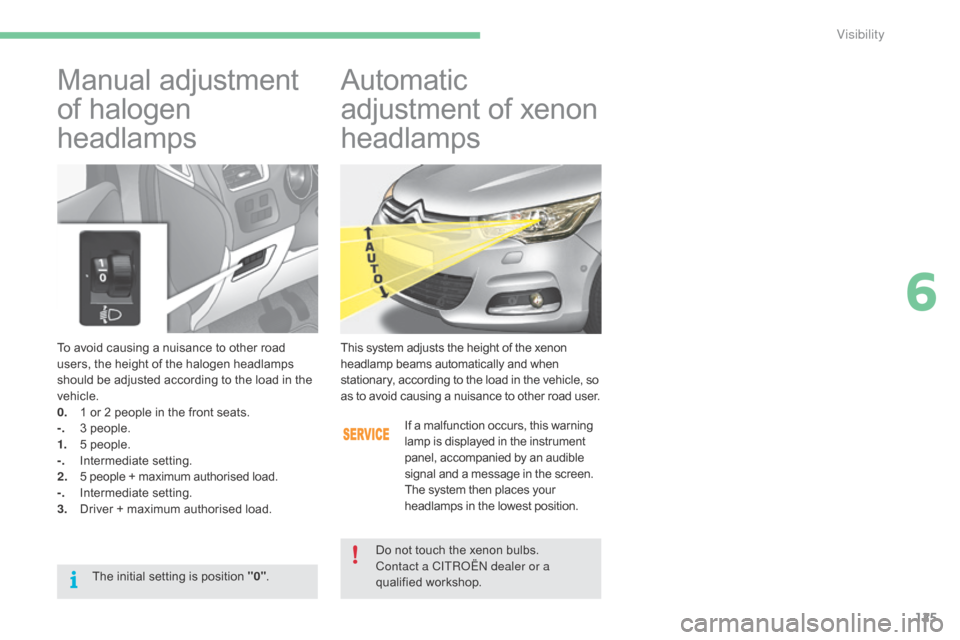
To avoid causing a nuisance to other road users, the height of the halogen headlamps
s
hould be adjusted according to the load in the
v
ehicle.
0.
1
or 2 people in the front seats.
-.
3
people.
1.
5
people.
-.
I
ntermediate
s
etting.
2.
5
people + maximum authorised load.
-.
I
ntermediate
s
etting.
3.
D
river + maximum authorised load.
Manual adjustment
o
f halogen
h
eadlamps Automatic
a djustment of xenon
h
eadlamps
This system adjusts the height of the xenon headlamp beams automatically and when s
tationary, according to the load in the vehicle, so
a
s to avoid causing a nuisance to other road user.
If
a malfunction occurs, this warning
l
amp is displayed in the instrument
p
anel, accompanied by an audible
s
ignal and a message in the screen.
The
system then places your
h
eadlamps in the lowest position.
Do
not touch the xenon bulbs.
Contact a CITR
oËn
dealer or a
qualified
w
orkshop.
The
initial
setting
is
position
"0" .
6
Visibility
Page 137 of 494
135
C4-2_en_Chap07_securite-enfants_ed01-2015
C4-2_en_Chap07_securite-enfants_ed01-2015
General points relating to child seats
Although one of CITROËN main criteria when designing your vehicle, the safety of your children also depends on you.
*
T
he regulations on carrying children are
s
pecific to each country. Refer to the
l
egislation in force in your country.
For
maximum safety, please observe the
f
ollowing
r
ecommendations:
-
i
n accordance with European regulations,
a
ll children under the age of 12 or less
than one and a half metres tall must
travel in approved child seats suited to
their weight , on seats fitted with a seat
belt
or ISOFIX mountings*,
-
s
tatistically, the safest seats in your
vehicle for carr ying children are the
rear seats,
-
a c
hild weighing less than 9 kg must
travel in the rear ward facing position
both in the front and in the rear. CITROËN recommends
that children
should travel on the rear seats of your
vehicle:
-
r
earward facing
up to the age of 3,
-
fo
rward facing
over the age of 3.
7
Child safety