cooling CITROEN C4 2018 Owners Manual
[x] Cancel search | Manufacturer: CITROEN, Model Year: 2018, Model line: C4, Model: CITROEN C4 2018Pages: 317, PDF Size: 9.31 MB
Page 19 of 317
17
C4-cactus_en_Chap01_Instruments-de-bord_ed01-2016
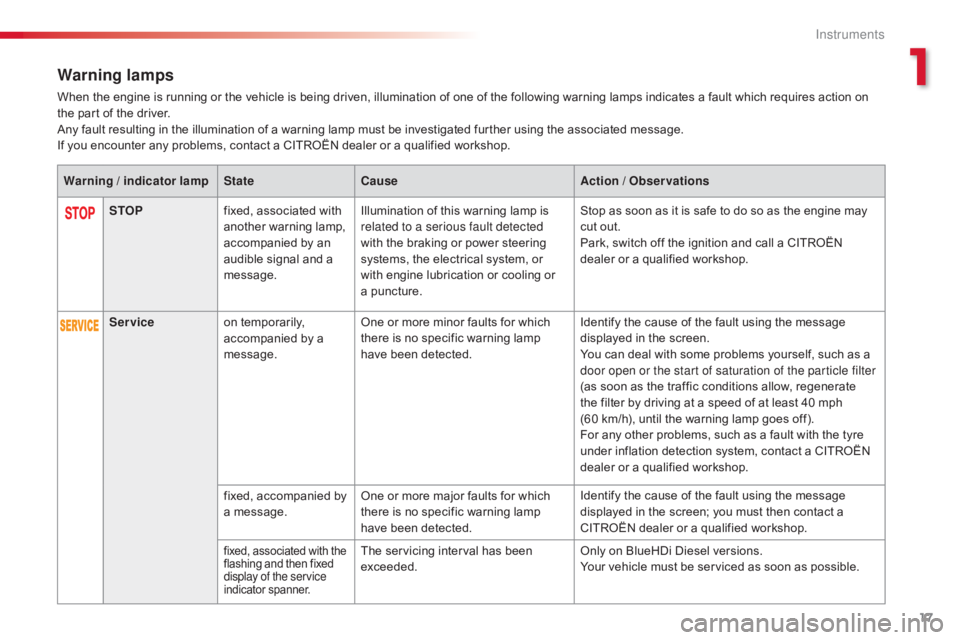
Warning lamps
When the engine is running or the vehicle is being driven, illumination of one of the following warning lamps indicates a fault which requires action on the part of the driver.
Any
fault resulting in the illumination of a warning lamp must be investigated further using the associated message.
If
you encounter any problems, contact a CITROËN dealer or a qualified workshop.
STOP fixed,
associated with
a
nother warning lamp,
a
ccompanied by an
a
udible signal and a
m
essage.Illumination
of this warning lamp is
r
elated to a serious fault detected
with
the braking or power steering
s
ystems, the electrical system, or
w
ith engine lubrication or cooling or
a pu
ncture.Stop
as soon as it is safe to do so as the engine may
c
ut out.
Park,
switch off the ignition and call a CITROËN
d
ealer or a qualified workshop.
Warning / indicator lamp
StateCause Action / Observations
Service on
temporarily,
a
ccompanied by a
m
essage.One
or more minor faults for which
t
here is no specific warning lamp
h
ave been detected.Identify
the cause of the fault using the message
d
isplayed in the screen.
You
can deal with some problems yourself, such as a
d
oor open or the start of saturation of the particle filter
(as
soon as the traffic conditions allow, regenerate
t
he filter by driving at a speed of at least 40 mph
(
60 km/h), until the warning lamp goes off).
For
any other problems, such as a fault with the tyre
u
nder inflation detection system, contact a CITROËN
d
ealer or a qualified workshop.
fixed,
accompanied by
a
message.One
or more major faults for which
t
here is no specific warning lamp
h
ave been detected.Identify
the cause of the fault using the message
d
isplayed in the screen; you must then contact a
C
ITROËN dealer or a qualified workshop.
fixed, associated with the flashing and then fixed d
isplay of the service
indicator
span
ner.The servicing interval has been exceeded. Only
on BlueHDi Diesel versions.
Your vehicle must be serviced as soon as possible.
1
Instruments
Page 24 of 317
22
C4-cactus_en_Chap01_Instruments-de-bord_ed01-2016
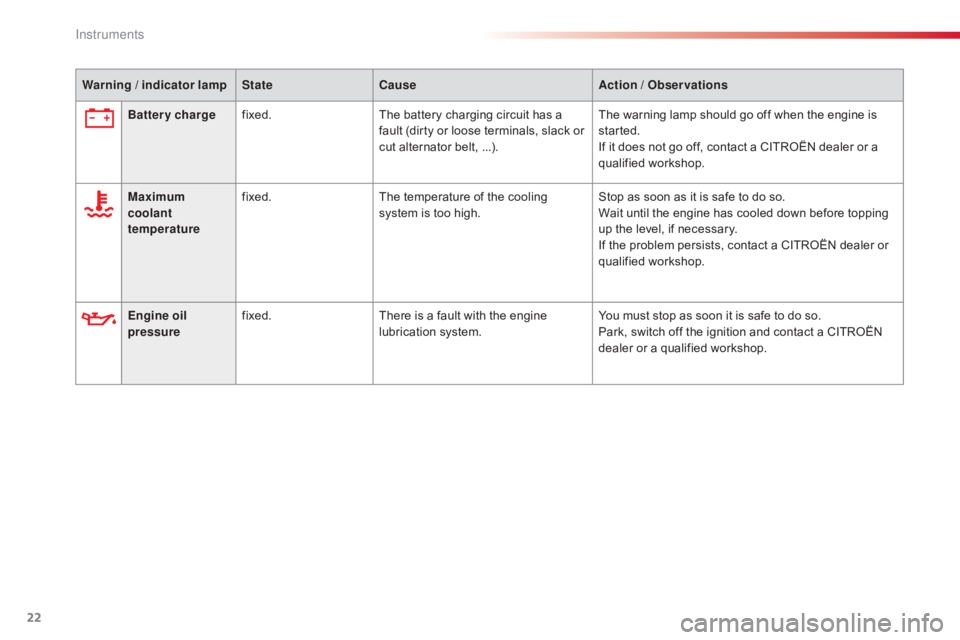
Engine oil
pressurefixed.
There is a fault with the engine l
ubrication system.You
must stop as soon it is safe to do so.
Park, switch off the ignition and contact a CITROËN
d
ealer or a qualified workshop.
Battery charge
fixed. The battery charging circuit has a
f
ault (dirty or loose terminals, slack or
c
ut alternator belt, ...).
The warning lamp should go off when the engine is
s
tarted.
If it does not go off, contact a CITROËN dealer or a
q
ualified
w
orkshop.
Maximum
coolant
temperature fixed.
The temperature of the cooling
s
ystem is too high.
Stop as soon as it is safe to do so.
Wait until the engine has cooled down before topping
u
p the level, if necessary.
If the problem persists, contact a CITROËN dealer or
q
ualified
w
orkshop.
Warning / indicator lamp
StateCause Action / Observations
Instruments
Page 57 of 317
55
C4-cactus_en_Chap03_Ergonomie-et-confort_ed01-2016
Ventilation
Air intake
The air circulating in the passenger compartment is filtered and originates either
f
rom the outside via the grille located at the
b
ase of the windscreen or from the inside in air
re
circulation
m
ode.
Air treatment
The incoming air follows various routes depending on the controls selected by the
d
river:
-
d
irect arrival in the passenger
c
ompartment (air intake),
-
p
assage through a heating circuit (heating),
-
p
assage through a cooling circuit (air
c
onditioning).
Control panel
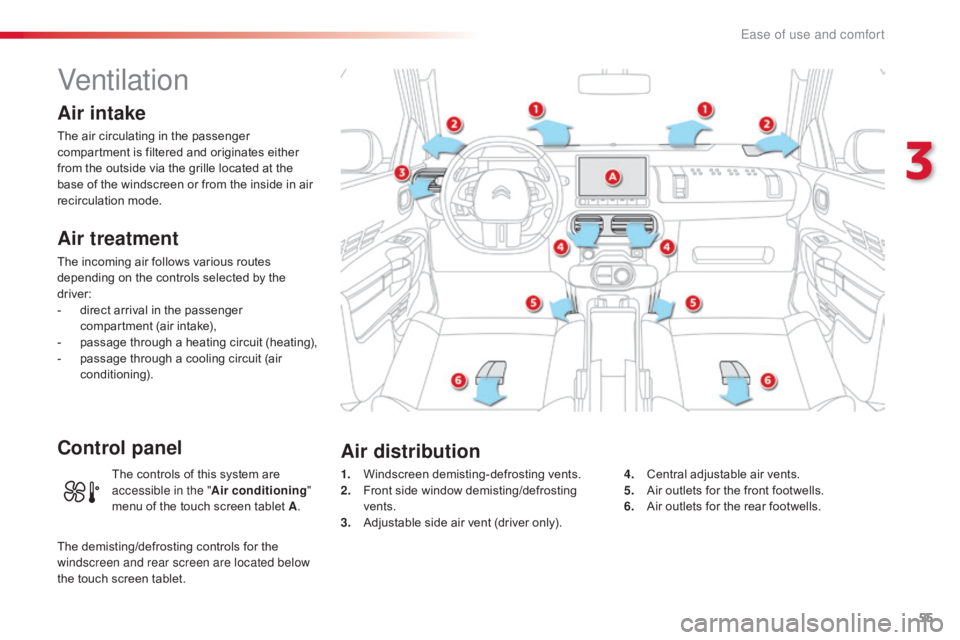
1. Windscreen d emisting-defrosting v ents.
2. F ront side window demisting/defrosting
ve
nts.
3.
A
djustable side air vent (driver only).4. C
entral adjustable air vents.
5. A ir outlets for the front footwells.
6.
A
ir outlets for the rear footwells.
Air distribution
The controls of this system are accessible in the " Air conditioning "
menu
of the touch screen tablet A.
The
demisting/defrosting controls for the
w
indscreen and rear screen are located below
the
touch
screen tablet.
3
Ease of use and comfort
Page 66 of 317
64
C4-cactus_en_Chap03_Ergonomie-et-confort_ed01-2016
Avoid the prolonged use of interior air recirculation (risk of misting and
d
eterioration of air quality).
It
allows
you:
-
i
n
summer,
to
lower
the
temperature,
-
i
n
winter,
above
3
°C,
to
improve
demisting.
F
P
ress
this
button
again
to
switch
o
ff
the
air
conditioning.
F
P
ress this button to switch on the
air
c
onditioning.
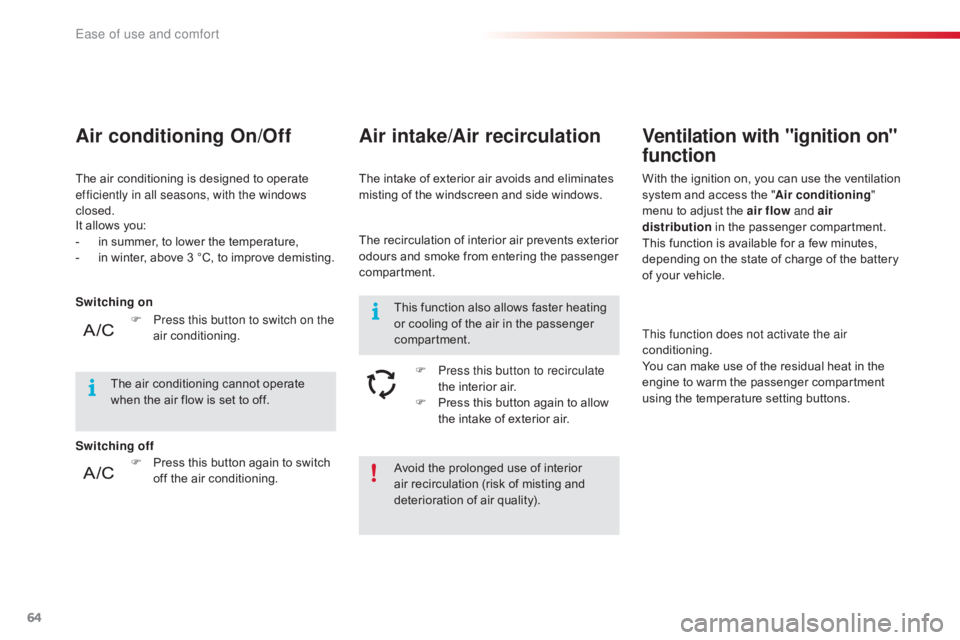
Air conditioning On/Off
The air conditioning is designed to operate e
fficiently in all seasons, with the windows
closed. The
intake of exterior air avoids and eliminates m
isting of the windscreen and side windows.
Air intake/Air recirculation
The recirculation of interior air prevents exterior o
dours and smoke from entering the passenger
c
ompartment.
F
P
ress this button to recirculate
the
interior air.
F
P
ress this button again to allow
t
he intake of exterior air.
The
air
conditioning
cannot
operate
w
hen
the
air
flow
is
set
to
off. This
function also allows faster heating
o
r cooling of the air in the passenger
c
ompartment.
Ventilation with "ignition on"
function
With the ignition on, you can use the ventilation system and access the "Air conditioning "
menu
to adjust the air flow and air
distribution
in the passenger compartment.
This
function is available for a few minutes,
d
epending on the state of charge of the battery
o
f your vehicle.
This function does not activate the air
conditioning.
You
can make use of the residual heat in the
e
ngine to warm the passenger compartment
u
sing the temperature setting buttons.
Switching on
Switching off
Ease of use and comfort
Page 122 of 317

120
C4-cactus_en_Chap06_conduite_ed01-2016
When towing
Distribution of loads
F Distribute the load in the trailer so that the heaviest items are as close as possible to
t
he axle and the nose weight approaches
t
he maximum permitted without
e
xceeding it.
Air density decreases with altitude, thus
reducing
engine per formance. Above
1 0
00 metres, the maximum towed load must
b
e reduced by 10 % for every 1 000 metres of
al
titude.
For
more information on weights (and the
t
owed loads which apply to your vehicle) refer
to
the corresponding section.
Side wind
F Take into account the increased sensitivity t
o side wind.
Cooling
Towing a trailer on a slope increases the temperature of the coolant.
As
the fan is electrically controlled, its cooling
c
apacity is not dependent on the engine speed.
F
T
o lower the engine speed, reduce your
s
peed.
The
maximum towed load on a long incline
d
epends on the gradient and the ambient
t
emperature.
In
all cases, keep a check on the coolant
t
emperature. F
I
f the warning lamp and the
S
TOP
warning lamp come on,
s
top the vehicle and switch off
the
engine as soon as possible.
Braking
Towing a trailer increases the braking distance.
T o avoid overheating of the brakes, the use of
e
ngine braking is recommended.
Ty r e s
F Check the tyre pressures of the towing v
ehicle and of the trailer, observing the
re
commended
p
ressures.
Lighting
F Check the electrical lighting and signalling o
n the trailer and the hadlamp beam height
o
f your vehicle.
For
more information on adjusting the
h
eadlamp beam height, refer to the
c
orresponding
s
ection.
The
rear parking sensors will be
d
eactivated automatically if a genuine
C
ITROËN towbar is used.
Driving
Page 169 of 317
167
C4-cactus_en_Chap07_info-pratiques_ed01-2016
Bonnet
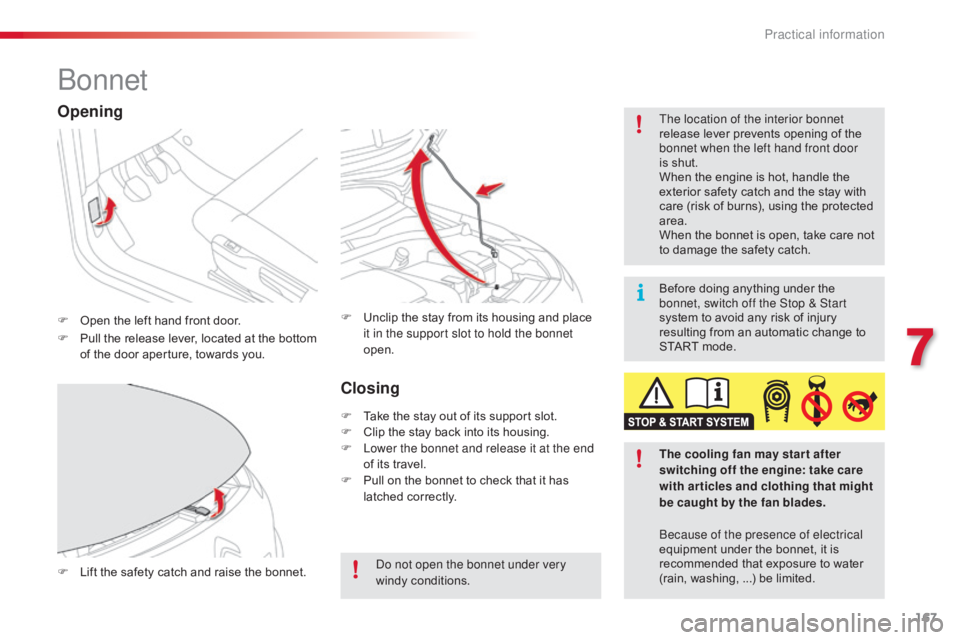
F Open the left hand front door. The location of the interior bonnet
release
lever prevents opening of the
b
onnet when the left hand front door
is shut.
When the engine is hot, handle the
e
xterior safety catch and the stay with
c
are (risk of burns), using the protected
a
rea.
When the bonnet is open, take care not
t
o damage the safety catch.
F
L
ift the safety catch and raise the bonnet.F
U nclip the stay from its housing and place i
t in the support slot to hold the bonnet
open.
Opening
F Pull the release lever, located at the bottom o
f the door aperture, towards you.
The cooling fan may star t after
switching off the engine: take care
with articles and clothing that might
be caught by the fan blades.
Do not open the bonnet under very
windy
c
onditions.
Closing
F Take the stay out of its support slot.
F C lip the stay back into its housing.
F
L
ower the bonnet and release it at the end
of
its travel.
F
P
ull on the bonnet to check that it has
l
atched correctly. Because of the presence of electrical
equipment
under the bonnet, it is
r
ecommended that exposure to water
(
rain, washing, ...) be limited.
Before
doing anything under the
b
onnet, switch off the Stop & Start
system to avoid any risk of injury
r
esulting from an automatic change to
S
TART mode.
7
Practical information
Page 172 of 317
170
C4-cactus_en_Chap07_info-pratiques_ed01-2016
Checking levels
Take care when working under the bonnet, as certain areas of the engine
m
ay be extremely hot (risk of burns)
a
nd the cooling fan could start at any
t
ime (even with the ignition off).
Engine oil level
The check is carried out either when the ignition is switched on using the
o
il level indicator in the instrument
p
anel for vehicles so equipped, or
u
sing the dipstick.
Checking using the dipstick
Check all of these levels regularly, in line with the manufacturer's service schedule. Top them up if necessary, unless other wise indicated.
I f a level drops significantly, have the corresponding system checked by a CITROËN dealer or a qualified workshop.
If you find that the level is above the A
mark or
belo
w the B mark, do not star t the engine.
-
I
f the level is above the MAX
mark (risk
o
f damage to the engine), contact a
C
ITROËN dealer or a qualified workshop.
-
I
f the level is below the MIN
mark, you
m
ust top up the engine oil.
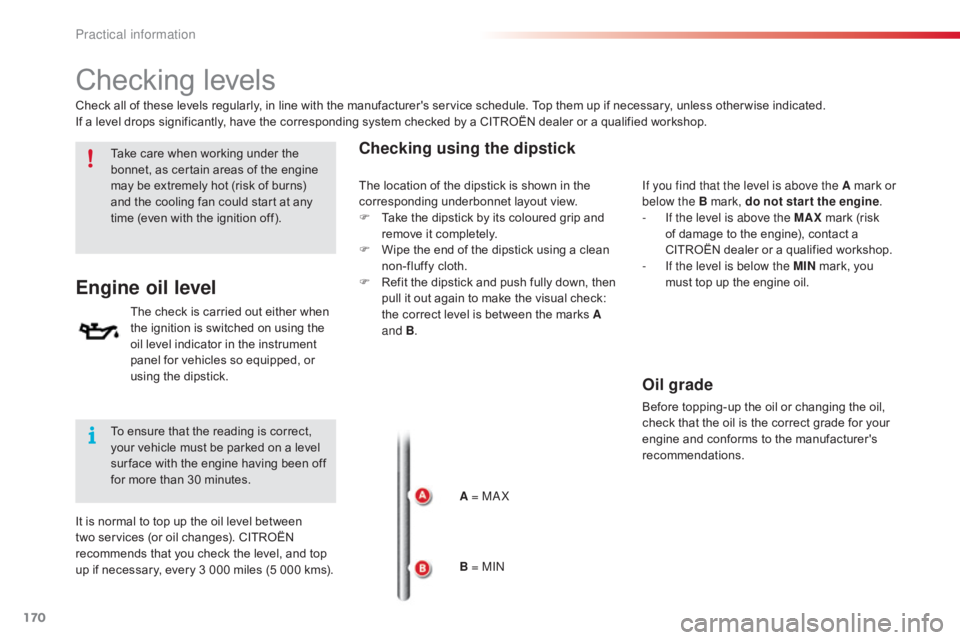
A = MA X
B = MIN
To
ensure that the reading is correct,
y
our vehicle must be parked on a level
s
ur face with the engine having been off
f
or more than 30 minutes.
It
is normal to top up the oil level between
t
wo services (or oil changes). CITROËN
r
ecommends that you check the level, and top
u
p if necessary, every 3 000 miles (5 000 kms).The
location of the dipstick is shown in the
c
orresponding underbonnet layout view.
F
T
ake the dipstick by its coloured grip and
r
emove it completely.
F
W
ipe the end of the dipstick using a clean
n
on-fluffy cloth.
F
R
efit the dipstick and push fully down, then
p
ull it out again to make the visual check:
t
he correct level is between the marks A
and B .
Oil grade
Before topping-up the oil or changing the oil, c
heck that the oil is the correct grade for your
e
ngine and conforms to the manufacturer's
r
ecommendations.
Practical information
Page 174 of 317
172
C4-cactus_en_Chap07_info-pratiques_ed01-2016
Coolant level
The coolant level should be close
to the "MA X" mark but should never
e
xceed it.
In
addition, as the cooling system is pressurised,
w
ait
at
least one hour after switching off the
e
ngine
before carrying out any work.
To
avoid
any risk of scalding, unscrew the cap by
t
wo
turns
to allow the pressure to drop. When the
p
ressure
has dropped, remove the cap and top
u
p
the
level.
Changing the coolant
The coolant does not have to be replaced at routine services.
The cooling fan may star t after switching
off the engine: take care with ar ticles and
clothing that might be caught by the fan
blades. When the engine is warm, the temperature of
t
he coolant is regulated by the fan.
Fluid specification
The coolant must conform to the ma
nufacturer's r ecommendations.
Fluid specification
For optimum cleaning and to avoid freezing, this fluid must not be topped up or replaced
w
ith plain water.
In
w
intry
c
onditions,
i
t
i
s
r
ecommended
t
hat
y
ou
u
se an ethyl alcohol or methanol based fluid.
Screenwash fluid level
Top up the level when necessary.
To p p i n g u p
The reservoir must be topped up without delay by a CITROËN dealer or a qualified workshop.
Diesel fuel additive
level (Diesel with particle
filter)
The additive reservoir low level is
indicated by fixed illumination of
A
void prolonged contact of used oil or
f
luids with the skin.
Most of these fluids are harmful to
h
ealth or indeed very corrosive.
Do not discard used oil or fluids into
sewers or onto the ground.
Take used oil to a CITROËN dealer or
a
qualified workshop (France) or to an
a
uthorised waste disposal site.
Used products
this warning lamp, accompanied by an audible s
ignal and a message that the particle filter
a
dditive level is too low.
Practical information
Page 212 of 317
210
C4-cactus_en_Chap08_En-cas-de-panne_ed01-2016
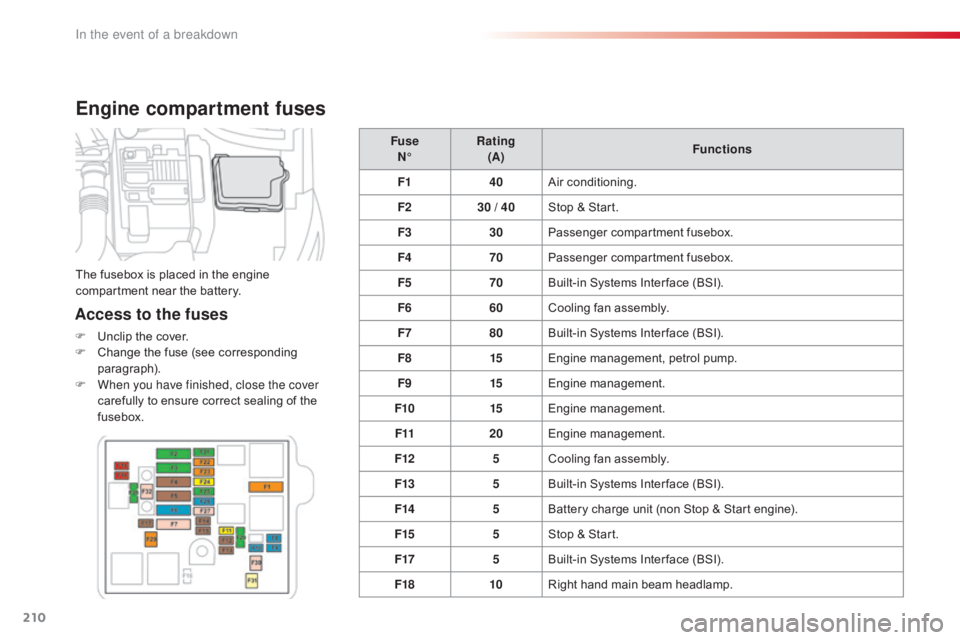
Engine compartment fuses
Access to the fuses
F Unclip the cover.
F C hange the fuse (see corresponding
par
agraph).
F
W
hen you have finished, close the cover
carefully
to ensure correct sealing of the
f
usebox. Fuse
N° Rating
(A) Functions
F1 40Air
c
onditioning.
F2 30 / 40Stop & Start.
F3 30Passenger
c
ompartment
f
usebox.
F4 70Passenger
c
ompartment
f
usebox.
F5 70Built-in Systems Inter face (BSI).
F6 60Cooling fan assembly.
F7 80Built-in Systems Inter face (BSI).
F8 15Engine
management, petrol pump.
F9 15Engine
m
anagement.
F10 15Engine
m
anagement.
F11 20Engine
m
anagement.
F12 5Cooling
fan assembly.
F13 5Built-in
Systems Inter face (BSI).
F14 5Battery
charge unit (non Stop & Start engine).
F15 5Stop
& Start.
F17 5Built-in
Systems Inter face (BSI).
F18 10Right
hand main beam headlamp.
The
fusebox is placed in the engine
c
ompartment near the battery.
In the event of a breakdown
Page 215 of 317
213
C4-cactus_en_Chap08_En-cas-de-panne_ed01-2016
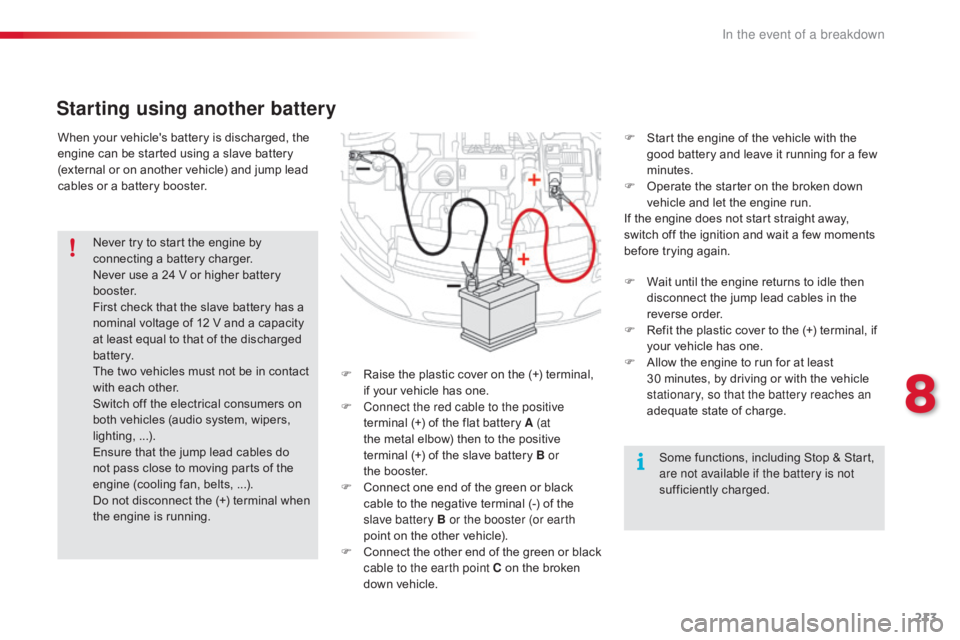
When your vehicle's battery is discharged, the engine can be started using a slave battery
(
external or on another vehicle) and jump lead
c
ables or a battery booster.
Starting using another battery
F Raise the plastic cover on the (+) terminal, i
f your vehicle has one.
F
C
onnect the red cable to the positive
terminal
(+) of the flat battery A (at
the
metal elbow) then to the positive
t
erminal (+) of the slave battery B or
the booster.
F
C
onnect one end of the green or black
c
able to the negative terminal (-) of the
s
lave battery B or the booster (or earth
point
on the other vehicle).
F
C
onnect
t
he
o
ther
e
nd
o
f
t
he
g
reen
o
r
b
lack
c
able to the earth point C on the broken
d
own vehicle. F
S
tart the engine of the vehicle with the
g
ood battery and leave it running for a few
m
inutes.
F
O
perate the starter on the broken down
v
ehicle and let the engine run.
If the engine does not start straight away,
s
witch off the ignition and wait a few moments
b
efore trying again.
Never
try
to
start
the
engine
by
c
onnecting
a
battery
charger.
Never
use
a
24
V
or
higher
battery
b
o o s t e r.
First
check
that
the
slave
battery
has
a
n
ominal
voltage
of
12
V
and
a
capacity
a
t
least
equal
to
that
of
the
discharged
b
attery.
The
two
vehicles
must
not
be
in
contact
w
ith
each
other.
Switch
off
the
electrical
consumers
on
b
oth
vehicles
(audio
system,
wipers,
l
ighting, ...).
Ensure
that
the
jump
lead
cables
do
n
ot
pass
close
to
moving
parts
of
the
e
ngine
(cooling
fan,
belts, ...).
Do
not
disconnect
the
(+)
terminal
when
t
he
engine
is
running. F
W
ait until the engine returns to idle then
d
isconnect the jump lead cables in the
r
everse
o
rder.
F
R
efit the plastic cover to the (+) terminal, if
y
our vehicle has one.
F A llow the engine to run for at least 3
0 minutes, by driving or with the vehicle
s
tationary, so that the battery reaches an
adequate
state of charge.
Some
functions, including Stop & Start,
a
re not available if the battery is not
sufficiently
c
harged.
8
In the event of a breakdown