start stop button CITROEN C4 2022 Owner's Manual
[x] Cancel search | Manufacturer: CITROEN, Model Year: 2022, Model line: C4, Model: CITROEN C4 2022Pages: 292, PDF Size: 7.79 MB
Page 178 of 292

176
Practical information
stations equipped with AdBlue® pumps specially
designed for passenger vehicles.
Recommendations on storage
AdBlue® freezes at about -11°C and deteriorates
above +25°C. Containers should be stored in a
cool area and protected from direct sunlight.
Under these conditions, the fluid can be kept for
at least a year.
If the fluid has frozen, it can be used once it has
completely thawed out at room temperature.
Never store AdBlue® containers in your
vehicle.
Precautions for use
AdBlue® is a urea-based solution. This fluid is
non-flammable, colourless and odourless (when
kept in a cool place).
In the event of contact with the skin, wash the
affected area with soap and running water. In the
event of contact with the eyes, immediately rinse
the eyes with large amounts of water or with an
eye wash solution for at least 15 minutes. Seek
medical attention if you feel a persistent burning
sensation or irritation.
If swallowed, immediately wash out the mouth
with clean water and then drink plenty of water.
In certain conditions (high temperature, for
example), the risk of release of ammonia cannot
be excluded: do not inhale the fluid. Ammonia
vapours have an irritant effect on mucous
membranes (eyes, nose and throat).
Store AdBlue® out of the reach of
children, in its original container.
Procedure
Before starting the top-up procedure, ensure that
the vehicle is parked on a flat and level surface.
In wintry conditions, ensure that the temperature
of the vehicle is above -11°C. Otherwise the
AdBlue
® may be frozen and so cannot be poured
into the tank. Park the vehicle in a warmer area
for a few hours to allow the top-up to be carried
out.
Never pour the AdBlue® into the Diesel
fuel tank.
If any AdBlue® is splashed, or if there are
any spillages on the bodywork, rinse
immediately with cold water or wipe with a
damp cloth.
If the fluid has crystallised, clean it off using a
sponge and hot water.
Important: in the event of a top-up after
a breakdown because of a lack of
AdBlue, it is essential to wait around 5
minutes before switching on the ignition,
without opening the driver’s door,
unlocking the vehicle, inserting the key
into the ignition switch, or bringing the
key for the "Keyless Entry and Start"
system into the passenger compartment.
Switch on the ignition, then wait for 10
seconds before starting the engine.
►
Switch off the ignition and remove the key
from the switch to switch off the engine.
or
►
With Keyless Entry and Start, press the
"
START/STOP" button to switch off the engine.
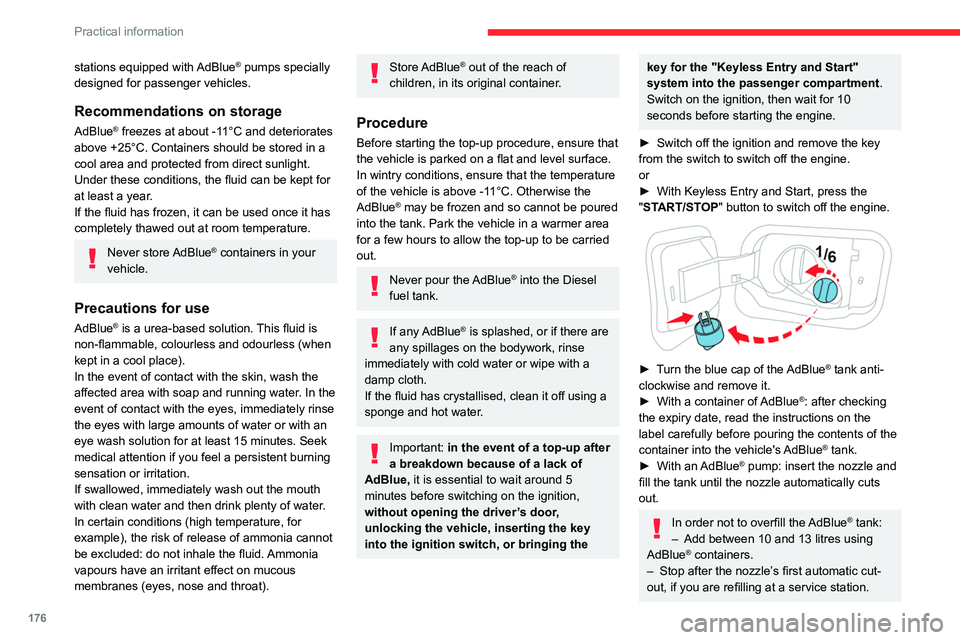
► Turn the blue cap of the AdBlue® tank anti-
clockwise and remove it.
►
With a container of
AdBlue
®: after checking
the expiry date, read the instructions on the
label carefully before pouring the contents of the
container into the vehicle's AdBlue
® tank.
►
With an
AdBlue® pump: insert the nozzle and
fill the tank until the nozzle automatically cuts
out.
In order not to overfill the AdBlue® tank:
–
Add between 10 and 13 litres using
AdBlue® containers.
–
Stop after the nozzle’ s first automatic cut-
out, if you are refilling at a service station.
Page 185 of 292

183
In the event of a breakdown
8
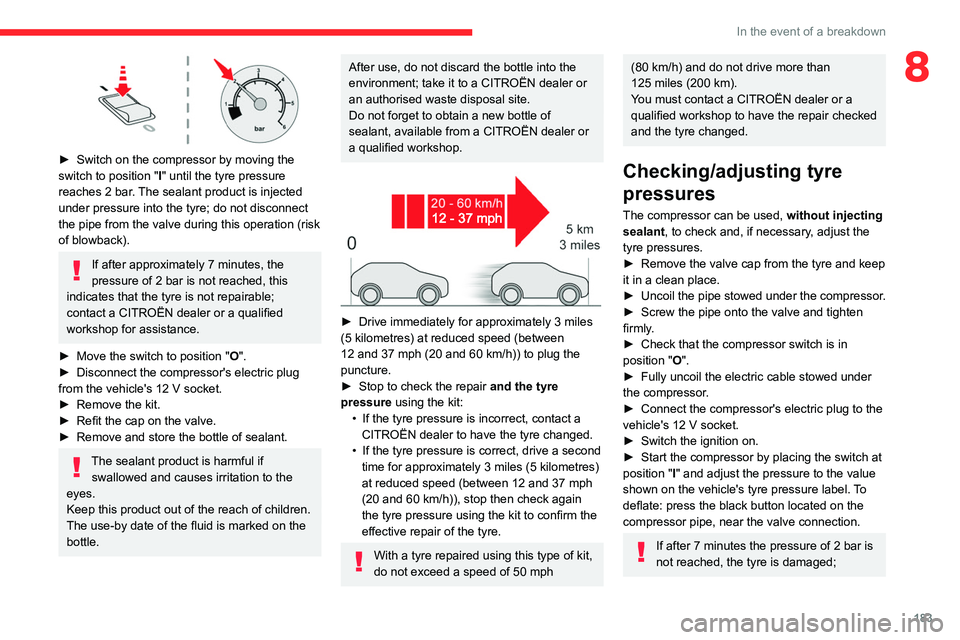
► Switch on the compressor by moving the
switch to position "I" until the tyre pressure
reaches 2
bar. The sealant product is injected
under pressure into the tyre; do not disconnect
the pipe from the valve during this operation (risk
of blowback).
If after approximately 7 minutes, the
pressure of 2 bar is not reached, this
indicates that the tyre is not repairable;
contact a CITROËN dealer or a qualified
workshop for assistance.
►
Move the switch to position
"O".
►
Disconnect the compressor's electric plug
from the vehicle's 12
V socket.
►
Remove the kit.
►
Refit the cap on the valve.
►
Remove and store the bottle of sealant.
The sealant product is harmful if swallowed and causes irritation to the
eyes.
Keep this product out of the reach of children.
The use-by date of the fluid is marked on the
bottle.
After use, do not discard the bottle into the
environment; take it to a CITROËN dealer or
an authorised waste disposal site.
Do not forget to obtain a new bottle of
sealant, available from a CITROËN dealer or
a qualified workshop.
► Drive immediately for approximately 3 miles
(5 kilometres) at reduced speed (between
12 and 37
mph (20 and 60 km/h)) to plug the
puncture.
►
Stop to check the repair
and the tyre
pressure using the kit:
•
If the tyre pressure is incorrect, contact a
CITROËN dealer to have the tyre changed.
•
If the tyre pressure is correct, drive a second
time for approximately 3
miles (5 kilometres)
at reduced speed (between 12 and 37
mph
(20 and 60
km/h)), stop then check again
the tyre pressure using the kit to confirm the
effective repair of the tyre.
With a tyre repaired using this type of kit,
do not exceed a speed of 50 mph
(80 km/h) and do not drive more than
125 miles (200 km).
You must contact a CITROËN dealer or a
qualified workshop to have the repair checked
and the tyre changed.
Checking/adjusting tyre
pressures
The compressor can be used, without injecting
sealant, to check and, if necessary, adjust the
tyre pressures.
►
Remove the valve cap from the tyre and keep
it in a clean place.
►
Uncoil
the pipe stowed under the compressor.
►
Screw the pipe onto the valve and tighten
firmly
.
►
Check that the compressor switch is in
position " O
".
►
Fully uncoil the electric cable stowed under
the compressor
.
►
Connect the compressor's electric plug to the
vehicle's 12
V socket.
►
Switch the ignition on.
►
Start the compressor by placing the switch at
position " I
" and adjust the pressure to the value
shown on the vehicle's tyre pressure label. To
deflate: press the black button located on the
compressor pipe, near the valve connection.
If after 7 minutes the pressure of 2 bar is
not reached, the tyre is damaged;
Page 229 of 292

227
MyCitroën Drive
12MyCitroën Drive
GPS navigation -
Applications - Multimedia
audio system - Bluetooth
®
telephone
The functions and settings described
vary according to the vehicle version and
configuration, as well as the country of sale.
For safety reasons and because they
require sustained attention by the driver,
the following operations must be carried out
with the vehicle stationary and the ignition
on:
–
Pairing the smartphone with the system via
Bluetooth.
–
Using the smartphone.
–
Connecting to the CarPlay® or Android
Auto applications (certain applications stop
displaying when the vehicle is moving).
–
W
atching a video (the video stops when the
vehicle starts to move again).
–
Changing the system settings and
configuration.
AM and DAB radio are not available on Hybrid vehicles.
The system is protected so that it only operates in the vehicle.
The message Energy economy mode is
displayed when the system is about to go into
standby.
System and map updates can be
downloaded from the Brand's website.
The update procedure is also available there.
The system’s Open Source Software (OSS) source codes are available at the
following addresses:
https://www.groupe-psa.com/fr/oss/
https://www.groupe-psa.com/en/oss/
First steps
With the engine running, a press mutes
the sound.
With the ignition off, a press turns the system on.
Increase or decrease the volume using
the wheel or the "plus" or "minus" buttons
(depending on the equipment).
Use the menu buttons on either side of or below
the touch screen for access to the menus, then
press the virtual buttons in the touch screen.
Depending on the model, use the "Source" or
"Menu" buttons to access the rolling menus, then
press the virtual buttons in the touch screen.
Display the rolling menus at any time by pressing
the screen briefly with three fingers.
All of the touch areas of the screen are white.
Press the back arrow to go back a level.
Press "OK" to confirm.
The touch screen is of the "capacitive" type.
To clean the screen, use a soft, non-abrasive
cloth (e.g. spectacles cloth) with no additional
product.
Do not use sharp objects on the screen.
Do not touch the screen with wet hands.
Certain information is displayed permanently
in the side bars or in the upper bar of the touch
screen (depending on equipment):
–
Air conditioning status information (depending
on version), and direct access to the
corresponding menu.
–
Go directly to the audio source selection
option, to view the list of radio stations (or list of
titles depending on the source).
–
Go to the "Notifications" of messages, emails,
map updates and, depending on the services,
the navigation notifications.
–
Go to the settings for the touch screen and the
digital instrument panel.
Audio source selection (depending on
equipment):
–
FM/DAB/AM radio stations (depending on
equipment).
–
T
elephone connected via Bluetooth and
Bluetooth multimedia broadcast (streaming).
–
USB memory stick.
Page 245 of 292

243
MyCitroën Drive
12Selecting the source
Press Radio Media to display the main
page.
Select "SOURCES".
Select the source.
Watching a video
Depending on equipment/Depending on version/
Depending on country.
Insert a USB memory stick in the USB port.
Video control commands are accessible
only through the touch screen.
Press Radio Media to display the main
page.
Select "SOURCES".
Select Video to start the video.
To remove the USB memory stick, press the pause button to stop the video, then
remove the memory stick.
The system can play video files in the MPEG-4
Part 2, MPEG-2, MPEG-1, H.264, H.263, VP8,
WMV and RealVideo formats.
Streaming Bluetooth®
Streaming allows you to listen to the audio feed
from your smartphone.
The Bluetooth profile must be activated.
First adjust the volume on the portable device (to
a high level).
Then adjust the volume of the audio system.
If play does not start automatically, it may be
necessary to start the audio playback from the
smartphone.
Control is from the portable device or by using
the system's touch buttons.
Once connected in streaming mode, the
smartphone is considered to be a media
source.
Connecting Apple® players
Connect the Apple® player to the USB port using
a suitable cable (not supplied).
Play starts automatically.
Control is via the audio system.
The classifications available are those of the portable device connected (artists/
albums/genres/playlists/audio books/
podcasts).
The default classification used is by artist. To
modify the classification used, return to the
first level of the menu then select the desired
classification (playlists for example) and
confirm to go down through the menu to the
desired track.
The version of software in the audio system may
not be compatible with the generation of the
Apple
® player.
Information and advice
The system supports USB mass storage
devices, BlackBerry® devices and Apple® players
via the USB ports. The adapter cable is not
supplied.
Devices are managed using the audio system
controls.
Other devices, not recognised on connection,
must be connected to the auxiliary socket using
a jack cable (not supplied) or via Bluetooth
streaming, if compatible.
The audio system will only play audio files with
".wma", ".aac", ".flac", ".ogg" and ".mp3" file
extensions, at bit rates between 32 Kbps and
320 Kbps.
It also supports VBR (Variable Bit Rate) mode.
No other file types (".mp4", etc.) can be read.
All ".wma" files must be standard WMA 9 files.
The supported sampling rates are 32, 44 and
48 KHz.
To avoid reading and display problems, we
recommend choosing file names less than 20
characters long that do not contain any special
characters (e.g. “ ? .
; ù).
Use only USB memory sticks in FAT32 format
(File Allocation Table).
We recommend using the original USB
cable for the portable device.