time setting CITROEN C4 2023 Owner's Manual
[x] Cancel search | Manufacturer: CITROEN, Model Year: 2023, Model line: C4, Model: CITROEN C4 2023Pages: 292, PDF Size: 7.79 MB
Page 115 of 292
11 3
Driving
6instrument panel must match that of the
country you are driving in.
Automatic sign reading is a driving aid system and does not always display the
correct speed limits.
The speed limit signs present on the road
always take priority over those displayed by
the system.
The system is designed to detect signs that
conform to the Vienna Convention on road
signs.
Specific speed limits, such as those for
heavy goods vehicles, are not displayed.
The display of the speed limit on the
instrument panel is updated when passing
a speed limit sign intended for cars (light
vehicles).
Activation/Deactivation
By default, the system is automatically activated
at every engine start.
With Touch screen BLUETOOTH audio
system or MyCitroën Play
The settings are changed via the Driving
touch screen menu.
With MyCitroën Drive
The settings are changed via the Vehicle
touch screen menu.
With MyCitroën Drive Plus
The settings are changed via the ADAS
touch screen application.
Information displayed on
the instrument panel
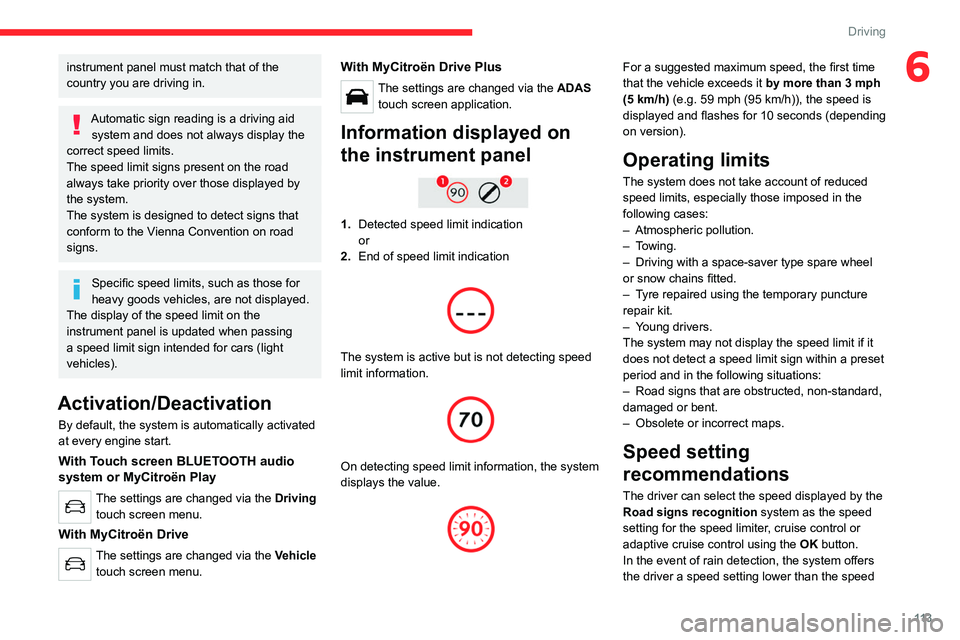
1. Detected speed limit indication
or
2. End of speed limit indication
The system is active but is not detecting speed
limit information.
On detecting speed limit information, the system
displays the value.
For a suggested maximum speed, the first time
that the vehicle exceeds it
by more than 3 mph
(5
km/h) (e.g. 59 mph (95 km/h)), the speed is
displayed and flashes for 10 seconds (depending
on version).
Operating limits
The system does not take account of reduced
speed limits, especially those imposed in the
following cases:
–
Atmospheric pollution.
–
Towing.
–
Driving with a space-saver type spare wheel
or snow chains fitted.
–
T
yre repaired using the temporary puncture
repair kit.
–
Y
oung drivers.
The system may not display the speed limit if it
does not detect a speed limit sign within a preset
period and in the following situations:
–
Road signs that are obstructed, non-standard,
damaged or bent.
–
Obsolete or incorrect maps.
Speed setting
recommendations
The driver can select the speed displayed by the
Road signs recognition system as the speed
setting for the speed limiter, cruise control or
adaptive cruise control using the OK button.
In the event of rain detection, the system offers
the driver a speed setting lower than the speed
Page 117 of 292
11 5
Driving
6With MyCitroën Drive Plus
The settings are changed via the ADAS
touch screen application.
Speed limiter
For more information, refer to the
General recommendations on the use
of driving and manoeuvring aids .
This system prevents the vehicle from
exceeding the speed programmed by the
driver (speed setting).
The speed limiter is switched on manually.
The minimum speed setting is 19 mph (30
km/h).
The speed setting remains in the system
memory when the ignition is switched off.
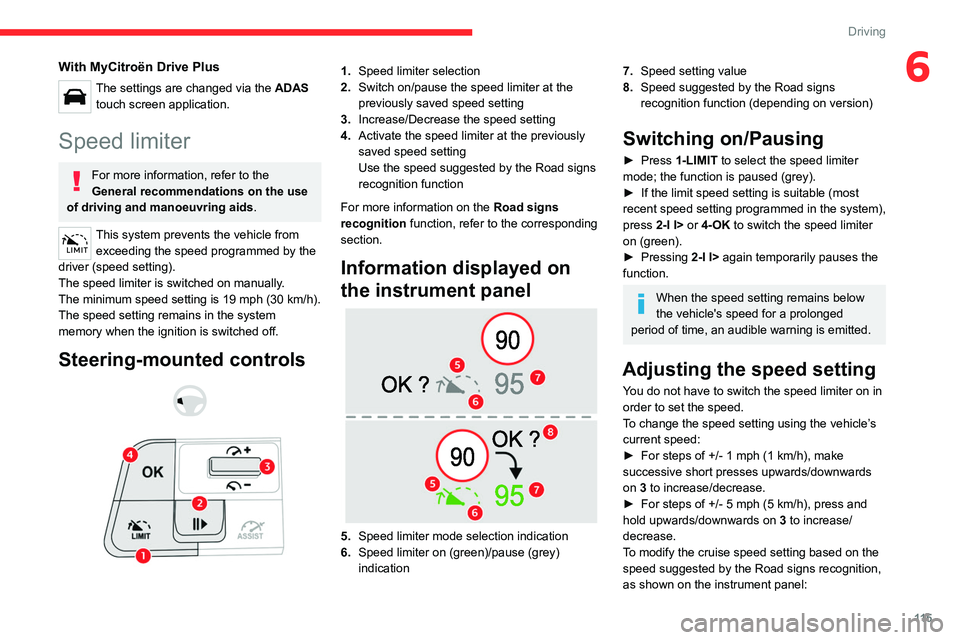
Steering-mounted controls
1. Speed limiter selection
2. Switch on/pause the speed limiter at the
previously saved speed setting
3. Increase/Decrease the speed setting
4. Activate the speed limiter at the previously
saved speed setting
Use the speed suggested by the Road signs
recognition function
For more information on the Road signs
recognition
function, refer to the corresponding
section.
Information displayed on
the instrument panel
5. Speed limiter mode selection indication
6. Speed limiter on (green)/pause (grey)
indication
7.Speed setting value
8. Speed suggested by the Road signs
recognition function (depending on version)
Switching on/Pausing
► Press 1-LIMIT to select the speed limiter
mode; the function is paused (grey).
►
If the limit speed setting is suitable (most
recent speed setting programmed in the system),
press
2-I I> or 4-OK to switch the speed limiter
on (green).
►
Pressing
2-I I> again temporarily pauses the
function.
When the speed setting remains below
the vehicle's speed for a prolonged
period of time, an audible warning is emitted.
Adjusting the speed setting
You do not have to switch the speed limiter on in
order to set the speed.
To change the speed setting using the vehicle’s
current speed:
►
For steps of +/- 1 mph (1 km/h), make
successive short presses upwards/downwards
on
3 to increase/decrease.
►
For steps of +/- 5 mph (5
km/h), press and
hold upwards/downwards on 3 to increase/
decrease.
To modify the cruise speed setting based on the speed suggested by the Road signs recognition,
as shown on the instrument panel:
Page 133 of 292
131
Driving
6► Press and hold this button to deactivate or
press briefly to reactivate the system at any time.
Deactivation is signalled by the lighting of
the indicator lamp in the button and this
warning lamp in the instrument panel.
With MyCitroën Drive Plus
It is configured in the ADAS touch screen
application or via the Shortcuts for
driving aids .
Deactivation is confirmed by the
illumination of this indicator lamp on the
instrument panel.
Malfunction
In the event of a malfunction,
these warning lamps light up on
the instrument panel, accompanied by the
display of a message and an audible signal.
Have it checked by a CITROËN dealer or a
qualified workshop.
Blind spot monitoring
For more information, refer to the
General recommendations on the use
of driving and manoeuvring aids .
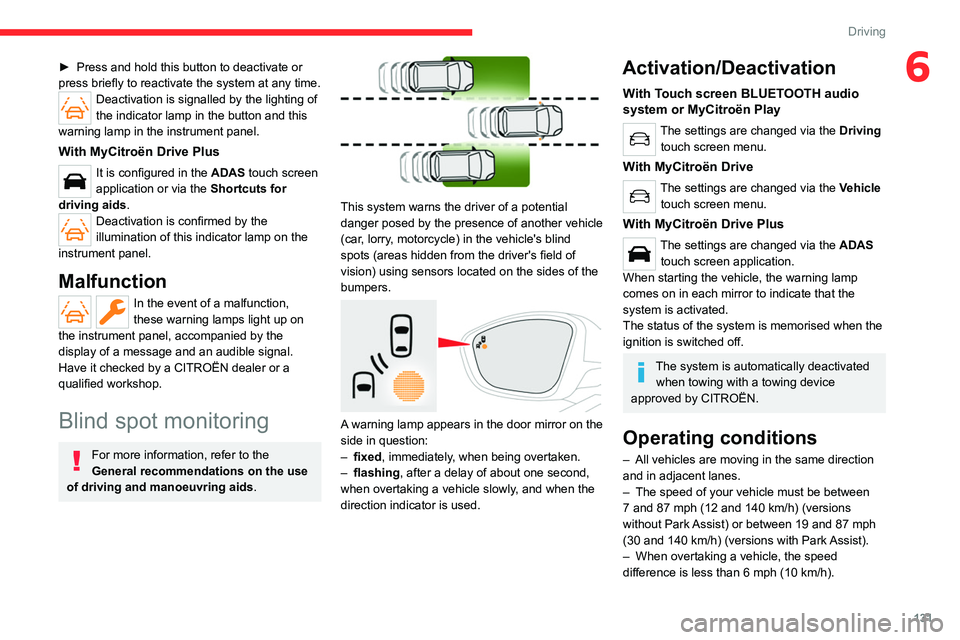
This system warns the driver of a potential
danger posed by the presence of another vehicle
(car, lorry, motorcycle) in the vehicle's blind
spots (areas hidden from the driver's field of
vision) using sensors located on the sides of the
bumpers.
A warning lamp appears in the door mirror on the
side in question:
–
fixed
, immediately, when being overtaken.
–
flashing , after a delay of about one second,
when overtaking a vehicle slowly
, and when the
direction indicator is used.
Activation/Deactivation
With Touch screen BLUETOOTH audio
system or MyCitroën Play
The settings are changed via the Driving
touch screen menu.
With MyCitroën Drive
The settings are changed via the Vehicle
touch screen menu.
With MyCitroën Drive Plus
The settings are changed via the ADAS
touch screen application.
When starting the vehicle, the warning lamp
comes on in each mirror to indicate that the
system is activated.
The status of the system is memorised when the
ignition is switched off.
The system is automatically deactivated when towing with a towing device
approved by CITROËN.
Operating conditions
– All vehicles are moving in the same direction
and in adjacent lanes.
–
The speed of your vehicle must be between
7
and 87 mph (12 and 140 km/h) (versions
without Park Assist) or between 19
and 87 mph
(30
and 140 km/h) (versions with Park Assist).
–
When overtaking a vehicle, the speed
difference is less than 6
mph (10 km/h).
Page 137 of 292
135
Driving
6It is possible that collision warnings are
not given, are given too late or seem
unjustified.
The driver must always stay in control of the
vehicle and be prepared to react at any time
to avoid an accident.
If you select "Far" in the touch screen,
then the system warns sooner. This
increases the safety but increases also the
amount of alerts, if the legal safety distance is
not kept.
To reduce the alert occurrence, you can
change the setting to either of the other two.
Intelligent emergency
braking assistance (iEBA)
This function increases vehicle deceleration
if the driver does not brake enough to avoid a
collision.
This assistance is only provided if the driver
presses the brake pedal.
Active Safety Brake
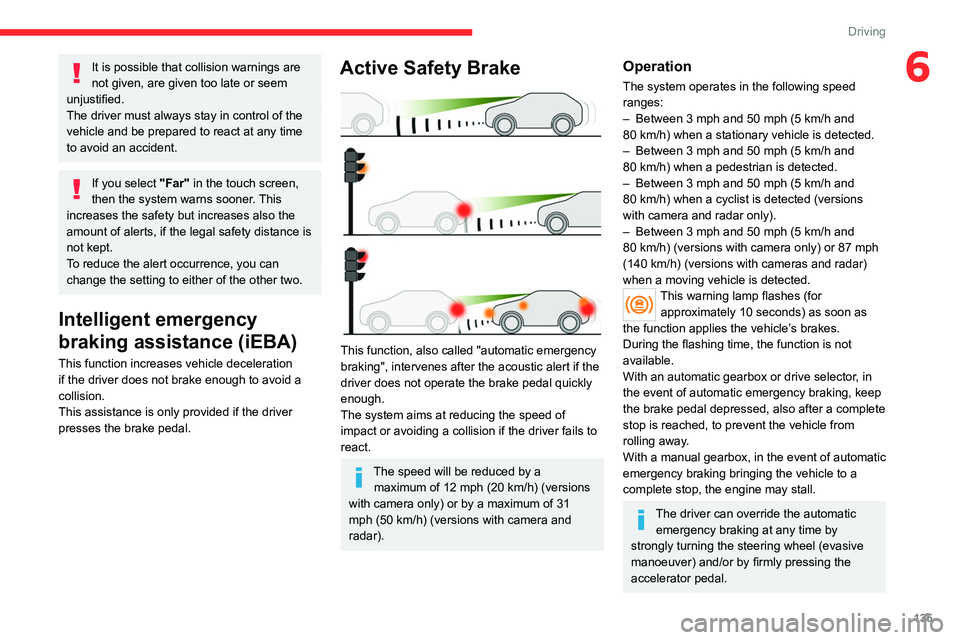
This function, also called "automatic emergency
braking", intervenes after the acoustic alert if the
driver does not operate the brake pedal quickly
enough.
The system aims at reducing the speed of
impact or avoiding a collision if the driver fails to
react.
The speed will be reduced by a maximum of 12 mph (20 km/h) (versions
with camera only) or by a maximum of 31
mph (50
km/h) (versions with camera and
radar).
Operation
The system operates in the following speed
ranges:
–
Between 3 mph and 50 mph (5
km/h and
80
km/h) when a stationary vehicle is detected.
–
Between 3 mph and 50 mph (5
km/h and
80
km/h) when a pedestrian is detected.
–
Between 3 mph and 50 mph (5
km/h and
80
km/h) when a cyclist is detected (versions
with camera and radar only).
–
Between 3 mph and 50 mph (5
km/h and
80
km/h) (versions with camera only) or 87 mph
(140
km/h) (versions with cameras and radar)
when a moving vehicle is detected.
This warning lamp flashes (for approximately 10 seconds) as soon as
the function applies the vehicle’s brakes.
During the flashing time, the function is not
available.
With an automatic gearbox or drive selector, in
the event of automatic emergency braking, keep
the brake pedal depressed, also after a complete
stop is reached, to prevent the vehicle from
rolling away.
With a manual gearbox, in the event of automatic
emergency braking bringing the vehicle to a
complete stop, the engine may stall.
The driver can override the automatic emergency braking at any time by
strongly turning the steering wheel (evasive
manoeuver) and/or by firmly pressing the
accelerator pedal.
Page 146 of 292
144
Driving
– Standard view.
– Panoramic view .
Depending on the context, the system chooses
the best view to display (standard or automatic
zoom).
The view type can be changed at any time
during the manoeuvre.
The system status is not saved when the ignition
is switched off.
Operating principle
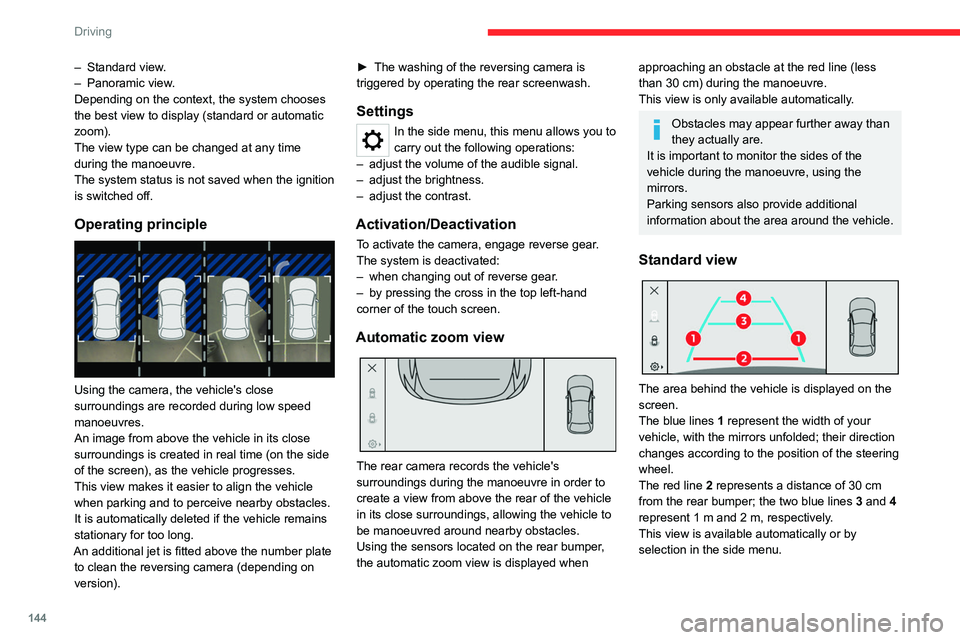
Using the camera, the vehicle's close
surroundings are recorded during low speed
manoeuvres.
An image from above the vehicle in its close
surroundings is created in real time (on the side
of the screen), as the vehicle progresses.
This view makes it easier to align the vehicle
when parking and to perceive nearby obstacles.
It is automatically deleted if the vehicle remains
stationary for too long.
An additional jet is fitted above the number plate to clean the reversing camera (depending on
version). ►
The washing of the reversing camera is
triggered by operating the rear screenwash.
Settings
In the side menu, this menu allows you to
carry out the following operations:
–
adjust the volume of the audible signal.
–
adjust the brightness.
–
adjust the contrast.
Activation/Deactivation
To activate the camera, engage reverse gear.
The system is deactivated:
–
when changing out of reverse gear
.
–
by pressing the cross in the top left-hand
corner of the touch screen.
Automatic zoom view
The rear camera records the vehicle's
surroundings during the manoeuvre in order to
create a view from above the rear of the vehicle
in its close surroundings, allowing the vehicle to
be manoeuvred around nearby obstacles.
Using the sensors located on the rear bumper,
the automatic zoom view is displayed when
approaching an obstacle at the red line (less
than 30 cm) during the manoeuvre.
This view is only available automatically.
Obstacles may appear further away than
they actually are.
It is important to monitor the sides of the
vehicle during the manoeuvre, using the
mirrors.
Parking sensors also provide additional
information about the area around the vehicle.
Standard view
The area behind the vehicle is displayed on the
screen.
The blue lines 1 represent the width of your
vehicle, with the mirrors unfolded; their direction
changes according to the position of the steering
wheel.
The red line 2 represents a distance of 30
cm
from the rear bumper; the two blue lines 3 and 4
represent 1
m and 2 m, respectively.
This view is available automatically or by
selection in the side menu.
Page 147 of 292
145
Driving
6Panoramic view
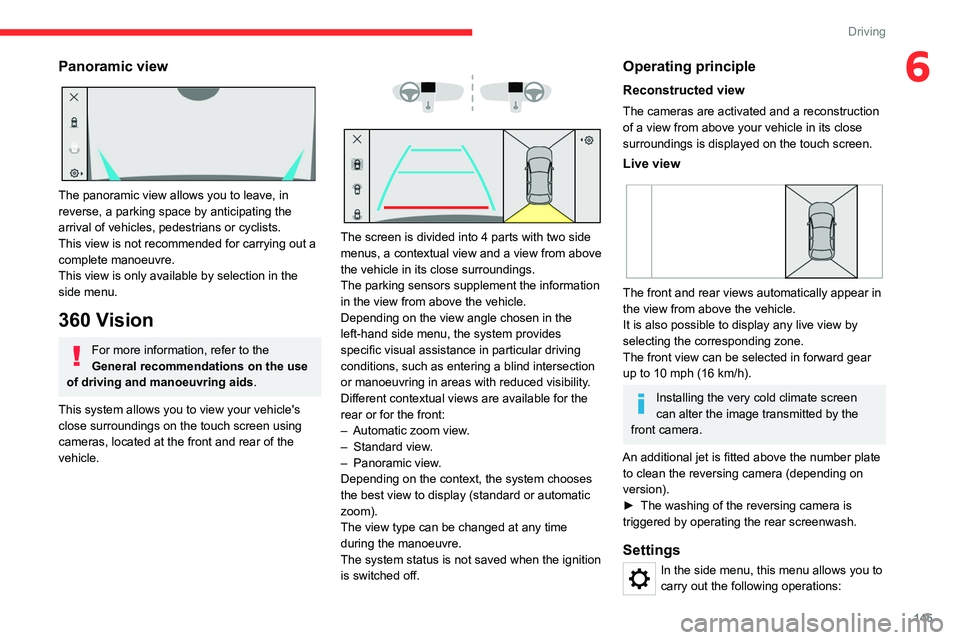
The panoramic view allows you to leave, in
reverse, a parking space by anticipating the
arrival of vehicles, pedestrians or cyclists.
This view is not recommended for carrying out a
complete manoeuvre.
This view is only available by selection in the
side menu.
360 Vision
For more information, refer to the
General recommendations on the use
of driving and manoeuvring aids .
This system allows you to view your vehicle's
close surroundings on the touch screen using
cameras, located at the front and rear of the
vehicle.
The screen is divided into 4 parts with two side
menus, a contextual view and a view from above
the vehicle in its close surroundings.
The parking sensors supplement the information
in the view from above the vehicle.
Depending on the view angle chosen in the
left-hand side menu, the system provides
specific visual assistance in particular driving
conditions, such as entering a blind intersection
or manoeuvring in areas with reduced visibility.
Different contextual views are available for the
rear or for the front:
–
Automatic zoom view
.
–
Standard view
.
–
Panoramic view
.
Depending on the context, the system chooses
the best view to display (standard or automatic
zoom).
The view type can be changed at any time
during the manoeuvre.
The system status is not saved when the ignition
is switched off.
Operating principle
Reconstructed view
The cameras are activated and a reconstruction
of a view from above your vehicle in its close
surroundings is displayed on the touch screen.
Live view
The front and rear views automatically appear in
the view from above the vehicle.
It is also possible to display any live view by
selecting the corresponding zone.
The front view can be selected in forward gear
up to 10 mph (16 km/h).
Installing the very cold climate screen
can alter the image transmitted by the
front camera.
An additional jet is fitted above the number plate to clean the reversing camera (depending on
version).
►
The washing of the reversing camera is
triggered by operating the rear screenwash.
Settings
In the side menu, this menu allows you to
carry out the following operations:
Page 165 of 292
163
Practical information
7the driver's door will display the charge level
on the instrument panel for about 20 seconds.
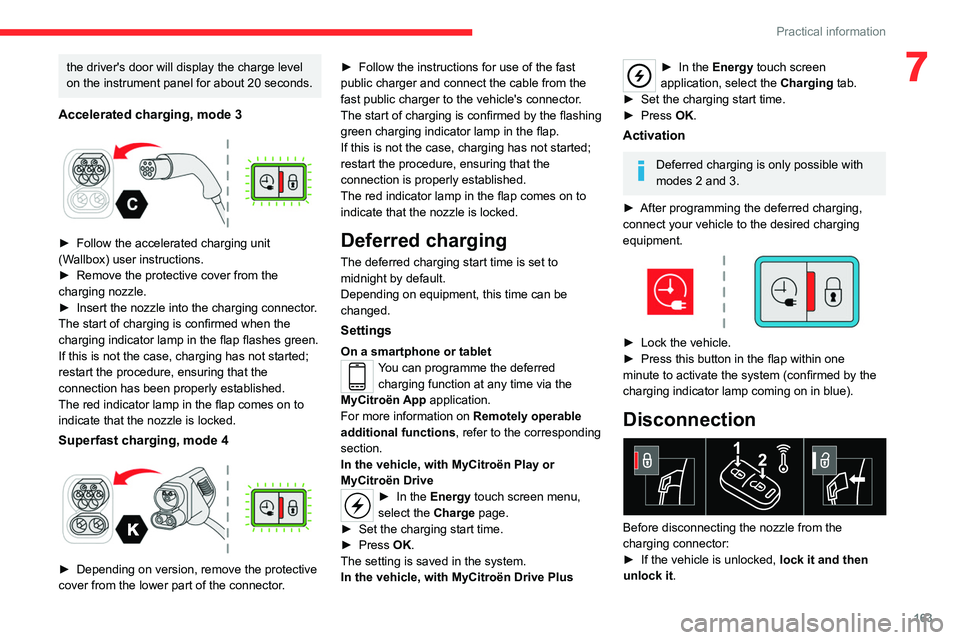
Accelerated charging, mode 3
► Follow the accelerated charging unit
(W allbox) user instructions.
►
Remove the protective cover from the
charging nozzle.
►
Insert the nozzle into the charging connector
.
The start of charging is confirmed when the
charging indicator lamp in the flap flashes green.
If this is not the case, charging has not started;
restart the procedure, ensuring that the
connection has been properly established.
The red indicator lamp in the flap comes on to
indicate that the nozzle is locked.
Superfast charging, mode 4
► Depending on version, remove the protective
cover from the lower part of the connector .►
Follow the instructions for use of the fast
public charger and connect the cable from the
fast public charger
to the vehicle's connector.
The start of charging is confirmed by the flashing
green charging indicator lamp in the flap.
If this is not the case, charging has not started;
restart the procedure, ensuring that the
connection is properly established.
The red indicator lamp in the flap comes on to
indicate that the nozzle is locked.
Deferred charging
The deferred charging start time is set to
midnight by default.
Depending on equipment, this time can be
changed.
Settings
On a smartphone or tabletYou can programme the deferred charging function at any time via the
MyCitroën App application.
For more information on Remotely operable
additional functions , refer to the corresponding
section.
In the vehicle, with MyCitroën Play or
MyCitroën Drive
► In the Energy touch screen menu,
select the Charge page.
►
Set the charging start time.
►
Press
OK.
The setting is saved in the system.
In the vehicle, with MyCitroën Drive Plus
► In the Energy touch screen
application, select the Charging tab.
►
Set the charging start time.
►
Press
OK.
Activation
Deferred charging is only possible with
modes 2 and 3.
►
After programming the deferred charging,
connect your vehicle to the desired charging
equipment.
► Lock the vehicle.
► Press this button in the flap within one
minute to activate the system (confirmed by the
charging indicator lamp coming on in blue).
Disconnection
Before disconnecting the nozzle from the
charging connector:
►
If the vehicle is unlocked, lock it and then
unlock it .
Page 206 of 292
204
Touch screen BLUETOOTH audio system
Touch screen BLUETOOTH audio
system
Multimedia audio system -
Bluetooth
® telephone
The functions and settings described
vary according to the vehicle version and
configuration.
For safety reasons and because they
require sustained attention by the driver,
the following operations must be carried out
with the vehicle stationary and the ignition
on:
–
Pairing the smartphone with the system in
Bluetooth mode.
–
Using the smartphone.
–
Changing the system settings and
configuration.
The system is protected in such a way that it will only operate in the vehicle.
The Energy Economy Mode message is
displayed when the system is about to enter
the corresponding mode.
First steps
With the engine running, a press mutes
the sound.
With the ignition off, a press turns the system on.
Increase or decrease the volume using
the thumbwheel on the left-hand side.
To access the menus, press this button on the touch screen.
Press the back arrow to go back a level.
To clean the screen, use a soft, non-abrasive cloth (e.g. spectacles cloth)
with no additional product.
Do not use sharp objects on the screen.
Do not touch the screen with wet hands.
Certain information is displayed permanently in
the upper bar of the touch screen:
–
Air conditioning information (depending on
version).
–
Bluetooth connection.
–
Indication of location data sharing.
Selection of the audio source:
–
FM/AM/DAB radio stations (depending on
equipment).
–
T
elephone connected via Bluetooth and
Bluetooth multimedia broadcast (streaming).
–
USB memory stick.
–
Media player connected via the auxiliary
socket (depending on equipment).
In very hot conditions, the volume may
be limited to protect the system. It may
go into standby (screen and sound off) for at
least 5 minutes.
The return to normal takes place when the
temperature in the passenger compartment
has dropped.
Steering mounted controls
Voice control: smartphone voice
commands.
Increase volume.
Decrease volume.
Mute by pressing the volume increase
and decrease buttons simultaneously.
Restore the sound by pressing one of the two
volume buttons.
Incoming call (short press): accept the
call.
Incoming call (long press): refuse the incoming
call.
Call in progress (short press): hang up.
Out of call (short press): access the call log of
the telephone connected via
Bluetooth
®.Radio (up/down): automatic search for
the next/previous station (in the list of
radio stations sorted by name or by frequencies).
Media (up/down): next/previous track, movement
in the lists.
Phone (up/down): browse the telephone's call
log.
Page 207 of 292
205
Touch screen BLUETOOTH audio system
10Short press: validate a selection. Out of
selection, display the lists.
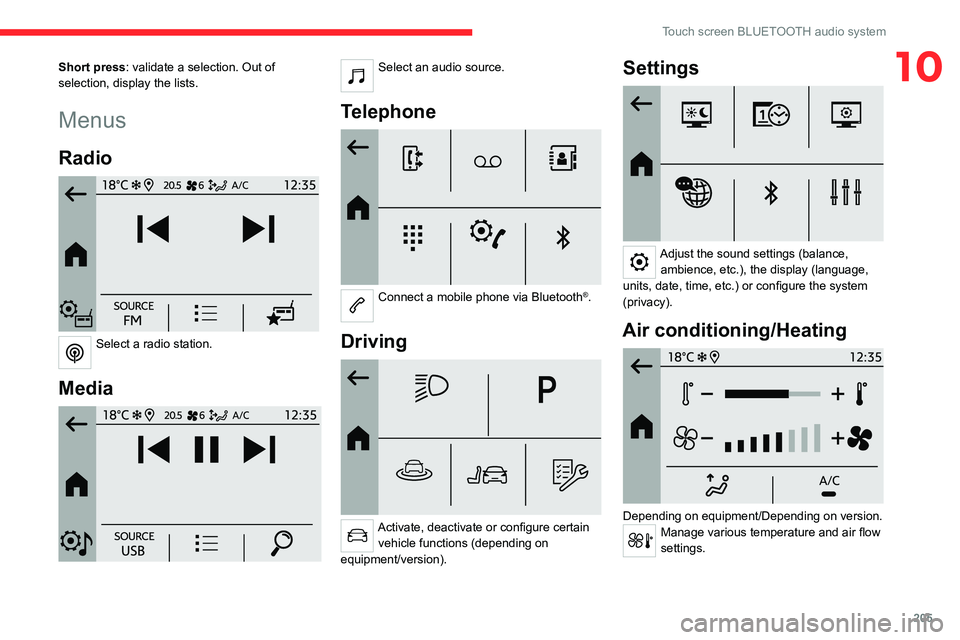
Menus
Radio
Select a radio station.
Media
Select an audio source.
Telephone
Connect a mobile phone via Bluetooth®.
Driving
Activate, deactivate or configure certain vehicle functions (depending on
equipment/version).
Settings
Adjust the sound settings (balance, ambience, etc.), the display (language,
units, date, time, etc.) or configure the system
(privacy).
Air conditioning/Heating
Depending on equipment/Depending on version.Manage various temperature and air flow
settings.
Page 209 of 292
207
Touch screen BLUETOOTH audio system
10DAB (Digital Audio
Broadcasting) radio
Terrestrial Digital Radio
Choosing the DAB radio
Terrestrial digital radio (DAB) provides higher
quality reception.
The different "multiplexes/ensembles" offer a
choice of radio stations arranged in alphabetical
order.
Press the "Radio" menu.
Press the "SOURCE" button.
In the list of available sources, choose " DAB
Radio".
Activating FM-DAB Tracking
"DAB" does not cover 100% of the territory.
When the digital radio signal is poor, the
"FM-DAB tracking" allows you to continue
listening to the same station, by automatically
switching to the corresponding "FM" analogue
station (if there is one).
Press the "Radio Settings " button.
Activate "DAB-FM".
If "FM-DAB tracking" is activated, there
may be a difference of a few seconds
when the system switches to "FM" analogue
radio with sometimes a variation in volume.
Once the digital signal quality is restored, the
system automatically changes back to "DAB".
If the "DAB" station being listened to is
not available on "FM", or if the "FM-DAB
tracking" is not activated, the sound will cut
out while the digital signal is too weak.
Media
Selecting the source
Press the "Media" menu.
Press the "SOURCE" button.
Select the source (USB, Bluetooth or AUX,
depending on equipment).
USB port
Insert the USB memory stick into the USB
port or connect the USB device to the
USB port using a suitable cable (not supplied).
To protect the system, do not use a USB hub.
The system builds playlists (in temporary
memory); this operation can take from a
few seconds to several minutes at the first
connection. Playlists are updated whenever a USB memory
stick is connected or the contents of a particular
USB memory stick are changed. The lists
are memorised: if they are not modified, the
subsequent loading time will be shorter.
Auxiliary (AUX) jack socket
Depending on equipmentConnect a portable device (MP3 player,
etc.) to the auxiliary jack socket using an
audio cable (not supplied).
This source is only available if " Aux
Amplification " has been selected in the audio
settings.
First adjust the volume on the portable device
(to a high level). Then adjust the volume of the
audio system.
Controls are managed via the portable device.
Bluetooth®streaming
Streaming allows you to listen to music from your
smartphone.
The Bluetooth profile must be activated, first
adjust the volume on the portable device (to a
high level).
Then adjust the volume of the system.
If play does not start automatically, it may be
necessary to start the audio playback from the
smartphone.
Control is from the portable device or by using
the system's touch buttons.