ESP CITROEN C4 AIRCROSS 2021 Handbook (in English)
[x] Cancel search | Manufacturer: CITROEN, Model Year: 2021, Model line: C4 AIRCROSS, Model: CITROEN C4 AIRCROSS 2021Pages: 414, PDF Size: 20.29 MB
Page 228 of 414

226
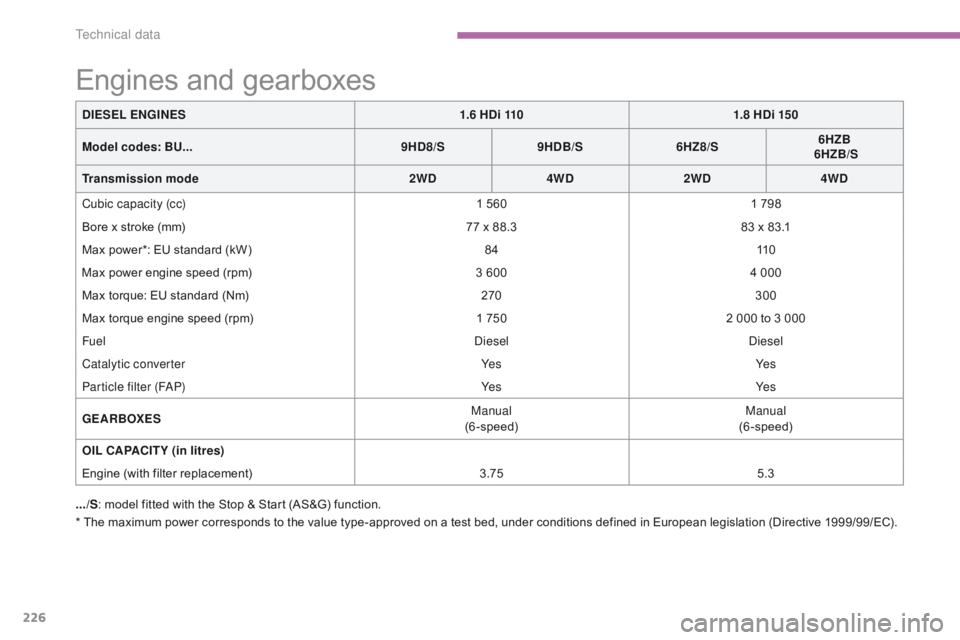
* The maximum power corresponds to the value type-approved on a test bed, under conditions defined in European legislation (Directive 1999/99/EC).DIESEL ENGINES
1.6 HDi 1101.8 HDi 150
Model codes: BU... 9HD8/S9HDB/S 6HZ8/S 6HZB
6HZB/S
Transmission mode 2WD4WD2WD 4WD
Cubic capacity (cc) 1 5601 798
Bore x stroke (mm) 77 x 88.383 x 83.1
Max power*: EU standard (kW) 8411 0
Max power engine speed (rpm) 3 6004 000
Max torque: EU standard (Nm) 270300
Max torque engine speed (rpm) 1 7502 000 to 3 000
Fuel
die
sel
die
sel
Catalytic converter Ye sYe s
Particle filter (F
aP
)
Ye sYe s
GEARBOXES Manual
(6-speed) Manual
(6-speed)
OIL CAPACITY (in litres)
Engine (with filter replacement) 3.755.3
Engines and gearboxes
.../S: model fitted with the Stop & Start (AS&G) function.
Technical data
Page 246 of 414

244
BLUETOOTH® TELEPHONE
WITH
VOICE
RECOGNITION
The system has its own phone book, independent of that of the
mobile telephone.
It can contain up to 32 names for each language.
Each name in the phone book is associated with 4 locations:
HOME, WORK, MOBILE and PAGER.
The system says "Select one of the following items: New Entry,
Change, List of names, Delete or Clear all, or say Cancel to
return to the main menu ".
Say "New entry". The system says "HOME, WORK, MOBILE OR PAGER".
Give the location which corresponds to the number that
you wish to record.
The system asks you to confirm the location.
a
nswer "Ye s".
Say "No" to return to step 7.
If a telephone number has already been recorded for this location,
the system says "The current number is -number-, number
please".
Saving a name in the system phone book
Press this button.
Say "Phone book ".
The system says "Name please ". Give the name of your choice.
If you do not wish to change the telephone number, repeat
the original number to retain it, otherwise say the new
number.
a
nswer "Ye s".
Say "No" to return to step 11.
The system asks you to confirm the number.
Page 247 of 414

245
BLUETOOTH® TELEPHONE
WITH
VOICE
RECOGNITION
Say "Call".
The system says "Name please ".
Using a name in the system phone book
Give the name of the person that you wish to call. Press this button. Give the location corresponding to the number that you
wish to call.
You must have first paired a compatible Bluetooth
® mobile
telephone with the system.
If several telephone numbers have been recorded for this person,
the system says "Do you wish to call -name- {home}, {work},
{mobile} or {pager}?" The system request confirmation of the name.
a
nswer "Ye s".
Say "No" to return to step 4.
The system says "Call to -name- at -location-" and makes the call.
Page 281 of 414

05
279
Connecting APPLE® players
Connect the apple® player to the USB port using a suitable cable
(not
supplied).
Play starts automatically.
Control is via the audio system.
The classifications available are those of the portable device
connected (artists / albums / genres / playlists / audiobooks /
podcasts).
The default classification used is by artist. To modify the classification
used, return to the first level of the menu then select the desired
classification (playlists for example) and confirm to go down through
the menu to the desired track.
The "Shuffle tracks" mode on an iPod
® corresponds to the "Random"
mode on the audio system.
The "Shuffle albums" mode on an iPod
® corresponds to the "Random
all" on the audio system.
"Shuffle tracks" is restored by default on each connection.
The version of software in the audio system may not be compatible
with the generation of your Apple
® player.
MUSIC
Using the SD card reader
The SD card reader can play MP3, WMA, AAC and WAV audio
files.
Press the OPEN button to open the
screen panel.
Insert the SD card containing audio
files into the right hand SD card
reader.
Push the SD card until it clicks into
place.
Press the OPEN button to closes the
screen panel.
Press the MODE button, then on "SD".
Page 285 of 414

283
Level 1
Level 2 Level 3 Comments
d
isplay
o
ff
Choose to switch off the screen.
To switch it back on, touch the screen or press any button.
System
Time
Choose adjustment of the time by the RDS signal, time zone, summer time.
LanguageSelect the language (English, Français, Deutsch, Nederlands, Português,
Español, Svenska, Italiano, Dansk, Vlaams, Polski, Norsk).
PairingSelect an authorisation "Select Device to Connect", "Register Device",
"Set
Passkey: Fixed", "Set Passcode".
UnitsSelect the units for the calculation of distances (km or miles and °C or °F).
Keyboard LayoutSelect the type of input keyboard (alphabet or PC).
Reset allRestore factory settings.
After reinitialisation, restart the system.
TP StandbySelect the traffic information (TP) setting: on or off.
Picture Control BrightnessAdjust the image settings for: brightness, contrast, black level.Contrast
Black Level
Clock Screen
Page 319 of 414

04
317
RADIO
Selecting radio sourcePress the RADIO button to switch on
the radio.
Press the RADIO button repeatedly
to select the waveband; it changes in
the following order: FM1
/ FM2 / FM3 /
MW
/ LW / FM1... Automatic station search
Manual station search
Turn the SEL knob to the left to search
the lower frequencies or to the right to
search the higher frequencies. Press the "9" or ":" button to search
the lower frequencies or the higher
frequencies respectively.
The search begins automatically and
stops at the first station found.
Selecting the waveband
Selection / Presetting
Page 320 of 414

04
318Press one of the six buttons "1" to "6" until an
audible signal is heard.
The sound cuts out then becomes audible again
when the station has been preset.
The number of the button and the associated radio
frequency appear in the screen. Manual station presetting
To recall the pre-set stored setting, press the button and release it
within two seconds.
RADIO
You can preset up to six stations on each waveband.
Presetting a new station replaces the previous station.
Automatic station presetting
Disconnecting the battery terminals clears the preset radio stations. Stations can only be preset automatically on wavebands FM1, FM2
and FM3.
Presetting new stations replaces the previous stations.
This presetting can be activated automatically irrespective of the
waveband selected.
Press the RADIO button for more
than two seconds.
The six stations offering the best
reception are preset and classified
from the weakest to the strongest on
the six corresponding buttons.
Recalling preset stations
Press one of the six buttons "1" to "6". The station
corresponding to the waveband selected appears on
the screen.
Page 324 of 414

04
322
RADIO
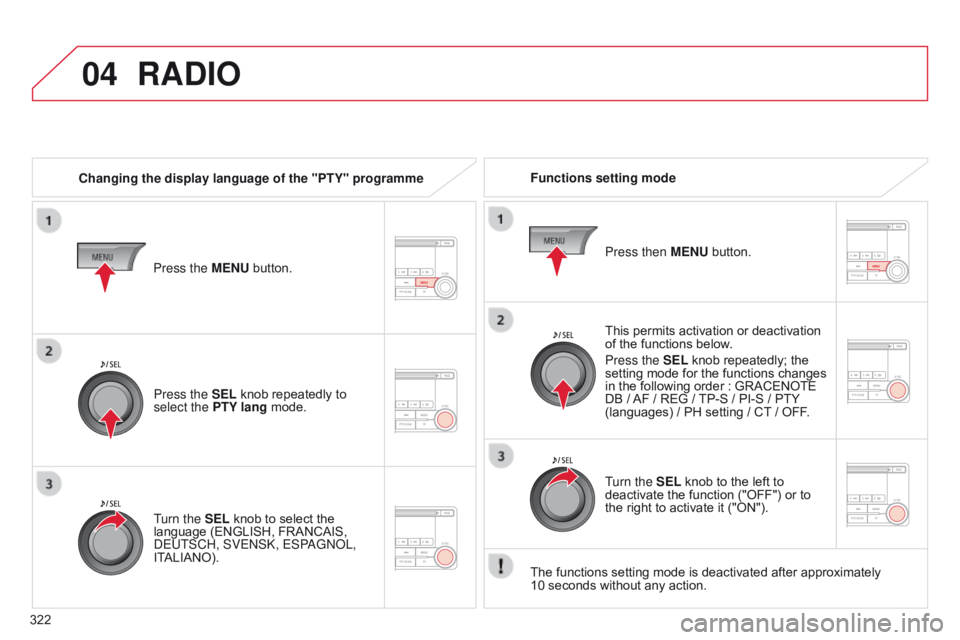
Changing the display language of the "PTY" programmeFunctions setting mode
This permits activation or deactivation
of the functions below.
Press the SEL knob repeatedly; the
setting mode for the functions changes
in the following order
: GRACENOTE
DB / AF / REG / TP-S / PI-S / PTY
(languages) / PH setting / CT
/ OFF.
The functions setting mode is deactivated after approximately
10 seconds without any action.
Press the MENU button.
Press the SEL knob repeatedly to
select the PTY lang mode.
Turn the SEL knob to select the
language (ENGLISH, FRANCAIS,
d
EUTSCH, SVE n S k , ESP
a
G no L,
ITALIANO). Press then MENU button.
Turn the SEL knob to the left to
deactivate the function ("OFF") or to
the right to activate it ("ON").
Page 326 of 414

05
324
MUSIC MEDIA PLAYERS
Random playing of a disc
Press the RDM button to start random
play of the tracks on the disc. "RDM"
appears in the screen.
To exit this mode, press this button
again.
Audio CD
Press and hold the " 7" or "8" button
to carry out a fast backwards or
forwards search respectively.
Play begins when the button is
released.
Fast search
Press the "9" or ":" button to select
the previous or next track respectively.
Selecting a track
Press the RPT button to repeat
the play of the current track. "RPT"
appears in the screen.
To exit this mode, press this button
again.
Repeating a track Playing the beginning of each track
Press the PTY/SCAN button to start
playback of the first ten seconds
of each track on the disc. "SCAN"
appears in the screen and the
corresponding track number flashes.
To exit this mode, press this button
again.
On CD-R/RWs, the quality of the playback sound depends on the
encoding software, the burning device and the burning speed used.
Page 328 of 414

05
326
MUSIC MEDIA PLAYERS
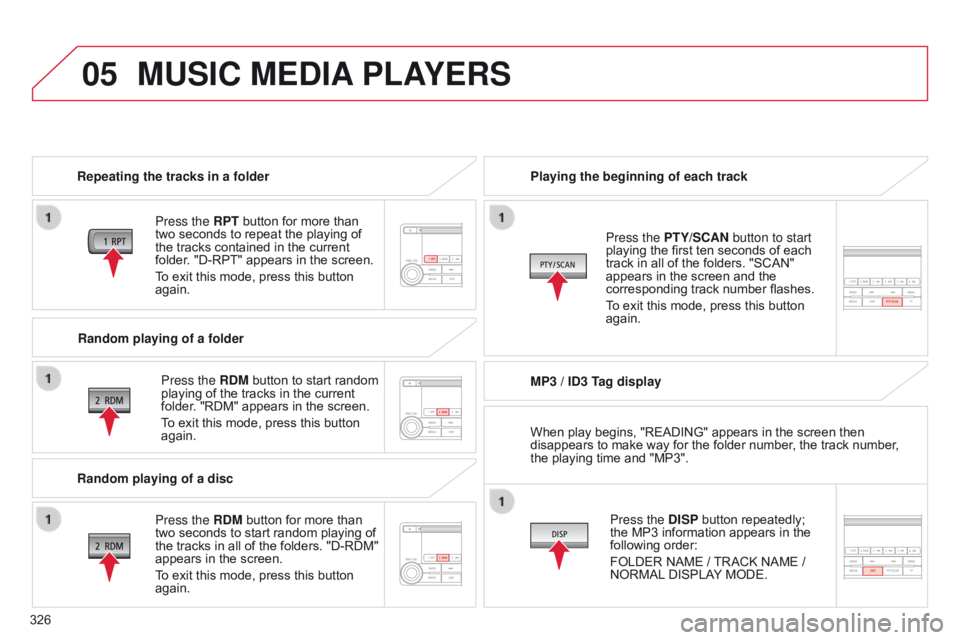
Repeating the tracks in a folder
Press the RPT button for more than
two seconds to repeat the playing of
the tracks contained in the current
folder. "D-RPT" appears in the screen.
To exit this mode, press this button
again.
Press the RDM button to start random
playing of the tracks in the current
folder. "RDM" appears in the screen.
To exit this mode, press this button
again. Playing the beginning of each track
MP3 / ID3 Tag display
Press the DISP button repeatedly;
the MP3 information appears in the
following order:
FOLDER NAME
/ TRACK NAME /
NORMAL DISPLAY MODE.
Press the PTY/SCAN button to start
playing the first ten seconds of each
track in all of the folders. "SCAN"
appears in the screen and the
corresponding track number flashes.
To exit this mode, press this button
again.
Random playing of a folder
Random playing of a disc Press the RDM button for more than
two seconds to start random playing of
the tracks in all of the folders. "D-RDM"
appears in the screen.
To exit this mode, press this button
again. When play begins, "READING" appears in the screen then
disappears to make way for the folder number, the track number,
the playing time and "MP3".