tow Citroen C4 AIRCROSS RHD 2014.5 1.G Owner's Guide
[x] Cancel search | Manufacturer: CITROEN, Model Year: 2014.5, Model line: C4 AIRCROSS RHD, Model: Citroen C4 AIRCROSS RHD 2014.5 1.GPages: 389, PDF Size: 15.51 MB
Page 176 of 389
174
F If the specified pressure has not been reached after about 10 minutes, this means
that the tyre is not repairable; contact a
CITROËN dealer or a qualified workshop
for roadside assistance.
F
R
emove the compressor and stow the kit.Do not operate the compressor for more
than 10 minutes continuously.
If the compressor seems extremely
hot, switch it off and disconnect it
immediately. Leave it to cool for at least
30 minutes.
As soon as possible after a repair using
the kit, go to a CITROËN dealer or a
qualified workshop.
Tell the technician that you have used
the kit. After checking, the technician
will advise you whether the tyre can be
repaired or must be replaced.
If the vehicle is fitted with under-
inflation detection, the under-inflation
warning lamp remains on until the
system has been reinitialised (see the
"Under-inflation detection" section). F
A
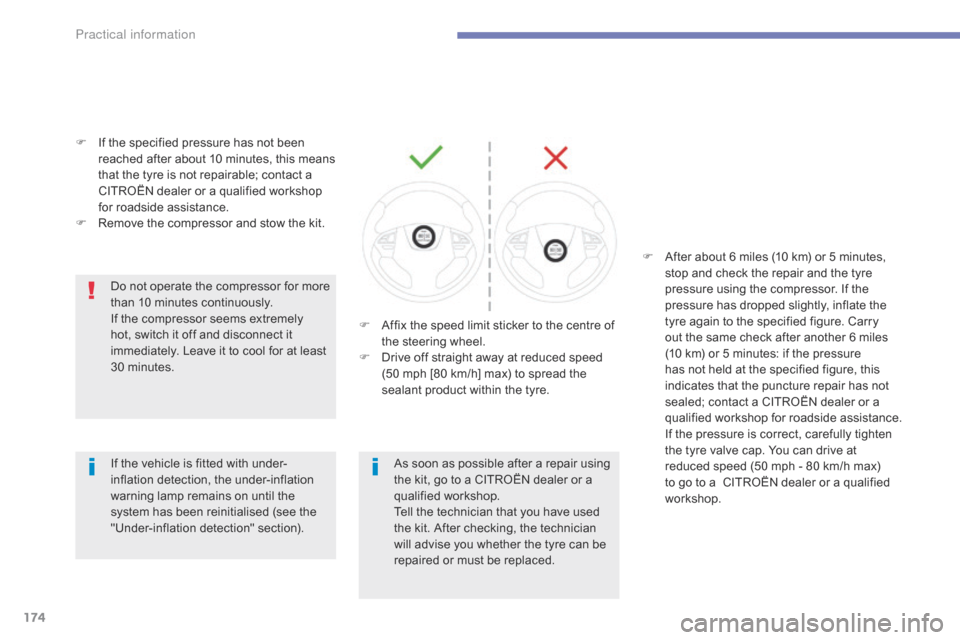
ffix the speed limit sticker to the centre of
the steering wheel.
F
D
rive off straight away at reduced speed
(50 mph [80 km/h] max) to spread the
sealant product within the tyre. F
A
fter about 6 miles (10 km) or 5 minutes,
stop and check the repair and the tyre
pressure using the compressor. If the
pressure has dropped slightly, inflate the
tyre again to the specified figure. Carry
out the same check after another 6 miles
(10 km) or 5 minutes: if the pressure
has not held at the specified figure, this
indicates that the puncture repair has not
sealed; contact a CITROËN dealer or a
qualified workshop for roadside assistance.
I
f the pressure is correct, carefully tighten
the tyre valve cap. You can drive at
reduced speed (50 mph - 80 km/h max)
to go to a
CITROËN dealer or a qualified
workshop.
Practical information
Page 177 of 389
175
Changing a wheel
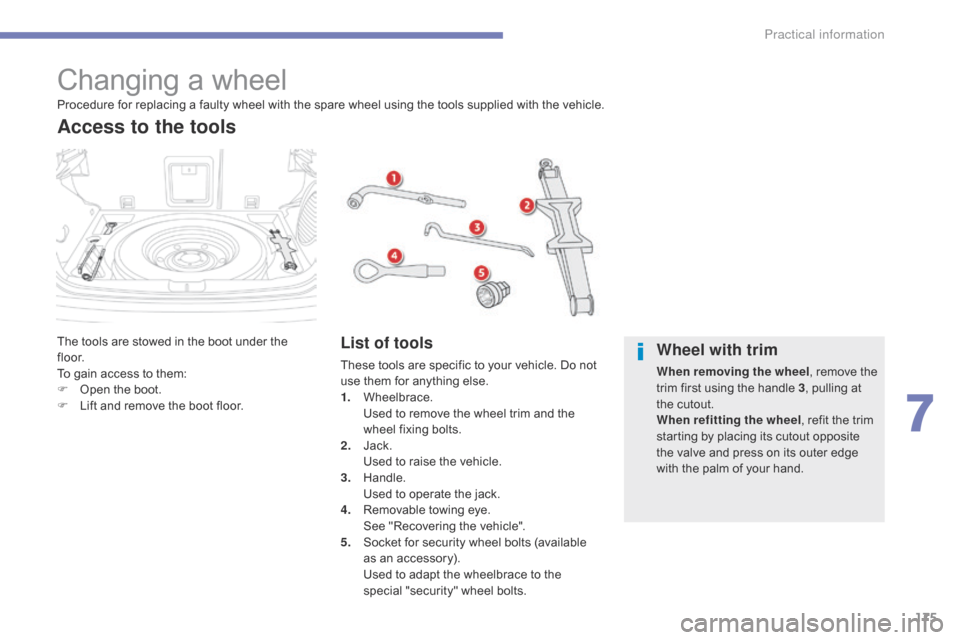
The tools are stowed in the boot under the
f l o o r.
To gain access to them:
F
O
pen the boot.
F
L
ift and remove the boot floor.
Access to the tools
List of tools
These tools are specific to your vehicle. Do not
use them for anything else.
1.
W
heelbrace.
U
sed to remove the wheel trim and the
wheel fixing bolts.
2.
J
ack.
U
sed to raise the vehicle.
3.
H
andle.
U
sed to operate the jack.
4.
R
emovable towing eye.
S
ee "Recovering the vehicle".
5.
S
ocket for security wheel bolts (available
as an accessory).
U
sed to adapt the wheelbrace to the
special "security" wheel bolts.
Procedure for replacing a faulty wheel with the spare wheel using the tools supplied with the vehicle.Wheel with trim
When removing the wheel
, remove the
trim first using the handle 3 , pulling at
the cutout.
When refitting the wheel , refit the trim
starting by placing its cutout opposite
the valve and press on its outer edge
with the palm of your hand.
7
Practical information
Page 178 of 389
176
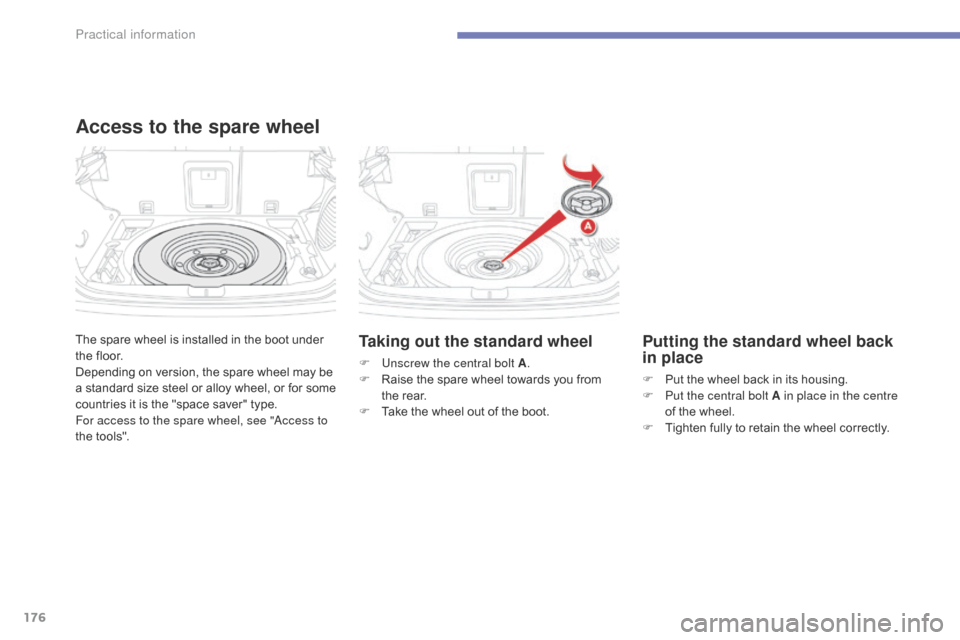
The spare wheel is installed in the boot under
the floor.
Depending on version, the spare wheel may be
a standard size steel or alloy wheel, or for some
countries it is the "space saver" type.
For access to the spare wheel, see "
ac
cess to
the tools".
Access to the spare wheel
Taking out the standard wheel
F Unscrew the central bolt A .
F R aise the spare wheel towards you from
the rear.
F
T
ake the wheel out of the boot.
Putting the standard wheel back
in place
F Put the wheel back in its housing.
F P ut the central bolt A in place in the centre
of the wheel.
F
T
ighten fully to retain the wheel correctly.
Practical information
Page 184 of 389
182
Changing a bulb
For bulbs that have alignment
lugs (H1, H7...) ensure that they are
fitted correctly for the best lighting
performance.
The headlamps have polycarbonate
lenses with a protective coating:
F
d
o not clean them using a dr y
or abrasive cloth, nor with a
detergent or solvent product,
F
u
se a sponge and soapy water,
F
w
hen using a high pressure washer
on persistent marks, do not keep
the lance directed towards the
lamps or their edges for too long,
so as not to damage their protective
coating and seals.
F
D
o not touch the bulb directly with
your fingers, use lint-free cloths.
Changing a bulb should only be done
after the headlamp has been switched
off for several minutes (risk of serious
burns).
It is imperative to use only anti-
ultraviolet (UV) type bulbs in order not
to damage the headlamp.
Always replace a failed bulb with a
new bulb with the same type and
specification.
Risk of electrocution
Replacement of the xenon bulbs
(D1S-35W) must be carried out by
a CITROËN dealer or a qualified
workshop.
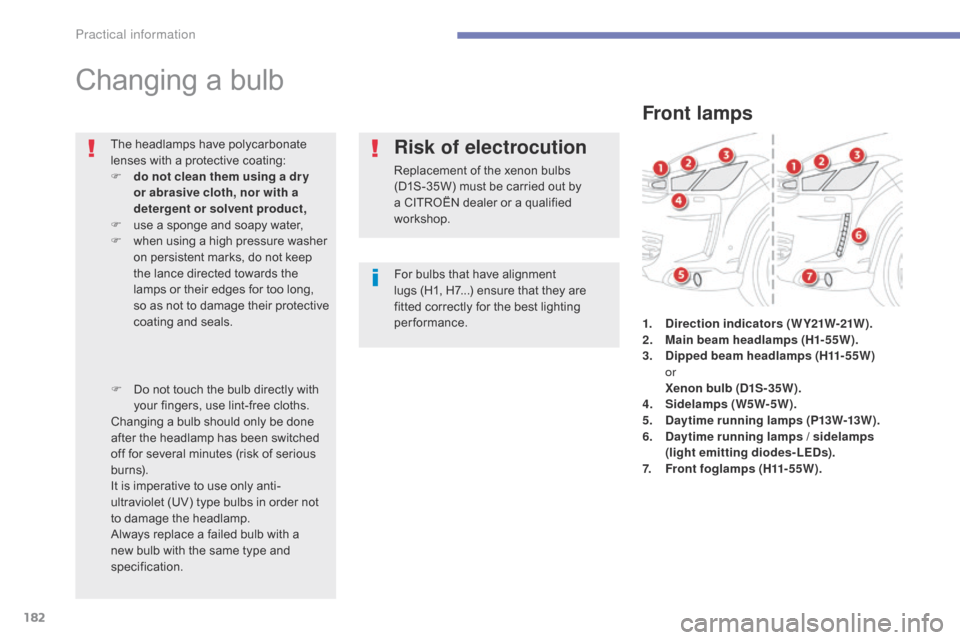
Front lamps
1. Direction indicators ( W Y21W-21W ).
2. M ain beam headlamps (H1-55W).
3.
D
ipped beam headlamps (H11-55W)
or
X
enon bulb (D1S-35W).
4.
S
idelamps (W5W-5W).
5.
D
aytime running lamps (P13W-13W).
6.
D
aytime running lamps / sidelamps
(light emitting diodes-LEDs).
7.
F
ront foglamps (H11-55W).
Practical information
Page 187 of 389
185
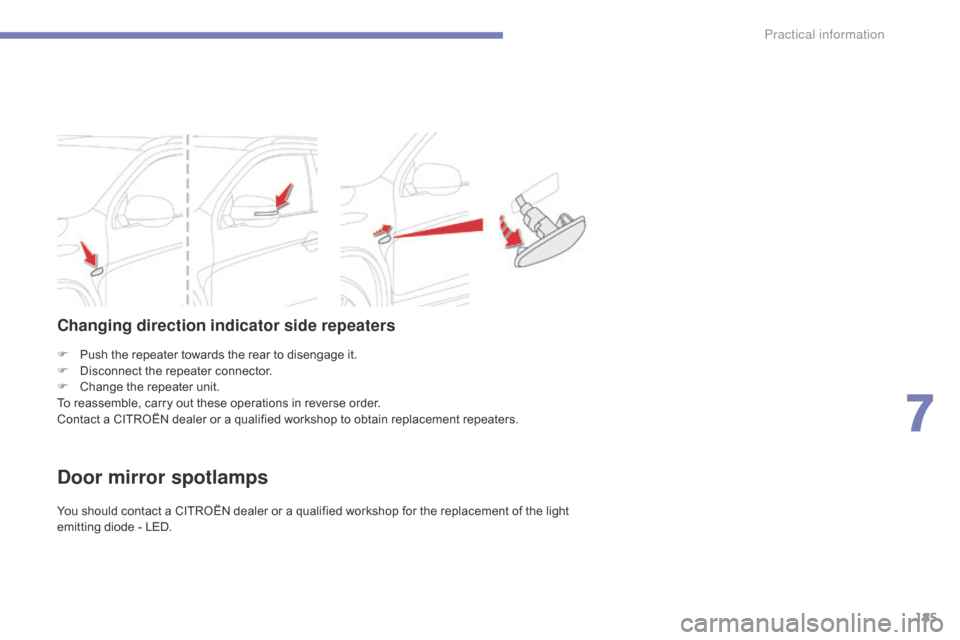
F Push the repeater towards the rear to disengage it.
F D isconnect the repeater connector.
F
C
hange the repeater unit.
To reassemble, carry out these operations in reverse order.
Contact a CITROËN dealer or a qualified workshop to obtain replacement repeaters.
Changing direction indicator side repeaters
Door mirror spotlamps
You should contact a CITROËN dealer or a qualified workshop for the replacement of the light
e mitting diode - LED.
7
Practical information
Page 188 of 389
186
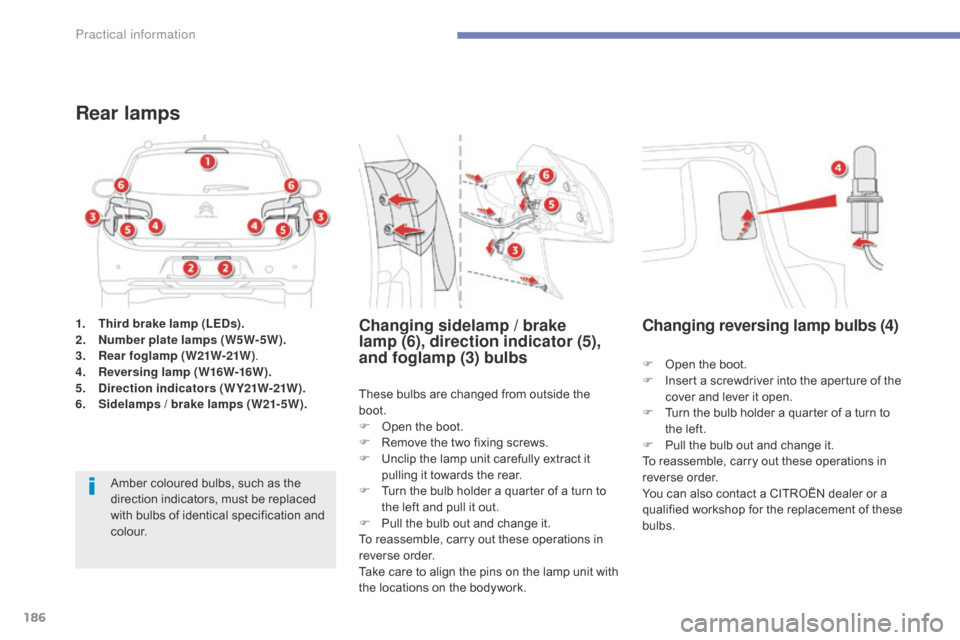
1. Third brake lamp (LEDs).
2. Number plate lamps (W5W-5W).
3.
R
ear foglamp ( W21W-21W ) .
4.
R
eversing lamp ( W16W-16W ).
5.
D
irection indicators (WY21W-21W).
6.
S
idelamps / brake lamps (W21-5W).
Rear lamps
Amber coloured bulbs, such as the
direction indicators, must be replaced
with bulbs of identical specification and
c o l o u r. These bulbs are changed from outside the
boot.
F
O
pen the boot.
F
R
emove the two fixing screws.
F
U
nclip the lamp unit carefully extract it
pulling it towards the rear.
F T urn the bulb holder a quarter of a turn to
the left and pull it out.
F
P
ull the bulb out and change it.
To reassemble, carry out these operations in
reverse order.
Take care to align the pins on the lamp unit with
the locations on the bodywork.
Changing sidelamp / brake
l amp (6), direction indicator (5),
and foglamp (3) bulbs
F Open the boot.
F
I nsert a screwdriver into the aperture of the
cover and lever it open.
F
T
urn the bulb holder a quarter of a turn to
the left.
F
P
ull the bulb out and change it.
To reassemble, carry out these operations in
reverse order.
You can also contact a CITROËN dealer or a
qualified workshop for the replacement of these
bulbs.
Changing reversing lamp bulbs (4)
Practical information
Page 191 of 389
189
Dashboard fuses
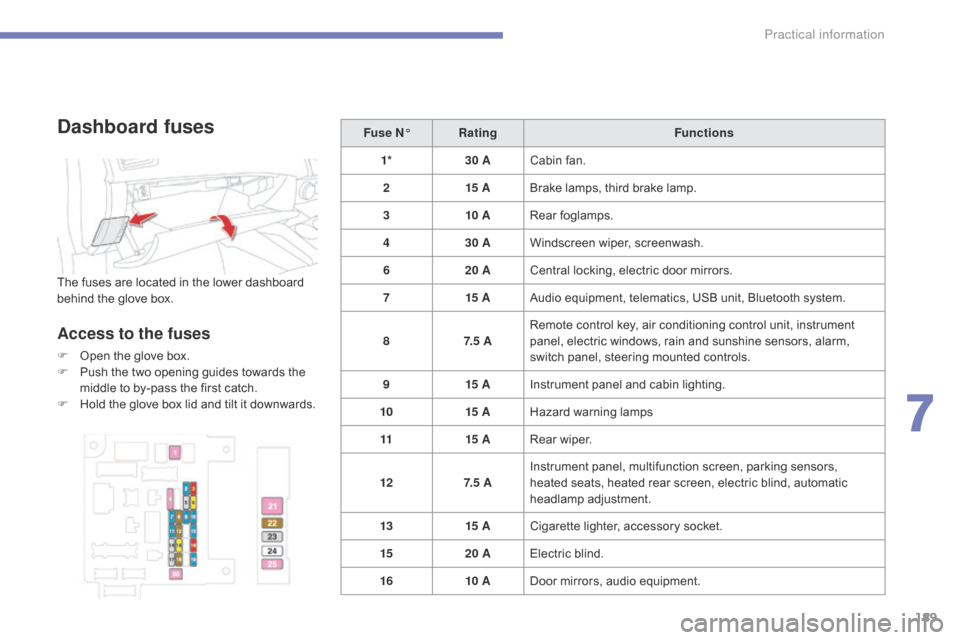
The fuses are located in the lower dashboard
behind the glove box.
Access to the fuses
F Open the glove box.
F P ush the two opening guides towards the
middle to by-pass the first catch.
F
H
old the glove box lid and tilt it downwards. Fuse N°
Rating Functions
1* 30 ACabin fan.
2 15 ABrake lamps, third brake lamp.
3 10 ARear foglamps.
4 30 AWindscreen wiper, screenwash.
6 20 ACentral locking, electric door mirrors.
7 15 AAudio equipment, telematics, USB unit, Bluetooth system.
8 7. 5 ARemote control key, air conditioning control unit, instrument
panel, electric windows, rain and sunshine sensors, alarm,
switch panel, steering mounted controls.
9 15 AInstrument panel and cabin lighting.
10 15 AHazard warning lamps
11 15 ARear wiper.
12 7. 5 AInstrument panel, multifunction screen, parking sensors,
heated seats, heated rear screen, electric blind, automatic
headlamp adjustment.
13 15 ACigarette lighter, accessory socket.
15 20 AElectric blind.
16 10 ADoor mirrors, audio equipment.
7
Practical information
Page 199 of 389
197
Removing a front or rear
wiper blade
F Raise the corresponding wiper arm.
F R emove the wiper blade, sliding it towards
the outside.
Changing a wiper
blade
Fitting a front or rear wiper
blade
F At the front, check the size of the wiper blade as the shorter blade is fitted on the
right-hand side of the vehicle.
F
P
ut the corresponding new wiper blade in
place and fix it.
F
F
old down the wiper arm carefully.
Automatic power cut-off to accessories
After the engine has stopped, when the
ignition switch is in the "ACC" position
(or the vehicle in "ACC" mode) you
can still use functions such as the audio
equipment, windscreen wipers, dipped beam
headlamps,
courtesy lamps, etc. for about
thirty
m
inutes.Cutting off
Once the thirty minutes have expired, the
power supply to the accessories will be
automatically cut off.
Restoring power
The power supply will be restored the next time
the ignition is switched on.
7
Practical information
Page 200 of 389
198
Recovering the vehicle
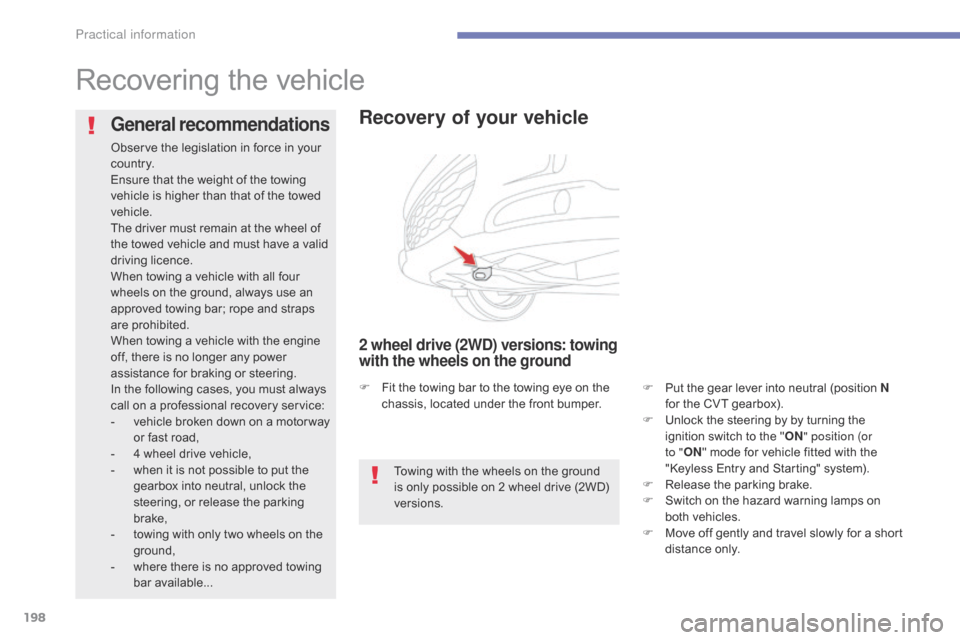
Recovery of your vehicle
2 wheel drive (2WD) versions: towing
with the wheels on the ground
F Put the gear lever into neutral (position N
for the CVT gearbox).
F
U
nlock the steering by by turning the
ignition switch to the " ON" position (or
to " ON " mode for vehicle fitted with the
"Keyless Entry and Starting" system).
F
R
elease the parking brake.
F
S
witch on the hazard warning lamps on
both vehicles.
F
M
ove off gently and travel slowly for a short
distance only.
General recommendations
Observe the legislation in force in your
c o unt r y.
Ensure that the weight of the towing
vehicle is higher than that of the towed
vehicle.
The driver must remain at the wheel of
the towed vehicle and must have a valid
driving licence.
When towing a vehicle with all four
wheels on the ground, always use an
approved towing bar; rope and straps
are prohibited.
When towing a vehicle with the engine
off, there is no longer any power
assistance for braking or steering.
In the following cases, you must always
call on a professional recovery service:
-
v
ehicle broken down on a motor way
or fast road,
-
4 w
heel drive vehicle,
-
w
hen it is not possible to put the
gearbox into neutral, unlock the
steering, or release the parking
brake,
-
t
owing with only two wheels on the
ground,
-
w
here there is no approved towing
bar available... Towing with the wheels on the ground
is only possible on 2 wheel drive (2WD)
versions.
F
F
it the towing bar to the towing eye on the
chassis, located under the front bumper.
Practical information
Page 201 of 389
199
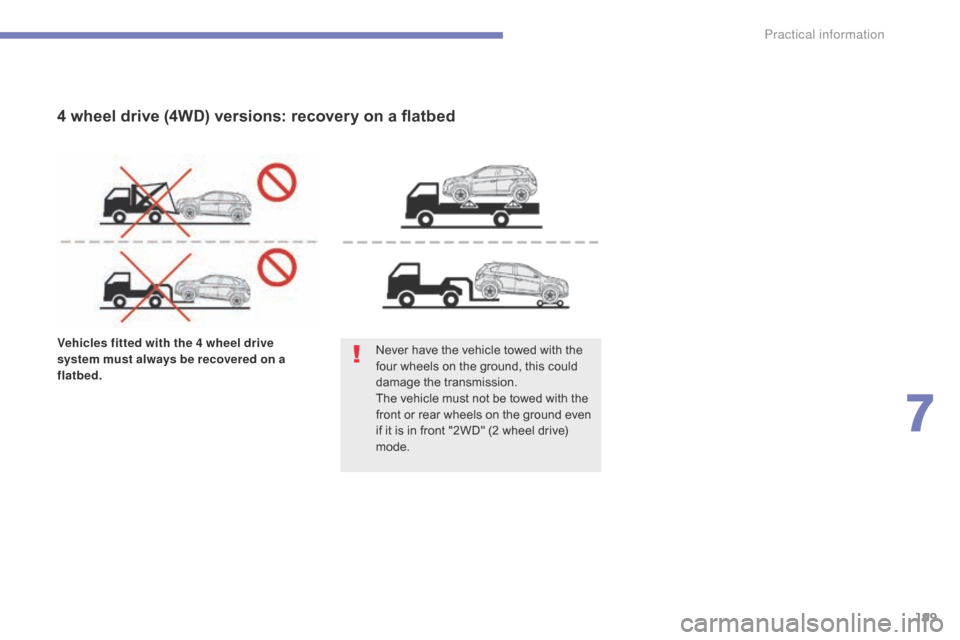
Vehicles fitted with the 4 wheel drive
system must always be recovered on a
flatbed.Never have the vehicle towed with the
four wheels on the ground, this could
damage the transmission.
The vehicle must not be towed with the
front or rear wheels on the ground even
if it is in front "2WD" (2 wheel drive)
mode.
4 wheel drive (4WD) versions: recovery on a flatbed
7
Practical information