window Citroen C4 CACTUS 2016 1.G Owner's Manual
[x] Cancel search | Manufacturer: CITROEN, Model Year: 2016, Model line: C4 CACTUS, Model: Citroen C4 CACTUS 2016 1.GPages: 308, PDF Size: 7.96 MB
Page 4 of 308
.
.
Instrument panel 11
Indicator and warning lamps
1
2
Indicators
2
4
7-inch
touch screen tablet
2
8
Trip
computer
3
5
Distance
recorders
3
7
Setting
the date and time
3
8
Brightness
of instruments and controls
3
9
InstrumentsOver view
Remote control key 4
0
Central locking
4
5
Doors
4
6
Boot
4
8
Front
electric window controls
4
9
Rear
door windows
4
9
Access
Front seats 50
Rear seats
5
2
Mirrors
5
4
Steering
wheel adjustment
5
5
Ventilation
5
6
Heating
5
8
Manual
a
ir
c
onditioning
6
0
Automatic
air conditioning
6
2
Front
demist - defrost
6
6
Rear
screen demist - defrost
6
7
Courtesy
lamp
6
8
Boot
lamp
6
9
Panoramic
sunroof
6
9
Interior
fittings
7
0
Boot
fittings
7
6
Rear
parcel shelf (enterprise version)
7
8
Ease of use a nd c omfort
Lighting control 7 9
Direction indicators
8
2
Automatic
illumination of headlamps
8
3
Daytime
running lamps / Sidelamps (LEDs)
8
4
Headlamp
beam height adjustment
8
5
Cornering
lighting
8
6
Wiper
control stalk
87
A
utomatic rain sensitive wipers
8
9
Lighting and v isibility
Hazard warning lamps 9 1
Horn
91
E
mergency or assistance call
9
1
Electronic
stability control (ESC)
9
2
Grip
control
9
5
Seat
belts
9
7
Airbags
1
00
Child
seats
1
05
Deactivating
the passenger's front airbag
1
08
ISOFIX
child seats
1
14
i-Size
child seats
1
17
Child
lock
1
19
Safety
Eco-driving
Contents
Page 7 of 308
5
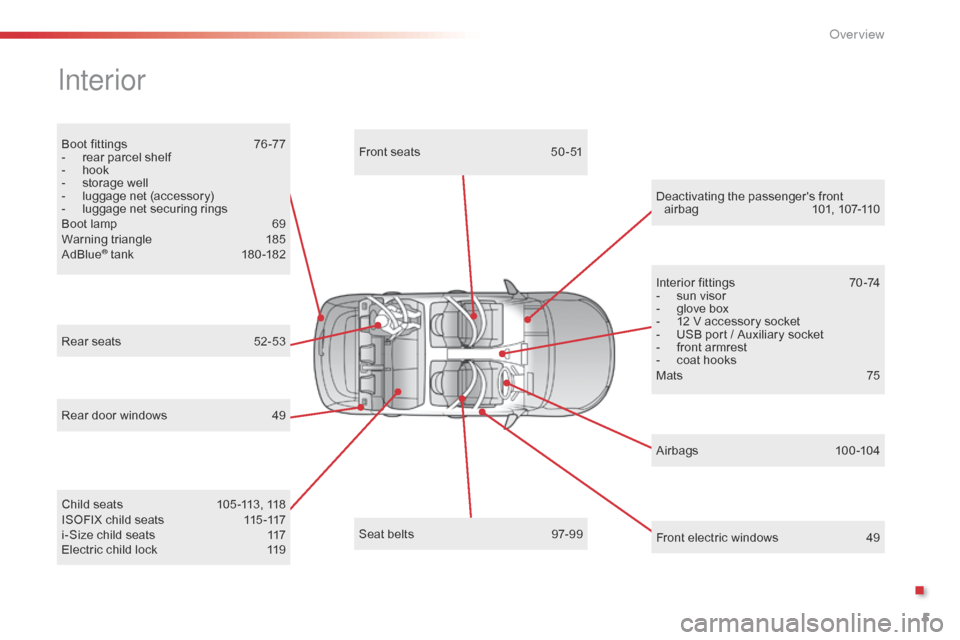
Boot fittings 76 -77
- r ear parcel shelf
-
h
ook
-
s
torage well
-
l
uggage net (accessory)
-
l
uggage net securing rings
Boot
lamp
6
9
Warning
triangle
1
85
AdBlue
® tank 18 0 -182
Interior
Rear door windows 4 9
Electric child lock
1
19
Rear
seats
5
2-53
Airbags
10
0 -104
Front
electric windows
4
9
Deactivating
t
he
p
assenger's
f
ront
a
irbag
10
1,
10
7-110
Seat belts
9
7-99
Child
seats
1
05 -113, 118
ISOFIX
child seats
1
15 -117
i-Size
child seats
1
17Front
seats
5
0 -51
Interior fittings
7
0 -74
-
s
un visor
-
g
love box
-
1
2 V accessory socket
-
U
SB port / Auxiliary socket
-
f
ront armrest
-
c
oat hooks
Mats
75
.
Over view
Page 8 of 308
6
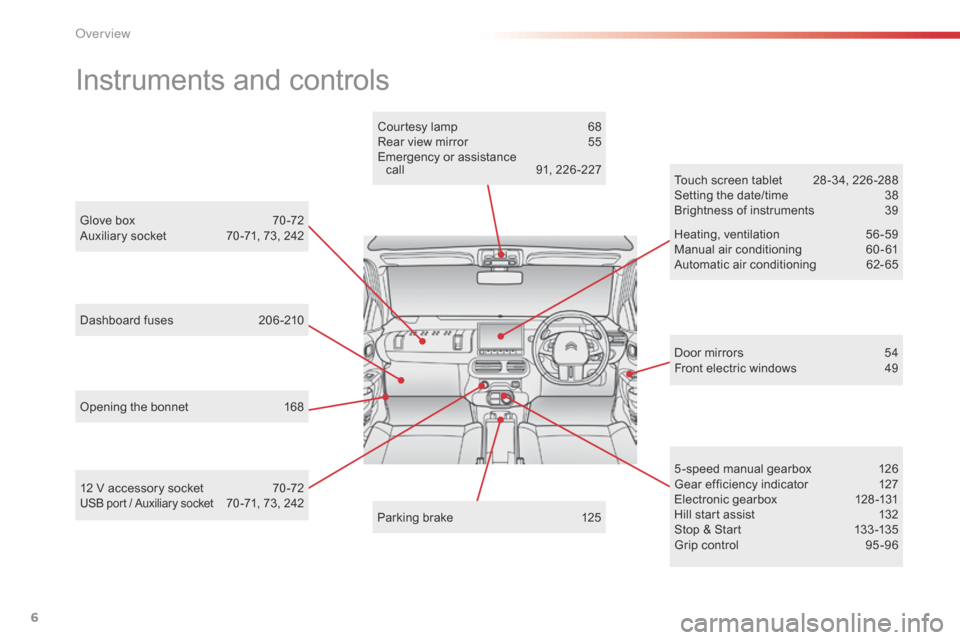
Instruments and controls
Door mirrors 54
Front electric windows 4 9
Opening
the
bonnet
1
68 Touch
screen tablet
2
8 -34, 226 -288
Setting the date/time
3
8
Brightness of instruments
3
9
Heating,
v
entilation
5
6-59
Manual
a
ir
c
onditioning
6
0-61
Automatic air conditioning
6
2- 65
5 -speed manual gearbox
1
26
Gear
efficiency indicator
1
27
Electronic
gearbox
1
28 -131
Hill
start assist
1
32
Stop
& Start
1
33 -135
Grip
control
9
5 -96
Glove
box
7
0 -72
Auxiliary
socket
7
0 -71,
73,
242
Courtesy
lamp
6
8
Rear
view
mirror
5
5
Emergency
or
assistance
c
all
9
1,
226 -227
Parking
brake
1
25
12
V
accessory
socket
7
0 -72
USB port / Auxiliary socket 70 -71, 73, 242
Dashboard
fuses
2
06 -210
O
Page 11 of 308
9
Optimise the use of your gearbox
With a manual gearbox, move off gently and change up without waiting. During acceleration change up early.
The
gear efficiency indicator invites you engage the most suitable gear:
a
s soon as the indication is displayed in the instrument panel, follow it
s
traight away.
Control the use of your electrical
equipment
Before moving off, if the passenger compartment is too warm, ventilate it by opening the windows and air vents before using the air conditioning.
Above
30 mph (50 km/h), close the windows and leave the air vents
ope
n.
Remember
to make use of equipment that can help keep the
t
emperature in the passenger compartment down (sunroof and window
b
linds...).
To
save energy, do not set the air conditioning at too low a temperature.
As
soon as the desired temperature has been reached, limit the use of
t
he air conditioning, except if regulation is automatic.
Switch
off the demisting and defrosting controls as soon as you consider
p
ossible.
Switch
off the heated seat as soon as possible.
Switch
off the headlamps and foglamp when the level of light does not
r
equire their use.
Avoid
running the engine before moving off, particularly in winter; your
v
ehicle will warm up much faster while driving.
As
a passenger, if you avoid connecting your multimedia devices
(
film, music, video game...), you will contribute towards limiting the
c
onsumption of electrical energy, and so of fuel.
Disconnect
your portable devices before leaving the vehicle.
Eco-driving
Eco-driving is a range of everyday practices that allow the motorist to optimise their fuel consumption and CO2 emissions.
With
an
electronic
gearbox,
do
not
press
the
accelerator
pedal
heavily
o
r
s
uddenly.
Drive smoothly
Maintain a safe distance between vehicles, use engine braking rather t han the brake pedal, and press the accelerator progressively. These
p
ractices contribute towards a reduction in fuel consumption and
CO2 emissions and also help reduce the background traffic noise.
I
f
your vehicle has cruise control, make use of the system at speeds
a
bove 25 mph (40 km/h) when the traffic is flowing well.
.
Eco-driving
Page 51 of 308
49
Front electric window controls
The electric window switches remain operational for approximately
4
5 seconds after the ignition is
s
witched off or until a front door
i
s opened. If, during this period of
4
5 seconds, you open a door while
o
perating a window, the window stops.
T
he window switch will then only be
o
perative after the ignition is switched
o
n again.
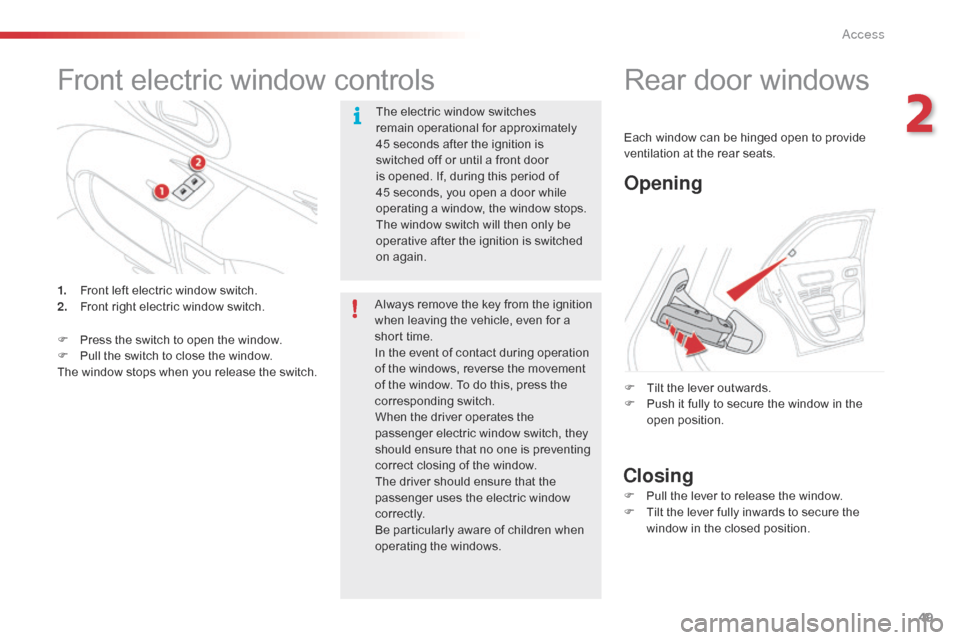
1.
F
ront
left
electric
window
switch.
2.
F
ront
right
electric
window
switch.
F
P
ress
the
switch
to
open
the
window.
F
P
ull
the
switch
to
close
the
window.
The
window
stops
when
you
release
the
switch. Always
remove the key from the ignition
w
hen leaving the vehicle, even for a
s
hort time.
In
the event of contact during operation
o
f the windows, reverse the movement
o
f the window. To do this, press the
c
orresponding
s
witch.
When
the driver operates the
p
assenger electric window switch, they
s
hould ensure that no one is preventing
c
orrect closing of the window.
The
driver should ensure that the
p
assenger uses the electric window
c
o r r e c t l y.
Be
particularly aware of children when
o
perating
t
he
w
indows.
Rear door windows
Opening
Closing
F Tilt the lever outwards.
F P ush it fully to secure the window in the
ope
n
p
osition.
F
P
ull the lever to release the window.
F
T
ilt the lever fully inwards to secure the
w
indow in the closed position.
Each
window can be hinged open to provide
v
entilation at the rear seats.
2
Access
Page 58 of 308
56
Ventilation
Air intake
The air circulating in the passenger compartment is filtered and originates either
f
rom the outside via the grille located at the
b
ase of the windscreen or from the inside in air
re
circulation
m
ode.
Air treatment
The incoming air follows various routes depending on the controls selected by the
d
river:
-
d
irect arrival in the passenger
c
ompartment (air intake),
-
p
assage through a heating circuit (heating),
-
p
assage through a cooling circuit (air
c
onditioning).
Control panel
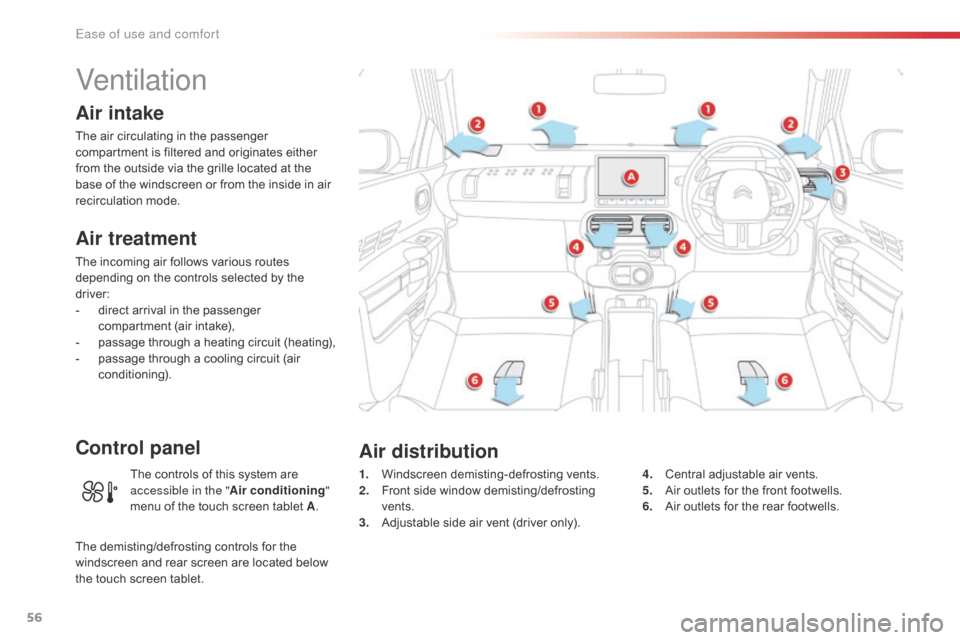
1. Windscreen d emisting-defrosting v ents.
2. F ront side window demisting/defrosting
ve
nts.
3.
A
djustable side air vent (driver only).4. C
entral adjustable air vents.
5. A ir outlets for the front footwells.
6.
A
ir outlets for the rear footwells.
Air distribution
The controls of this system are accessible in the " Air conditioning "
menu
of the touch screen tablet A.
The
demisting/defrosting controls for the
w
indscreen and rear screen are located below
t
he
touch
screen tablet.
Ease of use and comfort
Page 63 of 308
61
Fresh air intake / Air
recirculation
The intake of fresh air avoids and eliminates misting of the windscreen and side windows.
Recirculation of the interior air isolates the
passenger
compartment from exterior odours
a
nd fumes.
F
P
ress this button to recirculate
the
interior air. The
air conditioning is designed to operate e
ffectively in all seasons, with the windows closed.
It
enables you to:
Air conditioning On / Off
Switching on
Switching off
The air conditioning does not operate when the air flow adjustment is set
t
o off. F
P
ress this button to switch on the
air
c
onditioning.
Avoid
the
prolonged
use
of
interior
a
ir
recirculation
(risk
of
misting
and
d
eterioration
of
air
quality).
This
function
can
also
be
used
t
emporarily
to
speed
up
the
heating
or
c
ooling
of
the
passenger
compartment. -
l
ower the temperature, in summer,
-
i
ncrease the effectiveness of the demisting
i
n winter, above 3°C.
F
P
ress this button again to switch
o
ff the air conditioning.
Air distribution adjustment
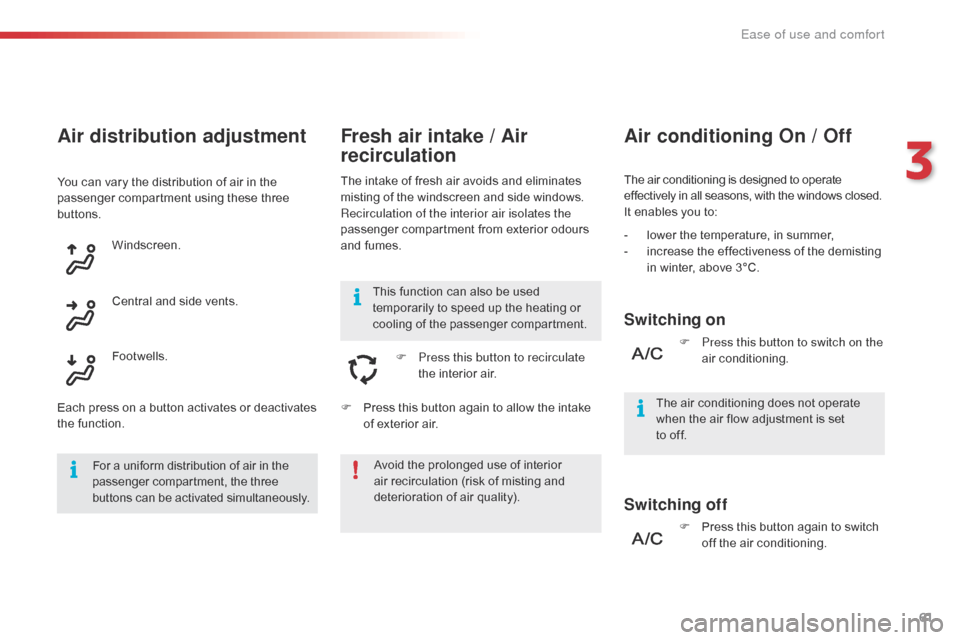
You can vary the distribution of air in the passenger compartment using these three
b
uttons. Windscreen.
Each
press on a button activates or deactivates
t
he function. Footwells. Central
and side vents.F
P
ress this button again to allow the intake
o
f exterior air.
For
a uniform distribution of air in the
p
assenger compartment, the three
b
uttons can be activated simultaneously.
3
Ease of use and comfort
Page 67 of 308
65
Avoid the prolonged use of interior air recirculation (risk of misting and
d
eterioration of air quality).
It
allows
you:
-
i
n
summer,
to
lower
the
temperature,
-
i
n
winter,
above
3
°C,
to
improve
demisting.
F
P
ress
this
button
again
to
switch
o
ff
the
air
conditioning.
F
P
ress this button to switch on the
air
c
onditioning.
Air conditioning On/Off
The air conditioning is designed to operate e
fficiently in all seasons, with the windows closed.The
intake of exterior air avoids and eliminates m
isting of the windscreen and side windows.
Air intake/Air recirculation
The recirculation of interior air prevents exterior odours and smoke from entering the passenger
c
ompartment.
F
P
ress this button to recirculate
the
interior air.
F
P
ress this button again to allow
t
he intake of exterior air.
The
air
conditioning
cannot
operate
w
hen
the
air
flow
is
set
to
off. This
function also allows faster heating
o
r cooling of the air in the passenger
c
ompartment.
Ventilation with "ignition on"
function
With the ignition on, you can use the ventilation system and access the "Air conditioning "
menu
to adjust the air flow
and air
distribution
in the passenger compartment.
This
function is available for a few minutes,
d
epending on the state of charge of the battery
o
f your vehicle.
This
function does not activate the air
c
onditioning.
You
can make use of the residual heat in the
e
ngine to warm the passenger compartment
u
sing the temperature setting buttons.
Switching on
Switching off
3
Ease of use and comfort
Page 105 of 308
103
In the event of a minor impact or bump on the side of the vehicle or if the
v
ehicle rolls over, the airbags may not
b
e deployed.
In the event of a rear or front collision,
none
of the lateral airbags is deployed.
System
contributing
towards
greater
protection
f
or
the
the
driver
and
passengers
(with
the
e
xception
of
the
rear
centre
passenger)
in
the
e
vent
of
a
serious
side
impact
in
order
to
limit
t
he
risk
of
injury
to
the
side
of
the
head.
Each
curtain
airbag
is
built
into
the
pillars
and
t
he
upper
passenger
compartment
area.
Curtain airbags
Deployment
The curtain airbag is deployed at the same t
ime as the corresponding lateral airbag in the
e
vent of a serious side impact applied to all or
p
art of the side impact zone B, perpendicular
t
o the longitudinal centreline of the vehicle on a
h
orizontal plane and directed from the outside
t
owards the inside of the vehicle.
The
curtain airbag inflates between the front or
r
ear occupant of the vehicle and the windows.If
this warning lamp comes on in the
i
nstrument panel, you must contact
a
CITROËN dealer or a qualified
w
orkshop to have the system checked.
Operating fault
The airbags may no longer be deployed in the e
vent of a serious impact.
5
Safety
Page 120 of 308
118
Child seats
Recommendations
Installing a booster
cushion
The chest part of the seat belt must be positioned on the child's shoulder without
t
ouching the neck.
Ensure that the lap part of the seat belt
passes
correctly over the child's thighs.
CITROËN
recommends the use of a booster
s
eat which has a back, fitted with a seat belt
g
uide at shoulder level.
As
a safety precaution, do not leave:
-
o
ne or more children alone and
u
nsupervised in a vehicle,
-
a
child or an animal in a vehicle which
i
s exposed to the sun, with the windows
c
losed,
-
t
he keys within reach of children inside
t
he vehicle.
To
prevent accidental opening of the doors,
u
se the child lock.
Take
care not to open the rear windows by
m
ore than one third.
To
protect young children from the rays of
t
he sun, fit side blinds on the rear windows.
Children at the front
For optimum installation o f t he fo rward f acing c
hild seat, ensure that the back of the child
s
eat is as close as possible to the backrest
o
f the vehicle's seat, or in contact if possible.
The
head restraint must be removed before
i
nstalling a child seat with a backrest on the
p
assenger
sea
t.
Ensure
that the head restraint is stowed or
a
ttached securely so that it is not thrown
a
round the vehicle in the event of sharp
b
raking.
Refit
the head restraint as soon as the child
s
eat is removed.
The
legislation on carrying a child on the
f
ront passenger seat is specific to each
c
ountry. Refer to the legislation in force in
t
he country in which you are driving.
Deactivate
the passenger's front airbag
w
hen a rear ward facing child seat is installed
o
n the front passenger seat. Other wise, the
c
hild would risk being seriously injured or
k
illed if the airbag were deployed.
The
incorrect
installation
of
a
child
seat
in
a
v
ehicle
compromises
the
child's
protection
in
t
he
event
of
an
accident.
Check
that
there
is
no
seat
belt
or
seat
belt
b
uckle
under
the
child
seat
as
this
could
de
stabilise
i
t.
Remember
to
fasten
the
seat
belts
or
the
c
hild
seat
harnesses
keeping the slack in
relation
to
the
child's
body
to a minimum ,
even
for
short
journeys.
For
the
installation
of
a
child
seat
using
a
s
eat
belt,
ensure
that
this
is
well
tensioned
o
n
the
child
seat
and
that
it
is
holding
the
c
hild
seat
firmly
against
the
seat
of
your
v
ehicle.
If
your
front
passenger
seat
is
a
djustable,
move
it
for ward
if
necessary.
At the rear seats, always leave sufficient
space
between
the
front
seat
and:
-
a
rear ward
facing
child
seat,
-
t
he
feet
of
a
child
seated
in
a
for ward
f
acing
child
seat.
For
this,
move
the
front
seat
for ward
and
if
n
ecessary
straighten
its
backrest.
Safety