ECO mode CITROEN C4 CACTUS 2022 Owners Manual
[x] Cancel search | Manufacturer: CITROEN, Model Year: 2022, Model line: C4 CACTUS, Model: CITROEN C4 CACTUS 2022Pages: 256, PDF Size: 7.62 MB
Page 5 of 256

3
.
.
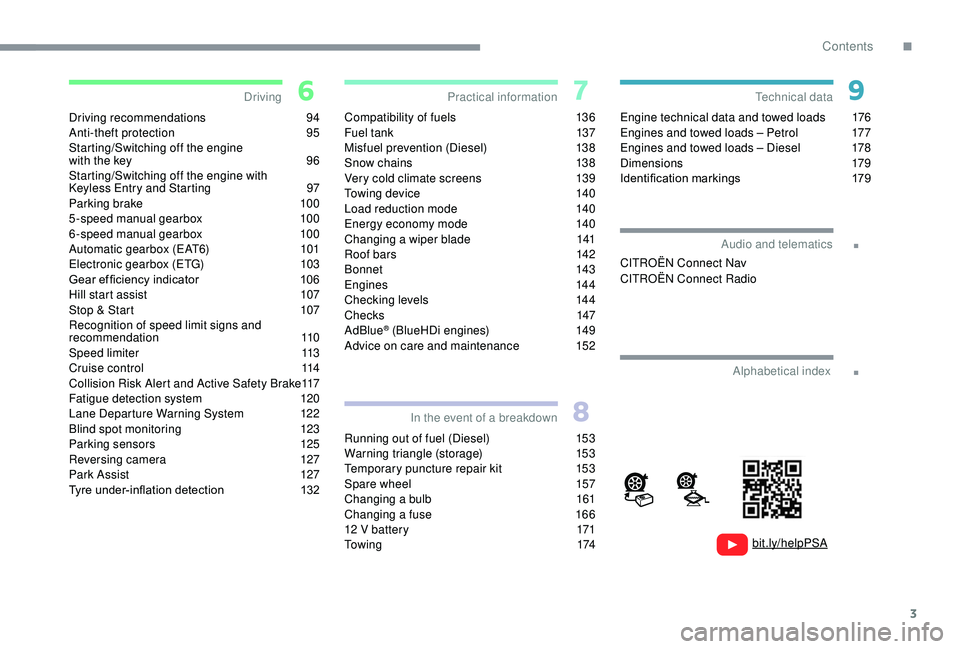
Driving recommendations 94
Anti-theft protection 9 5
Starting/Switching off the engine
with the key
9
6
Starting/Switching off the engine with
K
eyless Entry and Starting
9
7
Parking brake
1
00
5-speed manual gearbox
1
00
6-speed manual gearbox
1
00
Automatic gearbox (EAT6)
1
01
Electronic gearbox (ETG)
1
03
Gear ef ficiency indicator
1
06
Hill start assist
1
07
Stop & Start
1
07
Recognition of speed limit signs and
recommendation
110
Speed limiter
1
13
Cruise control
1
14
Collision Risk Alert and Active Safety Brake
1
17
Fatigue detection system
1
20
Lane Departure Warning System
1
22
Blind spot monitoring
1
23
Parking sensors
1
25
Reversing camera
1
27
Park Assist
1
27
Tyre under-inflation detection
1
32Compatibility of fuels 1
36
Fuel tank 1 37
Misfuel prevention (Diesel)
1
38
Snow chains
1
38
Very cold climate screens
1
39
Towing device
1
40
Load reduction mode
1
40
Energy economy mode
1
40
Changing a wiper blade
1
41
Roof bars
1
42
Bonnet
143
Engines
1
44
Checking levels
1
44
Checks
147
AdBlue
® (BlueHDi engines) 1 49
Advice on care and maintenance 1 52
Running out of fuel (Diesel)
1
53
Warning triangle (storage)
1
53
Temporary puncture repair kit
1
53
Spare wheel
1
57
Changing a bulb
1
61
Changing a fuse
1
66
12 V battery
1
71
To w i n g
174Engine technical data and towed loads
1
76
Engines and towed loads – Petrol
1
77
Engines and towed loads – Diesel
1
78
Dimensions
179
Identification markings
1
79
Driving
Practical information
In the event of a breakdown Technical data
Alphabetical index
bit.ly/helpPSA
Audio and telematics
CITROËN Connect Nav
CITROËN Connect Radio
.
Contents
Page 8 of 256

6
Eco- driving
Optimise the use of your
gearbox
With a manual gearbox, move off gently
and change up without waiting. During
acceleration, change up early.
With an automatic or electronic gearbox,
give preference to automatic mode and avoid
pressing the accelerator pedal heavily or
suddenly.
Adopt a smooth driving style
Maintain a safe distance between vehicles,
use engine braking rather than the
brake pedal, and press the accelerator
progressively. These practices contribute
towards a reduction in fuel consumption and
CO
2 emissions and also help to reduce the
background traffic noise.
If your vehicle has cruise control, make use of
the system at speeds above 25 mph (40 km/h)
when the traffic is flowing well.
Control the use of your electrical
equipment
Before moving off, if the passenger
compartment is too warm, ventilate it by
opening the windows and air vents before
using the air conditioning.
Above 31 mph (50 km/h), close the windows
and leave the air vents open.
Remember to make use of equipment that can
help keep the temperature in the passenger
compartment down (sunroof and window
blinds, etc.).
Switch off the air conditioning, unless it has
automatic regulation, as soon as the desired
temperature is attained. Switch off the lamps and foglamps when the
ambient light level does not require their use.
Avoid running the engine before moving off,
particularly in winter; your vehicle will warm up
much faster while driving. Switch off the demisting and defrosting
controls when not required, if they are not
automatically controlled.
Switch off the heated seat as soon as
possible.
As a passenger, if you avoid connecting your
multimedia devices (film, music, video game,
etc.), you will contribute towards limiting the
consumption of electrical energy, and so of
fuel.
Disconnect your portable devices before
leaving the vehicle.
The gear efficiency indicator invites you to
engage the most suitable gear: as soon as the
indication is displayed in the instrument panel,
follow it straight away.
For vehicles fitted with an electronic or
automatic gearbox, this indicator appears only
in manual mode. Eco-driving is a range of everyday practices
that allow the motorist to optimise their fuel
consumption and CO
2 emissions.
Eco-driving
Page 30 of 256

28
- The trip "1" tab with:
• t he average speed,
•
t
he average fuel consumption,
•
t
he distance travelled, for the first trip.
-
T
he trip " 2" tab with:
•
t
he average speed,
•
t
he average fuel consumption,
•
t
he distance travelled, for the second trip.
Resetting the trip recorder
F When the desired trip is displayed, press the "Reset" button or the end of the wiper
control stalk until zeros appear.
Tr i p s " 1" and " 2" are independent.
For example, trip " 1" can be used for daily
figures, and trip " 2" for monthly figures.
A few definitions…
Range
(miles or km)
The distance which can still be
travelled with the fuel remaining in
the tank (related to the average fuel
consumption over the last few miles
(kilometres) travelled). This value may fluctuate if a change
of driving style or terrain results in a
significant change in the current fuel
consumption.
Dashes are displayed when the range falls
below 19 miles (30 km).
After filling with at least 5 litres of fuel, the
range is recalculated and is displayed if it
exceeds 60 miles (100 km).
If dashes instead of figures continue to
be displayed when driving, contact a
CITROËN dealer or a qualified workshop.
Current fuel consumption
(mpg or l/100 km or km/l) Calculated during the last few
seconds.
This function is only displayed at speeds
above 19 mph (30 km/h).
Average fuel consumption
(mpg or l/100 km or km/l) Calculated since the last trip
computer reset.
Average speed
(mph or km/h)
Calculated since the last trip
computer reset.
Distance travelled
(miles or km)Calculated since the last trip
computer reset.
Stop & Star t time counter
(minutes/seconds or hours/minutes)
A cumulative time counter for periods in STOP
mode during a journey.
It resets to zero every time the ignition is
switched on.
Distance recorders
The total and trip distances are displayed for
thirty seconds when the ignition is switched off,
when the driver's door is opened and when the
vehicle is locked or unlocked.
Instruments
Page 40 of 256

38
Version with Keyless Entr y and Star ting
Batter y type: CR2032/3 volts.
F
U
nclip the cover by inserting a small
screwdriver in the slot and raise the cover.
F
R
emove the flat battery from its housing.
F
I
nsert the new battery with the correct
polarity and clip the cover onto the housing.
F
R
einitialise the remote control.
For more information on Reinitialising the
remote control , refer to the corresponding
section.
Do not throw remote control batteries
away as they contain metals which are
harmful to the environment. Take them
to an approved collection point.Reinitialising the remote
control
Following replacement of the battery or in
the event of a remote control fault, it may be
necessary to reinitialise the remote control.
Version without K eyless Entry
and Starting
F Switch off the ignition.
F
T urn the key to position 2 (Ignition on) .
F
P
ress the closed padlock immediately for a
few seconds.
F
S
witch off the ignition and remove the key
from the ignition switch.
The remote control is fully operational again.
Version with K eyless Entry and
Starting
F With a manual gearbox, place the gear
lever in neutral then fully depress the clutch
pedal.
F
Wi
th an automatic gearbox, from mode P,
fully depress the brake pedal.
F
W
ith an electronic gearbox, from mode N ,
fully depress the brake pedal.
F
P
lace the mechanical key (integral with the
remote control) in the lock to unlock your
vehicle.
F
P
lace the electronic key against the back-up
reader under the parking brake lever and
hold it there until the ignition is switched on.
Access
Page 53 of 256

51
F Press button 5 to activate/deactivate the air conditioning system.
When the indicator lamp is on, the air
conditioning function is activated.
The air conditioning does not operate
when the air flow adjustment is inhibited.
Switching the system off
F Press this button; the indicator lamp in the button comes on.
This action switches off all of the functions of
the system.
The temperature is no longer controlled.
However, a slight flow of air, due to the
movement of the vehicle, can still be felt.
Pressing any button reactivates the system with
the settings that were previously in use. Avoid driving for long periods with
the system off – Risk of misting and
deterioration of air quality!
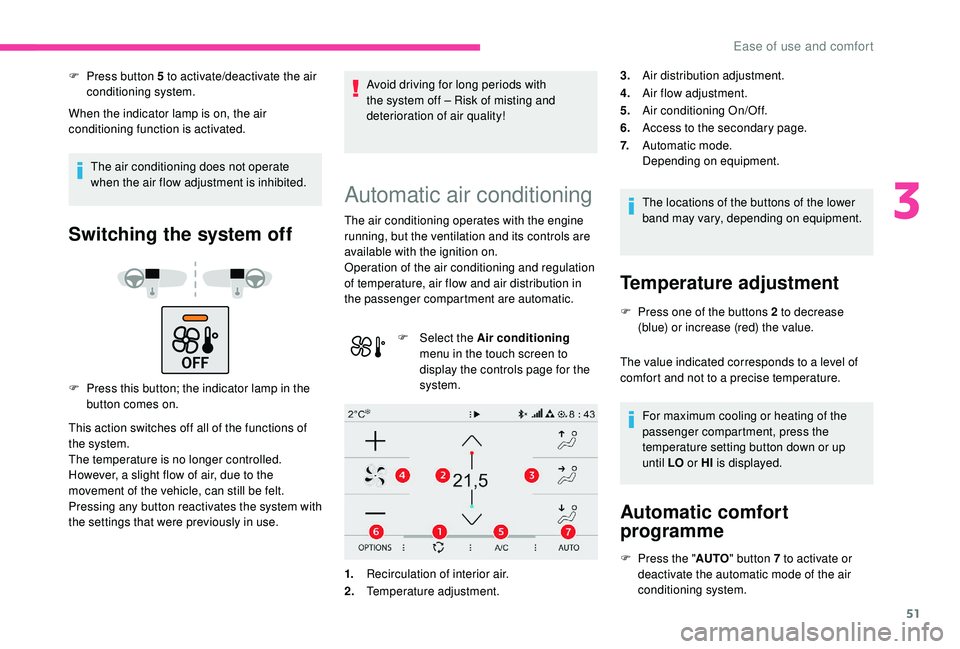
Automatic air conditioning
The air conditioning operates with the engine
running, but the ventilation and its controls are
available with the ignition on.
Operation of the air conditioning and regulation
of temperature, air flow and air distribution in
the passenger compartment are automatic.
F
Sel
ect the Air conditioning
menu in the touch screen to
display the controls page for the
system.
1. Recirculation of interior air.
2. Temperature adjustment. The locations of the buttons of the lower
band may vary, depending on equipment.
Temperature adjustment
F Press one of the buttons 2 to decrease
(blue) or increase (red) the value.
The value indicated corresponds to a level of
comfort and not to a precise temperature.
For maximum cooling or heating of the
passenger compartment, press the
temperature setting button down or up
until LO or HI is displayed.
Automatic comfort
programme
F Press the " AUTO" button 7 to activate or
deactivate the automatic mode of the air
conditioning system.
3.
Air distribution adjustment.
4. Air flow adjustment.
5. Air conditioning On/Off.
6. Access to the secondary page.
7. Automatic mode.
Depending on equipment.
3
Ease of use and comfort
Page 54 of 256

52
Mode AUTO
The air conditioning system operates
automatically: the system manages the
temperature, air flow and air distribution in
the passenger compartment in an optimum
way according to the comfort level you have
selected.
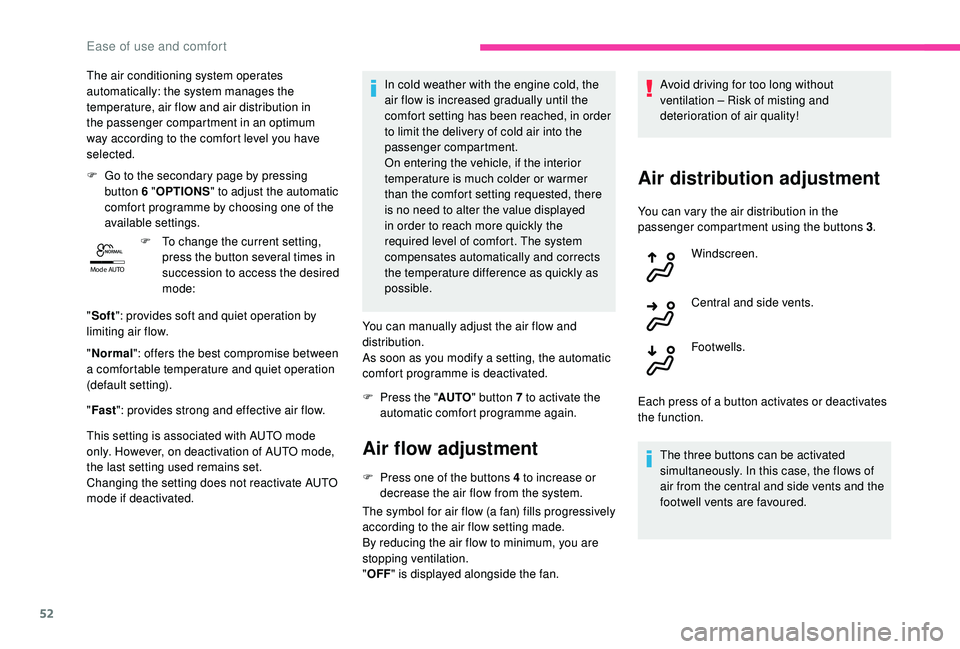
F
G
o to the secondary page by pressing
button 6 " OPTIONS " to adjust the automatic
comfort programme by choosing one of the
available settings.
F
T
o change the current setting,
press the button several times in
succession to access the desired
mode:
" Soft ": provides soft and quiet operation by
limiting air flow.
" Normal ": offers the best compromise between
a comfortable temperature and quiet operation
(default setting).
" Fast ": provides strong and effective air flow.
This setting is associated with AUTO mode
only. However, on deactivation of AUTO mode,
the last setting used remains set.
Changing the setting does not reactivate AUTO
mode if deactivated. In cold weather with the engine cold, the
air flow is increased gradually until the
comfort setting has been reached, in order
to limit the delivery of cold air into the
passenger compartment.
On entering the vehicle, if the interior
temperature is much colder or warmer
than the comfort setting requested, there
is no need to alter the value displayed
in order to reach more quickly the
required level of comfort. The system
compensates automatically and corrects
the temperature difference as quickly as
possible.
You can manually adjust the air flow and
distribution.
As soon as you modify a setting, the automatic
comfort programme is deactivated.
F
P
ress the "AUTO" button 7 to activate the
automatic comfort programme again.
Air flow adjustment
F Press one of the buttons 4 to increase or decrease the air flow from the system.
The symbol for air flow (a fan) fills progressively
according to the air flow setting made.
By reducing the air flow to minimum, you are
stopping ventilation.
" OFF " is displayed alongside the fan. Avoid driving for too long without
ventilation – Risk of misting and
deterioration of air quality!
Air distribution adjustment
You can vary the air distribution in the
passenger compartment using the buttons 3
.
Windscreen.
Central and side vents.
Footwells.
Each press of a button activates or deactivates
the function. The three buttons can be activated
simultaneously. In this case, the flows of
air from the central and side vents and the
footwell vents are favoured.
Ease of use and comfort
Page 57 of 256

55
- when opening a door,
- w hen the remote control locking button is
activated, in order to locate your vehicle.
It switches off gradually:
-
w
hen the vehicle is locked,
-
w
hen the ignition is switched on,
-
3
0 seconds after the last door is closed. Permanently off.
Permanent lighting.
In "permanent lighting" mode, the lighting time
varies according to the circumstances:
-
w
hen the ignition is off, approximately ten
minutes,
-
i
n energy saving mode, approximately thirty
seconds,
-
w
ith the engine running, unlimited.
When the courtesy lamp is in the
"permanent lighting" position, the rear
courtesy lamp also comes on, except if it
is in the "permanently off " position.
To switch off the rear courtesy lamp, put it
in the "permanently off " position.Front and rear map reading
lamps
F With the ignition on, press the corresponding switch.
Take care to avoid leaving anything in
contact with the courtesy lamps.
Boot lamp
It comes on automatically when the boot is
opened.
Different lighting times are provided:
-
w
ith the ignition off, approximately ten
minutes,
-
i
n energy economy mode, approximately
thirty seconds,
-
w
ith the engine running, unlimited.
Panoramic glazed sunroof
This glazed roof provides increased visibility
and light in the passenger compartment, while
maintaining normal temperatures thanks to its
"high thermal protection" coating.
Advice on care
In order to preser ve the properties of the
glazed roof, we recommend wiping or cleaning
the inner glass using a clean, soft and dry
cloth.
For stubborn stains, the glass should be
cleaned using screenwash fluid, rinsed with
clean water, then dried with a clean, soft cloth.
Do not use soapy water, abrasive
products, detergents (particularly those
with an ammonia base), solvents,
solutions with a high concentration of
alcohol, petrol, etc.
3
Ease of use and comfort
Page 64 of 256

62
When the lighting is switched off automatically
(with AUTO model), the foglamp and the dipped
beam headlamps will remain on.
F
T
o switch it off, turn the ring rear wards.
Front and rear foglamps
Rotate and release the ring:
F o nce for wards to switch on the front
foglamps,
F
f
or wards a second time to switch on the rear
foglamps,
F
o
nce backwards to switch off the rear
foglamps,
F
b
ackwards a second time to switch off the
front foglamps.
When the lighting is switched off automatically
(with AUTO model), or when the dipped beam
headlamps are switched off manually, the
foglamps and sidelamps remain on.
F
T
urn the ring backwards to switch off the
foglamps, the sidelamps will then switch off. In good or rainy weather, both day and
night, using the front foglamps and the
rear foglamp is prohibited. In these
situations, the power of their beams may
dazzle other drivers. They should only be
used in fog or falling snow.
In these weather conditions, it is your
responsibility to switch on the foglamps
and dipped beam headlamps manually as
the sunshine sensor may detect sufficient
light.
Switch off the front and rear foglamps
when they are no longer necessary.
Switching off of the lighting when the
ignition is switched off
On switching off the ignition, all of the
lighting turns off immediately, except for
dipped beam if automatic guide-me-home
lighting is activated.
Switching on the lighting after
switching off the ignition
To reactivate the lighting control stalk,
rotate the ring to position "
0" – lighting off,
then to the desired position.
When the driver's door is opened, a
temporary audible signal warns you that
the vehicle's lighting is on.
The lighting, with the exception of the
sidelamps, will switch off automatically
after a maximum duration of thirty minutes
to prevent discharging of the battery.Direction indicators
F Left: lower the lighting control stalk beyond the point of resistance.
F
R
ight: raise the lighting control stalk beyond
the point of resistance.
Lighting and visibility
Page 76 of 256

74
ASR/DSC
These systems offer increased safety
in normal driving, but they should not
encourage the driver to take extra risks or
drive at high speed.
It is in conditions of reduced grip (rain,
snow, ice) that the risk of loss of grip
increases. It is therefore important for your
safety to keep these systems activated in
all conditions, and particularly in difficult
conditions.
The correct operation of these
systems depends on obser vation of
the manufacturer's recommendations
regarding as much the wheels (tyres and
rims), braking and electronic components
as the assembly and repair procedures
used by CITROËN dealers.
To benefit in full from the effectiveness
of these systems in wintry conditions,
the vehicle must be fitted with four snow
tyres, allowing the vehicle to retain neutral
behaviour on the road.Grip control
Special patented traction control system which
improves traction on snow, mud and sand.
This system, the operation of which has been
optimised for each situation, allows you to
manoeuvre in most conditions of poor grip
(encountered when using a passenger car).
Associated with 205/50 R17 all-season M+S
(Mud and Snow) tyres, this system offers a
compromise between safety, grip and traction.
These tyres are efficient in winter and summer
conditions.
The accelerator pedal should be pressed
sufficiently to allow the system to use the power
of the engine. Operation at high engine speeds
is completely normal.
A five-position selector knob allows you to
choose the setting best suited to the driving
conditions encountered.
An indicator lamp associated with each mode
comes on to confirm your choice.
A specific and additional display appears
temporarily in the touch screen to confirm the
selection made with the knob.
Standard (ESC)
This mode is calibrated for a low level of wheel
spin, based on the different levels of grip
normally encountered on the road.F
P
lace the knob in this position.
Every time the ignition is switched off, the
system automatically resets to this mode.
Snow
This mode adapts its strategy to the conditions
of grip encountered for each of the two front
wheels on moving off.
(mode active up to 50 mph (80 km/h)) F
P
lace the knob in this position.
Safety
Page 77 of 256

75
All road (mud, damp grass,
etc.)
This mode, when moving off, allows
considerable spin on the wheel with the least
grip to optimise clearing of the mud and regain
grip. At the same time, the wheel with the most
grip is controlled in such a way as to pass as
much torque as possible.
When moving, the system optimises wheel spin
to respond to the driver's requirements as fully
as possible.
(mode active up to 31 mph (50 km/h))F
P
lace the knob in this position.
Sand
This mode allows little spin on the two driving
wheels at the same time to allow the vehicle to
move for ward and limit the risks of getting stuck
in the sand.
(mode active up to 75 mph (120 km/h))F
P
lace the knob in this position.
Do not use the other modes on sand as
the vehicle may become stuck. You can deactivate the ASR
and DSC systems by turning
the knob to the "
OFF" position.
The ASR and DSC systems will no longer
have an effect on engine operation or
the brakes in the event of an involuntary
change of trajectory.
These systems are reactivated
automatically from 31 mph (50 km/h) or
every time the ignition is switched on.
Driving recommendations
Your vehicle is designed principally to
drive on tarmac roads but it allows you to
occasionally drive on other less passable
terrain.
However, it does not permit off-road
driving such as:
- c rossing and driving on terrain which
could damage the underbody or strip
away components (fuel pipe, fuel
cooler, etc.) due to obstacles or stones
in particular,
-
d
riving on terrain with steep gradients
and poor grip,
-
c
rossing a stream.
Seat belts
Front seat belts
The front seat belts are fitted with a
pretensioning and force limiting system.
This system improves safety in the front
seats in the event of a front or side impact.
Depending on the severity of the impact, the
pretensioning system instantly tightens the seat
belts against the body of the occupants.
The pretensioning seat belts are active when
the ignition is on.
The force limiter reduces the pressure of
the seat belt on the occupant's chest, thus
improving their protection.
5
Safety