mirror controls CITROEN C4 CACTUS 2022 Owners Manual
[x] Cancel search | Manufacturer: CITROEN, Model Year: 2022, Model line: C4 CACTUS, Model: CITROEN C4 CACTUS 2022Pages: 256, PDF Size: 7.62 MB
Page 4 of 256

2
.
.
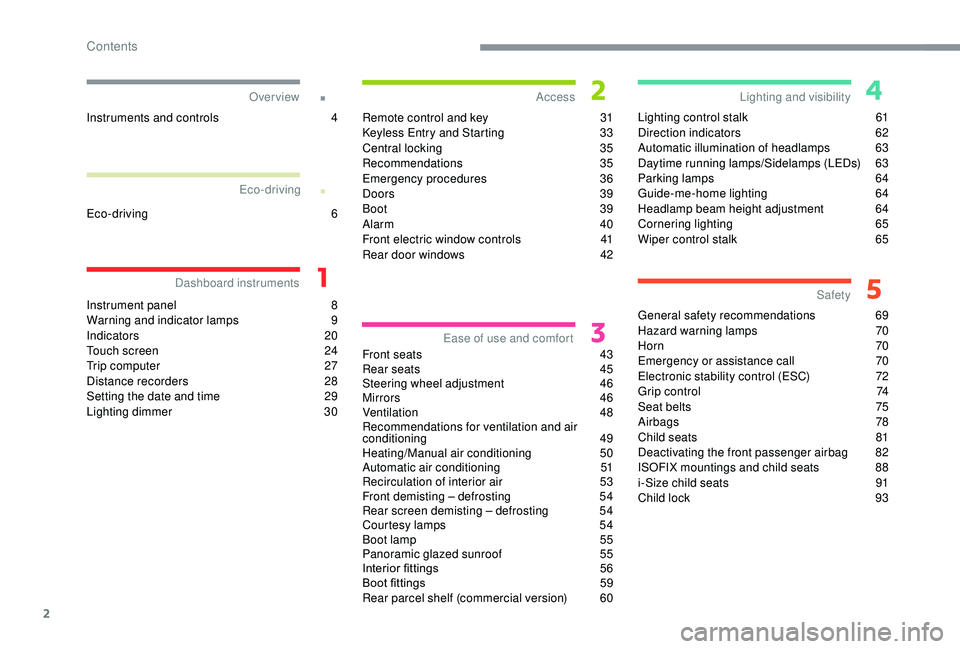
Instrument panel 8
W arning and indicator lamps 9
I
ndicators 20
Touch screen
2
4
Trip computer
2
7
Distance recorders
2
8
Setting the date and time
2
9
Lighting dimmer
3
0Remote control and key
3
1
K
eyless Entry and Starting
3
3
Central locking
3
5
Recommendations
35
Emergency procedures
3
6
Doors
39
Boot
39
Alarm
4
0
Front electric window controls
4
1
Rear door windows
4
2
Front seats
4
3
Rear seats
4
5
Steering wheel adjustment
4
6
Mirrors
46
Ventilation
48
Recommendations for ventilation and air
conditioning
49
Heating/Manual air conditioning
5
0
Automatic air conditioning
5
1
Recirculation of interior air
5
3
Front demisting – defrosting
5
4
Rear screen demisting – defrosting
5
4
Courtesy lamps
5
4
Boot lamp
5
5
Panoramic glazed sunroof
5
5
Interior fittings
5
6
Boot fittings
5
9
Rear parcel shelf (commercial version)
6
0Lighting control stalk
6
1
Direction indicators
6
2
Automatic illumination of headlamps
6
3
Daytime running lamps/Sidelamps (LEDs)
6
3
Parking lamps
6
4
Guide-me-home lighting
6
4
Headlamp beam height adjustment
6
4
Cornering lighting
6
5
Wiper control stalk
6
5
General safety recommendations 6 9
Hazard warning lamps
7
0
Horn
70
Emergency or assistance call
7
0
Electronic stability control (ESC)
7
2
Grip control
7
4
Seat belts
7
5
Airbags
78
Child seats
8
1
Deactivating the front passenger airbag
8
2
ISOFIX mountings and child seats
8
8
i-Size child seats
9
1
Child lock
9
3
Over view
Dashboard instruments Access
Ease of use and comfort Safety
Lighting and visibility
Eco-driving
Eco-driving
6
Instruments and controls
4
Contents
Page 6 of 256

4
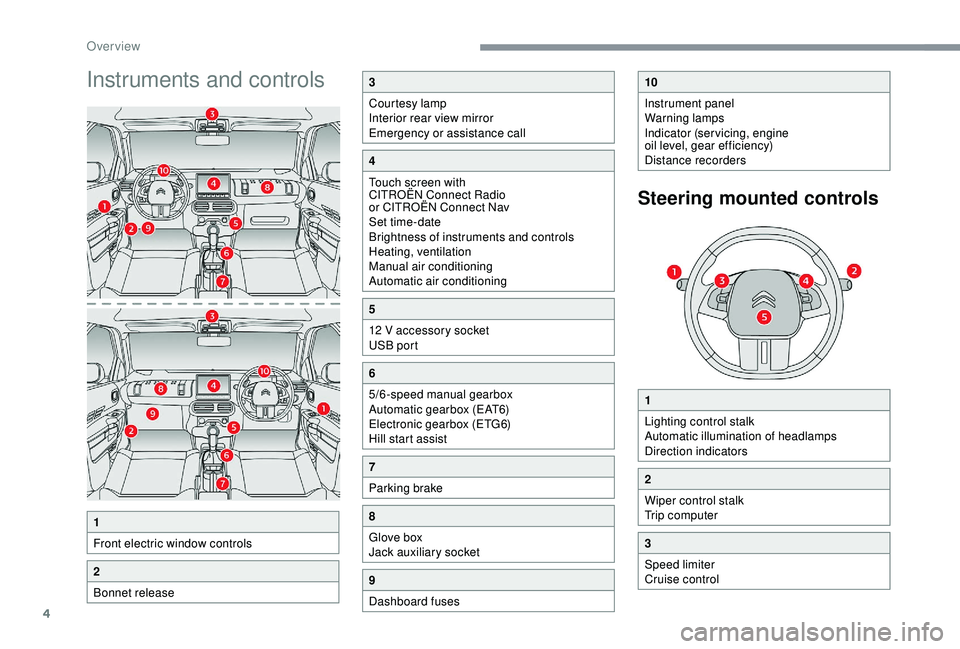
Instruments and controls
1
Front electric window controls
2
Bonnet release
3
Courtesy lamp
Interior rear view mirror
Emergency or assistance call
4
Touch screen with
CITROËN Connect Radio
or CITROËN Connect Nav
Set time-date
Brightness of instruments and controls
Heating, ventilation
Manual air conditioning
Automatic air conditioning
5
12 V accessory socket
USB port
6
5/6-speed manual gearbox
Automatic gearbox (EAT6)
Electronic gearbox (ETG6)
Hill start assist
7
Parking brake
8
Glove box
Jack auxiliary socket
9
Dashboard fuses
10
Instrument panel
Warning lamps
Indicator (servicing, engine
oil level, gear efficiency)
Distance recorders
1
Lighting control stalk
Automatic illumination of headlamps
Direction indicators
2
Wiper control stalk
Trip computer
3
Speed limiter
Cruise control
Steering mounted controls
Over view
Page 7 of 256

5
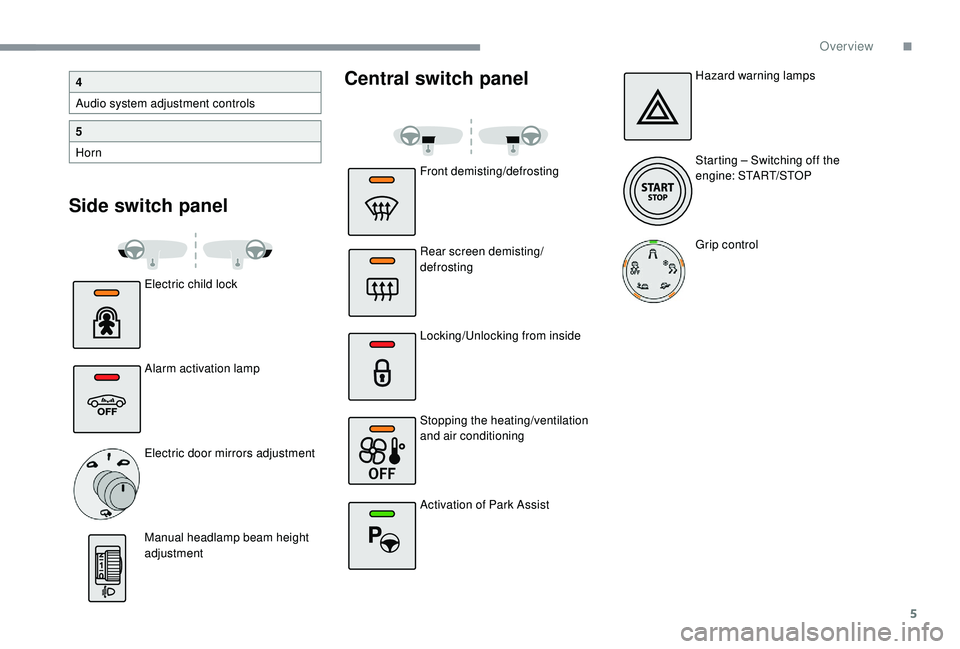
Side switch panelCentral switch panel
Electric child lock
Alarm activation lamp
Electric door mirrors adjustment
Manual headlamp beam height
adjustment
4
Audio system adjustment controls
5
Horn
Front demisting/defrosting
Rear screen demisting/
defrosting
Locking/Unlocking from inside
Stopping the heating/ventilation
and air conditioning
Activation of Park AssistHazard warning lamps
Starting – Switching off the
engine: START/STOP
Grip control
.
Over view
Page 35 of 256

33
F Press this button. The courtesy lamps will come on and the
direction indicators will flash for a
few seconds.
Deadlocking
Deadlocking deactivates the exterior and
interior door controls as well as the central
locking button on the dashboard.
You must therefore never leave anyone
inside the vehicle when it is deadlocked.
With the remote control
F Press this button once to lock the vehicle completely.
F
W
ithin five seconds, press the
button again to deadlock the
vehicle.
With the key
F Turn the key to the rear in the driver's door lock to lock the vehicle completely.
F
T
urn the key to the rear again within five
seconds to deadlock the vehicle.
For versions without an alarm, deadlocking
is confirmed by illumination of the direction
indicators for few seconds on the second press
of the locking button. If your vehicle is fitted with an alarm,
activation is confirmed by fixed
illumination of the direction indicators for a
few seconds.
Depending on version, the door mirrors fold.
Keyless Entry and
Starting
This system allows the unlocking, locking
and starting of the vehicle, while carrying the
electronic key on your person in the recognition
zone "
A" around the vehicle.
The electronic key also acts as a
remote control. For more information
on the Remote control, refer to the
corresponding section.
Unlocking the vehicle
F With the electronic key on your person in the recognition zone, pass your hand
behind the door handle of one of the front
doors or press the tailgate opening control.
The unlocking is confirmed by flashing of the
direction indicators for a few seconds. The door
mirrors unfold at the same time (depending on
ve r s i o n).
2
Access
Page 45 of 256

43
Front seats
As a safety measure, adjustments to the
driver's seat must only be done when
stationary.
Correct driving position
Before taking to the road and to make the most
of the ergonomic layout of the instruments and
controls, carry out these adjustments in the
following order:
-
h
eight of the head restraint,
-
b
ackrest angle,
-
sea
t cushion height,
-
l
ongitudinal position of the seat,
-
t
he height and reach of the steering wheel,
-
t
he interior and door mirrors. Once these adjustments have been made,
check the instrument panel can be viewed
correctly from your driving position.
Settings
Longitudinal
F Raise the control A and slide the seat
forwards or backwards.
Before moving the seat backwards,
ensure that there is no object or person in
the way, preventing full travel of the seat.
There is a risk of trapping or pinching
passengers if present in the rear seats
or jamming the seat if large objects are
placed on the floor behind the seat.
Backrest angle
F Turn the knob B to adjust the backrest.
Height
F Pull the control C upwards to raise the seat or push it downwards to lower it, as many
times as required, to obtain the desired
position.
3
Ease of use and comfort
Page 48 of 256

46
When folding the seat, the centre seat belt
should not be fastened but laid out flat on
the backrest.
The rear seat cushion remains fixed.
To increase the boot volume, fold the
backrest onto the cushion.
Returning the backrest to
the normal position
When repositioning the backrest, ensure
that the seat belts are not trapped and the
red indicator, located next to the controls 1,
is no longer visible.
Rear head restraints
These have one position for use (up) and a
stowed position (down).
They can be removed and are interchangeable
side to side.
To remove a head restraint:
F
P
ull the head restraint upwards as far as
possible.
F
T
hen, press the lug A .
To refit a head restraint:
F
E
ngage the head restraint rods in the
openings, keeping the head restraint in line
with the seat backrest.
To lower a head restraint:
F
P
ress down on the head restraint and on lug
A at the same time.
Never drive with the head restraints
removed; they must be in place and
adjusted to the normal position (up).
F
S
traighten the backrest 2 and secure it.
F
U
nfasten and return the seat belts to the
sides of the backrest.
Steering wheel adjustment
As a safety precaution, these operations
should only be carried out while the
vehicle is stationary.
F
W
hen stationary
, lower the control lever
A to release the steering wheel adjustment
mechanism.
F
A
djust the steering wheel height and reach
to suit your driving position.
F
R
aise the control lever A to lock the steering
wheel adjustment mechanism.
Mirrors
Door mirrors
The objects obser ved are, in reality, closer
than they appear.
Take this into account in order to
correctly judge the distance of vehicles
approaching from behind.
Ease of use and comfort
Page 50 of 256

48
This system automatically and progressively
changes between the day and night uses by
means of a sensor, which measures the light
from the rear of the vehicle.In order to ensure optimum visibility during
your manoeuvres, the mirror lightens
automatically when reverse gear is
engaged.
Ventilation
Air intake
The air circulating in the passenger
compartment is filtered and originates either
from the outside via the grille located at the
base of the windscreen or from the inside in air
recirculation mode.
Air treatment
The incoming air follows various routes
depending on the controls selected by the
driver:
-
d
irect arrival in the passenger compartment
(air intake),
-
p
assage through a heating circuit (heating),
-
p
assage through a cooling circuit (air
conditioning).
Control panel
The controls of this system are
accessible in the " Air conditioning"
menu of the touch screen A .
Air distribution
The demisting/defrosting controls for the
windscreen and rear screen are located below
the touch screen.
1.Windscreen demisting/defrosting vents.
2. Front side window demisting/defrosting
vents.
3. Adjustable side air vent (driver only).
4. Central adjustable air vents.
5. Air outlets to the front footwells.
6. Air outlets to the rear footwells.
Ease of use and comfort
Page 129 of 256

127
Operating fault
If a fault occurs when shifting
to reverse, this warning lamp
comes on in the instrument panel,
accompanied by a message and an
audible signal (short beep).
Contact a CITROËN dealer or a qualified
workshop
to have the system checked.
Reversing camera
The reversing camera function may be
supplemented with parking sensors.
The reversing camera cannot, in any
circumstances, replace the need for vigilance
on the part of the driver.
They are represented by lines marked "on
the ground" and do not allow the position
of the vehicle to be determined relative to
tall obstacles (for example: other vehicles,
e t c .) .
Some distortion of the image is normal.
It is normal to have part of the number
plate showing in the bottom of the screen. The green lines 3 represent distances of about
one and two metres beyond the edge of your
vehicle's rear bumper.
The turquoise blue curves 4 represent the
maximum turning circle.
Opening the tailgate causes the display to
disappear.
Clean the reversing camera regularly
using a soft, dry cloth.
High pressure washing
When washing your vehicle, keep the
lance at least 30 cm away from the
camera lens.
High pressure washing
When washing your vehicle, direct the
lance at least 30 cm away from the
sensors.
The reversing camera is activated automatically
when reverse gear is engaged.
The image is displayed on the touch screen. The superimposed representation of guide
lines helps with the manoeuvre.
The blue lines 1 represent the general direction
of the vehicle (the gap represents the width of
your vehicle except for the door mirrors).
The red line 2 represents a distance of about
30 cm beyond the edge of your vehicle's rear
b u m p e r.
Park Assist
This system provides active parking
assistance: it detects a parking space and then
steers in the appropriate direction to park in
this space while the driver controls the driving
direction, engagement of gears, acceleration
and braking.
To assist the driver in monitoring the
correct manoeuvring operation, the system
automatically triggers the display of the rear
view camera and the activation of the parking
sensors.
6
Driving