headlamp CITROEN C4 CACTUS 2023 User Guide
[x] Cancel search | Manufacturer: CITROEN, Model Year: 2023, Model line: C4 CACTUS, Model: CITROEN C4 CACTUS 2023Pages: 196, PDF Size: 6.12 MB
Page 71 of 196
69
Driving
6automatically to preserve the remaining battery
charge.
Starting the engine
With the parking brake applied:
► With a manual gearbox, place the gear lever
in neutral then fully depress the clutch pedal.
►
With an
automatic gearbox, place the gear
selector in mode N or P then fully depress the
brake pedal.
►
Insert the key into the ignition switch; the
system recognises the code.
►
Unlock
the steering column by simultaneously
turning the steering wheel and the key.
In certain cases, you may have to apply
significant force to move the steering
wheel (wheels on full lock, for example).
►
With a
petrol engine , operate the starter
motor by turning the key to position 3 without
pressing the accelerator pedal, until the engine
starts. Once the engine starts, release the key.
With petrol engines , after a cold start,
preheating the catalytic converter can
cause
noticeable engine vibrations for
anything up to 2 minutes while stationary with
the engine running (accelerated idle speed).
►
With a
Diesel engine, turn the key to position
2, ignition on, to operate the engine preheating
system.
Wait until this warning lamp goes off in the
instrument panel, then operate the starter
motor by turning the key to position 3 without
pressing the accelerator pedal, until the engine
starts. Once the engine starts, release the key.
In wintry conditions, the warning lamp
may stay on for a longer period. When
the engine is hot, the warning lamp does not
come on.
If the engine does not start straight away,
switch off the ignition. Wait a few
seconds before operating the starter motor
again. If the engine does not start after a few
attempts, do not keep trying - risk of
damaging the starter motor and the engine.
Contact a CITROËN dealer or a qualified
workshop.
In mild conditions, do not leave the
engine at idle to warm up but move off
straight away and drive at moderate speed.
Switching off the engine
► Immobilise the vehicle.
► With the engine at idle, turn the key to
position 1
.
►
Remove the key from the ignition switch.
►
T
o lock the steering column, turn the steering
wheel until it locks.
To facilitate unlocking of the steering column, it is recommended that the
wheels be returned to the straight ahead
position before switching off the engine.
Never switch off the ignition before the
complete immobilisation of the vehicle.
With the engine off, the braking and steering
assistance systems are also cut off - risk of
loss of control of the vehicle!
Check that the parking brake is correctly
applied, particularly on sloping ground.
When leaving the vehicle, keep the key in
your possession and lock the vehicle.
Energy economy mode
After the engine has stopped (position 1. Stop),
for a maximum combined duration of about thirty
minutes, you can still use functions such as the
audio and telematics system, courtesy lamps,
windscreen wipers, dipped beam headlamps,
etc.
For more information on Energy
economy mode, refer to the
corresponding section.
Key left in
When opening the driver's door, an alert
message is displayed, accompanied by an
Page 80 of 196
78
Driving
certain types of paint could interfere with the
operation of the radar.
Driving aids camera
This camera and its associated functions
may be impaired or not work if the windscreen
area in front of the camera is dirty, misty,
frosty, covered with snow, damaged or
masked by a sticker.
On versions with camera alone, this message
indicates to you that the camera is obstructed:
"Driving aids camera: visibility limited, see
user guide".
In humid and cold weather, demist the
windscreen regularly.
Poor visibility (inadequate street lighting,
heavy rain, thick fog, snowfall), dazzle
(headlamps of an oncoming vehicle, low sun,
reflections on a damp road, leaving a tunnel,
alternating shade and light) can also impair
detection performance.
In the event of a windscreen replacement,
contact a CITROËN dealer or a qualified
workshop to recalibrate the camera;
otherwise, the operation of the associated
driving aids may be disrupted.
During parking manoeuvres, STOP mode
is not available for a few seconds after
coming out of reverse gear or turning the
steering wheel.
Restarting the engine (START mode)
The engine automatically restarts as soon as the
driver indicates the intention of moving off again.
–
W
ith a manual gearbox: with the clutch pedal
fully depressed.
–
W
ith an automatic gearbox:
•
With the selector in position D
or M: with the
brake pedal released.
•
With the selector in position N
and the brake
pedal released: with the selector at D or M.
•
With the selector in position P
and the brake
pedal depressed: with the selector at R, N,
D or M.
Special cases
The engine will restart automatically if all
conditions for operation are met again and in the
following case.
–
Some specific conditions (braking assistance,
air conditioning setting, etc.).
In this case, this indicator lamp flashes for
a few seconds, then goes off.
Malfunctions
In the event of a system malfunction, this
warning lamp flashes on the instrument
panel.
Have the vehicle checked by a CITROËN dealer
or a qualified workshop.
The vehicle stalls in STOP mode
All of the instrument panel warning lamps come
on if there is a fault.
Depending on version, a warning message
may also be displayed, prompting you to place
the gear selector in position N and depress the
brake pedal.
►
Switch off the ignition then start the engine
again with the key or the " ST
ART/STOP" button.
The Stop & Start system requires a 12 V
battery of specific technology and
specification.
All work concerning the battery must be
carried out only by a CITROËN dealer or a
qualified workshop.
Driving and manoeuvring
aids - General
recommendations
Driving and manoeuvring aids cannot, in
any circumstances, replace the need for
vigilance on the part of the driver.
The driver must comply with the Highway
Code, must remain in control of the vehicle in
all circumstances and must be able to retake
control of it at all times. The driver must adapt
the speed to climactic conditions, traffic and
the state of the road.
It is the driver's responsibility to constantly
check the traffic, to assess the relative
distances and speeds of other vehicles and to
anticipate their movements before indicating
and changing lane.
The systems cannot exceed the limits of the
laws of physics.
Driving aids
You should hold the steering wheel
with both hands, always use the interior and
exterior rear view mirrors, always keep the
feet close to the pedals and take a break
every two hours.
Manoeuvring aids
The driver must always check the
surroundings of the vehicle before and during
the whole manoeuvre, in particular using the
mirrors.
Radar
The operation of the radar as well as the
associated functions may be impaired through
the accumulation of dirt (mud, frost, etc.), in
certain difficult weather conditions (very heavy
rain, snow) or if the bumper is damaged.
If the front bumper is to be repainted, contact
a CITROËN dealer or a qualified workshop;
Page 81 of 196

79
Driving
6certain types of paint could interfere with the
operation of the radar.
Driving aids camera
This camera and its associated functions
may be impaired or not work if the windscreen
area in front of the camera is dirty, misty,
frosty, covered with snow, damaged or
masked by a sticker.
On versions with camera alone, this message
indicates to you that the camera is obstructed:
"Driving aids camera: visibility limited, see
user guide".
In humid and cold weather, demist the
windscreen regularly.
Poor visibility (inadequate street lighting,
heavy rain, thick fog, snowfall), dazzle
(headlamps of an oncoming vehicle, low sun,
reflections on a damp road, leaving a tunnel,
alternating shade and light) can also impair
detection performance.
In the event of a windscreen replacement,
contact a CITROËN dealer or a qualified
workshop to recalibrate the camera;
otherwise, the operation of the associated
driving aids may be disrupted.
Other cameras
The images from the camera(s)
displayed on the touch screen or on the
instrument panel may be distorted by the
relief.
In the presence of areas in shade, or in
conditions of bright sunlight or inadequate
lighting, the image may be darkened and with
lower contrast.
Obstacles may appear further away than they
actually are.
Sensors
The operation of the sensors as well as
the associated functions may be disturbed
by sound interference such as that emitted
by noisy vehicles and machinery (e.g. lorries,
pneumatic drills), by the accumulation of
snow or dead leaves on the road or in the
event of damaged bumpers and mirrors.
When reverse gear is engaged, an audible
signal (long beep) indicates that the sensors
may be dirty.
A front or rear impact to the vehicle can
upset the sensors’ settings, which is not
always detected by the system: distance
measurements may be distorted.
The sensors do not systematically detect
obstacles that are too low (pavements, studs)
or too thin (trees, posts, wire fences).
Certain obstacles located in the sensors’ blind
spots may not be detected or may no longer
be detected during the manoeuvre.
Certain materials (fabrics) absorb sound
waves: pedestrians may not be detected.
Maintenance
Clean the bumpers and door mirrors and
the field of vision of the cameras regularly.
When washing your vehicle at high pressure,
direct the spray from at least 30
cm away
from the radar, sensors and cameras.
Mats
The use of mats not approved by
CITROËN may interfere with the operation of
the speed limiter or cruise control.
To avoid any risk of jamming the pedals:
►
ensure that the mat is secured correctly
,
►
never fit one mat on top of another
.
Units of speed
Ensure that the units of speed displayed
on the instrument panel (mph or km/h) are
those for the country you are driving in.
If this is not the case, when the vehicle is
stationary, set the display to the required
units of speed so that it complies with what is
authorised locally.
In case of doubt, contact a CITROËN dealer
or a qualified workshop.
Page 100 of 196
98
Practical information
Recommendations
► Distribute the load uniformly, taking
care to avoid overloading one of the sides.
► Arrange the heaviest part of the load as
close as possible to the roof.
► Lash the load down securely and fit a
warning flag if it overhangs the vehicle.
► Drive gently: the vehicle will be more
susceptible to the effects of side winds
(stability may be affected).
► Remove the roof bars once they are no
longer needed.
Maximum load, distributed over the roof
bars, for a loading height not exceeding
40 cm: 80 kg.
As this value may change, please verify the
maximum load quoted on the note supplied
with the roof bars.
If the height exceeds 40 cm, adapt the
speed of the vehicle to the profile of the road
to avoid damaging the roof bars and the
mountings on the vehicle.
Be sure to refer to national legislation in order
to comply with the regulations for transporting
objects which are longer than the vehicle.
Bonnet
Stop & Start
Before doing anything under the bonnet,
you must switch off the ignition to avoid any
systemI windscreen wipers, dipped beam
headlamps, courtesy lamps, etc. for a maximum
combined duration of about forty minutesK
Switching to the mode
A message indicating that the vehicle has
switched to economy mode is displayed on the
touch screen and the active functions are put on
standby.
If a telephone call is in progress at the
time, it will be maintained for around 10
minutes using your audio system’s hands-free
system.
Exiting the mode
These functions will be automatically restored
the next time the vehicle is used.
In order to restore the use of these functions
immediately, start the engine and let it run:
–
for less than ten minutes, to use the
equipment for approximately five minutes,
–
for more than ten minutes, to use the
equipment for up to approximately thirty minutes.
Let the engine run for the duration specified to
ensure that the battery charge is sufficient.
Do not repeatedly and continuously restart the
engine in order to charge the battery
.
A flat battery prevents the engine from starting.
For more information on the 12 V battery,
refer to the corresponding section.
Roof bars
For safety reasons and to avoid
damaging the roof, it is essential to use
the transverse bars approved for your vehicle.
Observe the fitting instructions and the
conditions of use in the guide supplied
with the roof bars.
Version without longitudinal
bars
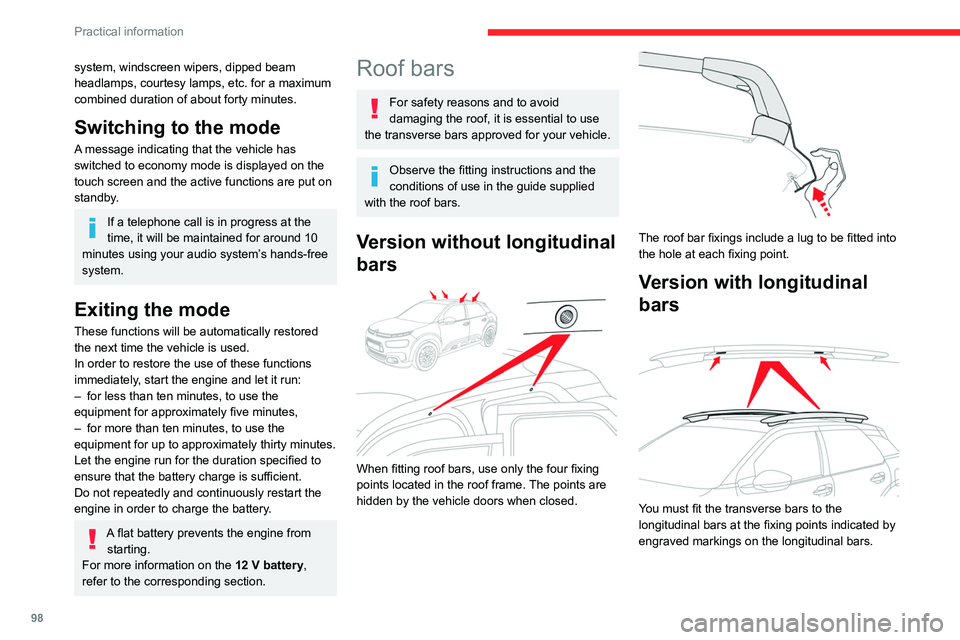
When fitting roof bars, use only the four fixing
points located in the roof frame. The points are
hidden by the vehicle doors when closed.
The roof bar fixings include a lug to be fitted into
the hole at each fixing point.
Version with longitudinal
bars
You must fit the transverse bars to the
longitudinal bars at the fixing points indicated by
engraved markings on the longitudinal bars.
Page 117 of 196

11 5
In the event of a breakdown
8After changing a wheel
Store the punctured wheel in the boot or,
depending on version, remove the central cover
first to store it beneath the floor in place of the
spare wheel.
With a "space-saver" type spare wheel
Deactivate certain driving aid functions
(Active Safety Brake, etc.).
Do not exceed the maximum authorised
speed of 50 mph (80
km/h).
Driving with more than one “space-saver”
type spare wheel is prohibited.
Visit a CITROËN dealer or a qualified
workshop as soon as possible to have
the tightness of the bolts and the pressure of
the spare wheel checked.
Have the punctured tyre examined. After
inspection, the technician will advise you on
whether the tyre can be repaired or if it must
be replaced.
Changing a bulb
In some weather conditions (e.g. low
temperature or humidity), misting on the
internal surface of the glass of the headlamps
and rear lamps is normal, and will disappear
after the lamps have been on for a few
minutes.
The headlamps have polycarbonate lenses with a protective coating:
–
Do not clean them with a dry or abrasive
cloth, nor with detergent or solvent
products.
–
Use a sponge and soapy water or a pH
neutral product.
–
When using a high-pressure washer on
persistent marks, do not keep the lance
directed towards the headlamps, lamps or
their edges for too long, so as not to damage
their protective coating and seals.
Changing a bulb must only be done with
the ignition off and after the headlamp /
lamp has been switched off for several
minutes - risk of serious burns!
Do not touch the bulb directly with your
fingers; use a lint-free cloth.
It is essential only to use anti-ultraviolet
(UV) type bulbs, so as not to damage the
headlamp.
Always replace a failed bulb with a new bulb
of the same type and specification. To avoid
lighting imbalance, replace the bulbs in pairs.
Opening the bonnet / Accessing the
bulbs
With the engine warm, proceed with caution -
risk of burns!
Take care with objects or clothing that could
be caught in the blades of the cooling fan -
risk of strangulation!
Halogen bulbs (Hx)
To ensure good quality lighting, check
that the bulb is correctly positioned in its
housing.
After changing a bulb
To refit, carry out the fitting operations in
reverse order.
Close the protective cover very carefully to
guarantee the sealing of the lamps.
Light-emitting diode (LED)
headlamps and lamps
Depending on version, the affected types of
headlamps / lamps are:
Page 118 of 196

11 6
In the event of a breakdown
– Daytime running lamps / sidelamps.
– Third brake lamp.
–
Rear sidelamps.
–
Rear foglamp(s).
For the replacement of this type of bulb,
you must contact a CITROËN dealer or a
qualified workshop.
Front lamps
1. Daytime running lamps / Sidelamps (LED).
2. Dipped beam headlamps (H7).
3. Main beam headlamps (H1).
4. Direction indicators (PY21W)..
5. Foglamps (PS24W).
Dipped beam headlamps
► Remove the protective cover by pulling the
tab.
►
T
ake the connector and bulb holder, then lift
the assembly upwards to unclip it.
►
Remove the assembly of connector and bulb
holder
.
► Disconnect the bulb connector .
► Remove the bulb and replace it.
Main beam headlamps
► Remove the protective cover by pulling the
tab.
►
Disconnect the bulb connector (do not
remove the earth connector located below).
►
Push on the spring, then move it towards the
middle of the vehicle to release the bulb.
►
Remove the bulb and replace it.
Direction indicators
Rapid flashing of a direction indicator
lamp (left or right) indicates that one of
the bulbs on the corresponding side has
failed.
► Turn the bulb holder a eighth of a turn anti-
clockwise and remove it.
► Remove the bulb and replace it.
Amber coloured bulbs must be replaced
by bulbs with identical specifications and
colour.
Front foglamps
► Below the front bumper, unscrew the 3 mud
guard fixing screws.
► Move the mud guard aside to allow access to
the front foglamp.
► Disconnect the bulb holder connector by
pressing the tab, located at the top.
Page 122 of 196
120
In the event of a breakdown
Fuses in the dashboard
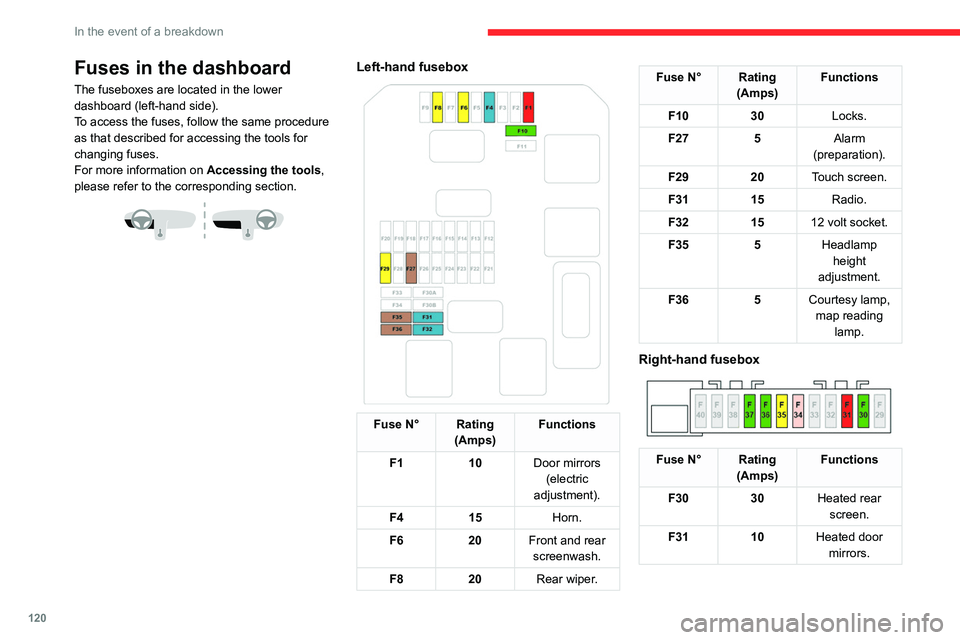
The fuseboxes are located in the lower
dashboard (left-hand side).
To access the fuses, follow the same procedure
as that described for accessing the tools for
changing fuses.
For more information on Accessing the tools,
please refer to the corresponding section.
Left-hand fusebox
Fuse N° Rating (Amps) Functions
F1 10Door mirrors
(electric
adjustment).
F4 15 Horn.
F6 20Front and rear
screenwash.
F8 20Rear wiper.
Fuse N° Rating
(Amps) Functions
F10 30Locks.
F27 5Alarm
(preparation).
F29 20Touch screen.
F31 15Radio.
F32 1512 volt socket.
F35 5Headlamp
height
adjustment.
F36 5Courtesy lamp,
map reading lamp.
Right-hand fusebox
Fuse N° Rating (Amps) Functions
F30 30Heated rear
screen.
F31 10Heated door
mirrors.
Fuse N° Rating (Amps) Functions
F34 25Trailer interface
unit.
F35 20Trailer interface
unit.
F36 30Front one-
touch electric windows.
F37 30Front heated
seats.
Fuses in the engine
compartment
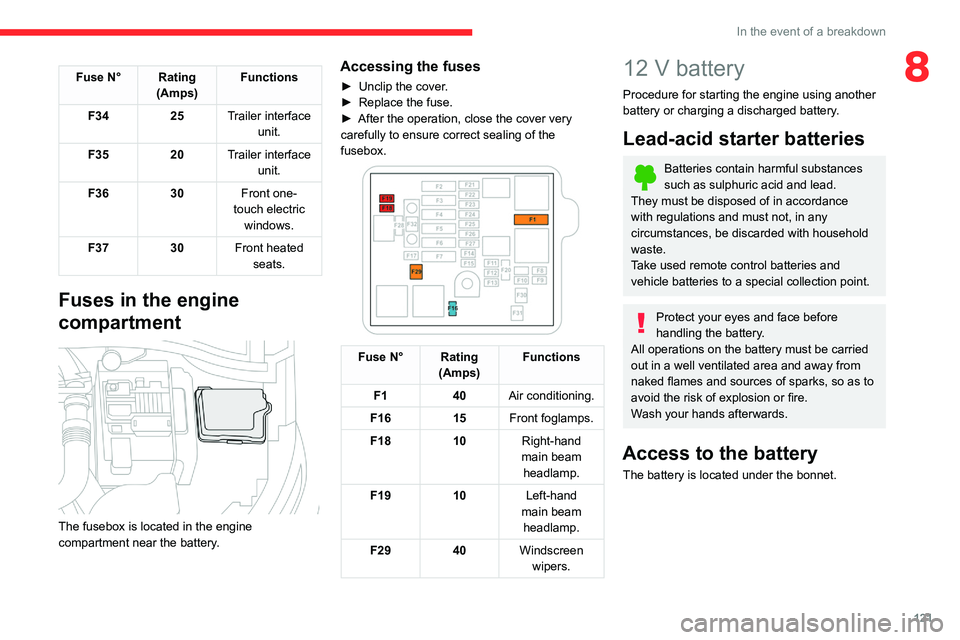
The fusebox is located in the engine
compartment near the battery.
Page 123 of 196
121
In the event of a breakdown
8Fuse N° Rating(Amps) Functions
F34 25Trailer interface
unit.
F35 20Trailer interface
unit.
F36 30Front one-
touch electric windows.
F37 30Front heated
seats.
Fuses in the engine
compartment
The fusebox is located in the engine
compartment near the battery.
Accessing the fuses
► Unclip the cover .
► Replace the fuse.
►
After the operation, close the cover very
carefully to ensure correct sealing of the
fusebox.
Fuse N° Rating (Amps) Functions
F1 40Air conditioning.
F16 15Front foglamps.
F18 10Right-hand
main beam headlamp.
F19 10Left-hand
main beam headlamp.
F29 40Windscreen
wipers.
12 V battery
Procedure for starting the engine using another
battery or charging a discharged battery.
Lead-acid starter batteries
Batteries contain harmful substances
such as sulphuric acid and lead.
They must be disposed of in accordance
with regulations and must not, in any
circumstances, be discarded with household
waste.
Take used remote control batteries and
vehicle batteries to a special collection point.
Protect your eyes and face before
handling the battery.
All operations on the battery must be carried
out in a well ventilated area and away from
naked flames and sources of sparks, so as to
avoid the risk of explosion or fire.
Wash your hands afterwards.
Access to the battery
The battery is located under the bonnet.
Page 173 of 196
171
Alphabetical index
A
ABS 52
Accessories
49
Active Safety Brake
85–87
AdBlue®
12, 104
AdBlue® tank
105
Additive, Diesel
102–103
Adjusting headlamps
44
Adjusting head restraints
28
Adjusting seat
27
Adjusting the air distribution
33–34
Adjusting the air flow
33–34
Adjusting the date
143, 167
Adjusting the height of the steering wheel
29
Adjusting the lumbar support
27
Adjusting the seat angle
27
Adjusting the temperature
33–34
Adjusting the time
143, 167
Advice on care and maintenance
37, 106–107
Advice on driving
6, 67
Airbags
55, 57, 59
Airbags, curtain
56–57
Airbags, front
56–57, 60
Airbags, lateral
56–57
Air conditioning
32, 34
Air conditioning, automatic
33–34
Air conditioning, manual
32, 34
Air intake
33–34
Air vents
31
Alarm
24
Anti-lock braking system (ABS)
52
Antitheft / Immobiliser 18
Apple CarPlay connection
139, 157
Armrest, front
37, 39
Assistance call
50
Assistance, emergency braking
52, 87
Audible warning
50
Audio streaming (Bluetooth)
138, 161–162
B
Battery 97–98, 121–122
Battery, 12 V
102, 122–124
Battery, charging
122–123
Battery, remote control
21–22
Blanking screen (snow shield)
96
Blind spot sensors
89
BlueHDi
12, 102, 108
Bluetooth (hands-free)
140–141, 163
Bluetooth (telephone)
140–141, 163–164
Bodywork
106
Bonnet
99–100
Boot
23–24, 37, 40
Brake discs
103
Brake lamps
11 7
Brakes
103
Braking assistance system
52
Braking, automatic emergency
85–87
Brightness
142
Bulbs
11 5
Bulbs (changing)
115–117
C
Cable, audio 161
Cable, Jack
161
Capacity, fuel tank
94–95
Cap, fuel filler
94–95
Care of the bodywork
106
CD
138, 161
CD, MP3
138, 161
Central locking
18–20
Changing a bulb
115–118
Changing a fuse
119–121
Changing a wheel
109, 111–112
Changing a wiper blade
46–47
Changing the remote control battery
22
Checking the engine oil level
11–12
Checking the levels
100–102
Checking tyre pressures
(using the kit)
108–109, 111
Checks
100, 102–103
Checks, routine
102–103
Child lock
65–66
Children
54, 60, 63–64, 65
Children (safety)
65–66
Child seats
54, 57–60
Child seats, conventional
60
Child seats, i-Size
65
Child seats, ISOFIX
62–63, 65
Cleaning (advice)
106
Closing the boot
23–24
Closing the doors
19–20
Coat hanger
39
Page 175 of 196

173
Alphabetical index
G
Gauge, fuel 94–95
Gearbox, automatic
72, 74–75, 77, 103
Gearbox, manual
37, 39, 72, 75, 77, 103
Gear lever, manual gearbox
72
Gear shift indicator ~ Gear efficiency
indicator
74
Glove box
37–38
G.P.S.
154
H
Hazard warning lamps 49, 108
headlamp adjustment
44
Headlamp adjustment
44
Headlamps, automatic illumination
43
Headlamps, dipped beam
42, 116
Headlamps, halogen
11 5
Headlamps, main beam
42, 116
Head restraints, front
28
Head restraints, rear
31
Heating
31–34
Hill start assist
75
Hooks
40
Horn
50
I
Ignition 35, 71, 164
Ignition on 71
Ignition switch
68–69
Immobiliser, electronic
21, 68
Indicator, AdBlue® range
12
Indicator, engine oil level
11–12
Indicator lamps, operation
42
Indicators, direction
43
Inflating tyres
103, 131
Inflating tyres and accessories
(using the kit)
108–109, 111
Infrared camera
79
Instrument panel
7, 79
Internet browser
158
ISOFIX mountings
62
J
Jack 111–112, 161
Jump starting
122
K
Key 17–19, 21–22
Key, electronic
19–20
Keyless Entry and Starting
19–21, 70
Key not recognised
71
Key with remote control
17–18, 68
Kit, hands-free
140–141, 163
Kit, puncture repair
109
Kit, temporary puncture
repair
40, 108–109, 111
L
Labels, identification 130
Lamp, boot
37, 118
Lamps, parking
43
Lamps, rear
11 7
Lane Departure Warning System (LDWS)
89
LEDs - Light-emitting diodes
44, 116
Level, AdBlue®
102
Level, brake fluid
101
Level, Diesel additive
102–103
Level, engine coolant
101
Level, engine oil
11–12, 101
Levels and checks
100–102
Level, screenwash fluid
46, 102
Light-emitting diodes - LEDs
44, 116, 118
Lighting
42
Lighting dimmer
16
Lighting, directional
45
Lighting, exterior
42
Lighting, guide-me home
44
Load reduction mode
97
Locating your vehicle
18
Locking
18, 21
Locking from the inside
20
Locking the doors
20–21
Low fuel level
94–95
Lumbar
27