wheel CITROEN C4 CACTUS 2023 Owners Manual
[x] Cancel search | Manufacturer: CITROEN, Model Year: 2023, Model line: C4 CACTUS, Model: CITROEN C4 CACTUS 2023Pages: 196, PDF Size: 6.12 MB
Page 4 of 196
2
Contents
■
Overview
Instruments and controls 4
■
Eco-driving
1Instruments
Instrument Panel 7
Warning and indicator lamps 7
Indicators
11
Touch screen 13
Trip computer 14
Distance recorders 15
Lighting dimmer 16
2Access
Electronic key with remote control
function and built-in key, 17
Keyless Entry and Starting 19
Central locking 20
Back-up procedures 21
Doors 23
Boot 23
Alarm 24
Electric windows 25
Rear door windows 26
3Ease of use and comfort
Front seats 27
Steering wheel adjustment 29
Mirrors 29
Rear seats 30
Heating and Ventilation 31
Heating / Manual air conditioning 32
Automatic air conditioning 33
Front demisting - defrosting 35
Rear screen demisting - defrosting 36
Courtesy lamps 36
Boot lighting 37
Panoramic glass sunroof 37
Interior fittings
37
Boot fittings 40
Rear shelf (van version) 41
4Lighting and visibility
Lighting control 42
Direction indicators 43
Automatic illumination of headlamps 43
Daytime running lamps/sidelamps (LEDs) 44
Headlamp beam height adjustment 44
Cornering lighting 45
Wiper control stalk 45
Changing a wiper blade 47
Automatic wiping 48
5Safety
General safety recommendations 49
Hazard warning lamps 49
Horn 50
Emergency or assistance call 50
Electronic stability control (ESC) 52
Seat belts 53
Airbags 55
Child seats 57
Deactivating the front passenger airbag 59
ISOFIX child seats 62
i-Size child seats 65
Child lock 65
6Driving
Driving recommendations 67
Starting / Switching off the engine with
the key
68
Starting / Switching off the engine with
Keyless Entry and Starting
70
Parking brake 72
6-speed manual gearbox 72
Automatic gearbox (EAT6) 72
Gear efficiency indicator 74
Hill start assist 75
Tyre under-inflation detection 75
Stop & Start 77
Driving and manoeuvring aids - General
recommendations
78
Speed Limit Recognition
and Recommendation
80
Speed limiter 82
Cruise control - particular recommendations 83
Cruise control 84
Active Safety Brake with Collision Risk
Alert and Intelligent emergency braking
assistance
85
Distraction detection 88
Lane Departure Warning System 89
Page 5 of 196
3
Contents
bit.ly/helpPSA
Blind Spot Monitoring System 89
Parking sensors 91
Reversing Camera 92
7Practical information
Compatibility of fuels 94
Refuelling 94
Misfuel prevention (Diesel) 95
Snow chains 96
Very cold climate screens
96
Towing device 97
Energy economy mode 97
Roof bars 98
Bonnet 99
Engine compartment 100
Checking levels 100
Speed checks 102
AdBlue® (BlueHDi) 104
Advice on care and maintenance 106
8In the event of a breakdown
Running out of fuel (Diesel) 108
Temporary puncture repair kit 108
Spare wheel 111
Changing a bulb 11 5
Changing a fuse 11 9
12 V battery 121
Towing 125
9Technical data
Engine technical data and towed loads 127
Petrol engines 128
Diesel engines 129
Dimensions 130
Identification markings 130
10CITROËN Connect Radio
First steps 132
Steering mounted controls 133
Menus 134
Applications
135
Radio 135
DAB (Digital Audio Broadcasting) radio 137
Media 137
Telephone 139
Settings 142
Frequently asked questions 144
11CITROËN Connect Nav
First steps 146
Steering mounted controls 147
Menus 148
Voice commands 149
Navigation 153
Connected navigation 154
Applications 157
Radio 159
DAB (Digital Audio Broadcasting) radio 161
Media 161
Telephone 163
Settings 165
Frequently asked questions 167
■
Alphabetical index
Access to additional videos
Page 8 of 196
6
Eco-driving
Eco-driving
Eco-driving refers to a range of everyday
practices that allow the motorist to optimise their
fuel consumption and CO
2emissions.
Optimise your use of the gearbox
With a manual gearbox, move off gently and
change up promptly. While accelerating, change
up early.
With an automatic gearbox, favour automatic
mode and avoid pressing the accelerator pedal
heavily or suddenly.
The gear efficiency indicator prompts you to
engage the most suitable gear: whenever this
indication is displayed on the instrument panel,
follow it straight away.
With an automatic gearbox, this indicator
appears only in manual mode.
Drive smoothly
Maintain a safe distance between vehicles, use
engine braking rather than the brake pedal and
press the accelerator gradually. These attitudes
help to save fuel, reduce CO
2 emissions and
decrease general traffic noise.
If the vehicle has the steering-mounted
"CRUISE" control, use cruise control at speeds
above 25 mph (40
km/h) when the traffic is
flowing well.
Use electrical equipment wisely
Before moving off, if the passenger compartment
is too warm, ventilate it by opening the windows
and air vents before using the air conditioning.
At speeds above 31
mph (50 km/h), close the
windows and leave the air vents open.
Consider using equipment that can help keep
the temperature in the passenger compartment
down (sunroof blind and window blinds, etc.).
Unless automatically regulated, switch off the air
conditioning as soon as the desired temperature
has been reached.
Switch off the demisting and defrosting functions,
if they are not managed automatically.
Switch off the heated seat as soon as possible.
Switch off the headlamps and foglamps when
the visibility conditions do not require their use.
Avoid running the engine before moving off,
particularly in winter; your vehicle will warm up
much faster while driving.
As a passenger, avoid connecting your
multimedia devices (film, music, video game,
etc.) to help reduce consumption of electrical
energy, and hence fuel.
Disconnect all portable devices before leaving
the vehicle.
Limit the causes of excess consumption
Spread loads throughout the vehicle; place the
heaviest items in the boot, as close as possible
to the rear seats.
Limit the loads carried in the vehicle and
minimise wind resistance (roof bars, roof rack, bicycle carrier, trailer, etc.). Preferably, use a
roof box.
Remove roof bars and roof racks after use.
At the end of winter, remove snow tyres and refit
summer tyres.
Avoid using the SPORT mode for too long, in
order to limit your fuel consumption.
Comply with servicing instructions
Check tyre pressures regularly, with the tyres
cold, referring to the label in the door aperture on
the driver's side.
Carry out this check in particular:
–
before a long journey
.
–
at each change of season.
–
after a long period out of use.
Do not overlook the spare wheel and, where
applicable, the tyres on your trailer or caravan.
Have your vehicle serviced regularly (engine oil,
oil filter
, air filter, passenger compartment filter,
etc.) and observe the schedule of operations in
the manufacturer's service schedule.
With a BlueHDi Diesel engine, if the SCR system
is faulty, your vehicle will emit pollution. Visit
a CITROËN dealer or a qualified workshop
as soon as possible to restore your vehicle’s
nitrogen oxide emissions to regulatory
compliance.
When filling the fuel tank, do not continue after
the third nozzle cut-out, to avoid overflow.
You will only see the fuel consumption of your
new vehicle settle down to a consistent average
after the first 1,900 miles (3,000 kilometres).
Page 12 of 196
10
Instruments
Indicators
Service indicator
The service indicator is displayed on the
instrument panel. Depending on the vehicle
version:
– the distance recorder display line indicates
the distance remaining before the next service
is due, or the distance travelled since it was due
preceded by the sign “-”.
– an alert message indicates the distance
remaining, as well as the period before the next
service is due or how long it is overdue.
Service spannerLights up temporarily when the ignition is
switched on.
Between 1,800 miles (3,000 km) and 600 miles
(1,000 km) remain before the next service is due.
Fixed, when the ignition is switched on.
The service is due in less than 600 miles
(1,000 km).
Have your vehicle serviced very soon.
Service spanner flashingFlashing then fixed, when the
ignition is switched on.
(With BlueHDi Diesel engines, combined with the
Service warning lamp.)
The servicing interval has been exceeded.
Have your vehicle serviced as soon as possible.
The distance indicated (in miles or kilometres) is calculated according to the
If the engine does not start, switch the ignition off
and then on, wait until the indicator lamp goes off
again, then start the engine.
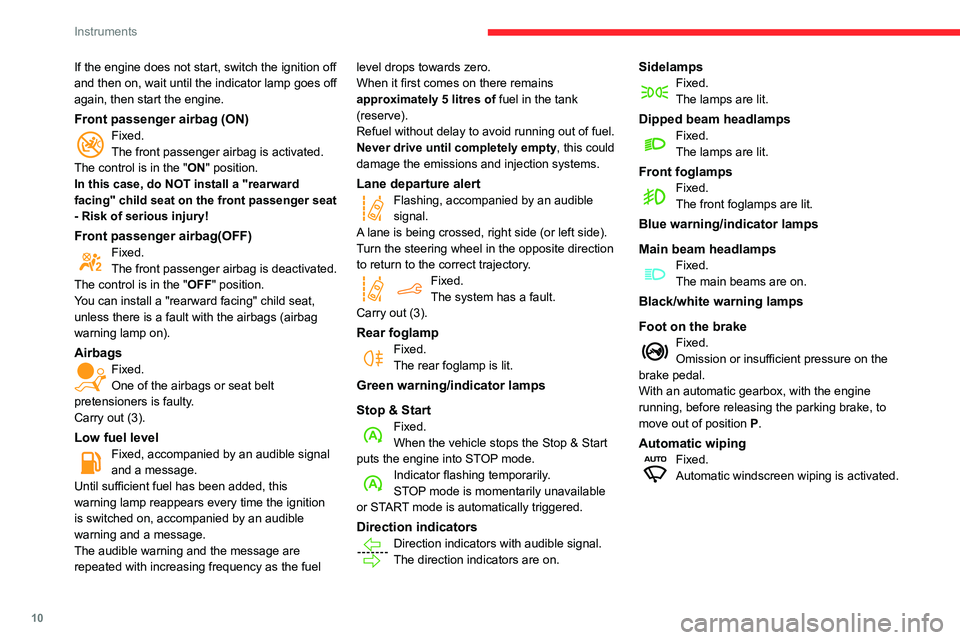
Front passenger airbag (ON)Fixed.
The front passenger airbag is activated.
The control is in the "ON" position.
In this case, do NOT install a "rearward
facing" child seat on the front passenger seat
- Risk of serious injury!
Front passenger airbag(OFF)Fixed.
The front passenger airbag is deactivated.
The control is in the "OFF" position.
You can install a "rearward facing" child seat,
unless there is a fault with the airbags (airbag
warning lamp on).
AirbagsFixed.
One of the airbags or seat belt
pretensioners is faulty.
Carry out (3).
Low fuel levelFixed, accompanied by an audible signal
and a message.
Until sufficient fuel has been added, this
warning lamp reappears every time the ignition
is switched on, accompanied by an audible
warning and a message.
The audible warning and the message are
repeated with increasing frequency as the fuel level drops towards zero.
When it first comes on there remains
approximately 5 litres of fuel in the tank
(reserve).
Refuel without delay to avoid running out of fuel.
Never drive until completely empty, this could
damage the emissions and injection systems.
Lane departure alertFlashing, accompanied by an audible
signal.
A lane is being crossed, right side (or left side).
Turn the steering wheel in the opposite direction
to return to the correct trajectory.
Fixed.
The system has a fault.
Carry out (3).
Rear foglampFixed.
The rear foglamp is lit.
Green warning/indicator lamps
Stop & Start
Fixed.
When the vehicle stops the Stop & Start
puts the engine into STOP mode.
Indicator flashing temporarily.
STOP mode is momentarily unavailable
or START mode is automatically triggered.
Direction indicatorsDirection indicators with audible signal.
The direction indicators are on.
SidelampsFixed.
The lamps are lit.
Dipped beam headlampsFixed.
The lamps are lit.
Front foglampsFixed.
The front foglamps are lit.
Blue warning/indicator lamps
Main beam headlamps
Fixed.
The main beams are on.
Black/white warning lamps
Foot on the brake
Fixed.
Omission or insufficient pressure on the
brake pedal.
With an automatic gearbox, with the engine
running, before releasing the parking brake, to
move out of position P.
Automatic wipingFixed.
Automatic windscreen wiping is activated.
Page 21 of 196
19
Access
2Avoid pressing the remote control buttons
while out of range of the vehicle, due to
the risk of rendering the remote control
inoperative. It would then be necessary to
reset it.
The remote control does not work when the
key is in the ignition switch, even when the
ignition is switched off.
Anti-theft protection
Do not modify the electronic vehicle
immobiliser, as this might result in
malfunctions.
For vehicles with a key ignition switch,
remember to remove the key and turn the
steering wheel to engage the steering lock.
Locking the vehicle
Driving with the doors locked could make
it more difficult for the emergency services to
enter the vehicle in an emergency.
As a safety precaution, remove the key from
the ignition or take the electronic key with you
when leaving the vehicle, even for a short
time.
Purchasing a second-hand vehicle
Have the key codes memorised by a
CITROËN dealer, to ensure that the keys in
your possession are the only ones able to
start the vehicle.
Keyless Entry and
Starting
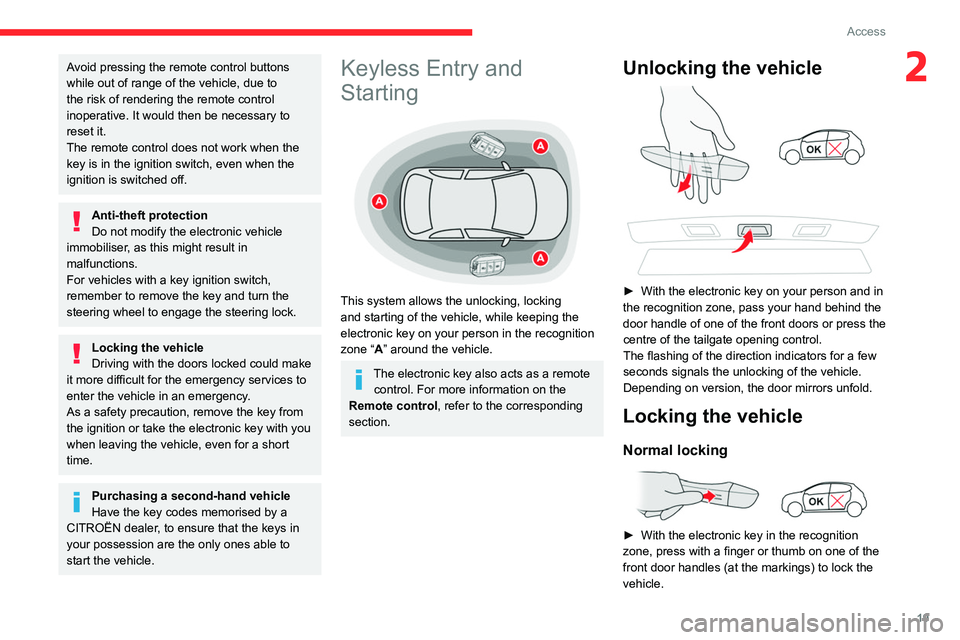
This system allows the unlocking, locking
and starting of the vehicle, while keeping the
electronic key on your person in the recognition
zone “A” around the vehicle.
The electronic key also acts as a remote control. For more information on the
Remote control, refer to the corresponding
section.
Unlocking the vehicle
► With the electronic key on your person and in
the recognition zone, pass your hand behind the
door handle of
one of the front doors or press the
centre of the tailgate opening control.
The flashing of the direction indicators for a few
seconds signals the unlocking of the vehicle.
Depending on version, the door mirrors unfold.
Locking the vehicle
Normal locking
► With the electronic key in the recognition
zone, press with a finger or thumb on one of the
front door handles (at the markings) to lock the
vehicle.
Page 29 of 196
27
Ease of use and comfort
3Front seats
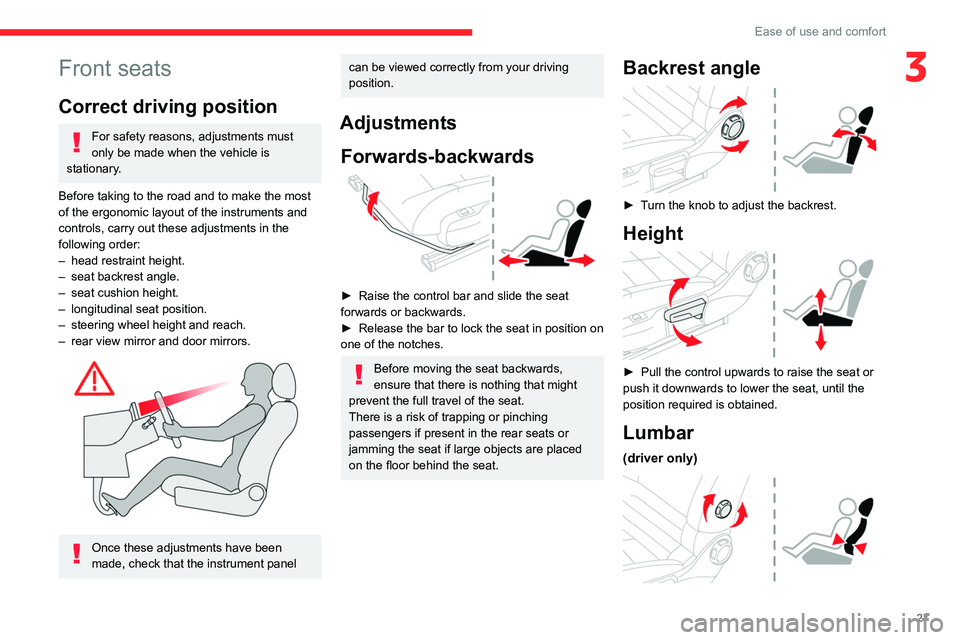
Correct driving position
For safety reasons, adjustments must
only be made when the vehicle is
stationary.
Before taking to the road and to make the most
of the ergonomic layout of the instruments and
controls, carry out these adjustments in the
following order:
–
head restraint height.
–
seat backrest angle.
–
seat cushion height.
–
longitudinal seat position.
–
steering wheel height and reach.
–
rear view mirror and door mirrors.
Once these adjustments have been
made, check that the instrument panel
can be viewed correctly from your driving
position.
Adjustments Forwards-backwards
► Raise the control bar and slide the seat
forwards or backwards.
►
Release the bar to lock the seat in position on
one of the notches.
Before moving the seat backwards,
ensure that there is nothing that might
prevent the full travel of the seat.
There is a risk of trapping or pinching
passengers if present in the rear seats or
jamming the seat if large objects are placed
on the floor behind the seat.
Backrest angle
► Turn the knob to adjust the backrest.
Height
► Pull the control upwards to raise the seat or
push it downwards to lower the seat, until the
position required is obtained.
Lumbar
(driver only)
Page 30 of 196
28
Ease of use and comfort
Steering wheel
adjustment
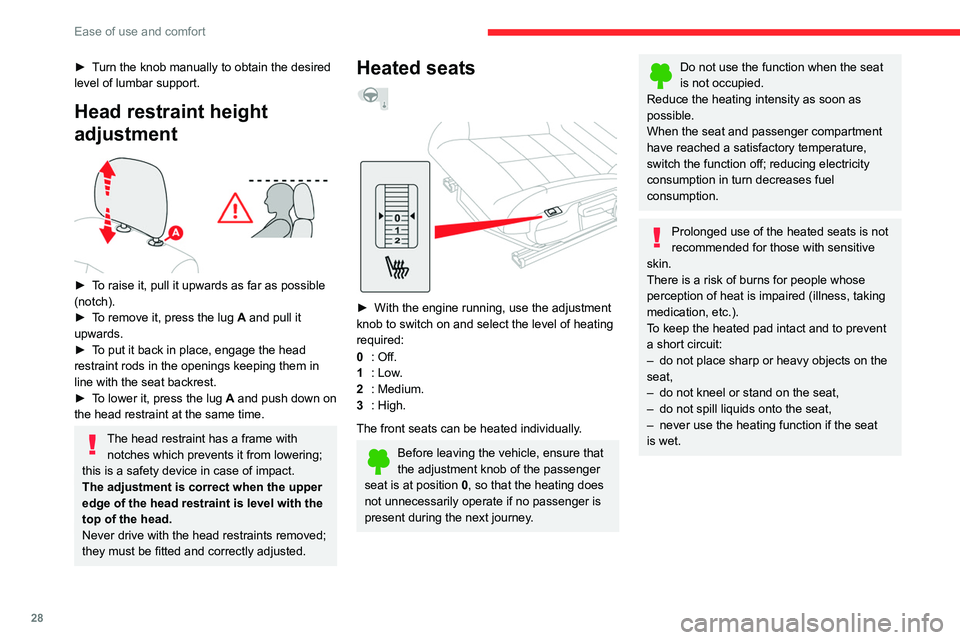
► When stationary, lower the control A to
release the steering wheel.
► Adjust the steering wheel height and reach to
suit your driving position.
► Raise the control A to lock the steering
wheel.
As a safety precaution, these operations should only be carried out while the
vehicle is stationary.
► Turn the knob manually to obtain the desired
level of lumbar support.
Head restraint height
adjustment
► To raise it, pull it upwards as far as possible
(notch).
►
T
o remove it, press the lug A and pull it
upwards.
►
T
o put it back in place, engage the head
restraint rods in the openings keeping them in
line with the seat backrest.
►
T
o lower it, press the lug A and push down on
the head restraint at the same time.
The head restraint has a frame with notches which prevents it from lowering;
this is a safety device in case of impact.
The adjustment is correct when the upper
edge of the head restraint is level with the
top of the head.
Never drive with the head restraints removed;
they must be fitted and correctly adjusted.
Heated seats
► With the engine running, use the adjustment
knob to switch on and select the level of heating
required:
0
: Off.
1
: Low.
2
: Medium.
3
: High.
The front seats can be heated individually.
Before leaving the vehicle, ensure that
the adjustment knob of the passenger
seat is at position
0, so that the heating does
not unnecessarily operate if no passenger is
present during the next journey.
Do not use the function when the seat
is not occupied.
Reduce the heating intensity as soon as
possible.
When the seat and passenger compartment
have reached a satisfactory temperature,
switch the function off; reducing electricity
consumption in turn decreases fuel
consumption.
Prolonged use of the heated seats is not
recommended for those with sensitive
skin.
There is a risk of burns for people whose
perception of heat is impaired (illness, taking
medication, etc.).
To keep the heated pad intact and to prevent
a short circuit:
–
do not place sharp or heavy objects on the
seat,
–
do not kneel or stand on the seat,
–
do not spill liquids onto the seat,
–
never use the heating function if the seat
is wet.
Page 31 of 196
29
Ease of use and comfort
3Steering wheel
adjustment
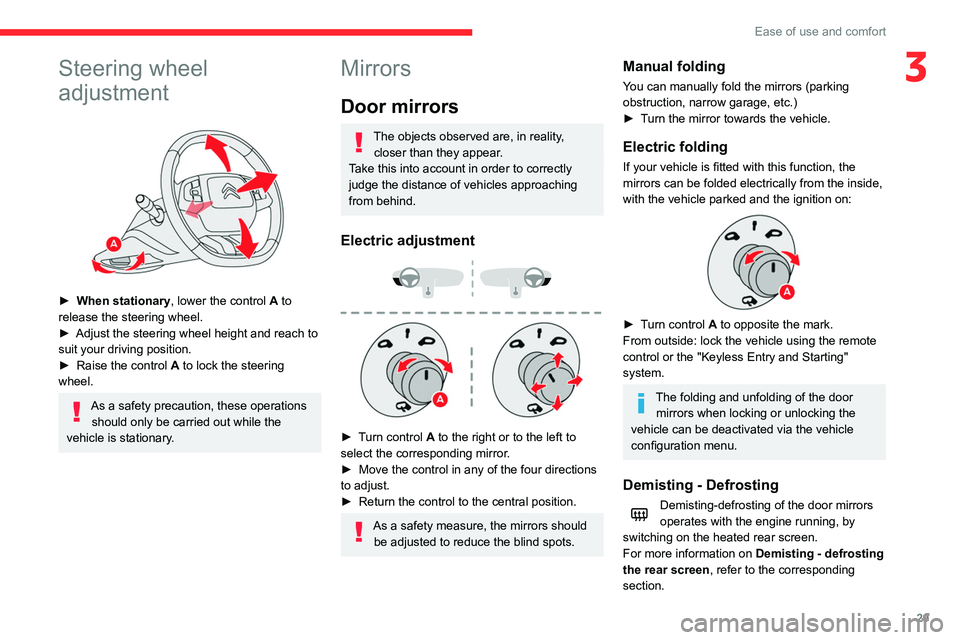
► When stationary, lower the control A to
release the steering wheel.
►
Adjust the steering wheel height and reach to
suit your driving position.
►
Raise the control A
to lock the steering
wheel.
As a safety precaution, these operations should only be carried out while the
vehicle is stationary.
Mirrors
Door mirrors
The objects observed are, in reality, closer than they appear.
Take this into account in order to correctly
judge the distance of vehicles approaching
from behind.
Electric adjustment
► Turn control A to the right or to the left to
select the corresponding mirror.
►
Move the control in any of the four directions
to adjust.
►
Return the control to the central position.
As a safety measure, the mirrors should be adjusted to reduce the blind spots.
Manual folding
You can manually fold the mirrors (parking
obstruction, narrow garage, etc.)
►
T
urn the mirror towards the vehicle.
Electric folding
If your vehicle is fitted with this function, the
mirrors can be folded electrically from the inside,
with the vehicle parked and the ignition on:
► Turn control A to opposite the mark.
From outside: lock the vehicle using the remote
control or the "Keyless Entry and Starting"
system.
The folding and unfolding of the door mirrors when locking or unlocking the
vehicle can be deactivated via the vehicle
configuration menu.
Demisting - Defrosting
Demisting-defrosting of the door mirrors
operates with the engine running, by
switching on the heated rear screen.
For more information on Demisting - defrosting
the rear screen , refer to the corresponding
section.
Page 47 of 196
45
Lighting and visibility
40. (Initial adjustment)Driver only or driver + front passenger
-. Driver + front passenger + rear passengers
1. Driver + front passenger + rear passengers +
load in the boot
-. Driver + front passenger + rear passengers +
load in the boot
2. Driver only + maximum authorised load in
the boot
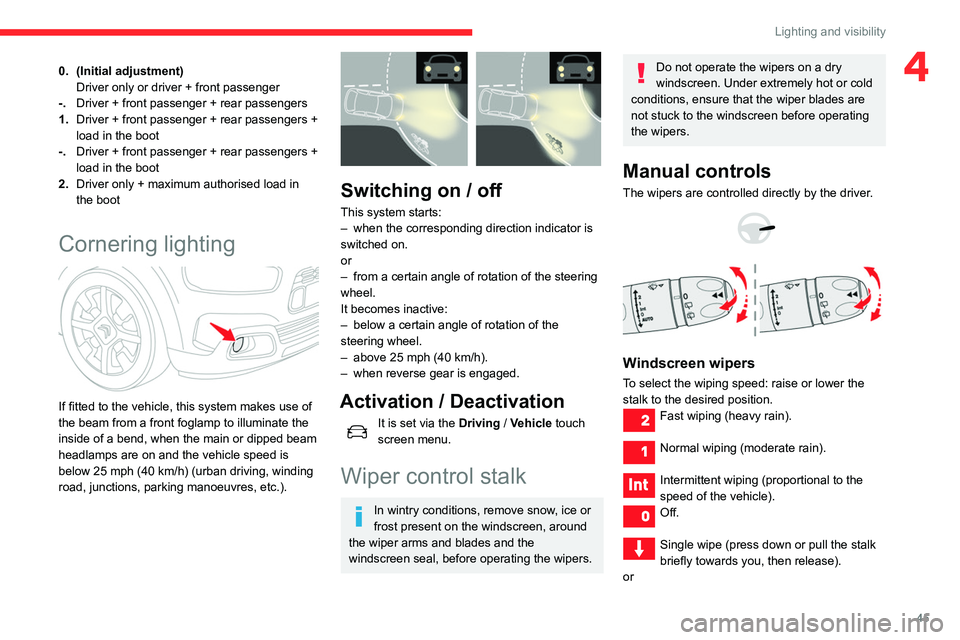
Cornering lighting
If fitted to the vehicle, this system makes use of
the beam from a front foglamp to illuminate the
inside of a bend, when the main or dipped beam
headlamps are on and the vehicle speed is
below 25 mph (40
km/h) (urban driving, winding
road, junctions, parking manoeuvres, etc.).
Switching on / off
This system starts:
– when the corresponding direction indicator is
switched on.
or
–
from a certain angle of rotation of the steering
wheel.
It becomes inactive:
–
below a certain angle of rotation of the
steering wheel.
–
above 25 mph (40
km/h).
–
when reverse gear is engaged.
Activation / Deactivation
It is set via the Driving / Vehicle touch
screen menu.
Wiper control stalk
In wintry conditions, remove snow, ice or
frost present on the windscreen, around
the wiper arms and blades and the
windscreen seal, before operating the wipers.
Do not operate the wipers on a dry
windscreen. Under extremely hot or cold
conditions, ensure that the wiper blades are
not stuck to the windscreen before operating
the wipers.
Manual controls
The wipers are controlled directly by the driver.
Windscreen wipers
To select the wiping speed: raise or lower the
stalk to the desired position.
Fast wiping (heavy rain).
Normal wiping (moderate rain).
Intermittent wiping (proportional to the
speed of the vehicle).
Off.
Single wipe (press down or pull the stalk
briefly towards you, then release).
or
Page 52 of 196

50
Safety
Horn
► Press the central part of the steering wheel.
Emergency or assistance
call
* In accordance with the general conditions of use of the service, available from dealers an\
d subject to technological and technical limitations.
** In areas covered by ‘Localised Emergency Call’ and ‘Localised Assistance Call’.
The list of countries covered and telematic services provided is availab\
le from dealers or on the website for your country.
Localised Emergency Call
(PE112)
► In an emergency , press button 1 for more
than 2 seconds.
The lighting of the indicator lamp and a voice
message confirm that the call has been made to
the emergency services*.
‘Localised Emergency Call’ immediately locates
your vehicle and puts you in contact with the
appropriate emergency services**.
►
Pressing again immediately cancels the
request.
The indicator lamp flashes when the vehicle
data is sent, and then remains lit when
communication is established.
If an impact is detected by the airbag
control unit, an emergency call is made
automatically, independently of the
deployment of any airbags.
‘Localised Emergency Call’ is a service
that can be accessed free of charge.
System operation
– Upon switching on the ignition, if the indicator
lamp lights up red, then green, and then goes
out: the system is operating correctly
.
– If the indicator lamp is fixed red: system
malfunction
–
If the indicator lamp flashes red: replace the
emergency battery
.
In the latter two cases, emergency and
assistance call services may not work.
Contact a dealer or a qualified repairer as soon
as possible.
The system fault does not prevent the vehicle from being driven.
Data processing
All processing of personal information
by the "Localised Emergency Call" system
(PE112) complies with the framework for
protection of personal information established
by Regulation 2016/679 (GDPR) and
Directive 2002/58/EC of the European
Parliament and the Council, and in particular,
seeks to protect the vital interests of the
data subject, in accordance with Article
6.1,
paragraph
d) of Regulation 2016/679.
Personal information processing is strictly
limited to the management of the "Localised
Emergency Call" system used with the “112”
European single emergency call number.
The "Localised Emergency Call" system is
able to collect and process only the following