Citroen C4 CACTUS RHD 2014 1.G Owner's Manual
Manufacturer: CITROEN, Model Year: 2014, Model line: C4 CACTUS RHD, Model: Citroen C4 CACTUS RHD 2014 1.GPages: 331, PDF Size: 8.56 MB
Page 191 of 331
189
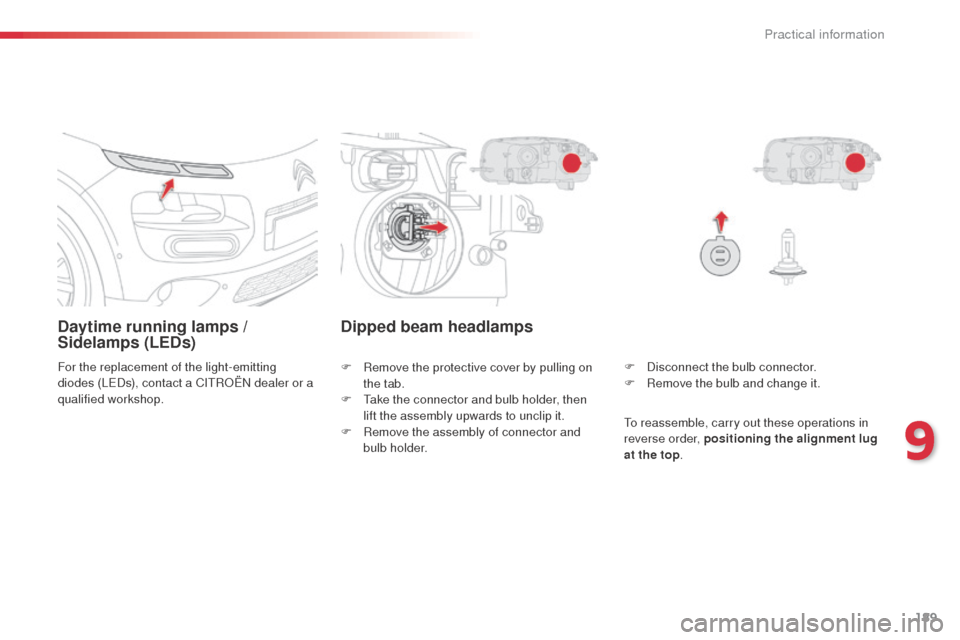
Daytime running lamps /
Sidelamps (LEDs)
For the replacement of the light-emitting
diodes (LEDs), contact a CITROËN dealer or a
qualified workshop.F
D isconnect the bulb connector.
F
R
emove the bulb and change it.
Dipped beam headlamps
F Remove the protective cover by pulling on the tab.
F
T
ake the connector and bulb holder, then
lift the assembly upwards to unclip it.
F
R
emove the assembly of connector and
bulb holder. To reassemble, carry out these operations in
reverse order, positioning the alignment lug
at the top
.
9
Practical information
Page 192 of 331

190
Main beam headlamps
F Remove the protective cover by pulling on the tab.
F
D
isconnect the bulb connector (do not
remove the earth connector located below).
F
P
ush on the spring, then move it towards
the middle of the vehicle to release the
bulb.
F
R
emove the bulb and change it.
Direction indicators
Amber coloured bulbs, such as the
direction indicators, must be replaced
with bulbs of identical specifications
and colour.
Rapid flashing of the direction indicator
warning lamp (right or left) indicates the
failure of a bulb on that side.
F
T
urn the bulb holder an eighth of a turn
anti-clockwise and extract it.
F
R
emove the bulb and change it.
To reassemble, carry out these operations in
reverse order.
To reassemble, carry out these operations in
reverse order.
Practical information
Page 193 of 331
191
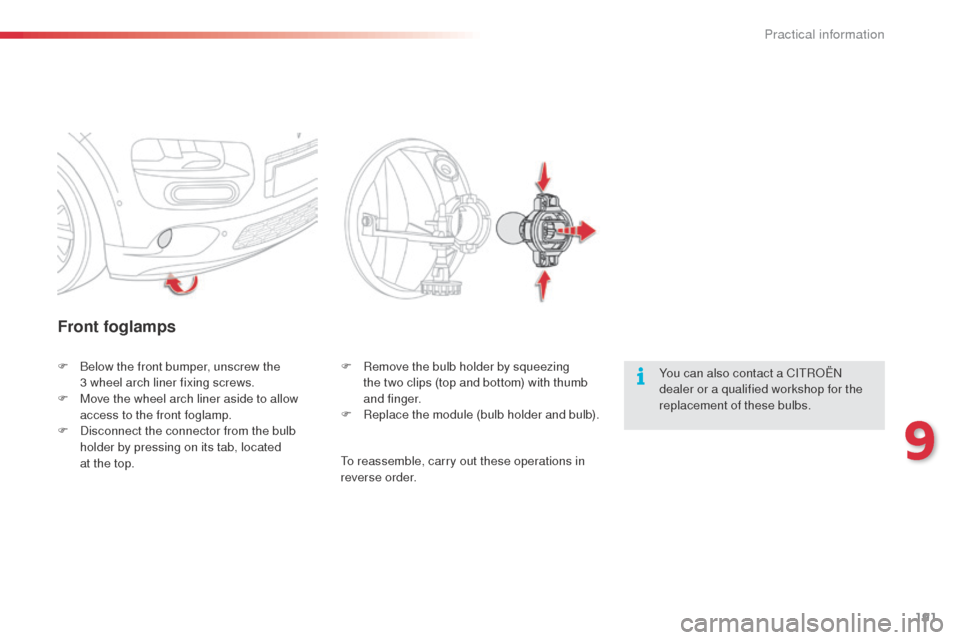
Front foglamps
You can also contact a CITROËN
dealer or a qualified workshop for the
replacement of these bulbs.
F
B
elow the front bumper, unscrew the
3 wheel arch liner fixing screws.
F
M
ove the wheel arch liner aside to allow
access to the front foglamp.
F
D
isconnect the connector from the bulb
holder by pressing on its tab, located
at the top. F
R
emove the bulb holder by squeezing
the two clips (top and bottom) with thumb
and finger.
F
R
eplace the module (bulb holder and bulb).
To reassemble, carry out these operations in
reverse order.
9
Practical information
Page 194 of 331
192
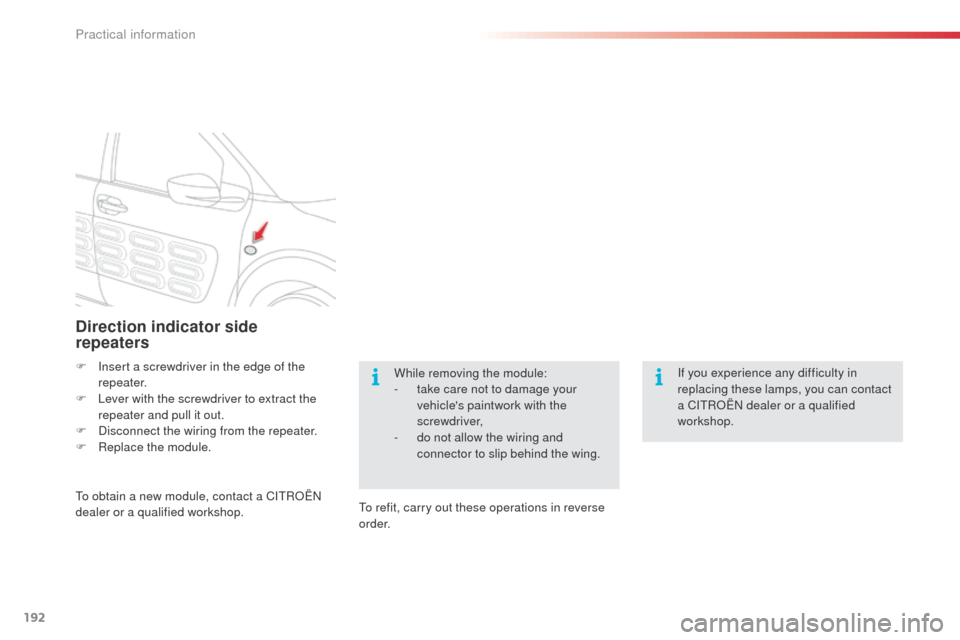
Direction indicator side
repeaters
F Insert a screwdriver in the edge of the repeater.
F
L
ever with the screwdriver to extract the
repeater and pull it out.
F
D
isconnect the wiring from the repeater.
F
R
eplace the module.
To obtain a new module, contact a CITROËN
dealer or a qualified workshop. To refit, carry out these operations in reverse
o r d e r.While removing the module:
-
t
ake care not to damage your
vehicle's paintwork with the
screwdriver,
-
d
o not allow the wiring and
connector to slip behind the wing. If you experience any difficulty in
replacing these lamps, you can contact
a CITROËN dealer or a qualified
workshop.
Practical information
Page 195 of 331
193
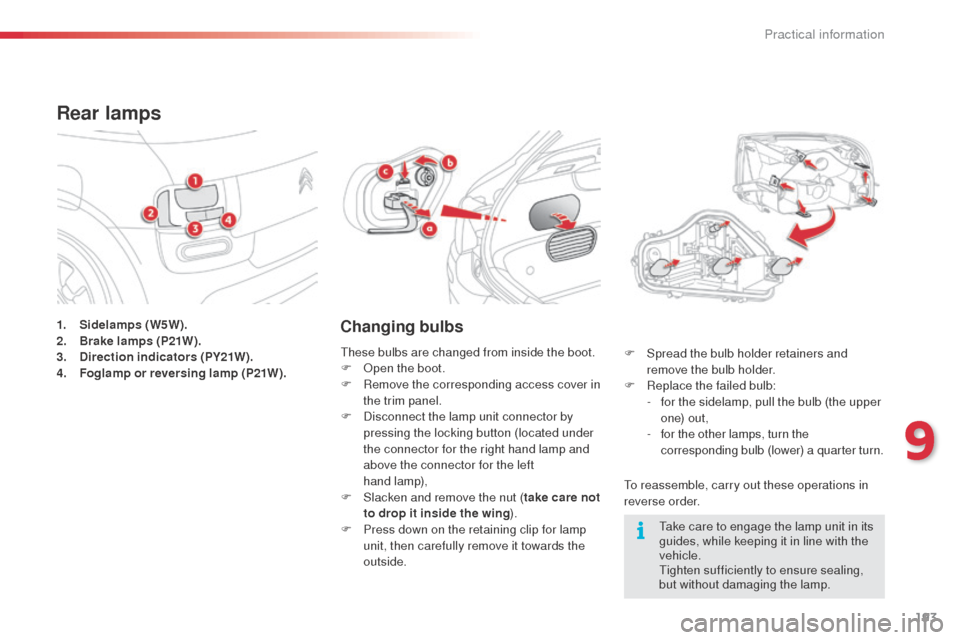
1. Sidelamps (W5W).
2. Brake lamps (P21W).
3.
D
irection indicators (PY21W).
4.
F
oglamp or reversing lamp (P21W).
Rear lamps
Changing bulbs
To reassemble, carry out these operations in
reverse order. F
S
pread the bulb holder retainers and
remove the bulb holder.
F
R
eplace the failed bulb:
-
f
or the sidelamp, pull the bulb (the upper
o n e) o u t ,
-
f
or the other lamps, turn the
corresponding bulb (lower) a quarter turn.
These bulbs are changed from inside the boot.
F
O
pen the boot.
F
R
emove the corresponding access cover in
the trim panel.
F
D
isconnect the lamp unit connector by
pressing the locking button (located under
the connector for the right hand lamp and
above the connector for the left
hand lamp),
F
S
lacken and remove the nut ( take care not
to drop it inside the wing ).
F
P
ress down on the retaining clip for lamp
unit, then carefully remove it towards the
outside. Take care to engage the lamp unit in its
guides, while keeping it in line with the
vehicle.
Tighten sufficiently to ensure sealing,
but without damaging the lamp.
9
Practical information
Page 196 of 331
194
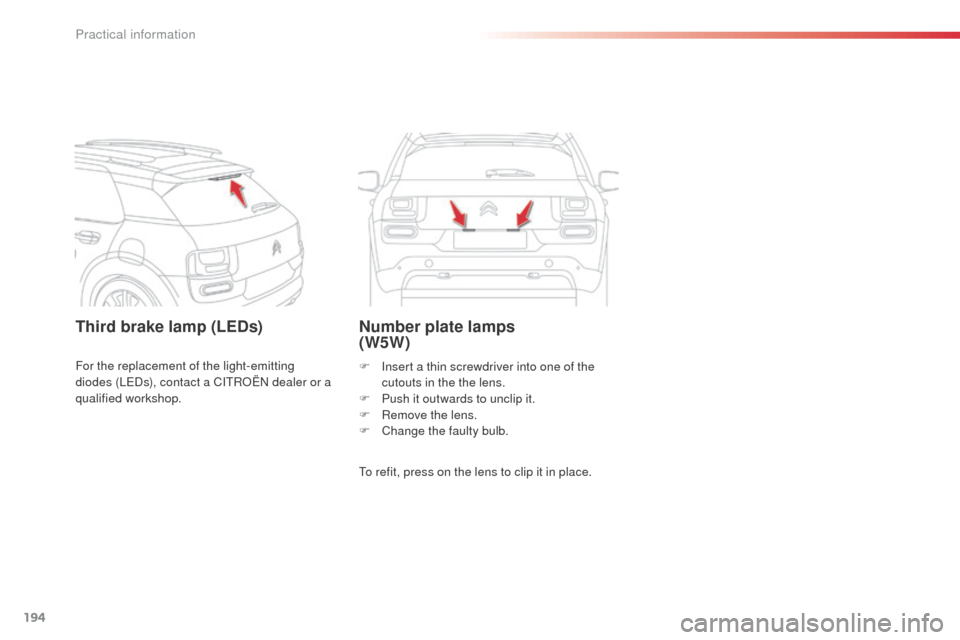
Third brake lamp (LEDs)Number plate lamps
(W5W)
To refit, press on the lens to clip it in place. F
I
nsert a thin screwdriver into one of the
cutouts in the the lens.
F
P
ush it outwards to unclip it.
F
R
emove the lens.
F
C
hange the faulty bulb.
For the replacement of the light-emitting
diodes (LEDs), contact a CITROËN dealer or a
qualified workshop.
Practical information
Page 197 of 331
195
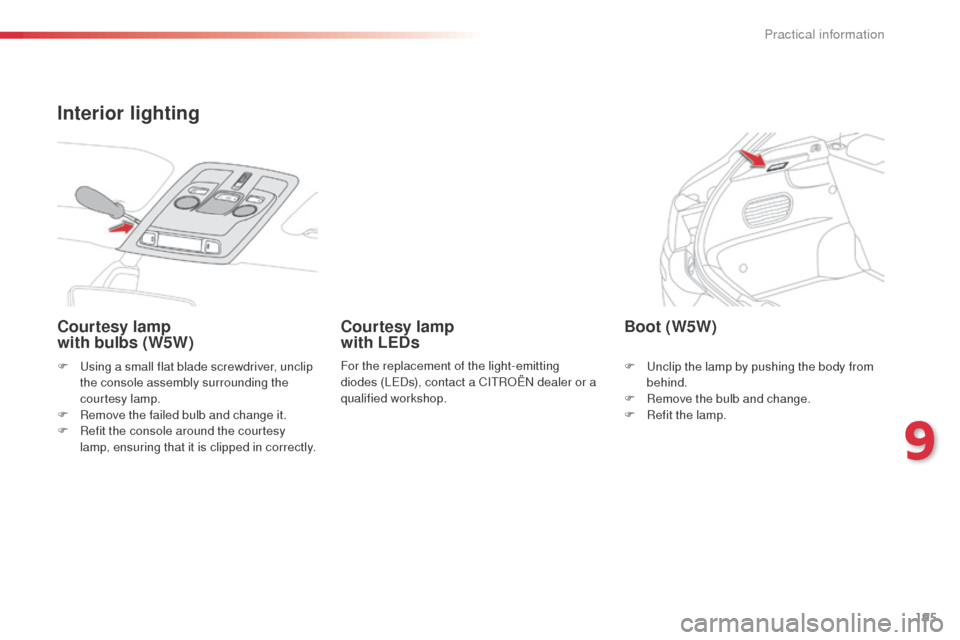
F Using a small flat blade screwdriver, unclip the console assembly surrounding the
courtesy lamp.
F
R
emove the failed bulb and change it.
F
R
efit the console around the courtesy
lamp, ensuring that it is clipped in correctly.
Courtesy lamp
with bulbs (W5W) Courtesy lamp
with LEDs
For the replacement of the light-emitting
diodes (LEDs), contact a CITROËN dealer or a
qualified workshop.
Boot (W5W)
F Unclip the lamp by pushing the body from
behind.
F
R
emove the bulb and change.
F
R
efit the lamp.
Interior lighting
9
Practical information
Page 198 of 331
196
Before changing a fuse:
F t he cause of the failure must be identified
and rectified,
F
a
ll electrical consumers must b
switched
off,
F
t
he vehicle must be immobilised with the
ignition off,
F
i
dentify the failed fuse using the tables and
layout drawings in the following pages.
Changing a fuse
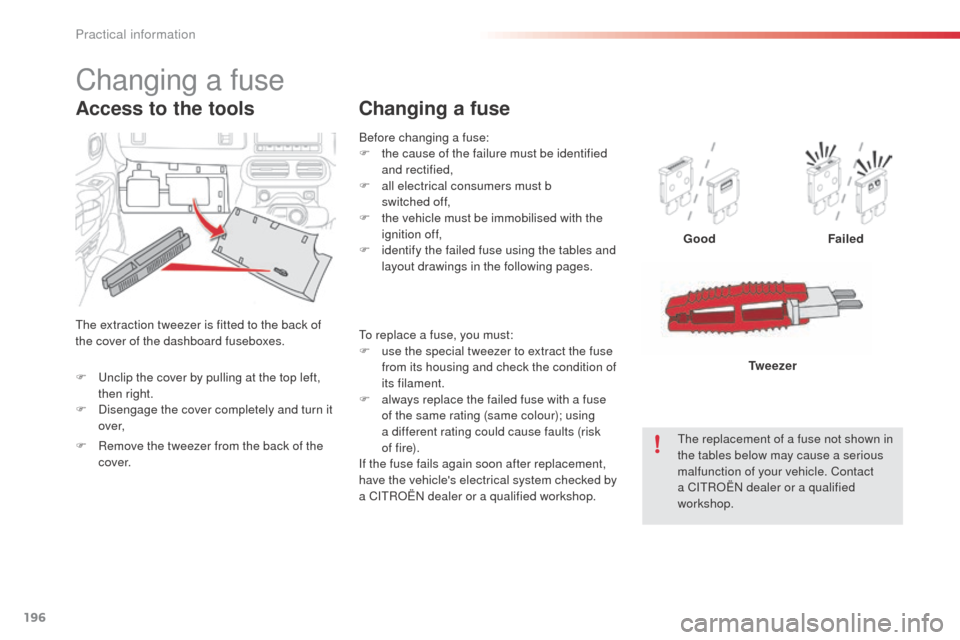
Good Failed
The replacement of a fuse not shown in
the tables below may cause a serious
malfunction of your vehicle. Contact
a CITROËN dealer or a qualified
workshop. Tw e e z e r
Changing a fuse
The extraction tweezer is fitted to the back of
the cover of the dashboard fuseboxes.
Access to the tools
To replace a fuse, you must:
F
u se the special tweezer to extract the fuse
from its housing and check the condition of
its filament.
F
a
lways replace the failed fuse with a fuse
of the same rating (same colour); using
a different rating could cause faults (risk
of f i r e).
If the fuse fails again soon after replacement,
have the vehicle's electrical system checked by
a CITROËN dealer or a qualified workshop.
F
U
nclip the cover by pulling at the top left,
then right.
F
D
isengage the cover completely and turn it
ove r,
F
R
emove the tweezer from the back of the
c ove r.
Practical information
Page 199 of 331
197
CITROËN will not accept responsibility
for the cost incurred in repairing your
vehicle or for rectifying malfunctions
resulting from the installation of
accessories not supplied and not
recommended by CITROËN and
not installed in accordance with its
instructions, in particular when the
combined consumption of all of the
additional equipment connected
exceeds 10 milliamperes.
Installing electrical
accessories
Your vehicle's electrical system is
designed to operate with standard or
optional equipment.
Before installing other electrical
equipment or accessories on your
vehicle, contact a CITROËN dealer or a
qualified workshop.
9
Practical information
Page 200 of 331
198
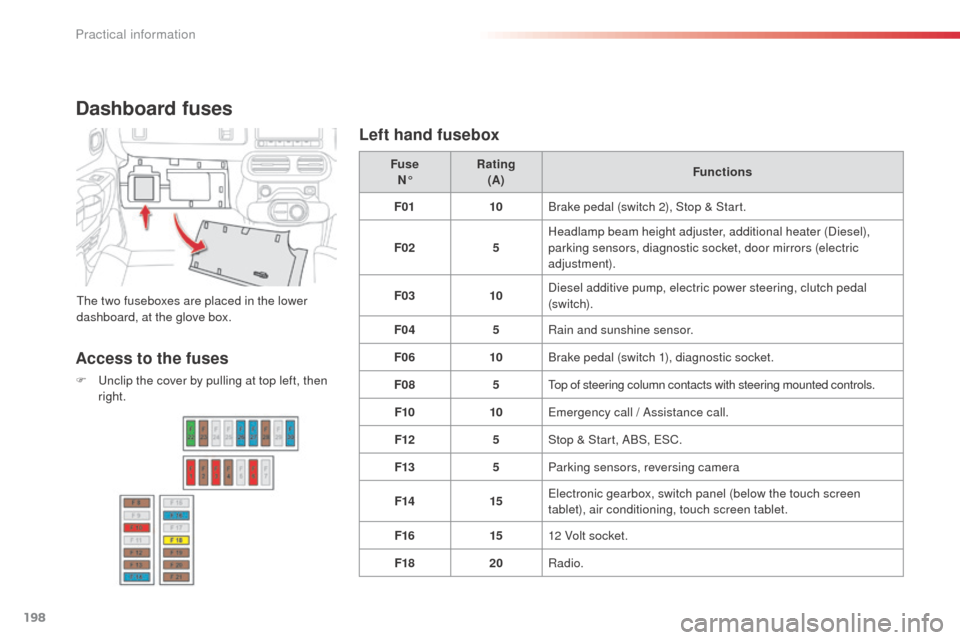
Dashboard fuses
The two fuseboxes are placed in the lower
dashboard, at the glove box.Fuse
N° Rating
(A) Functions
F01 10Brake pedal (switch 2), Stop & Start.
F02 5Headlamp beam height adjuster, additional heater (Diesel),
parking sensors, diagnostic socket, door mirrors (electric
adjustment).
F03 10Diesel additive pump, electric power steering, clutch pedal
(sw i tc h).
F04 5Rain and sunshine sensor.
F06 10Brake pedal (switch 1), diagnostic socket.
F08 5Top of steering column contacts with steering mounted controls.
F10 10Emergency call / Assistance call.
F12 5Stop & Start, ABS, ESC.
F13 5Parking sensors, reversing camera
F14 15Electronic gearbox, switch panel (below the touch screen
tablet), air conditioning, touch screen tablet.
F16 1512 Volt socket.
F18 20Radio.
Access to the fuses
F Unclip the cover by pulling at top left, then
right.
Left hand fusebox
Practical information