display Citroen C4 CACTUS RHD 2014 1.G Owner's Manual
[x] Cancel search | Manufacturer: CITROEN, Model Year: 2014, Model line: C4 CACTUS RHD, Model: Citroen C4 CACTUS RHD 2014 1.GPages: 331, PDF Size: 8.56 MB
Page 9 of 331
7
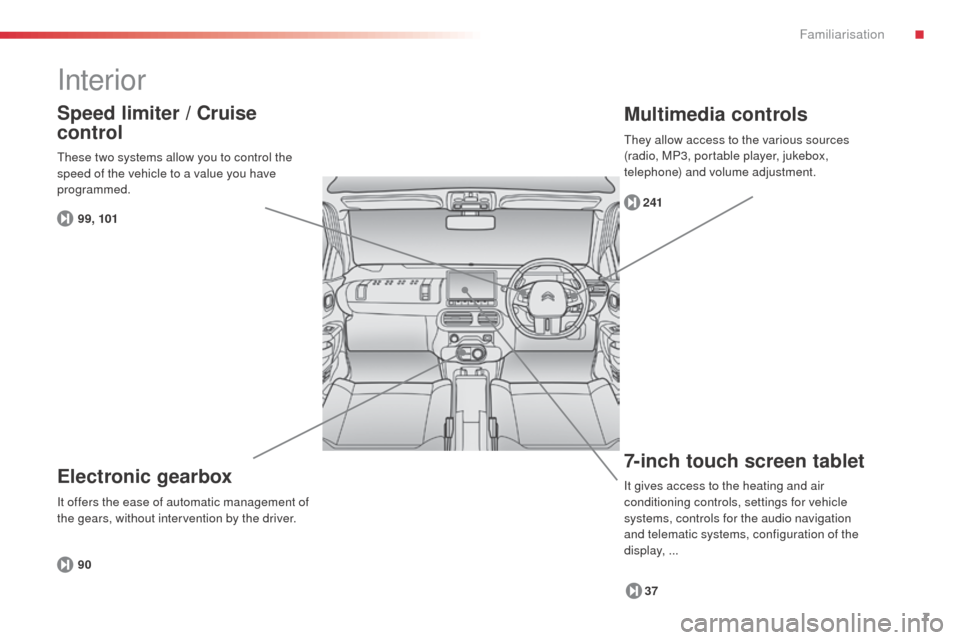
Interior
7-inch touch screen tablet
37
241
Multimedia controls
Electronic gearbox
90
Speed limiter / Cruise
control
99, 101
These two systems allow you to control the
speed of the vehicle to a value you have
programmed.
It offers the ease of automatic management of
the gears, without intervention by the driver.
It gives access to the heating and air
conditioning controls, settings for vehicle
systems, controls for the audio navigation
and telematic systems, configuration of the
display,
...
They allow access to the various sources
(radio, MP3, portable player, jukebox,
telephone) and volume adjustment.
.
Familiarisation
Page 11 of 331

9
7-inch touch screen tablet
Operation
Use the buttons arranged either side of the
touch screen tablet for access to the menus,
then press on the virtual buttons in the screen.
Each menu is displayed over one or two pages
(primary page and secondary page).For access to the secondary page
(from the primary page).
To return to the primary page
(from the secondary page).
For access to additional information
and to the settings for certain
functions.
To confirm.
To quit.
Menus
37 "
Air conditioning ".
Do not use pointed objects on the touch
screen.
Do not touch the touch screen with wet
hands. Use a clean soft cloth to clean the touch
screen tablet.
"
Driving assistance ".
" Media ".
" Navigation ". "
Configuration ".
" Connected services ".
" Telephone ".
.
Familiarisation
Page 17 of 331
15
Driving safely
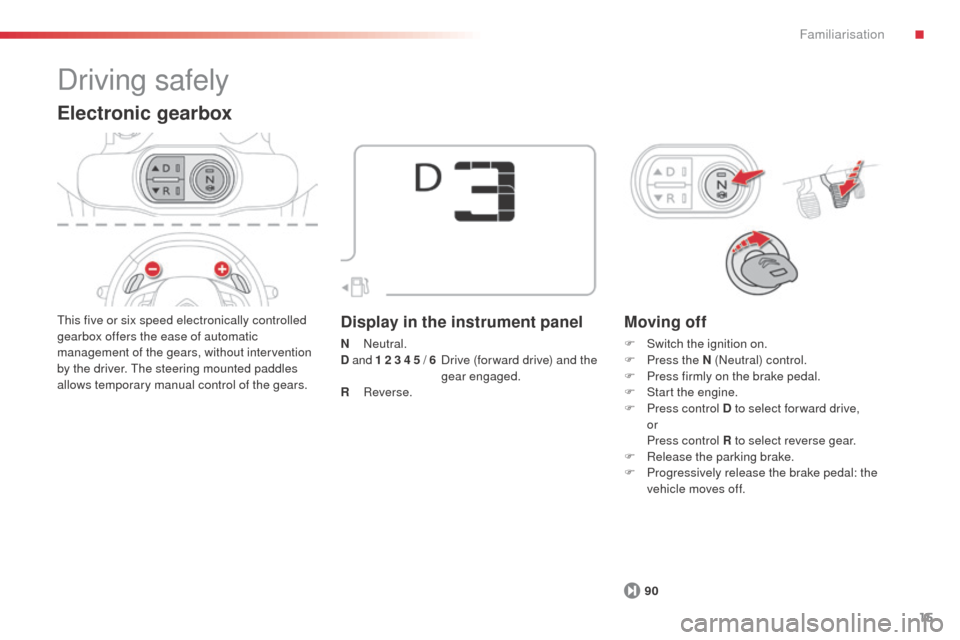
Electronic gearbox
This five or six speed electronically controlled
gearbox offers the ease of automatic
management of the gears, without intervention
by the driver. The steering mounted paddles
allows temporary manual control of the gears.Display in the instrument panel
N Neutral.
D a
nd 1 2 3 4 5 / 6 D rive (for ward drive) and the
gear engaged.
R
Reverse.
Moving off
F Switch the ignition on.
F P ress the N (Neutral) control.
F
P
ress firmly on the brake pedal.
F
S
tart the engine.
F
P
ress control D to select for ward drive,
or
P
ress control R to select reverse gear.
F
R
elease the parking brake.
F
P
rogressively release the brake pedal: the
vehicle moves off.
90
.
Familiarisation
Page 19 of 331
17
Driving safely
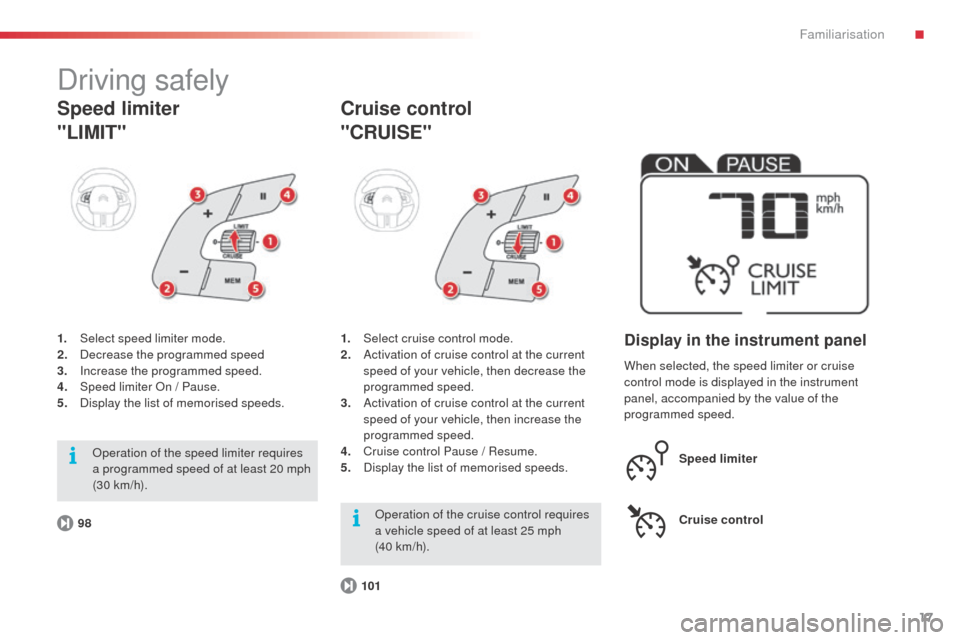
1. Select speed limiter mode.
2. Decrease the programmed speed
3.
In
crease the programmed speed.
4.
S
peed limiter On / Pause.
5.
D
isplay the list of memorised speeds.
Speed limiter
"LIMIT"
98 1.
Sel
ect cruise control mode.
2.
A
ctivation of cruise control at the current
speed of your vehicle, then decrease the
programmed speed.
3.
A
ctivation of cruise control at the current
speed of your vehicle, then increase the
programmed speed.
4.
C
ruise control Pause / Resume.
5.
D
isplay the list of memorised speeds.
Cruise control
"CRUISE"
101When selected, the speed limiter or cruise
control mode is displayed in the instrument
panel, accompanied by the value of the
programmed speed.
Display in the instrument panel
Speed limiter
Cruise control
Operation of the speed limiter requires
a programmed speed of at least 20 mph
(30 km/h).
Operation of the cruise control requires
a vehicle speed of at least 25 mph
(40 km/h).
.
Familiarisation
Page 20 of 331
18
Optimise the use of your gearbox
With a manual gearbox, move off gently and change up without waiting.
During acceleration change up early.
The gear efficiency indicator invites you engage the most suitable gear:
as soon as the indication is displayed in the instrument panel, follow it
straight away.
Control the use of your electrical
equipment
Before moving off, if the passenger compartment is too warm, ventilate it
by opening the windows and air vents before using the air conditioning.
Above 30 mph (50 km/h), close the windows and leave the air vents
open.
Remember to make use of equipment that can help keep the
temperature in the passenger compartment down (sunroof and window
blinds...).
To save energy, do not set the air conditioning at too low a temperature.
As soon as the desired temperature has been reached, limit the use of
the air conditioning, except if regulation is automatic.
Switch off the demisting and defrosting controls as soon as you consider
possible.
Switch off the heated seat as soon as possible.
Switch off the headlamps and foglamp when the level of light does not
require their use.
Avoid running the engine before moving off, particularly in winter; your
vehicle will warm up much faster while driving.
As a passenger, if you avoid connecting your multimedia devices
(film, music, video game...), you will contribute towards limiting the
consumption of electrical energy, and so of fuel.
Disconnect your portable devices before leaving the vehicle.
Eco-driving
Eco-driving is a range of everyday practices that allow the motorist to optimise their fuel consumption and CO2 emissions.
With an electronic gearbox, do not press the accelerator pedal heavily
or suddenly.
Drive smoothly
Maintain a safe distance between vehicles, use engine braking rather
than the brake pedal, and press the accelerator progressively. These
practices contribute towards a reduction in fuel consumption and CO
2
emissions and also help reduce the background traffic noise.
If your vehicle has cruise control, make use of the system at speeds
above 25 mph (40 km/h) when the traffic is flowing well.
Familiarisation
Page 22 of 331
20
Instrument panel
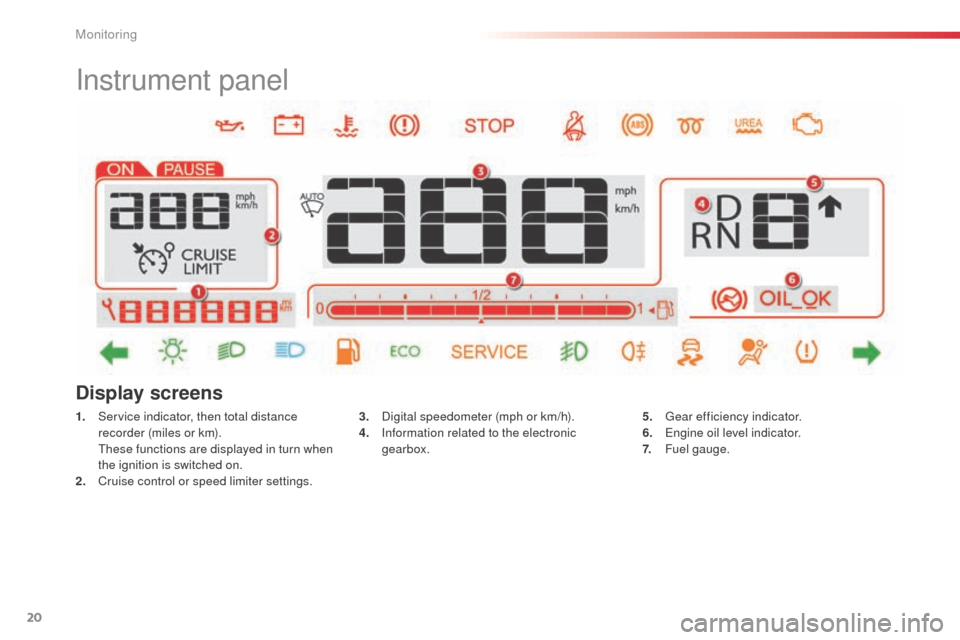
1. Service indicator, then total distance recorder (miles or km).
T
hese functions are displayed in turn when
the ignition is switched on.
2.
C
ruise control or speed limiter settings. 3. D
igital speedometer (mph or km/h).
4. I nformation related to the electronic
gearbox.
Display screens
5. Gear efficiency indicator.
6. E ngine oil level indicator.
7.
F
uel gauge.
Monitoring
Page 23 of 331
21
Indicator and warning lamps
Certain warning lamps may come on in
one of two modes: fixed (continuous) or
flashing.
Only by relating the type of illumination
to the operation of the vehicle can it
be determined whether the situation is
normal or a fault has occurred. In the
event of a fault, the illumination of the
warning lamp may be accompanied by
a message.
Refer to the tables in the following
pages for more information.
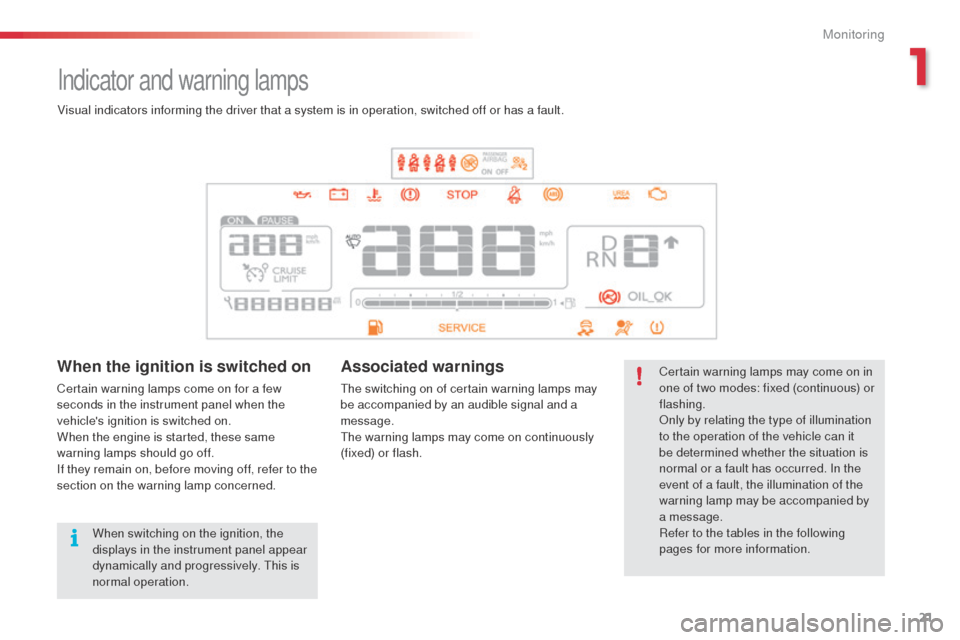
Visual indicators informing the driver that a system is in operation, switched off or has a fault.When the ignition is switched on
Certain warning lamps come on for a few
seconds in the instrument panel when the
vehicle's ignition is switched on.
When the engine is started, these same
warning lamps should go off.
If they remain on, before moving off, refer to the
section on the warning lamp concerned.
Associated warnings
The switching on of certain warning lamps may
be accompanied by an audible signal and a
message.
The warning lamps may come on continuously
(fixed) or flash.
When switching on the ignition, the
displays in the instrument panel appear
dynamically and progressively. This is
normal operation.
1
Monitoring
Page 27 of 331
25
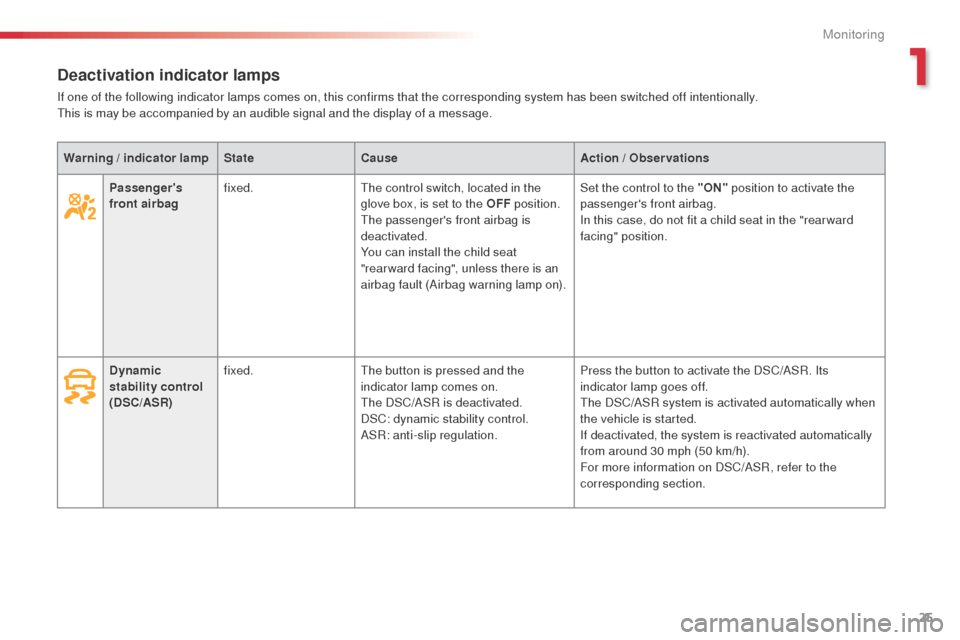
Passenger's
front airbag fixed.
The control switch, located in the
glove box, is set to the OFF position.
The passenger's front airbag is
deactivated.
You can install the child seat
"rear ward facing", unless there is an
airbag fault (Airbag warning lamp on). Set the control to the "ON"
position to activate the
passenger's front airbag.
In this case, do not fit a child seat in the "rear ward
facing" position.
Dynamic
stability control
(DSC/ASR) fixed.
The button is pressed and the
indicator lamp comes on.
The DSC/ASR is deactivated.
DSC: dynamic stability control.
ASR: anti-slip regulation. Press the button to activate the DSC/ASR. Its
indicator lamp goes off.
The DSC/ASR system is activated automatically when
the vehicle is started.
If deactivated, the system is reactivated automatically
from around 30 mph (50 km/h).
For more information on DSC/ASR, refer to the
corresponding section.
Warning / indicator lamp
StateCause Action / Observations
Deactivation indicator lamps
If one of the following indicator lamps comes on, this confirms that the corresponding system has been switched off intentionally.
This is may be accompanied by an audible signal and the display of a message.
1
Monitoring
Page 35 of 331

33
Service indicator
System which informs the driver when the
next service is due, in accordance with the
manufacturer's servicing schedule.
More than 1 800 miles (3 000 km)
remain before the next service is due
When the ignition is switched on, no service
information appears in the screen.
Between 600 miles (1 000 km) and 1 800 miles
(3 000 km) remain before the next service is due
For 5 seconds after the ignition is switched on,
the spanner symbolising the service operations
comes on. The distance recorder display line
indicates the distance remaining before the
next service is due.
Example: 1 700 miles (2 800 km) remain
before the next service is due.
For 5 seconds after the ignition is switched on,
the screen indicates:
5 seconds after the ignition is switched on,
the spanner goes off ; the distance recorder
resumes its normal operation. The screen then
indicates the total distance.
Indicators
The point at which the next service is due is
calculated from the last indicator zero reset,
depending on the distance travelled and the
time elapsed since the last service.
For BlueHDi Diesel versions, the
degree of deterioration of the engine oil
is also taken into account (depending
on the country of sale).
1
Monitoring
Page 37 of 331

35
Service indicator zero
reset
After each service, the service indicator must
be reset to zero.
If you have carried out the service on your
vehicle yourself:
F
s
witch off the ignition,
F
p
ress and hold the button on the end of the
lighting control stalk,
F
s
witch on the ignition; the distance recorder
display begins a countdown,
F
w
hen the display indicates "=0" , release
the button; the spanner disappears. Following this operation, if you wish to
disconnect the battery, lock the vehicle
and wait at least five minutes for the
zero reset to be taken into account.
Retrieving the service
information
You can access the service information at any
time in the touch screen tablet.
F
Sel
ect the "Driving assistance "
menu.
F
I
n the secondary page, select
" Diagnostic ".
The servicing information is displayed in the
screen.
1
Monitoring