instrument panel Citroen C4 CACTUS RHD 2014 1.G Owner's Manual
[x] Cancel search | Manufacturer: CITROEN, Model Year: 2014, Model line: C4 CACTUS RHD, Model: Citroen C4 CACTUS RHD 2014 1.GPages: 331, PDF Size: 8.56 MB
Page 4 of 331
.
.
Lighting control 113
Automatic illumination of headlamps
1
17
Daytime running lamps / Sidelamps (LEDs)
1
18
Headlamp adjustment
1
20
Cornering lighting
1
21
Wiper control stalk
1
22
Automatic rain sensitive wipers
1
24
Panoramic sunroof
1
26
Courtesy lamp
1
27
Brightness of instruments and controls
1
28
Boot lamp
1
28
Visibility
Instrument panel 2 0
Indicator and warning lamps
2
1
Indicators
33
7
-inch touch screen tablet
3
7
Trip computer
4
3
Distance recorders
4
5
Setting the date and time
4
6
Monitoring
Familiarisation
Remote control key 4
7
Central locking
5
2
Doors
53
Boot
55
Front electric window controls
5
6
Rear door windows
5
7
Access
Front seats 58
Rear seats
6
0
Mirrors
62
Steering wheel adjustment
6
4
Ventilation
65
Heating
67
Manual air conditioning
6
9
Automatic air conditioning
7
1
Front Demist - Defrost
7
5
Rear screen demist - defrost
7
6
Comfort
Interior fittings 77
Boot fittings
8
3
Fittings
Starting - Stopping the engine 86
Parking brake
87
5
-speed manual gearbox
8
8
Gear ef ficiency indicator
8
9
Electronic gearbox
9
0
Hill start assist
9
4
Stop & Start
9
5
Speed limiter
9
8
Cruise control
1
01
Memorising speeds
1
04
Parking sensors
1
05
Reversing camera
1
07
Park Assist
1
08
Driving
Eco-driving
Contents
Page 10 of 331
8
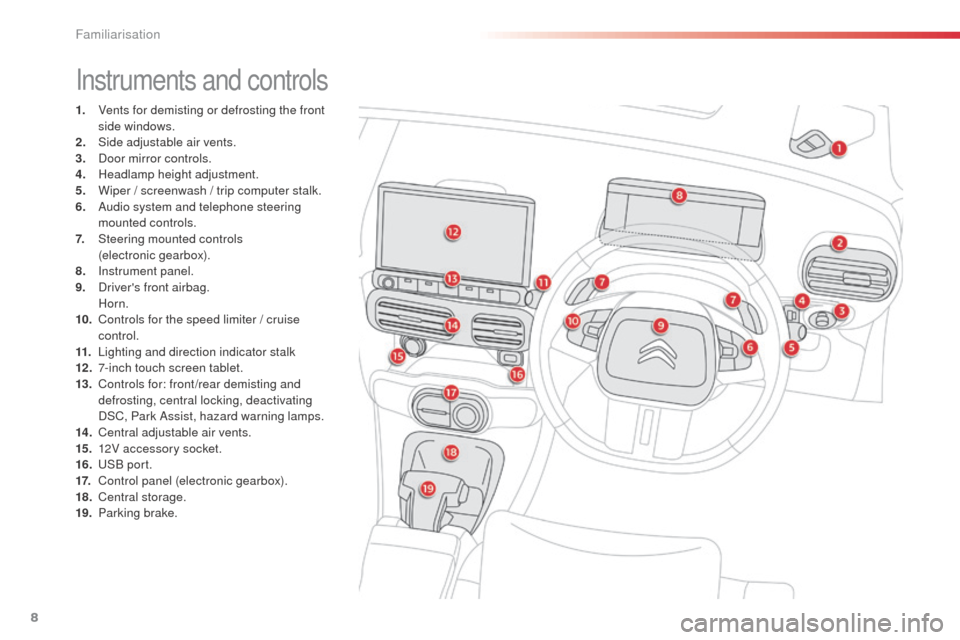
Instruments and controls
1. Vents for demisting or defrosting the front side windows.
2.
S
ide adjustable air vents.
3.
D
oor mirror controls.
4.
H
eadlamp height adjustment.
5.
W
iper / screenwash / trip computer stalk.
6.
A
udio system and telephone steering
mounted controls.
7.
S
teering mounted controls
(electronic gearbox).
8.
I
nstrument panel.
9.
D
river's front airbag.
Horn.
10.
C
ontrols for the speed limiter / cruise
control.
11.
L
ighting and direction indicator stalk
12 .
7
-inch touch screen tablet.
13.
C
ontrols for: front /rear demisting and
defrosting, central locking, deactivating
DSC, Park Assist, hazard warning lamps.
14 .
C
entral adjustable air vents.
15.
1
2V accessory socket.
16.
U
SB port.
17.
C
ontrol panel (electronic gearbox).
18.
C
entral storage.
19.
P
arking brake.
Familiarisation
Page 16 of 331
14
Passenger's front airbag
Passenger safety
160
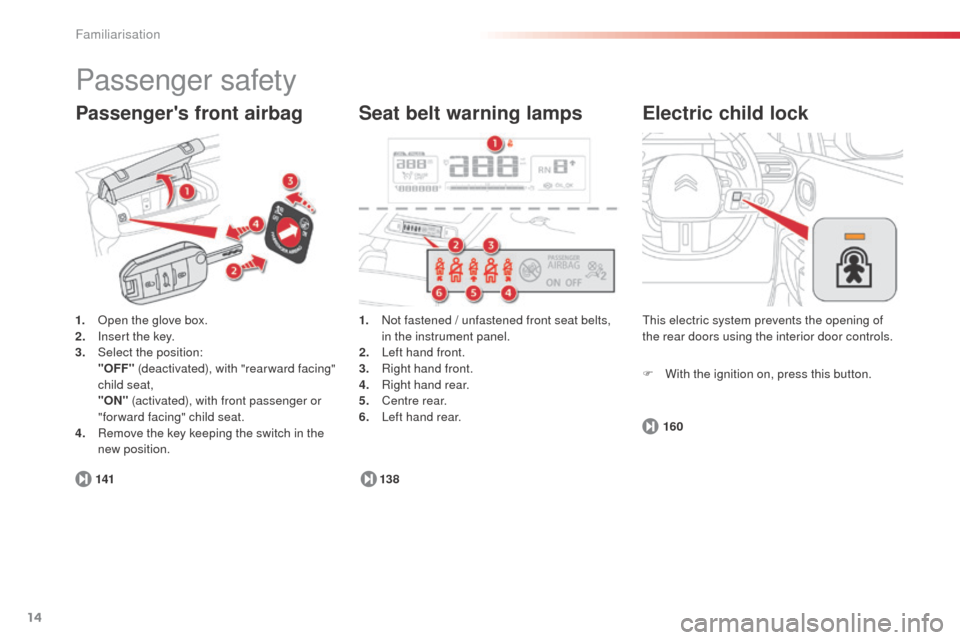
141 1.
N
ot fastened / unfastened front seat belts,
in the instrument panel.
2.
L
eft hand front.
3.
R
ight hand front.
4.
R
ight hand rear.
5.
C
entre rear.
6. L
eft hand rear.
138
Seat belt warning lamps
This electric system prevents the opening of
the rear doors using the interior door controls.
Electric child lock
1. Open the glove box.
2. I nsert the key.
3.
Sel
ect the position:
"
OFF" (deactivated), with "rear ward facing"
child seat,
"ON" (activated), with front passenger or
"for ward facing" child seat.
4.
R
emove the key keeping the switch in the
new position. F
W
ith the ignition on, press this button.
Familiarisation
Page 17 of 331
15
Driving safely
Electronic gearbox
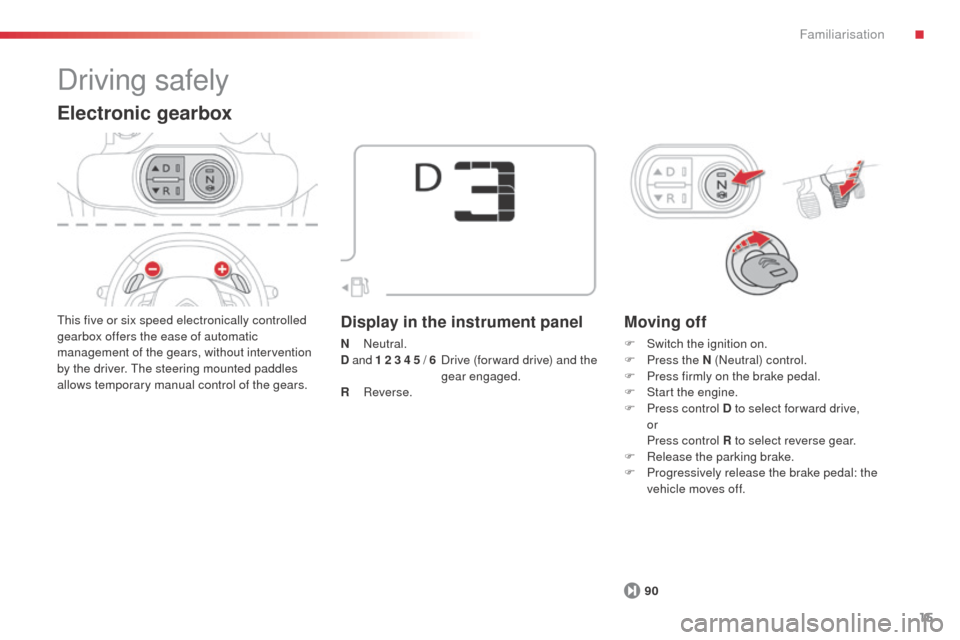
This five or six speed electronically controlled
gearbox offers the ease of automatic
management of the gears, without intervention
by the driver. The steering mounted paddles
allows temporary manual control of the gears.Display in the instrument panel
N Neutral.
D a
nd 1 2 3 4 5 / 6 D rive (for ward drive) and the
gear engaged.
R
Reverse.
Moving off
F Switch the ignition on.
F P ress the N (Neutral) control.
F
P
ress firmly on the brake pedal.
F
S
tart the engine.
F
P
ress control D to select for ward drive,
or
P
ress control R to select reverse gear.
F
R
elease the parking brake.
F
P
rogressively release the brake pedal: the
vehicle moves off.
90
.
Familiarisation
Page 18 of 331
16
Stop & Start
Going into engine STOP mode
95The "
ECO" warning lamp comes on in
the instrument panel and the engine
automatically goes into standby:
Going into engine START mode Deactivation / Reactivation
96
97
The "
ECO" warning lamp goes off and
the engine restarts automatically:
-
w
ith a manual gearbox
, when you fully
depress the clutch pedal,
-
w
ith an electronic gearbox
:
●
c
ontrol on
D, when you release the brake
pedal,
●
c
ontrol on N and brake pedal released,
when you press control D ,
●
w
hen you engage reverse.
-
w
ith a manual gearbox
, vehicle
stationary, when you put the gearbox into
neutral and release the clutch pedal,
-
w
ith an electronic gearbox
, vehicle
stationary or at speeds below 5 mph
(8
km/h) (depending on version), when you
put the gearbox into neutral (control on N )
or when you press the brake pedal.
In certain special circumstances, START
mode may be invoked automatically; the " ECO"
warning lamp flashes for few seconds, then
goes off.
In some circumstances, STOP mode may not
be available; the "
ECO" warning lamp flashes
for few seconds, then goes off.
Driving safely
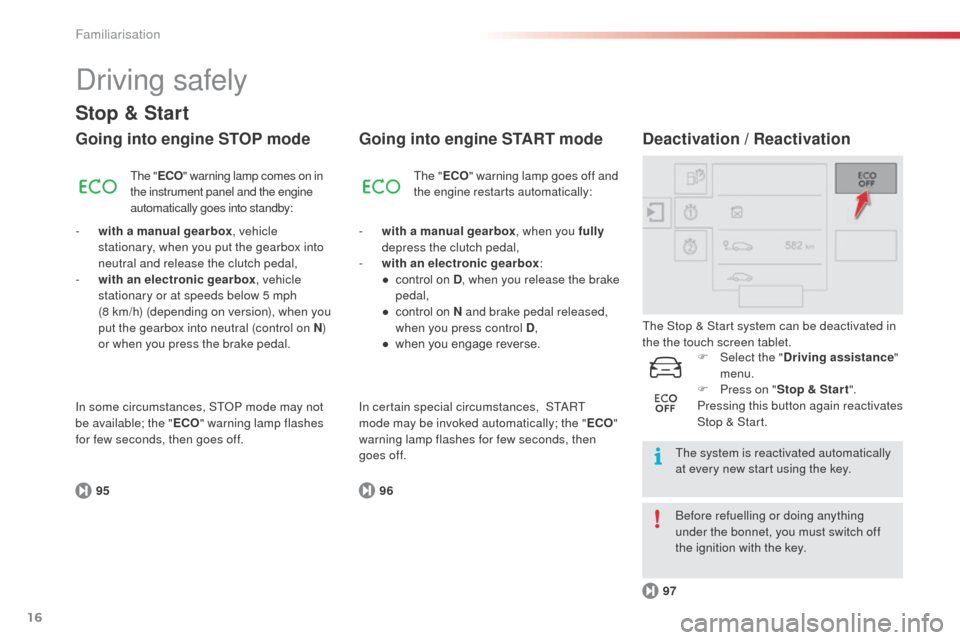
F Select the " Driving assistance "
menu.
F
P
ress on " Stop & Star t ".
Pressing this button again reactivates
Stop & Start.
Before refuelling or doing anything
under the bonnet, you must switch off
the ignition with the key. The system is reactivated automatically
at every new start using the key.
The Stop & Start system can be deactivated in
the the touch screen tablet.
Familiarisation
Page 19 of 331
17
Driving safely
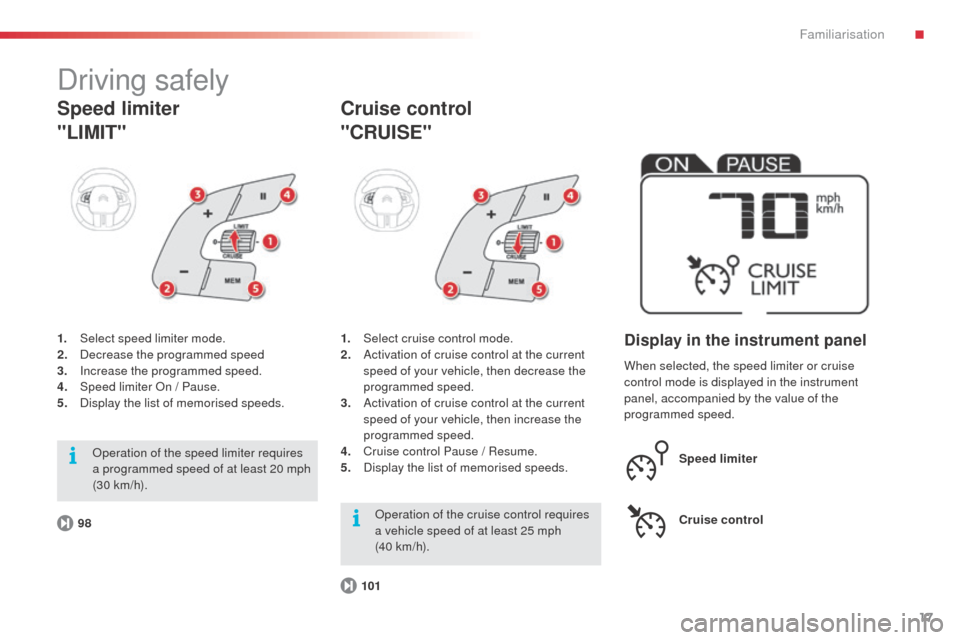
1. Select speed limiter mode.
2. Decrease the programmed speed
3.
In
crease the programmed speed.
4.
S
peed limiter On / Pause.
5.
D
isplay the list of memorised speeds.
Speed limiter
"LIMIT"
98 1.
Sel
ect cruise control mode.
2.
A
ctivation of cruise control at the current
speed of your vehicle, then decrease the
programmed speed.
3.
A
ctivation of cruise control at the current
speed of your vehicle, then increase the
programmed speed.
4.
C
ruise control Pause / Resume.
5.
D
isplay the list of memorised speeds.
Cruise control
"CRUISE"
101When selected, the speed limiter or cruise
control mode is displayed in the instrument
panel, accompanied by the value of the
programmed speed.
Display in the instrument panel
Speed limiter
Cruise control
Operation of the speed limiter requires
a programmed speed of at least 20 mph
(30 km/h).
Operation of the cruise control requires
a vehicle speed of at least 25 mph
(40 km/h).
.
Familiarisation
Page 20 of 331
18
Optimise the use of your gearbox
With a manual gearbox, move off gently and change up without waiting.
During acceleration change up early.
The gear efficiency indicator invites you engage the most suitable gear:
as soon as the indication is displayed in the instrument panel, follow it
straight away.
Control the use of your electrical
equipment
Before moving off, if the passenger compartment is too warm, ventilate it
by opening the windows and air vents before using the air conditioning.
Above 30 mph (50 km/h), close the windows and leave the air vents
open.
Remember to make use of equipment that can help keep the
temperature in the passenger compartment down (sunroof and window
blinds...).
To save energy, do not set the air conditioning at too low a temperature.
As soon as the desired temperature has been reached, limit the use of
the air conditioning, except if regulation is automatic.
Switch off the demisting and defrosting controls as soon as you consider
possible.
Switch off the heated seat as soon as possible.
Switch off the headlamps and foglamp when the level of light does not
require their use.
Avoid running the engine before moving off, particularly in winter; your
vehicle will warm up much faster while driving.
As a passenger, if you avoid connecting your multimedia devices
(film, music, video game...), you will contribute towards limiting the
consumption of electrical energy, and so of fuel.
Disconnect your portable devices before leaving the vehicle.
Eco-driving
Eco-driving is a range of everyday practices that allow the motorist to optimise their fuel consumption and CO2 emissions.
With an electronic gearbox, do not press the accelerator pedal heavily
or suddenly.
Drive smoothly
Maintain a safe distance between vehicles, use engine braking rather
than the brake pedal, and press the accelerator progressively. These
practices contribute towards a reduction in fuel consumption and CO
2
emissions and also help reduce the background traffic noise.
If your vehicle has cruise control, make use of the system at speeds
above 25 mph (40 km/h) when the traffic is flowing well.
Familiarisation
Page 22 of 331
20
Instrument panel
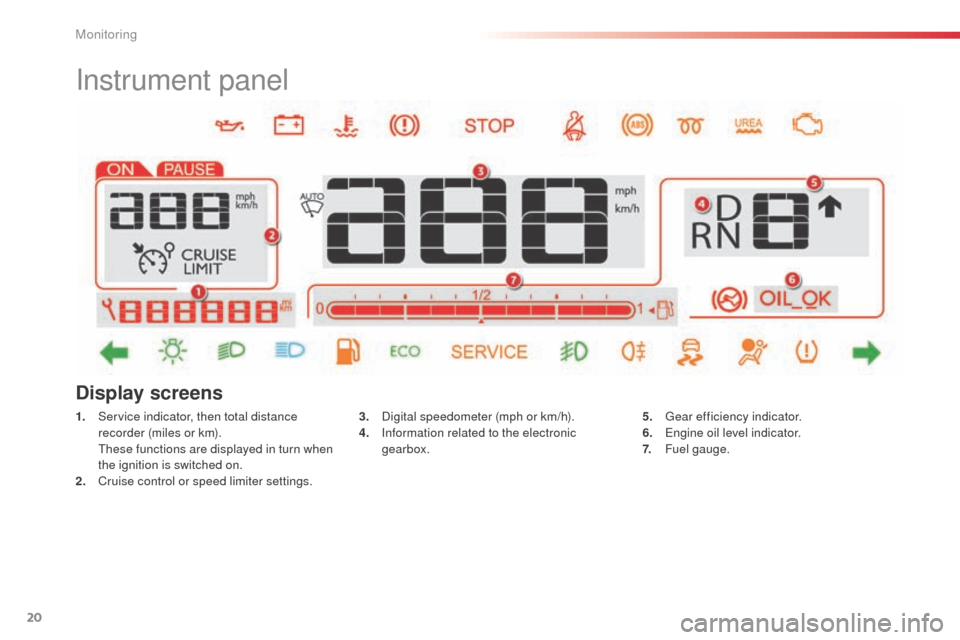
1. Service indicator, then total distance recorder (miles or km).
T
hese functions are displayed in turn when
the ignition is switched on.
2.
C
ruise control or speed limiter settings. 3. D
igital speedometer (mph or km/h).
4. I nformation related to the electronic
gearbox.
Display screens
5. Gear efficiency indicator.
6. E ngine oil level indicator.
7.
F
uel gauge.
Monitoring
Page 23 of 331
21
Indicator and warning lamps
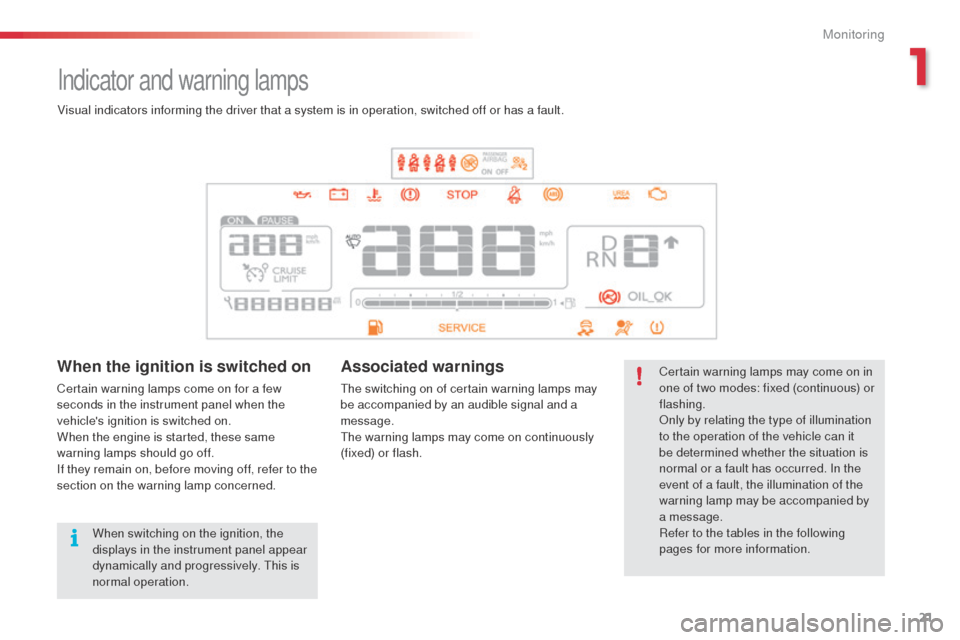
Certain warning lamps may come on in
one of two modes: fixed (continuous) or
flashing.
Only by relating the type of illumination
to the operation of the vehicle can it
be determined whether the situation is
normal or a fault has occurred. In the
event of a fault, the illumination of the
warning lamp may be accompanied by
a message.
Refer to the tables in the following
pages for more information.
Visual indicators informing the driver that a system is in operation, switched off or has a fault.When the ignition is switched on
Certain warning lamps come on for a few
seconds in the instrument panel when the
vehicle's ignition is switched on.
When the engine is started, these same
warning lamps should go off.
If they remain on, before moving off, refer to the
section on the warning lamp concerned.
Associated warnings
The switching on of certain warning lamps may
be accompanied by an audible signal and a
message.
The warning lamps may come on continuously
(fixed) or flash.
When switching on the ignition, the
displays in the instrument panel appear
dynamically and progressively. This is
normal operation.
1
Monitoring
Page 38 of 331
36
Engine oil level
indicator
(depending on version)
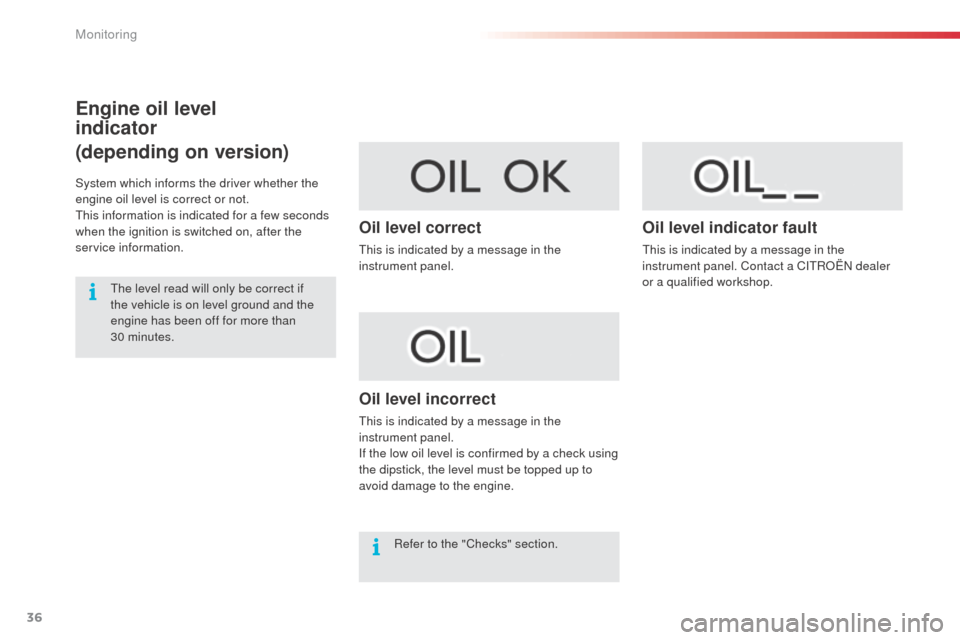
System which informs the driver whether the
engine oil level is correct or not.
This information is indicated for a few seconds
when the ignition is switched on, after the
service information.The level read will only be correct if
the vehicle is on level ground and the
engine has been off for more than
30 minutes.
Oil level correct
This is indicated by a message in the
instrument panel.
Oil level incorrect
This is indicated by a message in the
instrument panel.
If the low oil level is confirmed by a check using
the dipstick, the level must be topped up to
avoid damage to the engine.
Oil level indicator fault
This is indicated by a message in the
instrument panel. Contact a CITROËN dealer
or a qualified workshop.
Refer to the "Checks" section.
Monitoring