steering Citroen C4 CACTUS RHD 2015 1.G Owner's Guide
[x] Cancel search | Manufacturer: CITROEN, Model Year: 2015, Model line: C4 CACTUS RHD, Model: Citroen C4 CACTUS RHD 2015 1.GPages: 326, PDF Size: 8.56 MB
Page 172 of 326
170
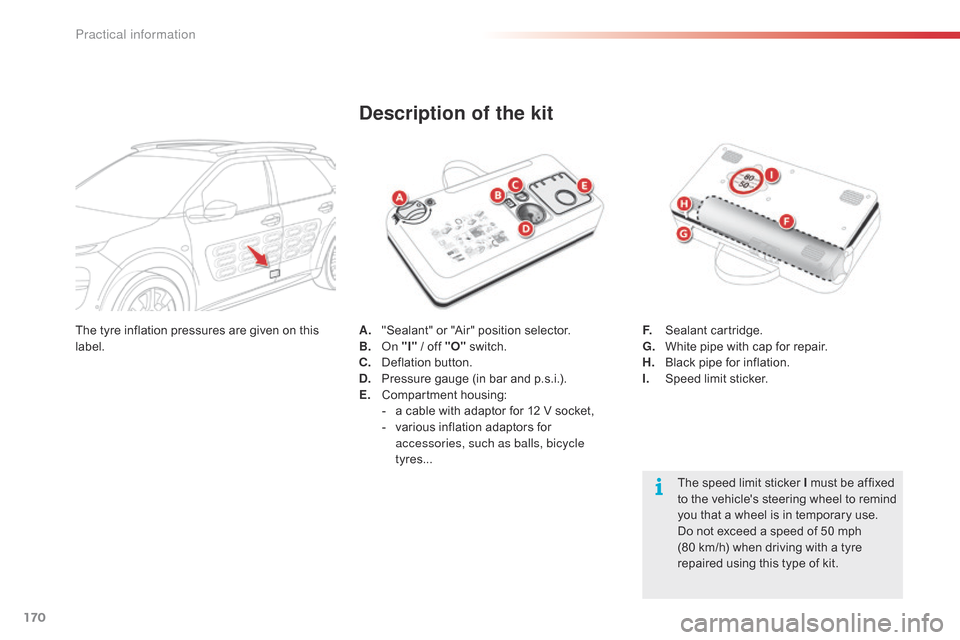
A. "Sealant" or "Air" position selector.
B. on "
I" / off "O" s witch.
C.
D
eflation button.
D.
P
ressure gauge (in bar and p.s.i.).
E.
C
ompartment
h
ousing:
-
a
cable with adaptor for 12 V socket,
-
v
arious inflation adaptors for
a
ccessories, such as balls, bicycle
tyres...
Description of the kit
The speed limit sticker I must be affixed t o the vehicle's steering wheel to remind
y
ou that a wheel is in temporary use.
Do
not exceed a speed of 50 mph
(80
km/h) when driving with a tyre
r
epaired using this type of kit.
F.
S
ealant
c
artridge.
G.
W
hite pipe with cap for repair.
H.
B
lack pipe for inflation.
I.
S
peed limit sticker.
The
tyre
inflation
pressures
are
given
on
this
lab
el.
Practical information
Page 195 of 326
193
Dashboard fuses
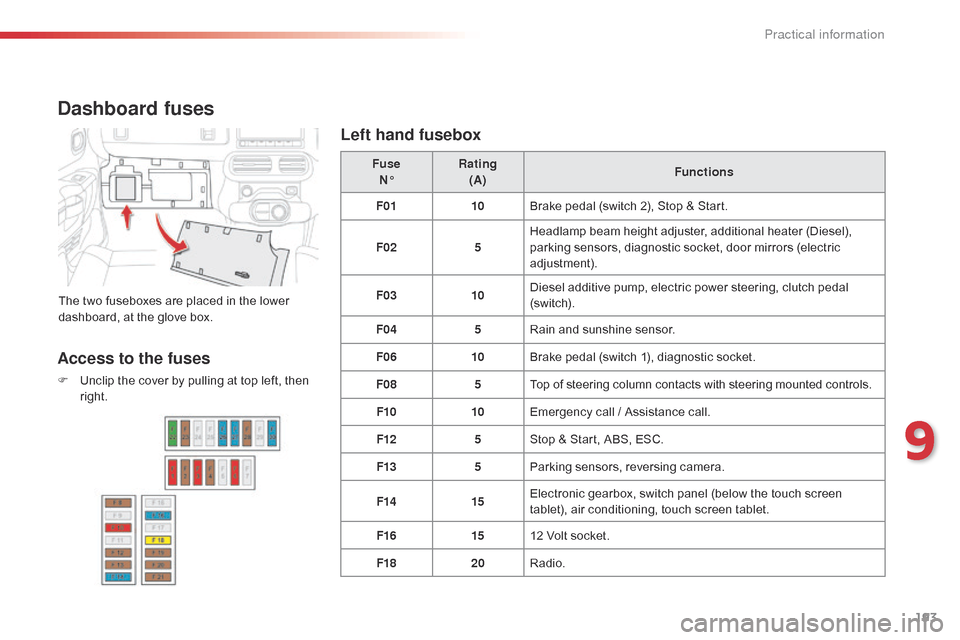
The two fuseboxes are placed in the lower dashboard, at the glove box. Fuse
N° Rating
(A) Functions
F01 10Brake pedal (switch 2), Stop & Start.
F02 5Headlamp beam height adjuster, additional heater (Diesel),
p
arking sensors, diagnostic socket, door mirrors (electric
adj
ustment).
F03 10Diesel additive pump, electric power steering, clutch pedal (
sw i tc h).
F04 5Rain
and sunshine sensor.
F06 10Brake
pedal (switch 1), diagnostic socket.
F08 5Top
of steering column contacts with steering mounted controls.
F10 10Emergency
call / Assistance call.
F12 5Stop
& Start, ABS, ESC.
F13 5Parking
sensors, reversing camera.
F14 15Electronic
gearbox, switch panel (below the touch screen
t
ablet), air conditioning, touch screen tablet.
F16 1512
Volt socket.
F18 20Radio.
Access to the fuses
F Unclip the cover by pulling at top left, then r
ight.
Left hand fusebox
9
Practical information
Page 199 of 326
197
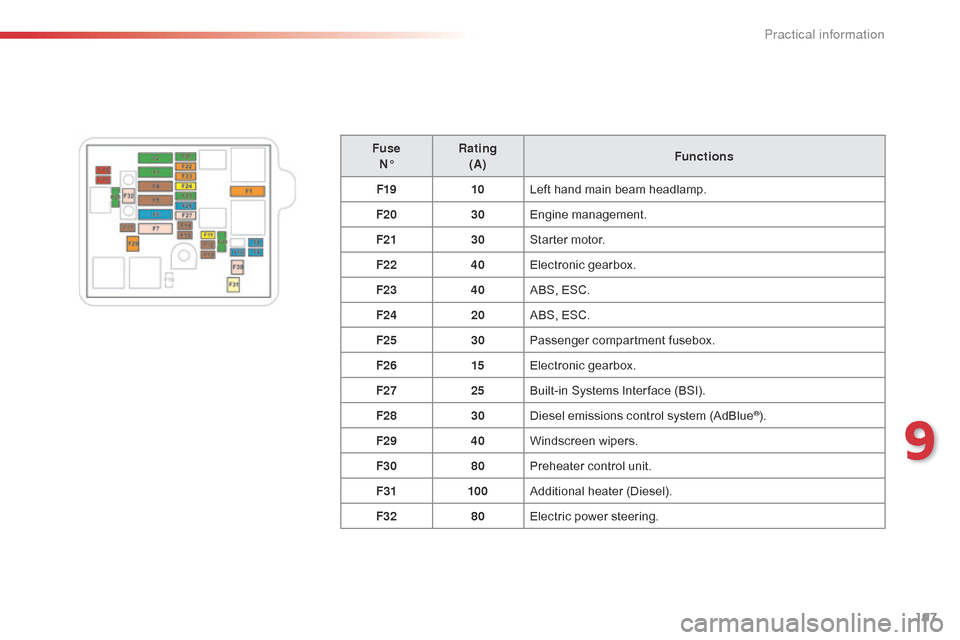
FuseN° Rating
(A) Functions
F19 10Left
hand main beam headlamp.
F20 30Engine
m
anagement.
F21 30Starter
motor.
F22 40Electronic
g
earbox.
F23 40ABS,
ESC.
F24 20ABS,
ESC.
F25 30Passenger
c
ompartment
f
usebox.
F26 15Electronic
g
earbox.
F27 25Built-in
Systems Inter face (BSI).
F28 30Diesel
emissions control system (AdBlue
®).
F29 40Windscreen
w
ipers.
F30 80Preheater
control
unit.
F31 100Additional
hea
ter
(
Diesel).
F32 80Electric
power
steering.
9
Practical information
Page 206 of 326
204
To w i n g
General recommendations
Observe the legislation in force in your country.
E nsure that the weight of the towing vehicle is higher than that of the towed vehicle.
The
driver must remain at the wheel of the towed vehicle and must have a valid driving licence.
When
towing a vehicle with all four wheels on the ground, always use an approved towing arm;
r
ope and straps are prohibited.
The
towing vehicle must move off gently.
When
towing a vehicle with the engine off, there is no longer any power assistance for braking
o
r steering.
In
the following cases, you must always call on a professional recovery service:
-
v
ehicle broken down on a motor way or fast road,
-
f
our-wheel drive vehicle,
-
w
hen it is not possible to put the gearbox into neutral, unlock the steering, or release the
par
king
b
rake,
-
t
owing with only two wheels on the ground,
-
w
here there is no approved towing arm available...
Procedure
for
having
your
vehicle
towed
or
for
towing
another vehicle using a removable towing eye.
The towing eye
is
stowed
under
the
boot
floor,
o
r
may
be
located
under
the
front
passenger
sea
t, d
epending o
n v
ersion.
Practical information
Page 207 of 326
205
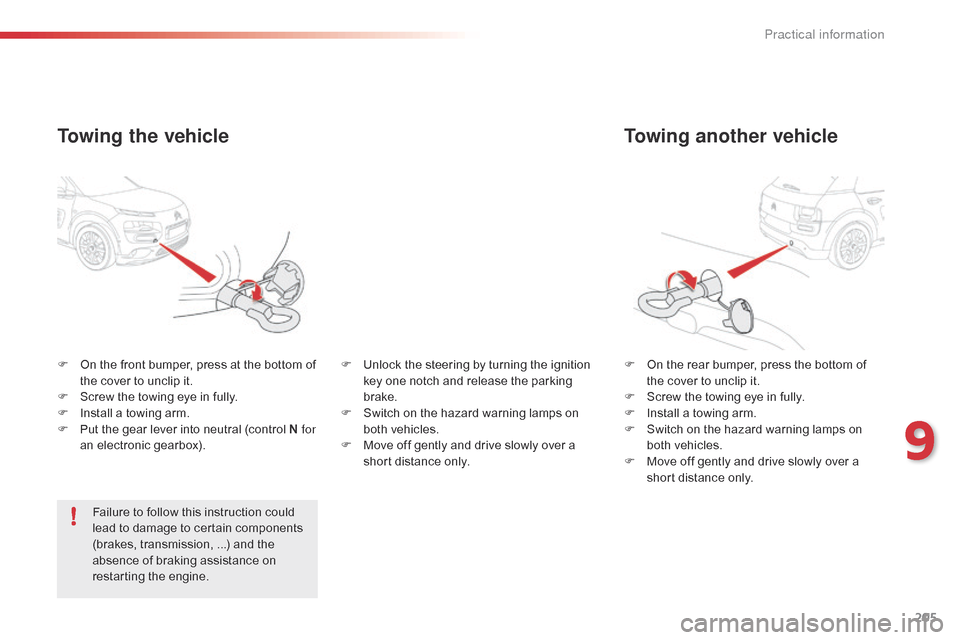
Towing another vehicle
F On the rear bumper, press the bottom of t
he cover to unclip it.
F
S
crew the towing eye in fully.
F
I
nstall a towing arm.
F
S
witch on the hazard warning lamps on
b
oth vehicles.
F
M
ove off gently and drive slowly over a
s
hort distance only.
F
O
n
the
front
bumper,
press
at
the
bottom
of
t
he
cover
to
unclip
it.
F
S
crew
the
towing
eye
in
fully.
F
I
nstall
a
towing
arm.
F
P
ut
the
gear
lever
into
neutral
(control
N for
an
electronic
gearbox).
Towing the vehicle
Failure to follow this instruction could l ead to damage to certain components
(
brakes, transmission, ...) and the
a
bsence of braking assistance on
r
estarting the engine. F
U
nlock the steering by turning the ignition
k
ey one notch and release the parking
b
rake.
F
S
witch on the hazard warning lamps on
b
oth vehicles.
F
M
ove off gently and drive slowly over a
s
hort distance only.
9
Practical information
Page 235 of 326

233
The
system
is
protected
in
such
a
way
that
it
will
only
operate
in
your
vehicle.
7-inch touch screen tablet
01 General
operation
For safety reasons, the driver must carry out operations which
require prolonged attention while the vehicle is
stationary
.
When
the engine is switched off and to prevent
discharging
of the battery, the system switches off
following
the activation of the energy economy mode.
CONTENTS
02
First steps - Control
panel
04
Media
05
Navigation
06
Configuration
07
Connected service
s
08
Telephone p.
p.
p.
p.
p.
p.
p.
Frequently asked questions p.
GPS satellite navigation system
Multimedia audio system
Bluetooth
® telephone
234
236
256 238
276
286
288
298
03
Steering mounted
controls p. 237
Page 239 of 326
03
237
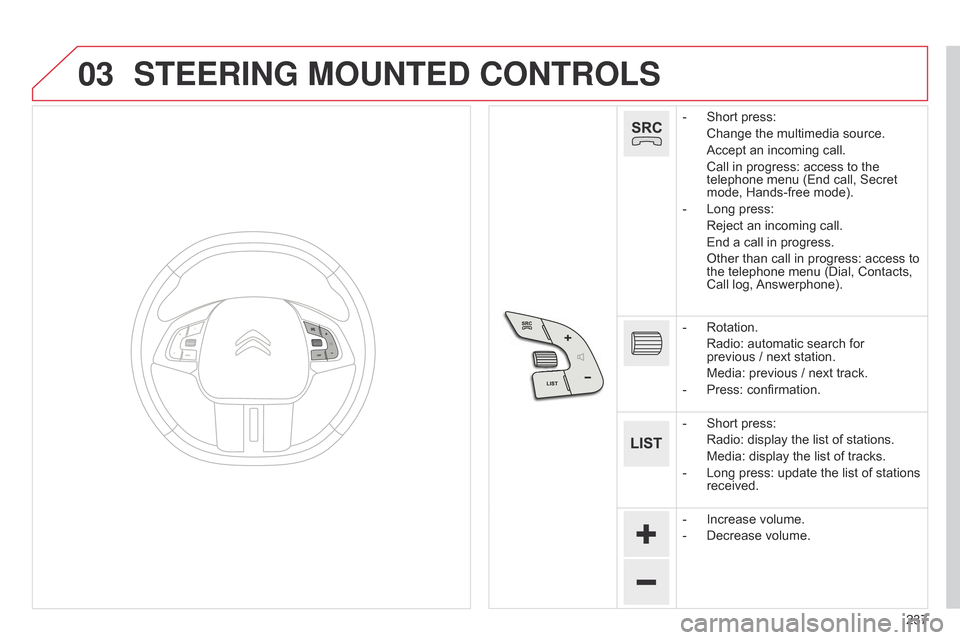
STEERING MOUNTED CONTROLS
- Short press:
Change
the multimedia source.
Accept
an incoming call.
Call
in progress: access to the
telephone
menu (End call, Secret
mode,
Hands-free mode).
-
Long
press:
Reject
an incoming call.
End
a call in progress.
Other
than call in progress: access to
the
telephone menu (Dial, Contacts,
Call
log,
Answerphone).
-
Rotation.
Radio:
automatic search for
previous /
next station.
Media:
previous / next track.
-
Press:
confirmation.
-
Short
press:
Radio:
display the list of stations.
Media:
display the list of tracks.
-
Long
press: update the list of stations
received.
-
Increase
volume.
-
Decrease
volume.
Page 252 of 326
04
250
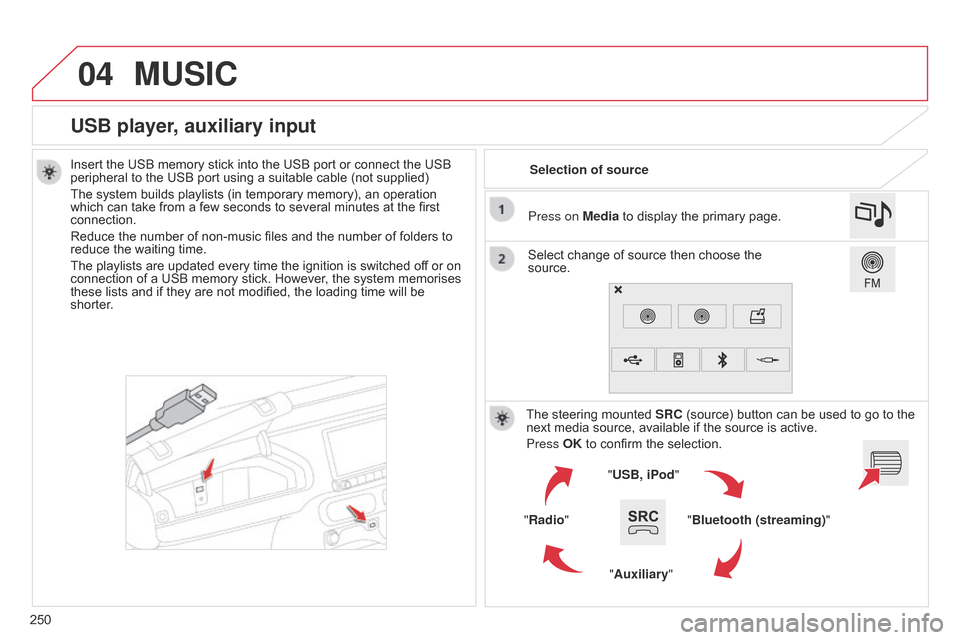
USB player, auxiliary input
Insert the USB memory stick into the USB port or connect the USB peripheral to the USB port using a suitable cable (not supplied)
The
system builds playlists (in temporary memory), an operation
which
can take from a few seconds to several minutes at the first
connection.
Reduce
the number of non-music files and the number of folders to
reduce
the waiting time.
The
playlists are updated every time the ignition is switched off or on
connection
of a USB memory stick. However, the system memorises
these
lists and if they are not modified, the loading time will be
shorter
. Selection of source
The
steering mounted
SRC
(source) button can be used to go to the
next
media source, available if the source is active.
Press OK
to confirm the selection.
"USB, iPod "
"Bluetooth (streaming)"
"Auxiliary"
"Radio" Select
change of source then choose the
source. Press on
Media to display the primary page.
MUSIC
Page 296 of 326
08
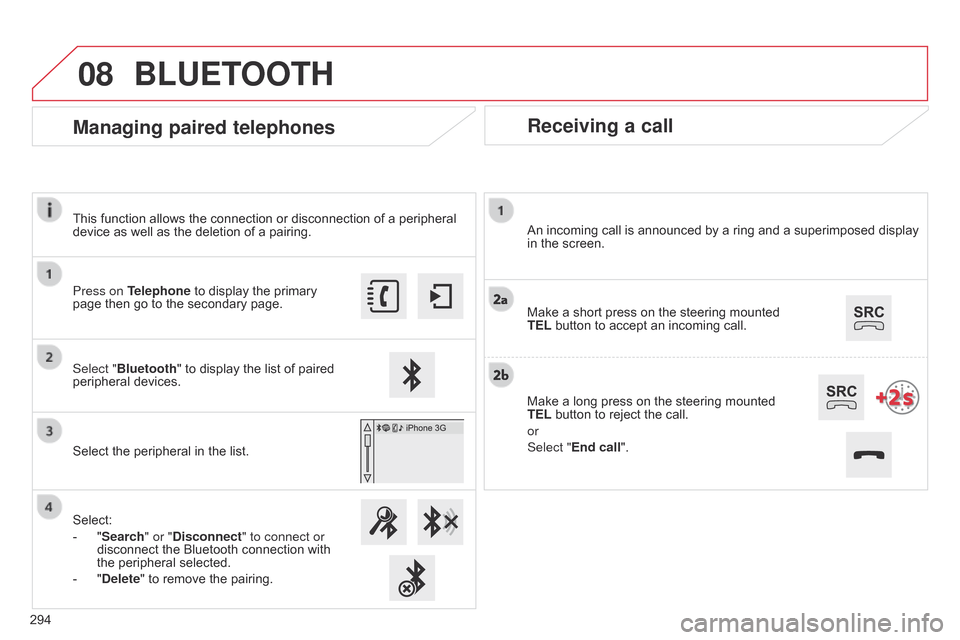
Receiving a call
An incoming call is announced by a ring and a superimposed display in the screen.
Make
a short press on the steering mounted
TEL
button to accept an incoming call.
Make
a long press on the steering mounted
TEL
button to reject the call.
or
Select "End call".
Managing paired telephones
Press on Telephone to display the primary page then go to the secondary page.
Select "Bluetooth"
to display the list of paired
peripheral
devices.
Select
the peripheral in the list.
Select:
-
"
Search" or "Disconnect" to connect or
disconnect
the Bluetooth connection with
the
peripheral selected.
-
"
Delete" to remove the pairing.
BLUETOOTH
294This function allows the connection or disconnection of a peripheral
device
as well as the deletion of a pairing.
Page 297 of 326
08
295
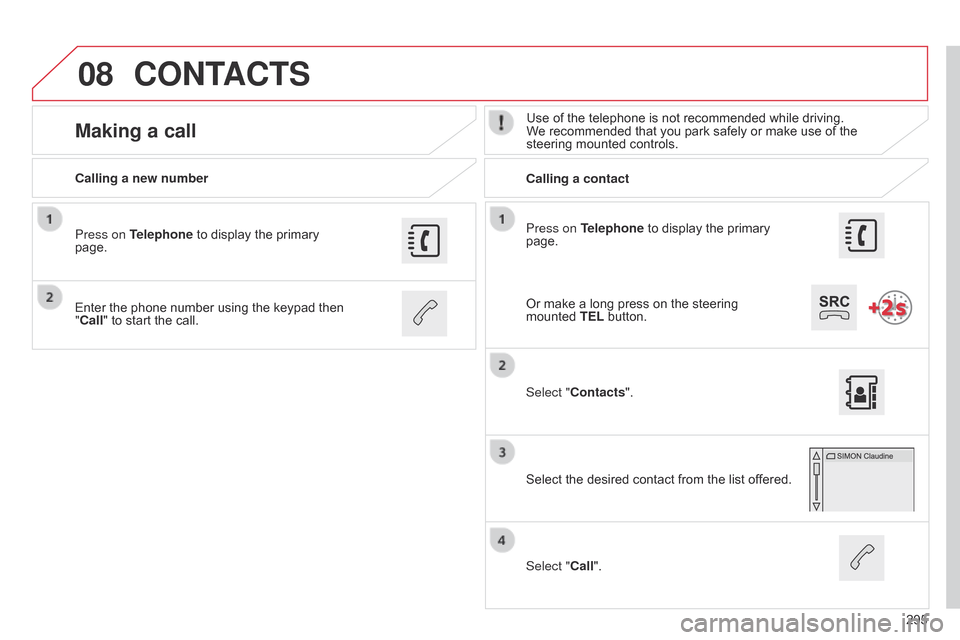
Press on Telephone
to
display
the
primary
page.
Calling a new number
Calling a contact
Making a callUse of the telephone is not recommended while driving. W
e recommended that you park safely or make use of the
steering
mounted controls.
Enter
the
phone
number
using
the
keypad
then
"
Call"
to
start
the
call.
Press on Telephone
to
display
the
primary
page.
Select "
Contacts".
Select
the desired contact from the list offered.
Select "Call".
CONTACTS
Or make a long press on the steering mounted TEL button.