cooling Citroen C4 CACTUS RHD 2015 1.G Owner's Manual
[x] Cancel search | Manufacturer: CITROEN, Model Year: 2015, Model line: C4 CACTUS RHD, Model: Citroen C4 CACTUS RHD 2015 1.GPages: 326, PDF Size: 8.56 MB
Page 19 of 326
17
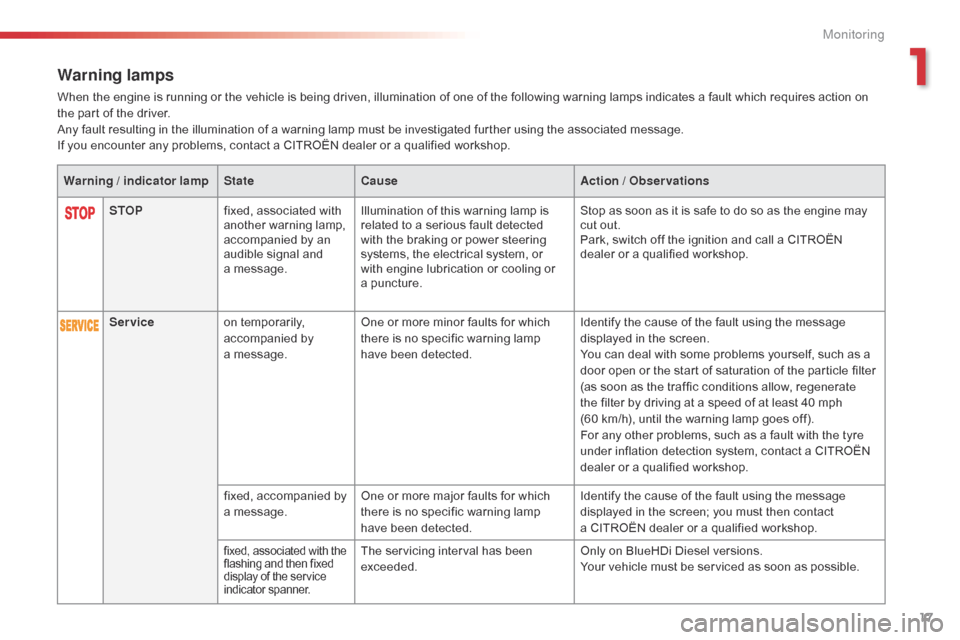
Warning lamps
When the engine is running or the vehicle is being driven, illumination of one of the following warning lamps indicates a fault which requires action on the part of the driver.
Any
fault resulting in the illumination of a warning lamp must be investigated further using the associated message.
If
you encounter any problems, contact a CITROËN dealer or a qualified workshop.
STOP fixed,
associated with
a
nother warning lamp,
a
ccompanied by an
a
udible signal and
a m
essage.Illumination
of this warning lamp is
r
elated to a serious fault detected
w
ith the braking or power steering
s
ystems, the electrical system, or
w
ith engine lubrication or cooling or
a pu
ncture.Stop
as soon as it is safe to do so as the engine may
c
ut out.
Park,
switch off the ignition and call a CITROËN
d
ealer or a qualified workshop.
Warning / indicator lamp
StateCause Action / Observations
Service on
temporarily,
a
ccompanied by
a m
essage.One
or more minor faults for which
t
here is no specific warning lamp
h
ave been detected.Identify
the cause of the fault using the message
d
isplayed in the screen.
You
can deal with some problems yourself, such as a
d
oor open or the start of saturation of the particle filter
(
as soon as the traffic conditions allow, regenerate
t
he filter by driving at a speed of at least 40 mph
(
60 km/h), until the warning lamp goes off).
For
any other problems, such as a fault with the tyre
u
nder inflation detection system, contact a CITROËN
d
ealer or a qualified workshop.
fixed,
accompanied by
a
message.One
or more major faults for which
t
here is no specific warning lamp
h
ave been detected.Identify
the cause of the fault using the message
d
isplayed in the screen; you must then contact
a C
ITROËN dealer or a qualified workshop.
fixed, associated with the flashing and then fixed d
isplay of the service
in
dicator
span
ner.The servicing interval has been exceeded. Only
on BlueHDi Diesel versions.
Your vehicle must be serviced as soon as possible.
1
Monitoring
Page 24 of 326
22
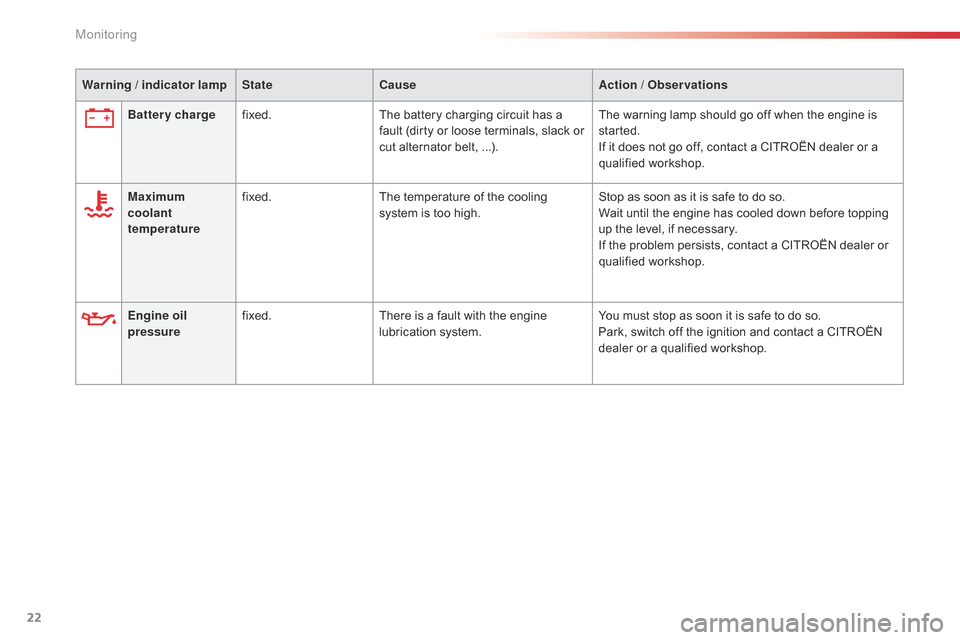
Engine oil
pressurefixed.
There is a fault with the engine l
ubrication system.You
must stop as soon it is safe to do so.
Park, switch off the ignition and contact a CITROËN
d
ealer or a qualified workshop.
Battery charge
fixed. The battery charging circuit has a
f
ault (dirty or loose terminals, slack or
c
ut alternator belt, ...).
The warning lamp should go off when the engine is
s
tarted.
If it does not go off, contact a CITROËN dealer or a
q
ualified
w
orkshop.
Maximum
coolant
temperature fixed.
The temperature of the cooling
s
ystem is too high.
Stop as soon as it is safe to do so.
Wait until the engine has cooled down before topping
u
p the level, if necessary.
If the problem persists, contact a CITROËN dealer or
q
ualified
w
orkshop.
Warning / indicator lamp
StateCause Action / Observations
Monitoring
Page 59 of 326
57
Ventilation
Air intake
The air circulating in the passenger compartment is filtered and originates either
f
rom the outside via the grille located at the
b
ase of the windscreen or from the inside in air
re
circulation
m
ode.
Air treatment
The incoming air follows various routes depending on the controls selected by the
d
river:
-
d
irect arrival in the passenger
c
ompartment (air intake),
-
p
assage through a heating circuit (heating),
-
p
assage through a cooling circuit (air
c
onditioning).
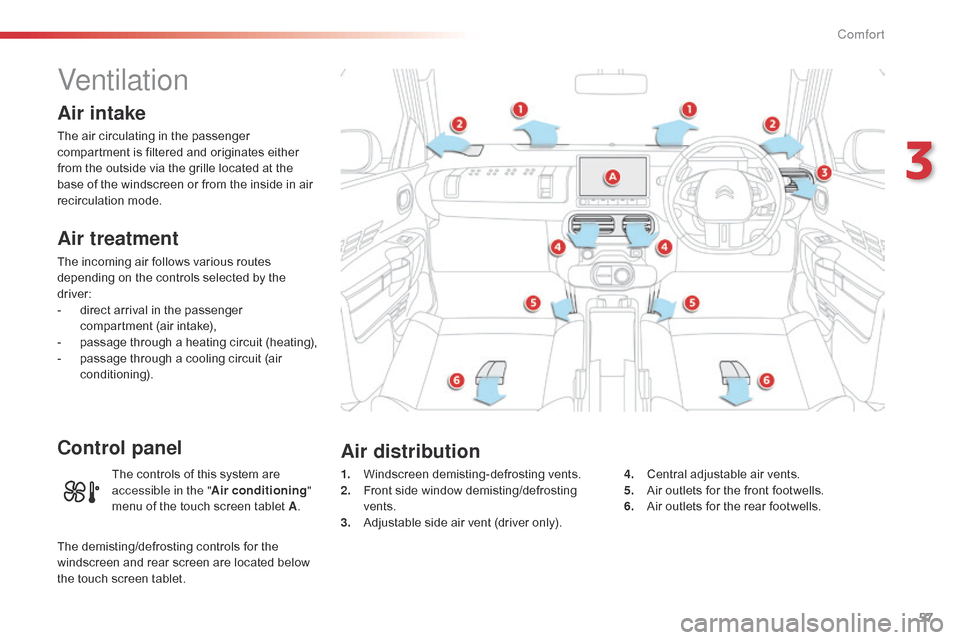
Control panel
1. Windscreen d emisting-defrosting v ents.
2. F ront side window demisting/defrosting
ve
nts.
3.
A
djustable side air vent (driver only).4. C
entral adjustable air vents.
5. A ir outlets for the front footwells.
6.
A
ir outlets for the rear footwells.
Air distribution
The controls of this system are accessible in the " Air conditioning "
menu
of the touch screen tablet A.
The
demisting/defrosting controls for the
w
indscreen and rear screen are located below
t
he
touch
screen tablet.
3
Comfort
Page 68 of 326
66
Avoid the prolonged use of interior air recirculation (risk of misting and
d
eterioration of air quality).
It
allows
you:
-
i
n
summer,
to
lower
the
temperature,
-
i
n
winter,
above
3
°C,
to
improve
demisting.
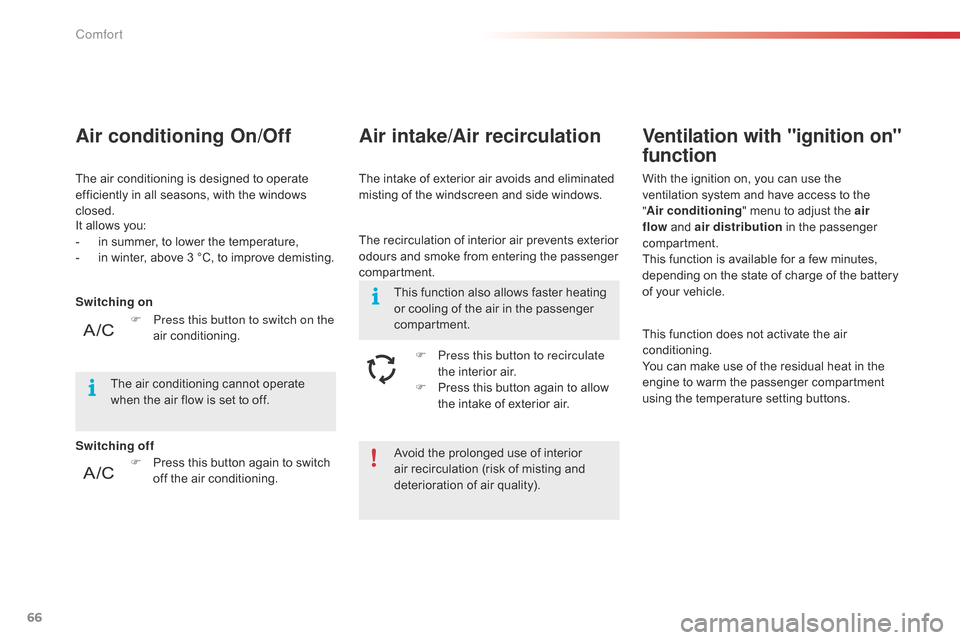
F
P
ress
this
button
again
to
switch
o
ff
the
air
conditioning.
F
P
ress this button to switch on the
air
c
onditioning.
Air conditioning On/Off
The air conditioning is designed to operate e
fficiently in all seasons, with the windows
c
losed. The
intake of exterior air avoids and eliminated m
isting of the windscreen and side windows.
Air intake/Air recirculation
The recirculation of interior air prevents exterior o
dours and smoke from entering the passenger
c
ompartment.
F
P
ress this button to recirculate
the
interior air.
F
P
ress this button again to allow
t
he intake of exterior air.
The
air
conditioning
cannot
operate
w
hen
the
air
flow
is
set
to
off. This
function also allows faster heating
o
r cooling of the air in the passenger
c
ompartment.
Ventilation with "ignition on"
function
With the ignition on, you can use the ventilation system and have access to the
"A
ir conditioning "
menu to adjust the air
flow
and air distribution
in the passenger
c
ompartment.
This
function is available for a few minutes,
d
epending on the state of charge of the battery
o
f your vehicle.
This
function does not activate the air
c
onditioning.
You
can make use of the residual heat in the
e
ngine to warm the passenger compartment
u
sing the temperature setting buttons.
Switching on
Switching off
Comfort
Page 198 of 326

196
Engine compartment fuses
Access to the fuses
F Unclip the cover.
F C hange the fuse (see corresponding
par
agraph).
F
W
hen you have finished, close the cover
c
arefully to ensure correct sealing of the
f
usebox. Fuse
N° Rating
(A) Functions
F1 40Air
c
onditioning.
F2 30 / 40Stop & Start.
F3 30Passenger
c
ompartment
f
usebox.
F4 70Passenger
c
ompartment
f
usebox.
F5 70Built-in Systems Inter face (BSI).
F6 60Cooling fan assembly.
F7 80Built-in Systems Inter face (BSI).
F8 15Engine
management, petrol pump.
F9 15Engine
m
anagement.
F10 15Engine
m
anagement.
F11 20Engine
m
anagement.
F12 5Cooling
fan assembly.
F13 5Built-in
Systems Inter face (BSI).
F14 5Battery
charge unit (non Stop & Start engine).
F15 5Stop
& Start.
F17 5Built-in
Systems Inter face (BSI).
F18 10Right
hand main beam headlamp.
The
fusebox is placed in the engine
c
ompartment near the battery.
Practical information
Page 209 of 326

207
Driving advice
Distribution of loads
F Distribute the load in the trailer so that t
he heaviest items are as close as
p
ossible to the axle and the nose weight
a
pproaches the maximum permitted
w
ithout exceeding it.
Air
density decreases with altitude, thus
r
educing engine per formance. Above
1 0
00 metres, the maximum towed load must
b
e reduced by 10 % for every 1 000 metres of
al
titude.
Side wind
F Take into account the increased sensitivity t
o side wind.
Cooling
Towing a trailer on a slope increases the temperature of the coolant.
As
the fan is electrically controlled, its cooling
c
apacity is not dependent on the engine speed.
F
T
o lower the engine speed, reduce your
s
peed.
The
maximum towed load on a long incline
d
epends on the gradient and the ambient
t
emperature.
In
all cases, keep a check on the coolant
t
emperature. F
I
f the warning lamp and the
S
TOP
warning lamp come on,
s
top the vehicle and switch off
t
he engine as soon as possible.
Braking
Towing a trailer increases the braking distance.
T o avoid overheating of the brakes on a long
m
ountain type of descent, the use of engine
b
raking is recommended.
Ty r e s
F Check the tyre pressures of the towing v
ehicle and of the trailer, observing the
re
commended
p
ressures.
Lighting
F Check the electrical lighting and signalling o
n the trailer.
Refer
to
the
"Technical
data"
section
for
details
o
f
the
weights
and
towed
loads
which
apply
to
y
our
vehicle.
When
not
towing
a
trailer,
remove
the
q
uickly-detachable
tow
ball
before
d
riving. The
rear parking sensors will be
d
eactivated automatically if a genuine
C
ITROËN towbar is used.
9
Practical information
Page 212 of 326
210
Very cold climate screens
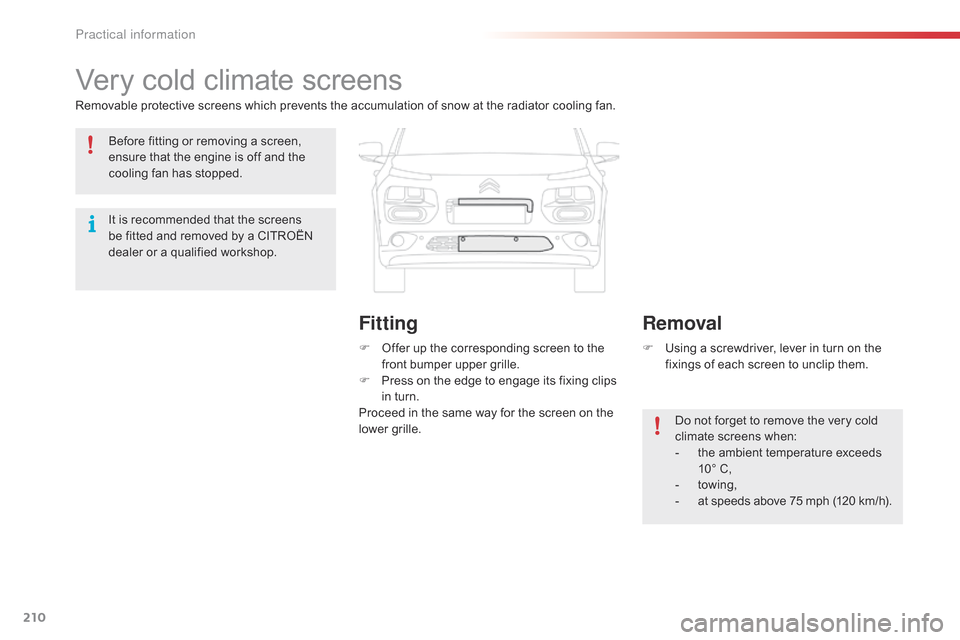
Removable protective screens which prevents the accumulation of snow at the radiator cooling fan.
F
O
ffer up the corresponding screen to the
f
ront bumper upper grille.
F
P
ress on the edge to engage its fixing clips
i
n turn.
Proceed
in the same way for the screen on the
l
ower grille.F
U
sing a screwdriver, lever in turn on the
f
ixings of each screen to unclip them.
Do
not forget to remove the very cold
c
limate screens when:
-
t
he ambient temperature exceeds
1
0° C,
-
tow
ing,
-
a
t speeds above 75 mph (120 km/h).
Removal
Fitting
Before fitting or removing a screen, e
nsure that the engine is off and the
c
ooling fan has stopped.
It
is recommended that the screens
b
e fitted and removed by a CITROËN
d
ealer or a qualified workshop.
Practical information
Page 218 of 326
216
bonnet
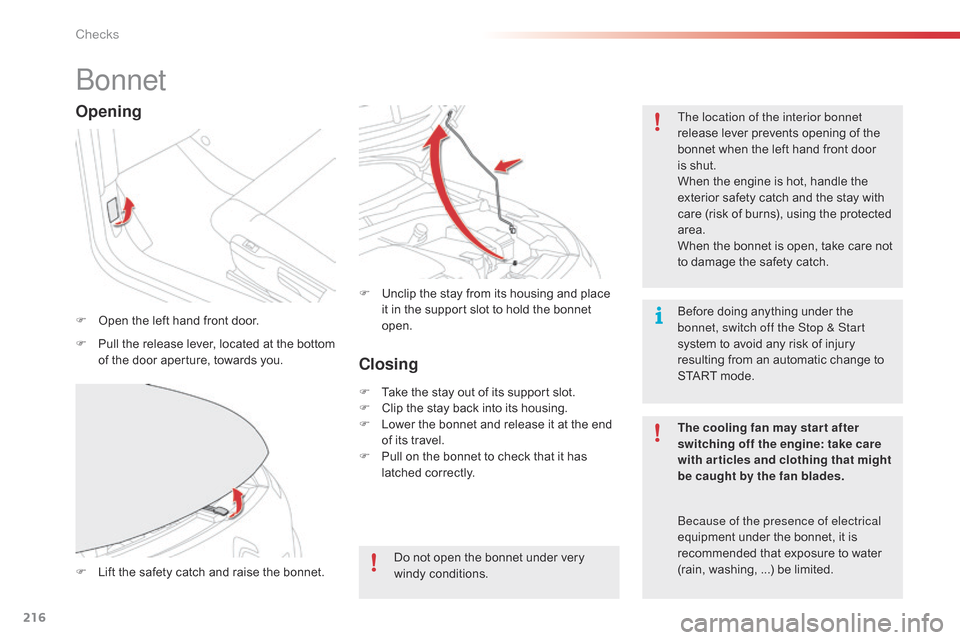
F Open the left hand front door. The location of the interior bonnet
release
lever prevents opening of the
b
onnet when the left hand front door
i
s shut.
When the engine is hot, handle the
e
xterior safety catch and the stay with
c
are (risk of burns), using the protected
a
rea.
When the bonnet is open, take care not
t
o damage the safety catch.
F
L
ift the safety catch and raise the bonnet.F
U
nclip the stay from its housing and place i
t in the support slot to hold the bonnet ope
n.
Opening
F Pull the release lever, located at the bottom o
f the door aperture, towards you.
The cooling fan may star t after
switching off the engine: take care
with articles and clothing that might
be caught by the fan blades.
Do
not open the bonnet under very
wi
ndy
c
onditions.
Closing
F Take the stay out of its support slot.
F C lip the stay back into its housing.
F
L
ower the bonnet and release it at the end
o
f its travel.
F
P
ull on the bonnet to check that it has
l
atched correctly.
be
cause of the presence of electrical
equipment
under the bonnet, it is
r
ecommended that exposure to water
(
rain, washing, ...) be limited.
Before
doing anything under the
b
onnet, switch off the Stop & Start
system to avoid any risk of injury
r
esulting from an automatic change to S
TART mode.
Checks
Page 221 of 326

219
Checking levels
Take care when working under the bonnet, as certain areas of the engine may be extremely hot (risk of burns) and the cooling fan could start at any time (even with the ignition off).
Engine oil level
The check is carried out either when the ignition is switched on using the
o
il level indicator in the instrument
p
anel for vehicles so equipped, or
u
sing the dipstick.Checking using the dipstick
Refer to the "Petrol engine" or "Diesel engine" section for the location of the dipstick in the
e
ngine compartment of your vehicle.
F
T
ake the dipstick by its coloured grip and
r
emove it completely.
F
W
ipe the end of the dipstick using a clean
n
on-fluffy cloth.
F
R
efit the dipstick and push fully down, then
p
ull it out again to make the visual check:
t
he correct level is between the marks A
and
B.
Check
all
of
these
levels
regularly,
in
line
with
the
manufacturer's service schedule. Top them up if necessary, unless other wise indicated.
If
a
level
drops
significantly,
have
the
corresponding system checked by a CITROËN dealer or a qualified workshop.
If you find that the level is above the A mark or
belo
w the B mark, do not star t the engine.
-
I
f the level is above the MAX
mark (risk
o
f damage to the engine), contact a
C
ITROËN dealer or a qualified workshop.
-
I
f the level is below the MIN
mark, you
m
ust top up the engine oil.
A = M
aX
B
= MI
nT
o
ensure
that
the
reading
is
correct,
y
our
vehicle
must
be
parked
on
a
level
s
ur face
with
the
engine
having
been
off
f
or
more
than
30
minutes.
It
is
normal
to
top
up
the
oil
level
between
t
wo
services
(or
oil
changes).
CITROËN
r
ecommends
that
you
check
the
level,
and
top
u
p
if
necessary,
every
3
000
miles
(5
000
kms).
10
Checks
Page 223 of 326
221
Coolant level
The coolant level should be close to the "MA X" mark but should never
e
xceed it.
In
addition, as the cooling system is
p
ressurised, wait at least one hour after
s
witching
off the engine before carrying out any
wo
rk.
To
avoid
any risk of scalding, unscrew the cap
b
y
two
turns to allow the pressure to drop.
W
hen
the
pressure has dropped, remove the
c
ap
and
top up the level.Changing the coolant
The coolant does not have to be replaced at routine services.
The brake fluid level should be close to the "MA X" mark. If it is not, check
t
he brake pad wear.
Brake fluid level
Changing the fluid
Refer to the manufacturer's service schedule for details of the interval for this operation.
Fluid specification
The brake fluid must conform to the manufacturer's r ecommendations. The cooling fan may star t after switching
off the engine: take care with ar ticles and
clothing that might be caught by the fan
blades. When the engine is warm, the temperature of
t
he coolant is regulated by the fan.
Fluid specification
The coolant must conform to the ma
nufacturer's r ecommendations.
10
Checks