low beam Citroen C4 CACTUS RHD 2015 1.G Owner's Manual
[x] Cancel search | Manufacturer: CITROEN, Model Year: 2015, Model line: C4 CACTUS RHD, Model: Citroen C4 CACTUS RHD 2015 1.GPages: 326, PDF Size: 8.56 MB
Page 15 of 326
13
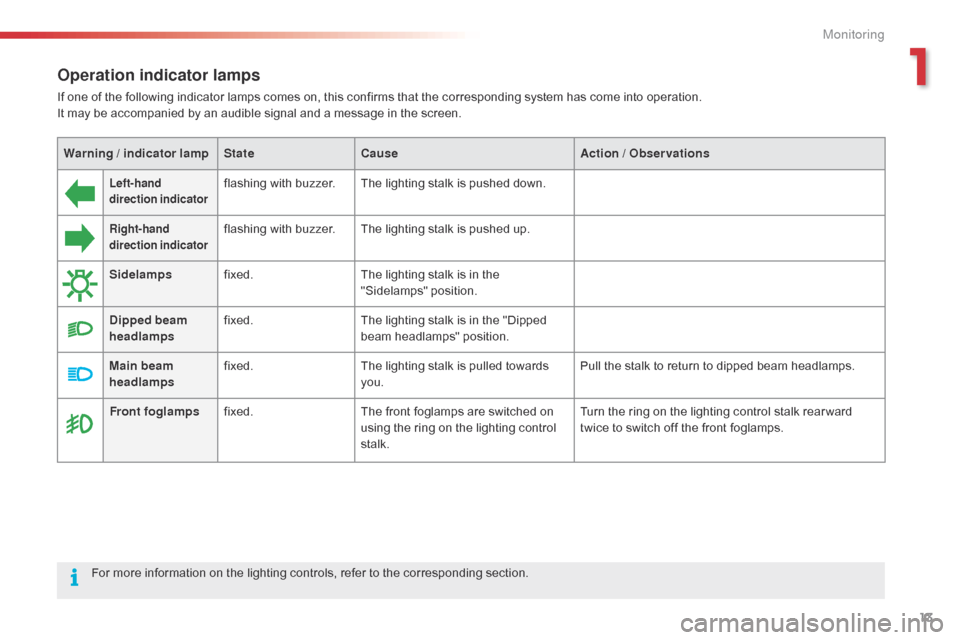
Operation indicator lamps
If one of the following indicator lamps comes on, this confirms that the corresponding system has come into operation.
I t may be accompanied by an audible signal and a message in the screen.
Left-hand
direction indicatorflashing with buzzer.The lighting stalk is pushed down.
Right-hand
direction indicatorflashing with buzzer.The lighting stalk is pushed up.
Sidelamps fixed. The
lighting stalk is in the
"
Sidelamps"
p
osition.
Dipped beam
headlamps fixed.
The
lighting stalk is in the "Dipped
b
eam headlamps" position.
Main beam
headlamps fixed.
The
lighting stalk is pulled towards
yo
u. Pull
the stalk to return to dipped beam headlamps.
Front foglamps fixed. The
front foglamps are switched on
u
sing the ring on the lighting control
st
alk. Turn
the ring on the lighting control stalk rear ward
t
wice to switch off the front foglamps.
For
more
information
on
the lighting controls, refer to the corresponding section.
Warning / indicator lamp
StateCause Action / Observations
1
Monitoring
Page 115 of 326
113
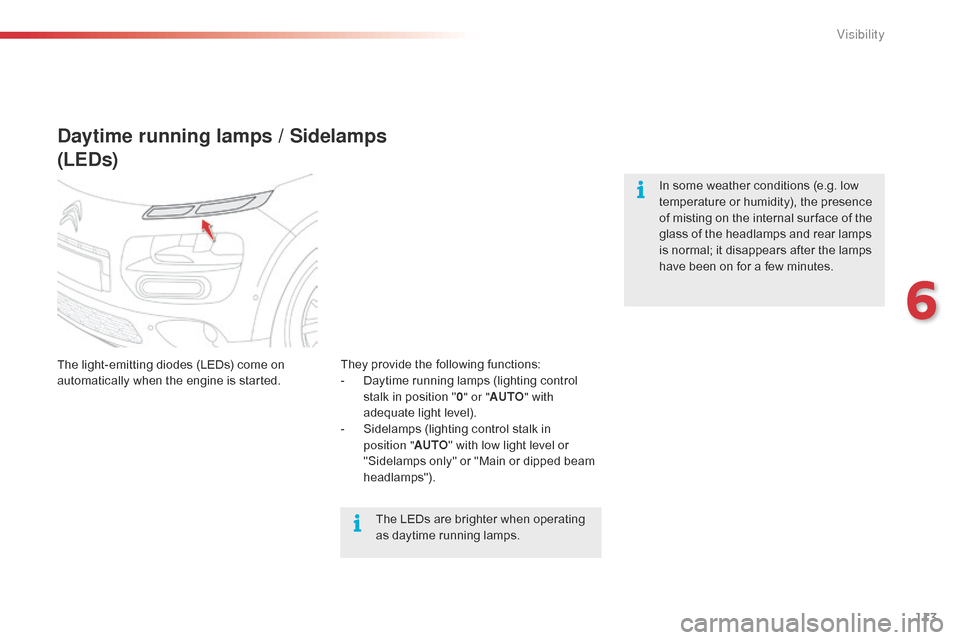
Daytime running lamps / Sidelamps
(LEDs)
The light-emitting diodes (LEDs) come on automatically when the engine is started. In
some weather conditions (e.g. low
t
emperature or humidity), the presence
o
f misting on the internal sur face of the
g
lass of the headlamps and rear lamps
i
s normal; it disappears after the lamps
h
ave been on for a few minutes.
They provide the following functions:
- D aytime running lamps (lighting control
s
talk in position "0 " or " AUTO " with
adequate
light level).
-
S
idelamps (lighting control stalk in
p
osition "AUTO"
with low light level or
"
Sidelamps only" or "Main or dipped beam
h
eadlamps").The
LEDs are brighter when operating
a
s daytime running lamps.
6
Visibility
Page 116 of 326
114
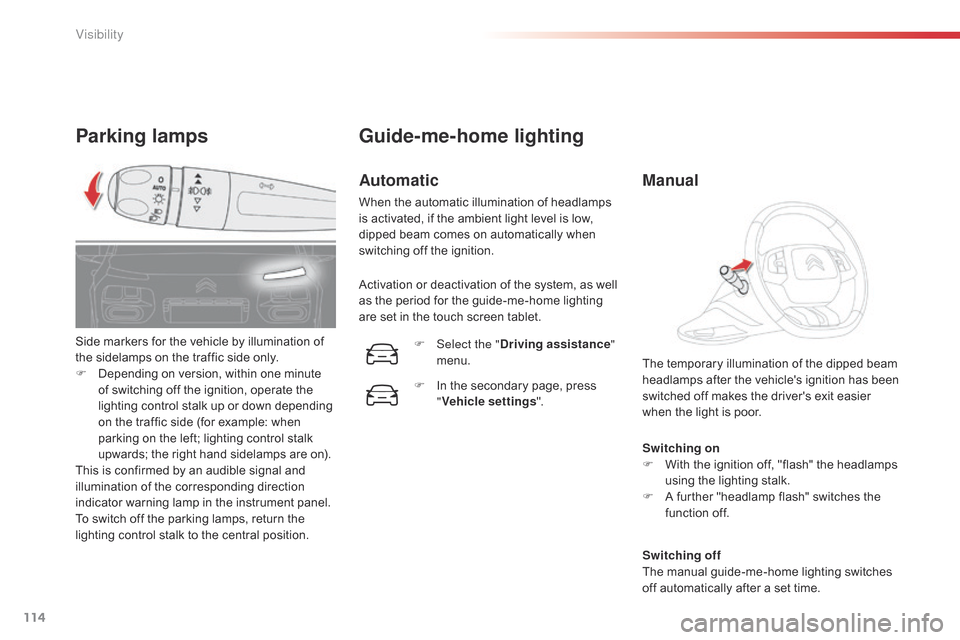
Parking lamps
Switching on
F W ith the ignition off, "flash" the headlamps
u
sing the lighting stalk.
F
A
further "headlamp flash" switches the
f
unction off.
Switching off
The
manual guide-me-home lighting switches
o
ff automatically after a set time.
The
temporary illumination of the dipped beam
h
eadlamps after the vehicle's ignition has been
s
witched off makes the driver's exit easier
w
hen the light is poor.
Side
markers
for
the
vehicle
by
illumination
of
t
he
sidelamps
on
the
traffic
side
only.
F
D
epending
on
version,
within
one
minute
o
f
switching
off
the
ignition,
operate
the
l
ighting
control
stalk
up
or
down
depending
o
n
the
traffic
side
(for
example:
when
p
arking
on
the
left;
lighting
control
stalk
u
pwards;
the
right
hand
sidelamps
are
on).
This
is
confirmed
by
an
audible
signal
and
i
llumination
of
the
corresponding
direction
i
ndicator
warning
lamp
in
the
instrument
panel.
To
switch
off
the
parking
lamps,
return
the
l
ighting
control
stalk
to
the
central
position.
Guide-me-home lighting
Automatic
When the automatic illumination of headlamps i s activated, if the ambient light level is low,
d
ipped beam comes on automatically when
s
witching off the ignition.
Activation
or deactivation of the system, as well
a
s the period for the guide-me-home lighting
a
re set in the touch screen tablet.
F
Sel
ect the "Driving assistance "
menu.
F
I
n the secondary page, press
"V
ehicle settings".
Manual
Visibility
Page 117 of 326
115
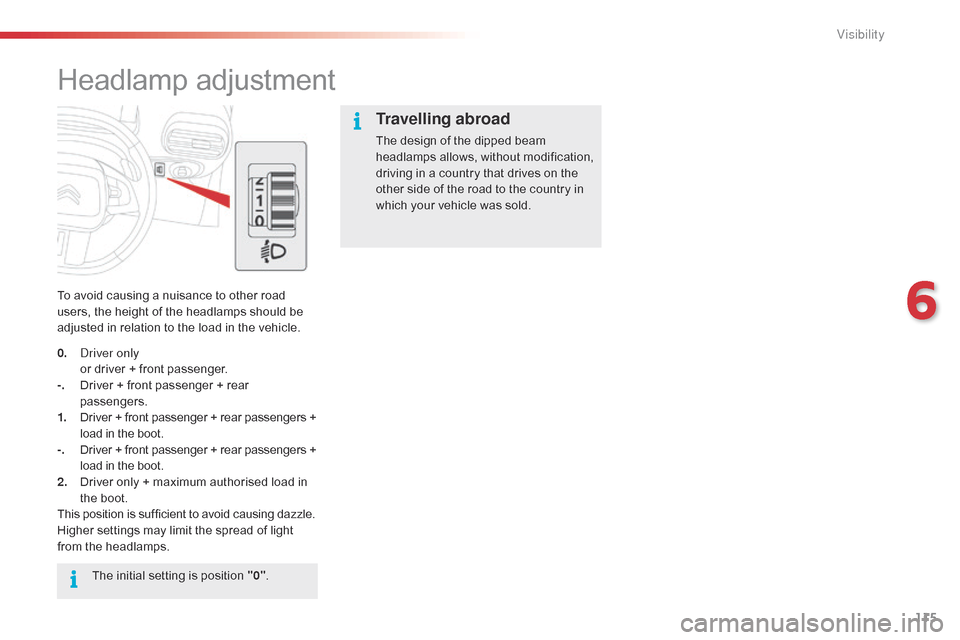
Headlamp adjustment
To avoid causing a nuisance to other road u
sers, the height of the headlamps should be
a
djusted in relation to the load in the vehicle.
The
initial setting is position "0".
Travelling abroad
The design of the dipped beam h
eadlamps allows, without modification,
d
riving in a country that drives on the
o
ther side of the road to the country in
w
hich your vehicle was sold.
0.
d
r
iver only
o
r
driver
+
front
passenger.
-.
D
river
+
front
passenger
+
rear
p
assengers.
1.
D
river
+
front
passenger
+
rear
passengers
+
l
oad
in
the
boot.
-.
D
river
+
front
passenger
+
rear
passengers
+
l
oad
in
the
boot.
2.
D
river
only
+
maximum
authorised
load
in
t
he
boot.
This
position
is
sufficient
to
avoid
causing
dazzle.
Higher
settings
may
limit
the
spread
of
light
f
rom
the
headlamps.
6
Visibility
Page 118 of 326
116
Cornering lighting
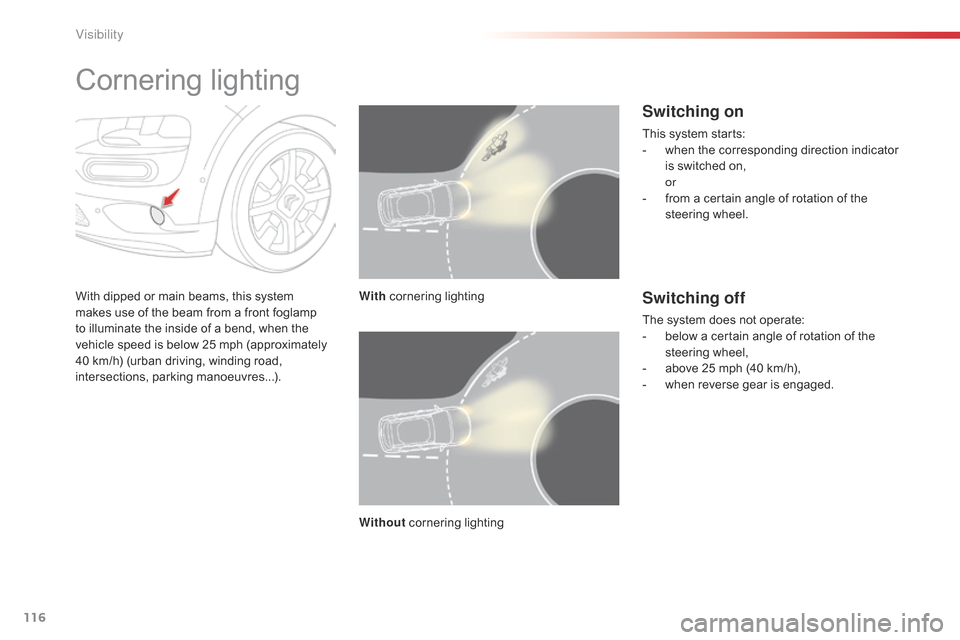
With dipped or main beams, this system makes use of the beam from a front foglamp
t
o illuminate the inside of a bend, when the
v
ehicle speed is below 25 mph (approximately
4
0 km/h) (urban driving, winding road,
in
tersections,
par
king
m
anoeuvres...). With cornering l
ighting
Without cornering
l
ighting
Switching on
This system starts:
- w hen the corresponding direction indicator
i
s switched on,
or
-
f
rom a certain angle of rotation of the
s
teering
w
heel.
Switching off
The system does not operate:
- b elow a certain angle of rotation of the
s
teering
w
heel,
-
a
bove 25 mph (40 km/h),
-
w
hen reverse gear is engaged.
Visibility
Page 185 of 326
183
Changing a bulb
Front lamps
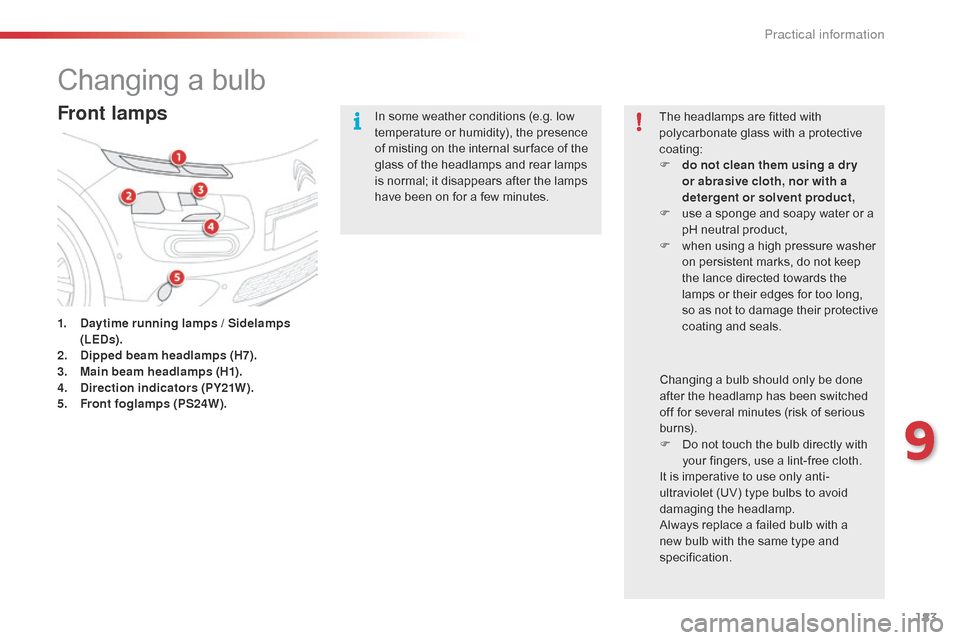
1. Daytime running lamps / Sidelamps (LEDs).
2.
D
ipped beam headlamps (H7).
3.
M
ain beam headlamps (H1).
4.
D
irection indicators (PY21W).
5.
F
ront foglamps (PS24W). In
some weather conditions (e.g. low
t
emperature or humidity), the presence
o
f misting on the internal sur face of the
g
lass of the headlamps and rear lamps
i
s normal; it disappears after the lamps
h
ave been on for a few minutes.
The headlamps are fitted with
p
olycarbonate glass with a protective
c
oating:
F
d
o not clean them using a dr y
or abrasive cloth, nor with a
detergent or solvent product,
F
u
se a sponge and soapy water or a
p
H neutral product,
F
w
hen using a high pressure washer
o
n persistent marks, do not keep
t
he lance directed towards the
l
amps or their edges for too long, s
o as not to damage their protective c
oating a nd sea ls.
Changing
a bulb should only be done
a
fter the headlamp has been switched
o
ff for several minutes (risk of serious
b
urns).
F
D
o not touch the bulb directly with
y
our fingers, use a lint-free cloth.
It
is imperative to use only anti-
ultraviolet
(UV) type bulbs to avoid
d
amaging
t
he
h
eadlamp.
Always
replace a failed bulb with a
n
ew bulb with the same type and
s
pecification.
9
Practical information
Page 195 of 326
193
Dashboard fuses
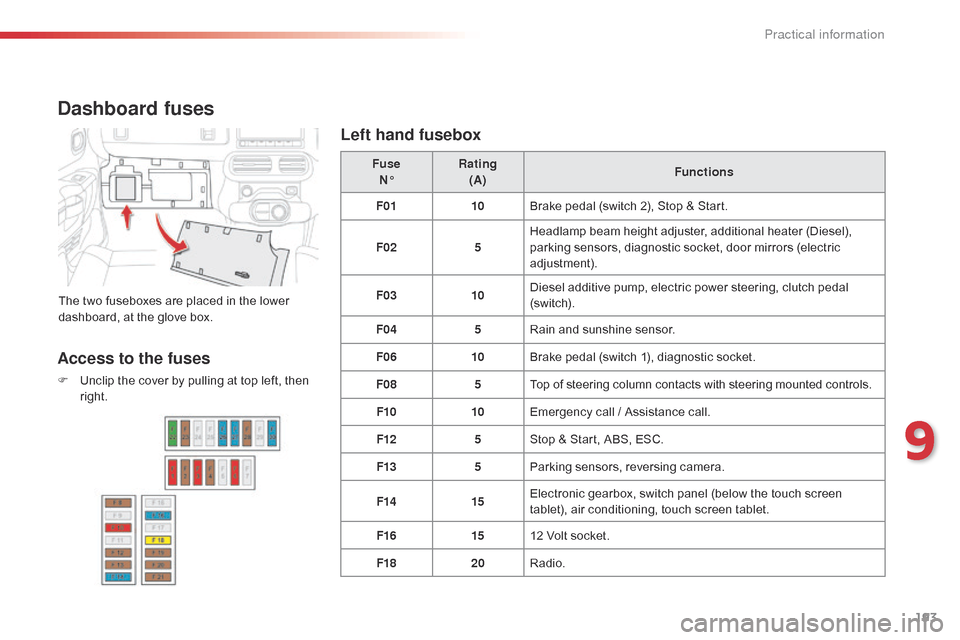
The two fuseboxes are placed in the lower dashboard, at the glove box. Fuse
N° Rating
(A) Functions
F01 10Brake pedal (switch 2), Stop & Start.
F02 5Headlamp beam height adjuster, additional heater (Diesel),
p
arking sensors, diagnostic socket, door mirrors (electric
adj
ustment).
F03 10Diesel additive pump, electric power steering, clutch pedal (
sw i tc h).
F04 5Rain
and sunshine sensor.
F06 10Brake
pedal (switch 1), diagnostic socket.
F08 5Top
of steering column contacts with steering mounted controls.
F10 10Emergency
call / Assistance call.
F12 5Stop
& Start, ABS, ESC.
F13 5Parking
sensors, reversing camera.
F14 15Electronic
gearbox, switch panel (below the touch screen
t
ablet), air conditioning, touch screen tablet.
F16 1512
Volt socket.
F18 20Radio.
Access to the fuses
F Unclip the cover by pulling at top left, then r
ight.
Left hand fusebox
9
Practical information
Page 309 of 326
307
C4-cactus_ gb_Chap13_index-alpha_ed02-2014
M
N
L
Labels, identification .....................................23 0
Lamps, front .......................................... 1 83, 214
Lamps,
re
ar
...............................
............ 188, 214
Lamps,
warning and indicator
..................13
-23
Leather
(
care)
...............................
.................214
LED
daytime running lamps
.... 1
09, 113, 183, 184
Level,
AdBlue
® additive ................................. 16 1
Level,
brake
fluid ........................................... 2
21
Levels
and
checks
..............................
...217-2 24
Light-emitting
diodes - LEDs
................ 1
13, 190
Lighting
bulbs
(replacement)
...................................... 1
8 3 -19 0
Lighting
control stalk
..................... 1
08, 109, 114
Lighting
dimmer
..............................
..............123
Lighting,
guide-me home
.............................. 11
4
Lighting,
i
nterior
............................................ 12
2
Loading
..............................
............................... 9
Load
reduction mode
.................................... 2
02
Locating
your
vehicle
...................................... 40
L
ocking
from
the inside
................................... 44
L
ocking
the
doors
.............................. 4
0, 44, 46
Low fuel level
..............................
............ 21, 156
Main
beam
..............................
......108, 183, 185
Maintenance
(
advice)
........................ 9
, 211, 214
Map
reading
lamps
....................................... 12
2
Markings,
id
entification
................................. 23
0
Mat
.......
............................................... 69, 70, 74
Menus
(audio)
............. 2
38, 240, 242, 256, 258,
260, 276, 288, 290
Menus
(Touch
screen tablet)
........... 2
8, 29, 234
Mirror, rear view
.............................................. 55
M
irrors,
door.................................................... 54Misfuel prevention
...............................
..........
15 8
Mountings for ISOFIX seats
.........................
15
0
O
P
Navigation ...............................
......................255 N
umber plate lamps ...................................... 18
9
Oil
change
...............................
......................219
Oil
consumption
............................................ 2
19
oil
filter
...............
........................................... 223
oi
l level .................................................... 27,
219
Opening
the bonnet
...................................... 2
16
Opening
the boot
..............................
..............47
Opening
the doors
...............................
...........45
Operation
indicator lamps
........................ 1
3, 16
Paint
colour code
.......................................... 23
0
Panoramic
glass sunroof
..............................12
1
Parcel shelf, rear
............................................. 76
P
ark Assist
...............................
.....................103
Parking
brake
..........................................8
2, 224
Parking
lam
ps
............................................... 11
4
Parking
sensors, front
...................................10
1
Parking
sensors, rear.................................... 10 0
Particle filter
......................................... 2
22,
2
23
Passenger
c
ompartment
f
ilter
......................2
23
R
Radio ............................................................. 244
RdS ................ ............................................... 247
Rear
door windows
................................. 4
8, 214
Rear
fo
glamp......................................... 110,
188
Rear
s
creen
(
demisting)
.................................. 68
R
echarging the battery
.................................2
01
Reduction
of electrical load
..........................2
02
Regeneration
of the particle filter
.................2
23
Reinitialising
the remote control
.....................42
R
emote control
.......................................... 3
9-43
Removable
screen
(snow
s
hield)
...............................
................210
Removing
a wheel
..............................
..........178
Removing
the mat
...............................
............74
Repair
kit, puncture
....................................... 16
9
Replacing
bu
lbs
..............................
......18 3 -19 0
Replacing
f
uses
..............................
.......191-197
Replacing
the air filter
...................................2
23
Replacing
the oil filter
...................................2
23
Replacing
t
he
p
assenger
c
ompartment filter
...................................... 2
23
Replacing
wiper blades.........................120, 203
Resetting
the service
indicator
...............................
.........................26
Resetting
the trip recorder
..............................37
R
eversing
c
amera
...............................
..........102
Plip
..............................
.............................. 39 - 44
P
ort, US
b
........................... 6
9, 70, 72, 250, 254
Preheater, d
i
esel
..............................
..............
14
Priming the fuel system
................................
16
0
Protecting children
................. 1
34, 136, 141-155
Protectors
...................................................... 2
11
Puncture
................
........................................
169
.
alphabetical index