steering wheel Citroen C4 CACTUS RHD 2015 1.G Owner's Manual
[x] Cancel search | Manufacturer: CITROEN, Model Year: 2015, Model line: C4 CACTUS RHD, Model: Citroen C4 CACTUS RHD 2015 1.GPages: 326, PDF Size: 8.56 MB
Page 4 of 326
.
.
Lighting control 108
Automatic illumination of headlamps
1
12
Daytime
running lamps / Sidelamps (LEDs)
1
13
Headlamp
adj
ustment
1
15
Cornering
lighting
1
16
Wiper
control stalk
1
17
Automatic
rain sensitive wipers
1
19
Panoramic
sunroof
1
21
Courtesy
lamp
1
22
Brightness
of instruments and controls
1
23
Boot
lamp
1
23
Visibility
Instrument panel 1 1
Indicator and warning lamps
1
2
Indicators
2
4
7-inch
touch screen tablet
2
8
Trip
computer
3
5
Distance
recorders
3
7
Setting
the date and time
3
8
Monitoring
ove
r view
Remote control key 3
9
Central locking
4
4
Doors
4
5
Boot
4
7
Front
electric window controls
4
8
Rear
door windows
4
9
access
Front seats 50
Rear seats
5
2
Mirrors
5
4
Steering
wheel adjustment
5
6
Ventilation
5
7
Heating
5
9
Manual
a
ir
c
onditioning
6
1
Automatic
air conditioning
6
3
Front
demist - defrost
6
7
Rear
screen demist - defrost
6
8
Comfort
Interior fittings 69
Boot fittings
7
5
Fittings
Driving recommendations 78
Starting-switching off the engine
7
9
Parking
brake
8
2
5 -speed
manual gearbox
8
3
Gear
ef ficiency indicator
8
4
ETG
electronic gearbox
8
5
Hill
start assist
8
9
Stop
& Start
9
0
Speed
limiter
9
3
Cruise
control
9
6
Memorising
speeds
9
9
Parking
sensors
1
00
Reversing
camera
1
02
Park
Assist
1
03
Driving
Eco-driving
Contents
Page 9 of 326
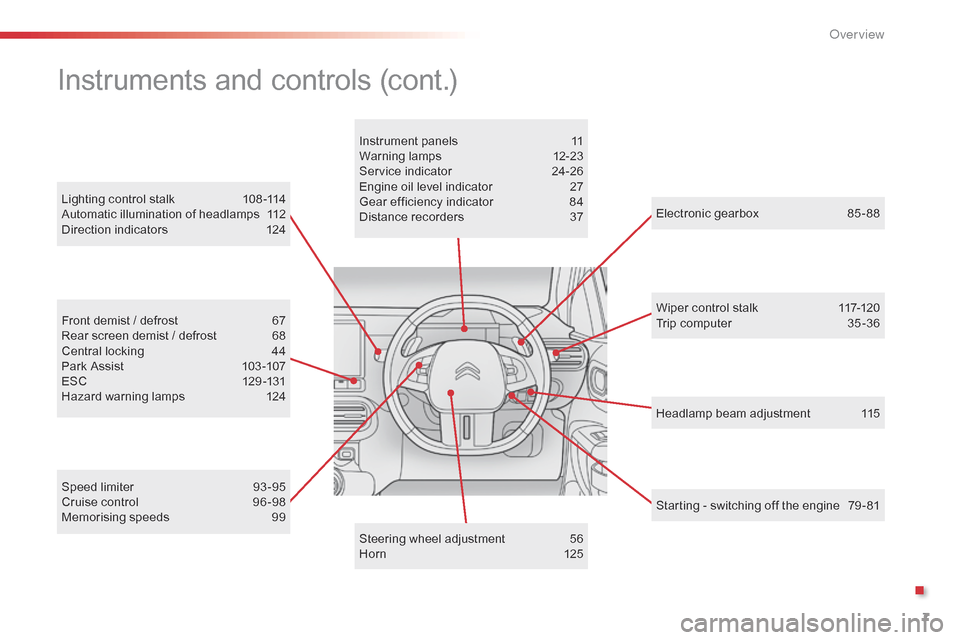
7
Headlamp beam adjustment 115
Lighting
control
stalk
1
08 -114
Automatic
illumination
of
headlamps
1
12
Direction
indicators
1
24
Electronic gearbox
8
5 - 88
Wiper control stalk
1
17-120
Trip computer
3
5 -36
Speed
limiter
9
3 -95
Cruise
control
9
6 -98
Memorising
speeds
9
9
Front
demist
/
defrost
6
7
Rear
screen
demist
/
defrost
6
8
Central
locking
4
4
Park
Assist
1
03 -107
ESC
1
29 -131
Hazard
warning
lamps
1
24 Instrument
panels
1
1
Warning
lam
ps
1
2-23
Service
indicator
2
4-26
Engine
oil
level
indicator
2
7
Gear
efficiency
indicator
8
4
Distance
recorders
3
7
Steering
wheel
adjustment
5
6
H or n
12
5
Instruments and controls (cont.)
Starting - switching off the engine 7 9 - 81
.
O
Page 58 of 326
56
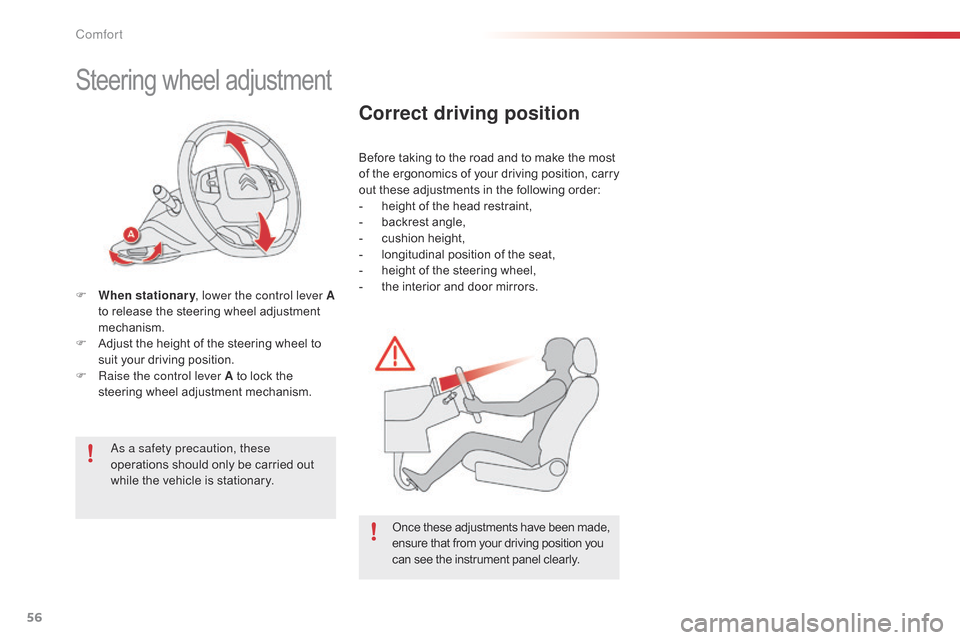
Steering wheel adjustment
F When stationary , lower the control lever A
to release the steering wheel adjustment
m
echanism.
F
A
djust the height of the steering wheel to
s
uit your driving position.
F
Ra
ise the control lever A to lock the
s
teering wheel adjustment mechanism.
as a s
afety precaution, these
operations
should only be carried out
w
hile the vehicle is stationary.
Correct driving position
Before taking to the road and to make the most of t he e rgonomics o f y our d riving p osition, c arry
o
ut these adjustments in the following order:
-
h
eight of the head restraint,
-
b
ackrest angle,
-
c
ushion height,
-
l
ongitudinal position of the seat,
-
h
eight of the steering wheel,
-
t
he interior and door mirrors.
Once
these adjustments have been made,
e
nsure that from your driving position you
c
an see the instrument panel clearly.
Comfort
Page 82 of 326
80
Starting
The parking brake must be applied.
F
W
ith
a manual gearbox, place the gear
l
ever
in neutral then depress the clutch
p
edal
f
ully.
F
W
ith
an electronic gearbox, place the
c
ontrol at N then press the brake pedal
f
i r m l y.
F
I
nsert
the key into the ignition switch; the
s
ystem recognises the code.
In
certain cases, you may have to apply
m
ore force to the steering (wheels on
f
ull
lock, for example).
F
W
ith
a petrol engine, operate the starter
m
otor
by turning the key to position 3
without
pressing the accelerator pedal,
u
ntil
the engine starts. Once the engine is
r
unning, release the key. F
W ith a Diesel engine, turn the key to
p
osition 2,
ignition on, to operate the
eng
ine
p
re-heating
s
ystem.
Wait until this warning lamp goes off in the instrument panel then operate the starter m
otor by turning the key to position 3
without
pressing the accelerator pedal,
u
ntil the engine starts. Once the engine is
r
unning, release the key.
In wintry conditions, the warning lamp can stay on for a longer period. When
t
he engine is hot, the warning lamp
d
oes not come on. In
temperate conditions, do not leave
t
he engine at idle to warm up but move
o
ff straight away and drive at moderate
s
peed.
Never leave the engine running in
a
n enclosed area without adequate
v
entilation:
in
ternal
c
ombustion
e
ngines emit toxic exhaust gases,
s
uch as carbon monoxide. Danger of i
ntoxication and death.
In very severe wintry conditions
(
temperatures below -23°C), to ensure
t
he correct operation and durability of
t
he mechanical components of your
v
ehicle, engine and gearbox, it is
n
ecessary to leave the engine running
f
or 4 minutes before moving off.
If
the engine does not start straight
a
way, switch off the ignition. Wait a few
m
oments before operating the starter
m
otor again. If the engine does not
s
tart after several attempts, do not keep
t
rying: you risk damaging the starter
m
otor or the engine.
Contact
a CITROËN dealer or a
q
ualified
w
orkshop.
F
U
nlock
the
steering
column
by
simultaneously
t
urning
the
steering
and
the
key.
Driving
Page 83 of 326
81
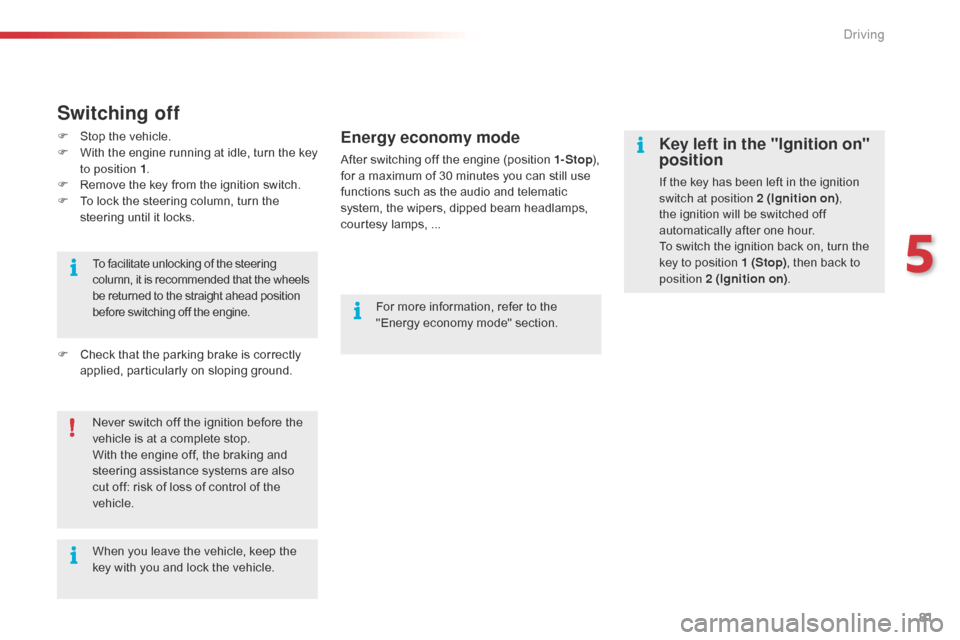
Key left in the "Ignition on"
position
If the key has been left in the ignition switch at position 2 (Ignition on) ,
the
ignition will be switched off
a
utomatically after one hour.
To
switch the ignition back on, turn the
k
ey to position 1 (Stop),
then back to
p
osition 2 (Ignition on) .
Never
switch
off
the
ignition
before
the
v
ehicle
is
at
a
complete
stop.
With
the
engine
off,
the
braking
and
s
teering
assistance
systems
are
also
c
ut
off:
risk
of
loss
of
control
of
the
v
ehicle.
When
you
leave
the
vehicle,
keep
the
k
ey
with
you
and
lock
the
vehicle.
To
facilitate
unlocking
of
the
steering
c
olumn,
it
is
recommended
that
the
wheels
b
e
returned
to
the
straight
ahead
position
b
efore
switching
off
the
engine.
Switching off
F Stop the vehicle.
F W ith the engine running at idle, turn the key
t
o position 1 .
F
R
emove the key from the ignition switch.
F
T
o lock the steering column, turn the
s
teering until it locks.
F
C
heck that the parking brake is correctly
a
pplied, particularly on sloping ground.For
more information, refer to the
"
Energy economy mode" section.Energy economy mode
After switching off the engine (position 1- Stop), f
or a maximum of 30 minutes you can still use
f
unctions such as the audio and telematic
s
ystem, the wipers, dipped beam headlamps,
c
ourtesy lamps, ...
5
Driving
Page 87 of 326
85
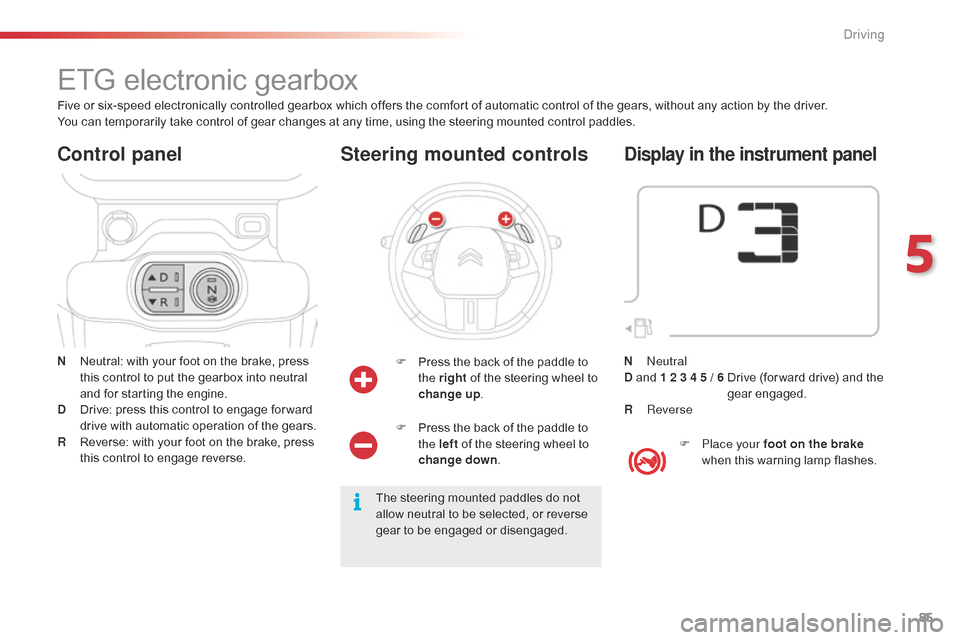
ETG electronic gearbox
N Neutral: with your foot on the brake, press t
his control to put the gearbox into neutral
a
nd for starting the engine.
D
D
rive: press this control to engage for ward
d
rive with automatic operation of the gears.
R
R
everse: with your foot on the brake, press
t
his control to engage reverse.
Control panel
F Press the back of the paddle to t
he right of the steering wheel to
ch
ange up .
Steering mounted controls
The steering mounted paddles do not a
llow neutral to be selected, or reverse
g
ear to be engaged or disengaged.
Five
or
six-speed
electronically
controlled
gearbox
which
offers the comfort of automatic control of the gears, without any action by the driver.
You
can
temporarily
take
control
of
gear
changes
at
any
time, using the steering mounted control paddles.
F
P
ress the back of the paddle to
t
he left
of the steering wheel to
ch
ange down
.
Display in the instrument panel
F Place your foot on the brake
when this warning lamp flashes.
N
n
e
utral
D
and
1 2 3 4 5 / 6
D
rive (for ward drive) and the
g
ear
enga
ged.
R
Reverse
5
Driving
Page 95 of 326
93
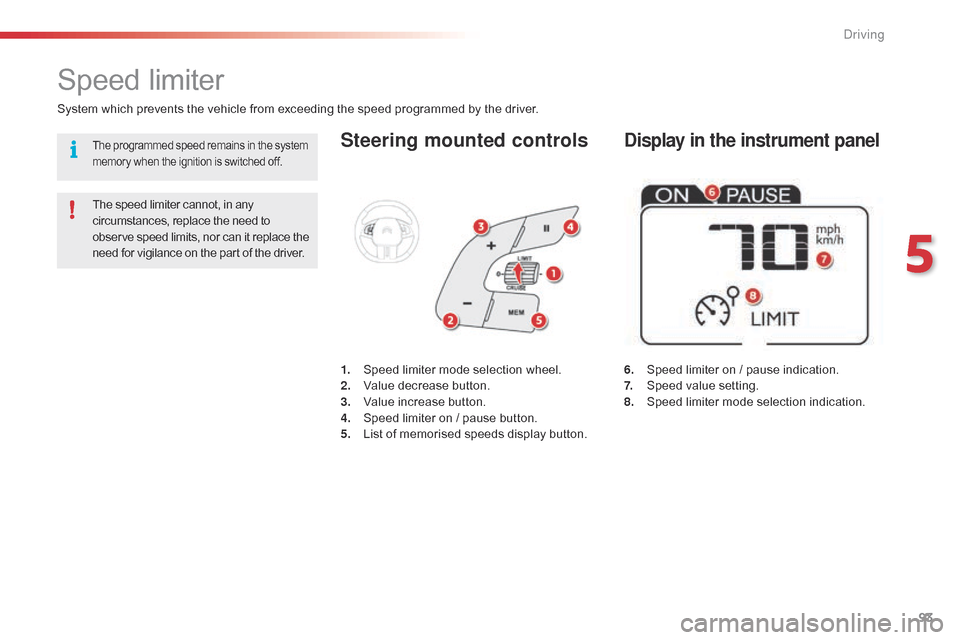
Steering mounted controls
6. Speed limiter on / pause indication.
7. S peed value setting.
8.
S
peed limiter mode selection indication.
Speed limiter
System which prevents the vehicle from exceeding the speed programmed by the driver.
T he speed limiter cannot, in any
c
ircumstances, replace the need to
o
bserve speed limits, nor can it replace the
n
eed for vigilance on the part of the driver.1.
S
peed limiter mode selection wheel.
2.
V
alue decrease button.
3.
V
alue increase button.
4.
S
peed limiter on / pause button.
5.
L
ist of memorised speeds display button.
Display in the instrument panelThe programmed speed remains in the system memory when the ignition is switched off.
5
Driving
Page 98 of 326
96
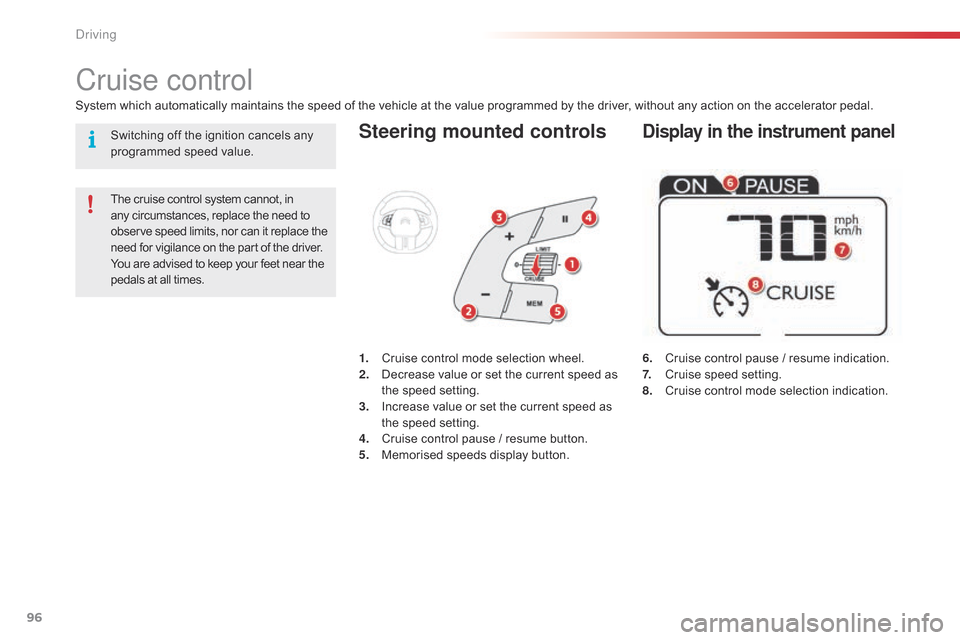
Steering mounted controls
6. Cruise control pause / resume indication.
7. C ruise speed setting.
8.
C
ruise control mode selection indication.
Cruise control
System which automatically maintains the speed of the vehicle at the value programmed by the driver, without any action on the accelerator pedal.
T he cruise control system cannot, in
a
ny circumstances, replace the need to
o
bserve speed limits, nor can it replace the
n
eed for vigilance on the part of the driver.
You
are advised to keep your feet near the
p
edals at all times. 1.
C
ruise control mode selection wheel.
2.
D
ecrease value or set the current speed as
t
he speed setting.
3.
I
ncrease value or set the current speed as
t
he speed setting.
4.
C
ruise control pause / resume button.
5.
M
emorised speeds display button.
Display in the instrument panelSwitching off the ignition cancels any programmed speed value.
Driving
Page 105 of 326

103
Park Assist
This system provides active assistance with parking, detecting a parking space then controlling the steering to park in the space.
I t controls the steering while the driver manages the accelerator, brakes, gears and clutch (manual gearbox). During phases of entry into and exit from
a
parking space, the system provides visual and audible information to the driver in order to make the manoeuvre safe. It may be necessary to move
f
or wards and backwards more than once.
The
Park Assist system cannot in any
c
ircumstances replace the need for
v
igilance on the part of the driver.
The
driver must remain in control of
t
heir vehicle ensuring that the space
r
emains clear during the manoeuvre.
In
some circumstances, the sensors
m
ay not detect small obstacles located
i
n their blind spots. Changing
tyre sizes (out-size tyres,
w
inter tyres, ...) can inter fere with
t
he correct operation of the parking
a
ssistance system.
During
a manoeuvre the steering wheel
t
urns quickly: do not hold the steering
w
heel, do not place your hand between
t
he spokes of the steering wheel and
t
ake care with loose and bulky clothing,
s
carves, handbags... There is a risk of
in
jury. For
entry into a parking space (parallel
p
arking) the system does not detect
s
paces which are clearly much smaller
o
r larger than the size of the vehicle.
This
"parking assistance" system
i
s activated automatically during
m
anoeuvres; it is therefore possible
t
hat a symbol comes on in the screen,
a
ccompanied by an audible signal,
w
ithout affecting the manoeuvre.The
selection of the type of manoeuvre
(
entering or exiting a parallel parking
s
pace) prevents a change to STOP
m
ode of Stop & Start.
In
STOP mode, this selection restarts
t
he
eng
ine.
The
driver can take control at any time by gripping the steering wheel.
The
s
ystem
p
rovides
a
ssistance
i
n
e
ntering
a
nd
e
xiting
a par
king
spa
ce
w
hen
par
allel
par
king.
5
D
Page 108 of 326
106
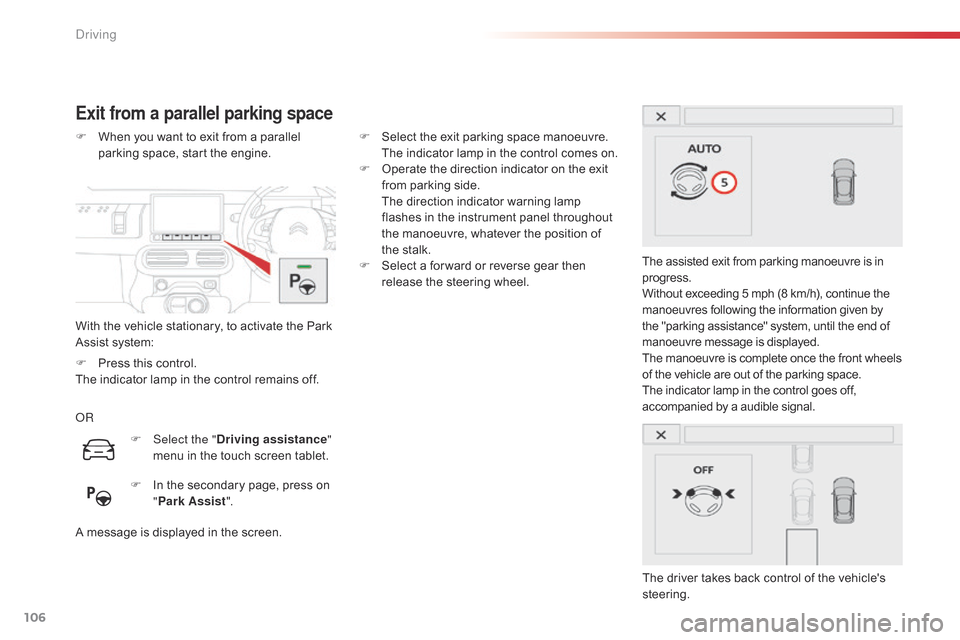
Exit from a parallel parking space
With the vehicle stationary, to activate the Park Assist system:
F
W
hen you want to exit from a parallel
p
arking space, start the engine.
The assisted exit from parking manoeuvre is in
p
rogress.
Without exceeding 5 mph (8 km/h), continue the
m
anoeuvres following the information given by
t
he "parking assistance" system, until the end of m
anoeuvre message is displayed.
The
manoeuvre is complete once the front wheels
o
f the vehicle are out of the parking space.
The
indicator lamp in the control goes off,
a
ccompanied by a audible signal.
The
driver takes back control of the vehicle's
s
teering.
oR
A
message is displayed in the screen.F
S
elect the exit parking space manoeuvre.
T
he indicator lamp in the control comes on.
F
O
perate the direction indicator on the exit
f
rom parking side.
T
he direction indicator warning lamp
f
lashes in the instrument panel throughout
t
he manoeuvre, whatever the position of
t
he stalk.
F
S
elect a for ward or reverse gear then
r
elease the steering wheel.
F
Sel
ect the "Driving assistance "
menu
in the touch screen tablet.
F
I
n the secondary page, press on
"P
ark Assist".
F
P
ress this control.
The
indicator lamp in the control remains off.
Driving