brake Citroen C4 DAG 2014.5 2.G Service Manual
[x] Cancel search | Manufacturer: CITROEN, Model Year: 2014.5, Model line: C4 DAG, Model: Citroen C4 DAG 2014.5 2.GPages: 340, PDF Size: 12.89 MB
Page 198 of 340
1111
196
C4-2_en_Chap11_info-pratique_ed01-2014
Access to the spare wheel
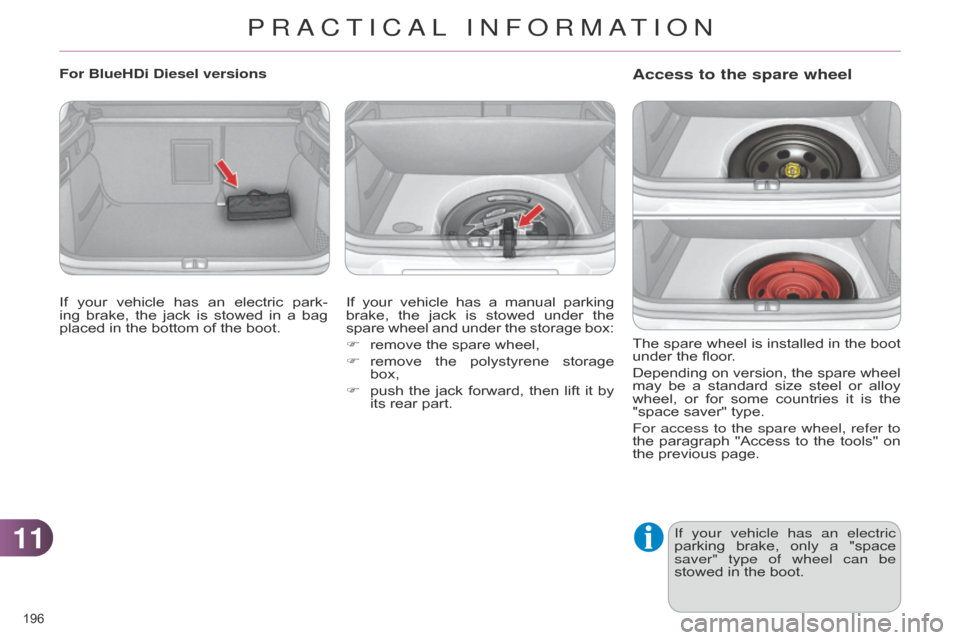
The spare wheel is installed in the boot under
the floor.
Depending
on
version,
the
spare
wheel
may
be
a
standard
size
steel
or
alloy
wheel,
or
for
some
countries
it
is
the
"space
saver" type.
For access to the spare wheel, refer to
the
paragraph
"Access
to
the
tools"
on
the
previous page.
If your vehicle has an electric
parking
brake,
only
a
"space
saver" type of wheel can be
stowed
in the boot.
For BlueHDi Diesel versions
If
your
vehicle
has
an
electric
park
-
ing
brake,
the
jack
is
stowed
in
a
bag
placed
in
the
bottom
of
the
boot. If
your
vehicle
has
a
manual
parking
brake,
the
jack
is
stowed
under
the
spare
wheel
and
under
the
storage
box:
F
remove
the
spare
wheel,
F
remove
the
polystyrene
storage
box,
F
push
the
jack
forward,
then
lift
it
by
its
rear
part.
PRACTICAL INFORMATION
Page 200 of 340
1111
198
C4-2_en_Chap11_info-pratique_ed01-2014
Ensure that the jack is stable. If the
ground is slippery or loose,
the
jack
may
slip
or
drop
-
Risk
of
injury!
Removing a wheel
Parking the vehicle
Immobilise
the
vehicle
where
it
does
not
block
traffic:
the
ground
must
be
level,
stable
and
non-
slippery
ground.
Apply
the
parking
brake
unless
it
has
been
programmed
to
au
-
tomatic
mode,
switch
of
f
the
ig
-
nition
and
engage
first
gear*
to
lock
the wheels.
Check
that
the
braking
warning
lamps
in
the
instrument
panel
are
on (not flashing).
The
occupants
must
get
out
of
the
vehicle
and
wait
where
they
are
safe.
If
necessary
,
place
a
chock
un
-
der
the
wheel
diagonally
oppo
-
site
the wheel to be changed.
Never
go
underneath
a
vehicle
raised
using
a
jack;
use
an
axle
stand. *
position R
for
an
electronic
gearbox;
P
for
an automatic gearbox.
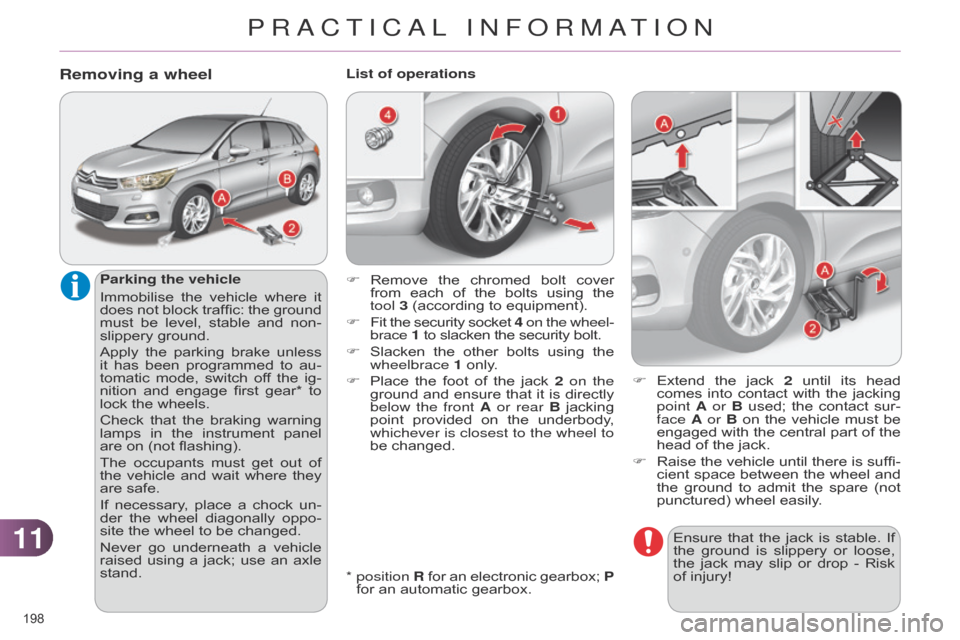
List of operations
F
Extend
the
jack
2
until
its
head
comes
into
contact
with
the
jacking
point A
or B
used;
the
contact
sur
-
face A or B
on
the
vehicle
must
be
engaged
with
the
central
part
of
the
head
of the jack.
F
Raise
the
vehicle
until
there
is
suffi
-
cient
space
between
the
wheel
and
the
ground
to
admit
the
spare
(not
punctured)
wheel easily.
F
Remove the chromed bolt cover from
each of the bolts using the
tool
3 (according to equipment).
F
Fit
the
security
socket
4 on the wheel
-
brace 1
to slacken the security bolt.
F
Slacken
the
other
bolts
using
the
wheelbrace
1 only.
F
Place
the
foot
of
the
jack
2
on the
ground
and
ensure
that
it
is
directly
below the front
A or rear B
jacking
point
provided
on
the
underbody
,
whichever is closest to the wheel to
be
changed.
PRACTICAL INFORMATION
Page 203 of 340
1111
201
C4-2_en_Chap11_info-pratique_ed01-2014
SNOW CHAINS
In wintry conditions, snow chains im -
prove traction as well as the behaviour
of
the vehicle when braking. Advice on installation
F
If
you
have
to
fit
the
chains
during
a
journey
,
stop
the
vehicle
on
a
flat
surface
on the side of the road.
F
Apply
the
parking
brake
and
posi
-
tion
any
wheel
chocks
to
prevent
movement
of your vehicle.
F
Fit
the
chains
following
the
instruc
-
tions
provided by the manufacturer.
F
Move
of
f
gently
and
drive
for
a
few
moments,
without
exceeding
30 mph
(50 km/h).
F
Stop
your
vehicle
and
check
that
the
snow
chains
are
correctly
tight
-
ened.
The
snow
chains
must
be
fitted
only
to
the
front
wheels.
They
must
never
be
fitted
to
"space-
saver"
type spare wheels.
Take
account
of
the
legislation
in
force in your country on the use
of
snow
chains
and
the
maxi
-
mum
running speed authorised.Avoid
driving
with
snow
chains
on
roads
that
have
been
cleared
of
snow
,
to
avoid
damaging
your
vehicle's
tyres
and
the
road
sur
-
face.
If
your
vehicle
is
fitted
with
alloy
wheels,
check
that
no
part
of
the
chain
or
its
fixings
is
in
contact
with the wheel rim.
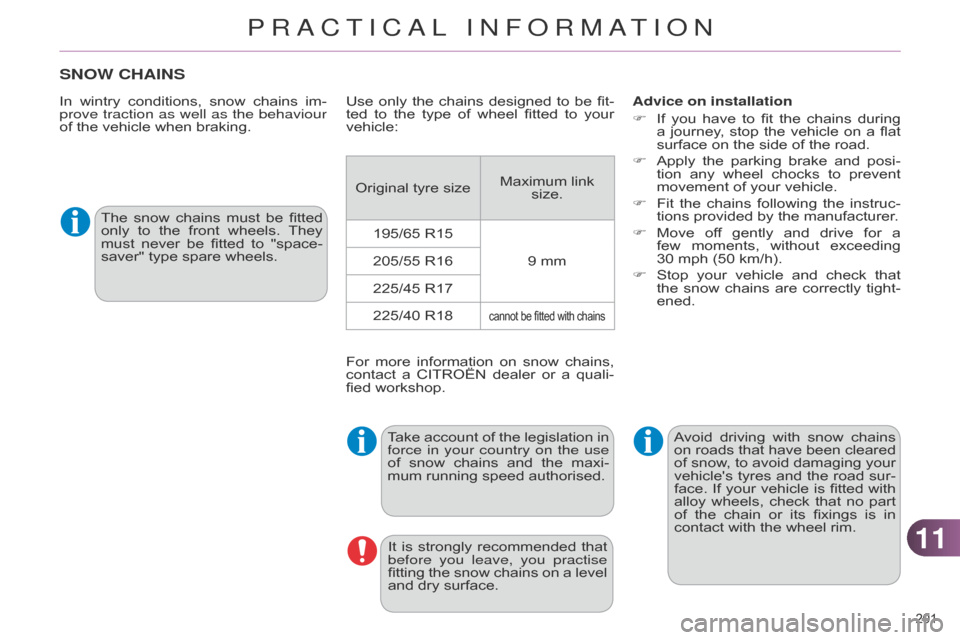
Use
only the chains designed to be fit -
ted to the type of wheel fitted to your
vehicle:
Original
tyre sizeMaximum
link
size.
195/65
R159
mm
205/55
R16
225/45
R17
225/40
R18
cannot be fitted with chains
For more information on snow chains, contact
a CITROËN dealer or a quali -
fied
workshop.
It
is
strongly
recommended
that
before you leave, you practise
fitting
the
snow
chains
on
a
level
and
dry surface.
PRACTICAL INFORMATION
Page 208 of 340
1111
206
C4-2_en_Chap11_info-pratique_ed01-2014
Rear lamps
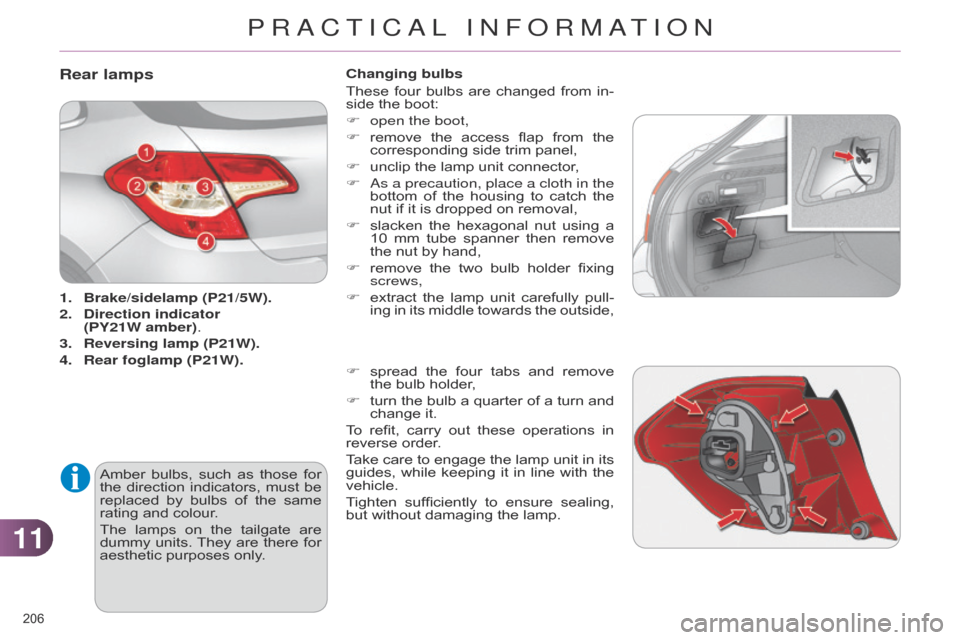
1. Brake/sidelamp (P21/5W).
2.
Direction
indicator
(PY21W amber).
3.
Reversing lamp (P21W).
4.
Rear
foglamp (P21W).
Amber
bulbs,
such
as
those
for
the
direction
indicators,
must
be
replaced
by
bulbs
of
the
same
rating
and colour.
The
lamps
on
the
tailgate
are
dummy
units.
They
are
there
for
aesthetic
purposes only.Changing bulbs
These
four
bulbs
are
changed
from
in
-
side the boot:
F
open the boot,
F
remove
the
access
flap
from
the
corresponding
side trim panel,
F
unclip
the lamp unit connector,
F a s a precaution, place a cloth in the
bottom
of
the
housing
to
catch
the
nut
if it is dropped on removal,
F
slacken
the
hexagonal
nut
using
a
10
mm
tube
spanner
then
remove
the
nut by hand,
F
remove
the
two
bulb
holder
fixing
screws,
F
extract the lamp unit carefully pull -
ing in its middle towards the outside,
F
spread
the
four
tabs
and
remove
the
bulb holder,
F
turn
the
bulb
a
quarter
of
a
turn
and
change
it.
To
refit,
carry
out
these
operations
in
reverse
order.
Take
care
to
engage
the
lamp
unit
in
its
guides,
while
keeping
it
in
line
with
the
vehicle.
T
ighten
sufficiently
to
ensure
sealing,
but
without damaging the lamp.
PRACTICAL INFORMATION
Page 209 of 340
1111
207
C4-2_en_Chap11_info-pratique_ed01-2014
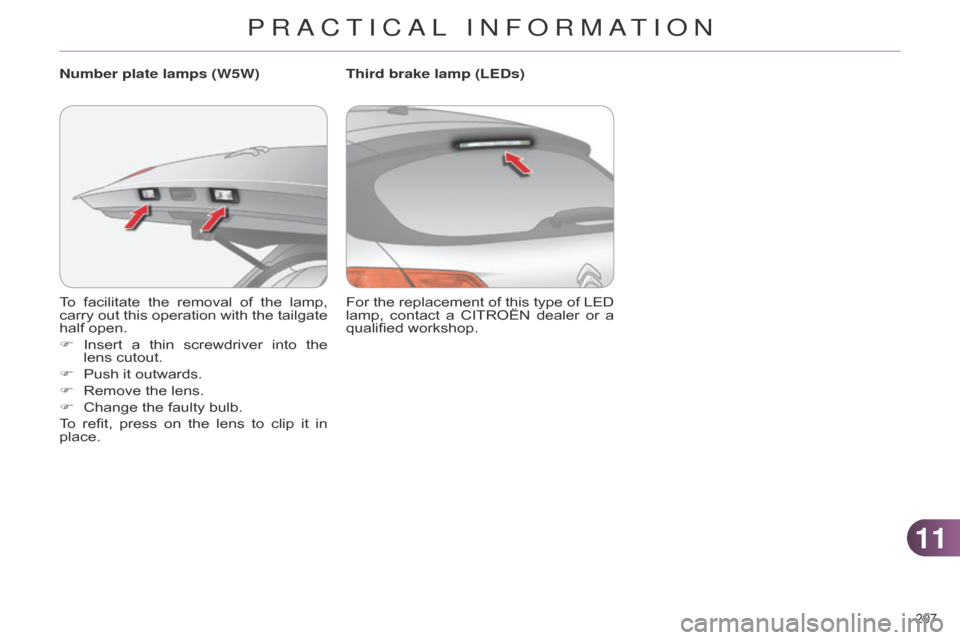
To facilitate the removal of the lamp, carry
out this operation with the tailgate
half
open.
F
Insert
a
thin
screwdriver
into
the
lens
cutout.
F
Push
it outwards.
F
Remove
the lens.
F
Change
the faulty bulb.
To
refit,
press
on
the
lens
to
clip
it
in
place. Number plate lamps (W5W)
For
the replacement of this type of LED lamp,
contact a CITROËN dealer or a
qualified
workshop.
Third brake lamp (LEDs)
PRACTICAL INFORMATION
Page 219 of 340
1111
217
C4-2_en_Chap11_info-pratique_ed01-2014
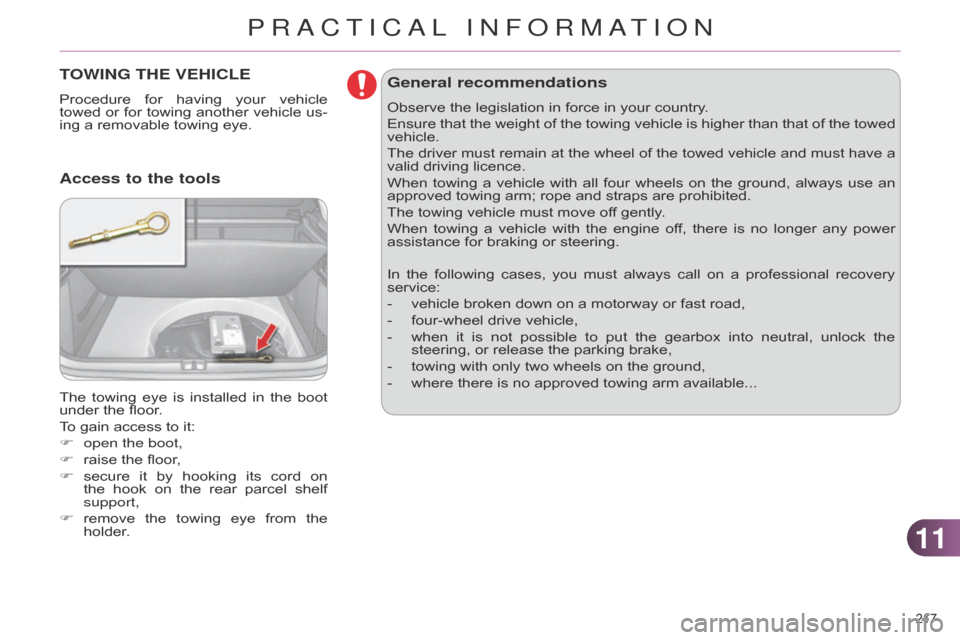
TOWING THE VEHICLE
Procedure for having your vehicle towed
or for towing another vehicle us -
ing
a removable towing eye.
The
towing
eye
is
installed
in
the
boot
under
the floor.
To
gain access to it:
F
open the boot,
F
raise
the floor,
F
secure
it
by
hooking
its
cord
on
the
hook
on
the
rear
parcel
shelf
support,
F
remove
the
towing
eye
from
the
holder
.
Access to the tools General recommendations
Observe the legislation in force in your country.
Ensure
that
the
weight
of
the
towing
vehicle
is
higher
than
that
of
the
towed
vehicle.
The
driver
must
remain
at
the
wheel
of
the
towed
vehicle
and
must
have
a
valid
driving licence.
When
towing
a
vehicle
with
all
four
wheels
on
the
ground,
always
use
an
approved
towing arm; rope and straps are prohibited.
The
towing vehicle must move off gently.
When
towing
a
vehicle
with
the
engine
of
f,
there
is
no
longer
any
power
assistance
for braking or steering.
In
the
following
cases,
you
must
always
call
on
a
professional
recovery
service:
-
vehicle
broken down on a motorway or fast road,
-
four-wheel
drive vehicle,
-
when
it
is
not
possible
to
put
the
gearbox
into
neutral,
unlock
the
steering,
or release the parking brake,
-
towing
with only two wheels on the ground,
-
where
there is no approved towing arm available...
PRACTICAL INFORMATION
Page 220 of 340
1111
218
C4-2_en_Chap11_info-pratique_ed01-2014
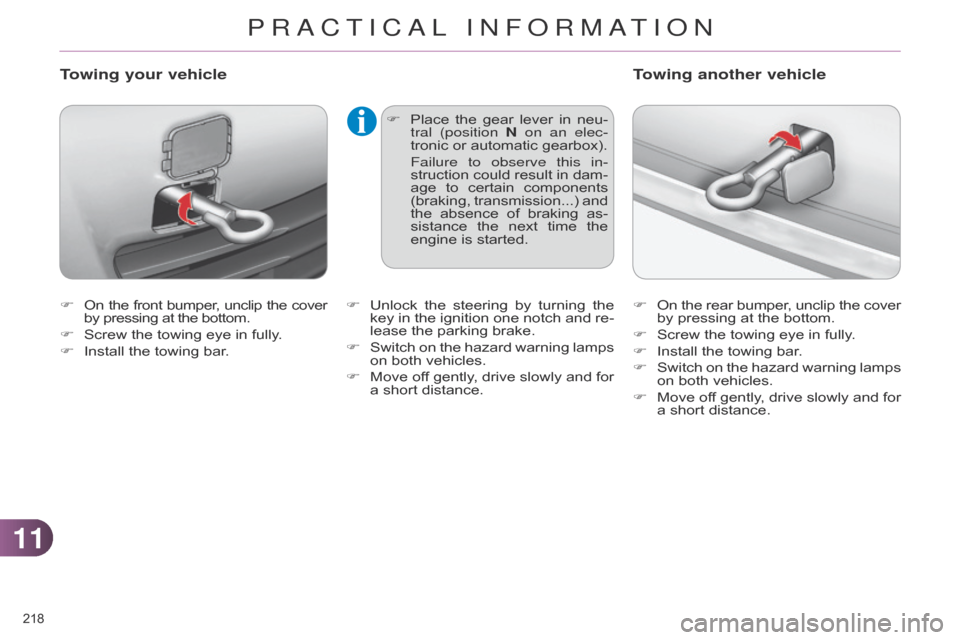
F On the front bumper , unclip the cover by
pressing at the bottom.
F
Screw
the towing eye in fully.
F
Install
the towing bar.
Towing your vehicle
F Place the gear lever in neu -
tral (position N on an elec-
tronic
or automatic gearbox).
Failure to observe this in
-
struction
could
result
in
dam
-
age
to
certain
components
(braking,
transmission...)
and
the
absence
of
braking
as
-
sistance
the
next
time
the
engine
is started. F
On
the
rear
bumper
,
unclip
the
cover by
pressing at the bottom.
F
Screw
the towing eye in fully.
F
Install
the towing bar.
F
Switch
on
the
hazard
warning
lamps
on
both vehicles.
F
Move
of
f
gently
,
drive
slowly
and
for
a
short distance.
Towing another vehicle
F Unlock the steering by turning the key
in the ignition one notch and re -
lease
the parking brake.
F
Switch
on
the
hazard
warning
lamps
on
both vehicles.
F
Move
of
f
gently
,
drive
slowly
and
for
a
short distance.
PRACTICAL INFORMATION
Page 221 of 340
1111
219
C4-2_en_Chap11_info-pratique_ed01-2014
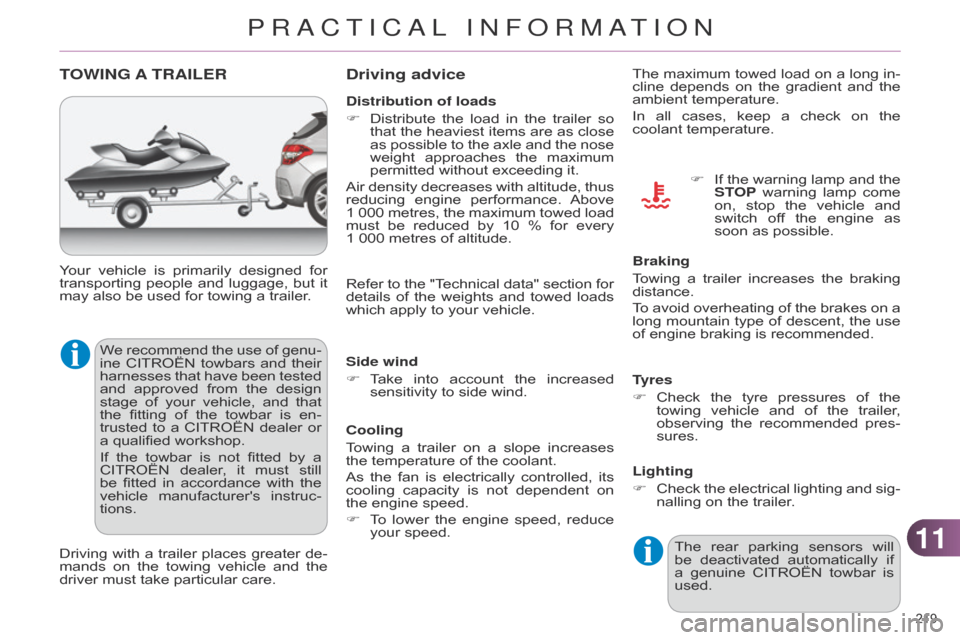
TOWING A TRAILER
We recommend the use of genu -
ine CITROËN towbars and their
harnesses
that
have
been
tested
and
approved
from
the
design
stage
of
your
vehicle,
and
that
the
fitting
of
the
towbar
is
en
-
trusted
to
a
CITROËN
dealer
or
a
qualified workshop.
If
the
towbar
is
not
fitted
by
a
CITROËN
dealer
,
it
must
still
be
fitted
in
accordance
with
the
vehicle
manufacturer's
instruc
-
tions.
Your
vehicle
is
primarily
designed
for
transporting
people
and
luggage,
but
it
may
also be used for towing a trailer.
Driving
with
a
trailer
places
greater
de
-
mands
on
the
towing
vehicle
and
the
driver
must take particular care.
Driving advice
Distribution of loads
F
Distribute
the
load
in
the
trailer
so
that
the
heaviest
items
are
as
close
as
possible
to
the
axle
and
the
nose
weight
approaches
the
maximum
permitted
without exceeding it.
Air
density
decreases
with
altitude,
thus
reducing
engine
performance.
Above
1
000
metres,
the
maximum
towed
load
must
be
reduced
by
10
%
for
every
1 000
metres of altitude.
Side wind
F
T
ake
into
account
the
increased
sensitivity
to side wind.
Cooling
Towing
a
trailer
on
a
slope
increases
the
temperature of the coolant.
As
the
fan
is
electrically
controlled,
its
cooling
capacity
is
not
dependent
on
the
engine speed.
F
T
o
lower
the
engine
speed,
reduce
your
speed. The
maximum
towed
load
on
a
long
in
-
cline depends on the gradient and the ambient
temperature.
In all cases, keep a check on the
coolant
temperature.
F
If
the
warning
lamp
and
the
ST
OP
warning
lamp
come
on,
stop
the
vehicle
and
switch
of
f
the
engine
as
soon
as possible.
Braking
Towing
a
trailer
increases
the
braking
distance.
T
o
avoid
overheating
of
the
brakes
on
a
long
mountain
type
of
descent,
the
use
of
engine braking is recommended.
Tyres
F
Check
the
tyre
pressures
of
the
towing
vehicle
and
of
the
trailer
,
observing
the
recommended
pres
-
sures.
Lighting
F
Check
the
electrical
lighting
and
sig
-
nalling
on the trailer.
Refer
to
the
"T
echnical
data"
section
for
details
of
the
weights
and
towed
loads
which
apply to your vehicle.
The
rear
parking
sensors
will
be
deactivated
automatically
if
a
genuine
CITROËN
towbar
is
used.
PRACTICAL INFORMATION
Page 227 of 340

225
C4-2_en_Chap12_caracteristique_ed01-2014
* The kerb weight is equal to the unladen weight + driver (75 kg).
**
The
weight
of
the
braked
trailer
can
be
increased,
within
the
GTW
limit,
if
the
GVW
of
the
towing
vehicle
is
reduced
by
an
equal amount. Warning: towing using a lightly loaded towing vehicle may have an adverse effect on its road holding.
PETROL WEIGHTS AND TOWED LOADS ( IN KG )
The GTW and towed load values indicated are valid up to a maximum altitude of 1 000 metres; the towed load mentioned must
be reduced by 10 % for each additional 1 000 metres of altitude.
When
towing, the maximum authorised speed is reduced (comply with the legislation in force in your country).
High
ambient
temperatures
may
result
in
a
reduction
in
the
performance
of
the
vehicle
to
protect
the
engine;
if
the
ambient
temperature
is above 37 °C, limit the towed load.
Petrol engine
VTi 95 THP 110VTi 120
Gearbox Manual Manual Manual Automatic
Model code:
NC... 8FR0HNZ6
HNZ6/1 -/2 5FS05FS9
5FS9/D
-
Unladen
weight
1 200
1 200
1 205
1 270
-
Kerb
weight*
1 275
1 275
1 280
1 345
-
Gross
vehicle weight (GVW)
1 720
1 770
1 765
1 755
-
Gross
train weight (GTW)
on
a 12 % gradient
2 920
2 970
3 065
3 055
-
Braked
trailer (within the GTW limit)
on
a 12 % gradient
1 200
1 200
1 300
1 300
-
Braked
trailer**
(with
load
transfer
within
the
GTW
limit)
1 450
1 450
1 550
1 550
-
Unbraked
trailer
635635640670
-
Recommended
nose weight
75757575
12
TECHNICAL DATA
Page 228 of 340

226
C4-2_en_Chap12_caracteristique_ed01-2014
* The kerb weight is equal to the unladen weight + driver (75 kg).
**
The
weight
of
the
braked
trailer
can
be
increased,
within
the
GTW
limit,
if
the
GVW
of
the
towing
vehicle
is
reduced
by
an
equal amount. Warning: towing using a lightly loaded towing vehicle may have an adverse effect on its road holding.
The
GTW
and
towed
load
values
indicated
are
valid
up
to
a
maximum
altitude
of
1
000
metres;
the
towed
load
mentioned
must
be reduced by 10 % for each additional 1 000 metres of altitude.
When
towing, the maximum authorised speed is reduced (comply with the legislation in force in your country).
High
ambient
temperatures
may
result
in
a
reduction
in
the
performance
of
the
vehicle
to
protect
the
engine;
if
the
ambient
temperature
is above 37 °C, limit the towed load.
Petrol engine
e-THP 130THP 155
Gearbox ManualElectronic
Model code:
NC... HNYM/S
HNYM/1S 5FV8/P
-
Unladen
weight
1 205
1 275
-
Kerb
weight*
1 280
1 350
-
Gross
vehicle weight (GVW)
1 790
1 805
-
Gross
train weight (GTW)
on
a 12% gradient
3 090
3 205
-
Braked
trailer (within the GTW limit)
on
a 12% gradient
1 300
1 400
-
Braked
trailer** (with load transfer within the
GTW
limit)
1 550
1 650
-
Unbraked
trailer
640675
-
Recommended
nose weight
7575
12
TECHNICAL DATA