height Citroen C4 DAG 2014.5 2.G Owner's Manual
[x] Cancel search | Manufacturer: CITROEN, Model Year: 2014.5, Model line: C4 DAG, Model: Citroen C4 DAG 2014.5 2.GPages: 340, PDF Size: 12.89 MB
Page 59 of 340
33
57
C4-2_en_Chap03_confort_ed01-2014
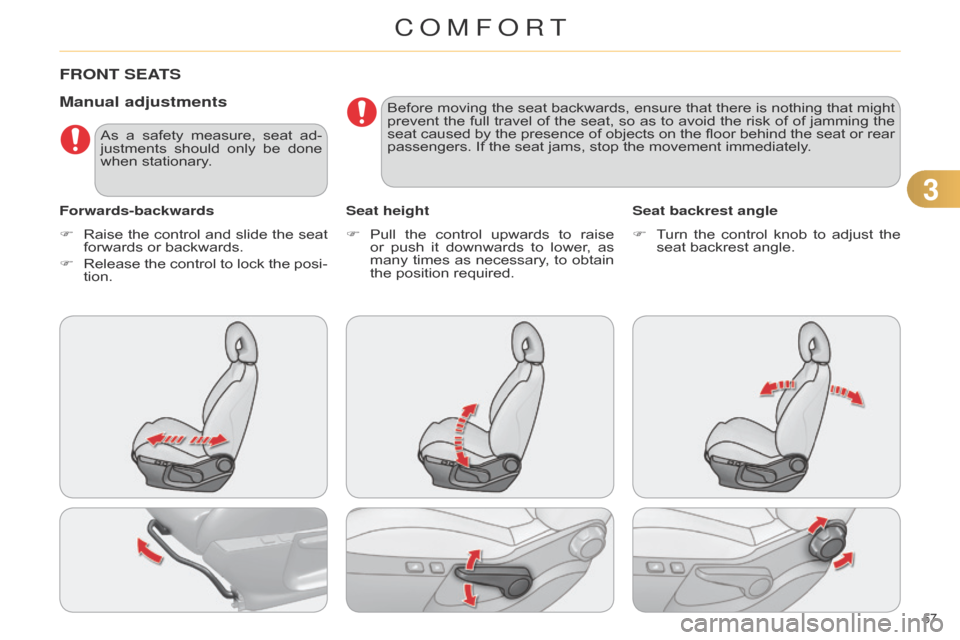
FRONT SEATS
Manual adjustments
Forwards-backwardsSeat heightSeat backrest angle
F
Raise
the
control
and
slide
the
seat
forwards
or backwards.
F
Release
the
control
to
lock
the
posi
-
tion. F
Pull
the
control
upwards
to
raise
or
push
it
downwards
to
lower
,
as
many
times
as
necessary
,
to
obtain
the
position required.F
T
urn
the
control
knob
to
adjust
the
seat
backrest angle.
As
a
safety
measure,
seat
ad
-
justments
should
only
be
done
when
stationary. Before
moving
the
seat
backwards,
ensure
that
there
is
nothing
that
might
prevent
the
full
travel
of
the
seat,
so
as
to
avoid
the
risk
of
of
jamming
the
seat
caused
by
the
presence
of
objects
on
the
floor
behind
the
seat
or
rear
passengers.
If the seat jams, stop the movement immediately.
COMFORT
Page 60 of 340
33
58
C4-2_en_Chap03_confort_ed01-2014
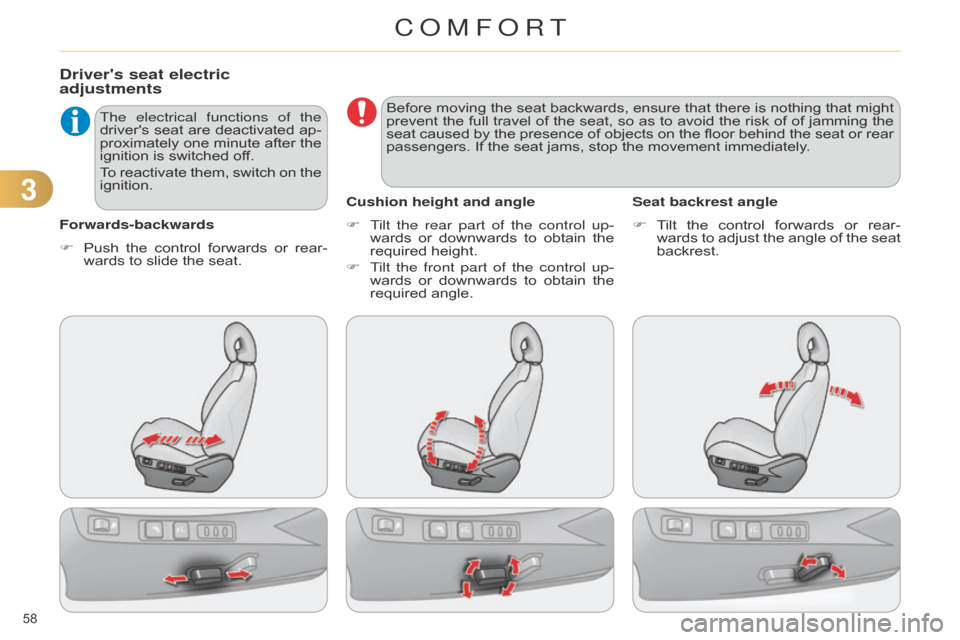
Driver's seat electric
adjustments
Forwards-backwardsThe electrical functions of the
driver's
seat
are
deactivated
ap
-
proximately
one
minute
after
the
ignition
is switched off.
To
reactivate
them,
switch
on
the
ignition.
F
T ilt the rear part of the control up-
wards
or downwards to obtain the
required
height.
F
T
ilt the front part of the control up-
wards
or
downwards
to
obtain
the
required
angle.
Cushion height and angle
F T ilt the control forwards or rear -
wards
to adjust the angle of the seat
backrest.
Seat backrest angle
F
Push
the
control
forwards
or
rear
-
wards
to slide the seat. Before
moving
the
seat
backwards,
ensure
that
there
is
nothing
that
might
prevent
the
full
travel
of
the
seat,
so
as
to
avoid
the
risk
of
of
jamming
the
seat
caused
by
the
presence
of
objects
on
the
floor
behind
the
seat
or
rear
passengers.
If the seat jams, stop the movement immediately.
COMFORT
Page 61 of 340
33
59
C4-2_en_Chap03_confort_ed01-2014
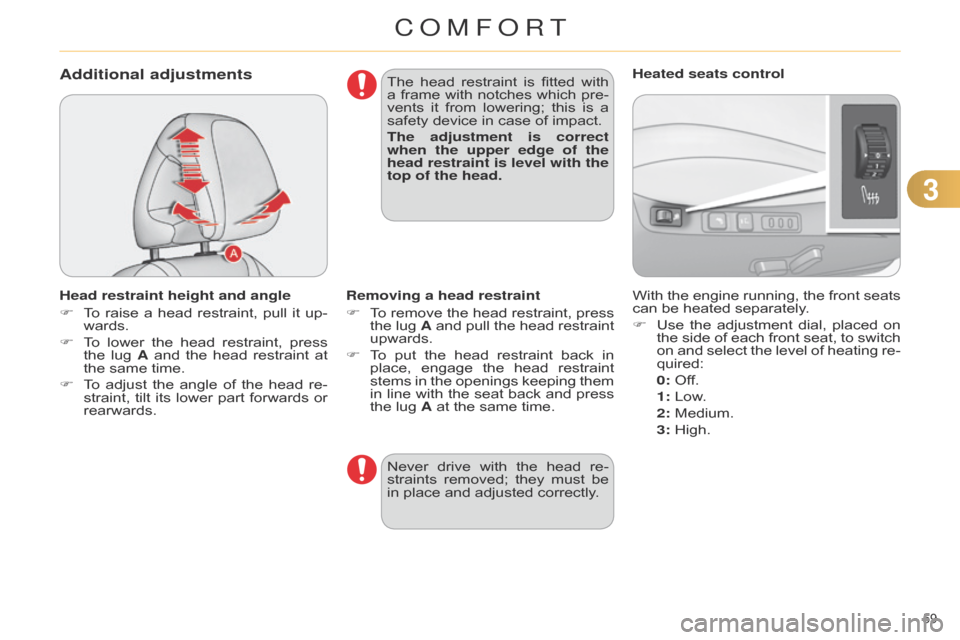
Additional adjustments
Head restraint height and angle
F
T
o
raise
a
head
restraint,
pull
it
up
-
wards.
F
T
o
lower
the
head
restraint,
press
the
lug
A
and
the
head
restraint
at
the
same time.
F
T
o
adjust
the
angle
of
the
head
re
-
straint,
tilt
its
lower
part
forwards
or
rearwards. The
head
restraint
is
fitted
with
a
frame
with
notches
which
pre
-
vents
it
from
lowering;
this
is
a
safety
device in case of impact.
The adjustment is correct
when the upper edge of the
head restraint is level with the
top of the head.
With the engine running, the front seats can
be heated separately.
F
Use
the
adjustment
dial,
placed
on
the
side
of
each
front
seat,
to
switch
on
and
select
the
level
of
heating
re
-
quired:
0:
Off.
1
: Low.
2
: Medium.
3
: High.
Heated seats control
Removing a head restraint
F
T
o
remove
the
head
restraint,
press
the
lug
A
and
pull
the
head
restraint
upwards.
F
T
o
put
the
head
restraint
back
in
place,
engage
the
head
restraint
stems
in
the
openings
keeping
them
in
line
with
the
seat
back
and
press
the
lug A at the same time.
Never
drive
with
the
head
re
-
straints
removed;
they
must
be
in
place and adjusted correctly.
COMFORT
Page 67 of 340

33
65
C4-2_en_Chap03_confort_ed01-2014
Automatic day/night model
By
means
of
a
sensor
,
which
measures
the
light
from
the
rear
of
the
vehicle,
this
system
automatically
and
progres
-
sively
changes
between
the
day
and
night
uses.In
order
to
ensure
optimum
vis
-
ibility
during
your
manoeuvres,
the
mirror
lightens
automatically
when
reverse gear is engaged.STEERING WHEEL AD j USTMENT
F When stationary, pull the control
lever to release the adjustment
mechanism.
F
Adjust
the
height
and
reach
to
suit
your
driving position.
F
Push
the
control
lever
to
lock
the
adjustment
mechanism.
a
s a safety precaution, these
operations
should
only
be
carried out
with the vehicle stationary.
Rear view mirror
Adjustable mirror providing a central rearward
view.
Equipped
with
an
anti-dazzle
system,
which
darkens
the
mirror
glass
and
re
-
duces
the
nuisance
to
the
driver
caused
by
the
sun,
headlamps
from
other
ve
-
hicles...
Manual day/night model
Adjustment
F
Adjust
the
mirror
so
that
the
glass
is
directed
correctly in the "day" position.
Day/night position
F
Pull
the
lever
to
change
to
the
"night"
anti-dazzle position.
F
Push
the
lever
to
change
to
the
normal
"day" position.
COMFORT
Page 89 of 340
55
87
C4-2_en_Chap05_visibilite_ed01-2014
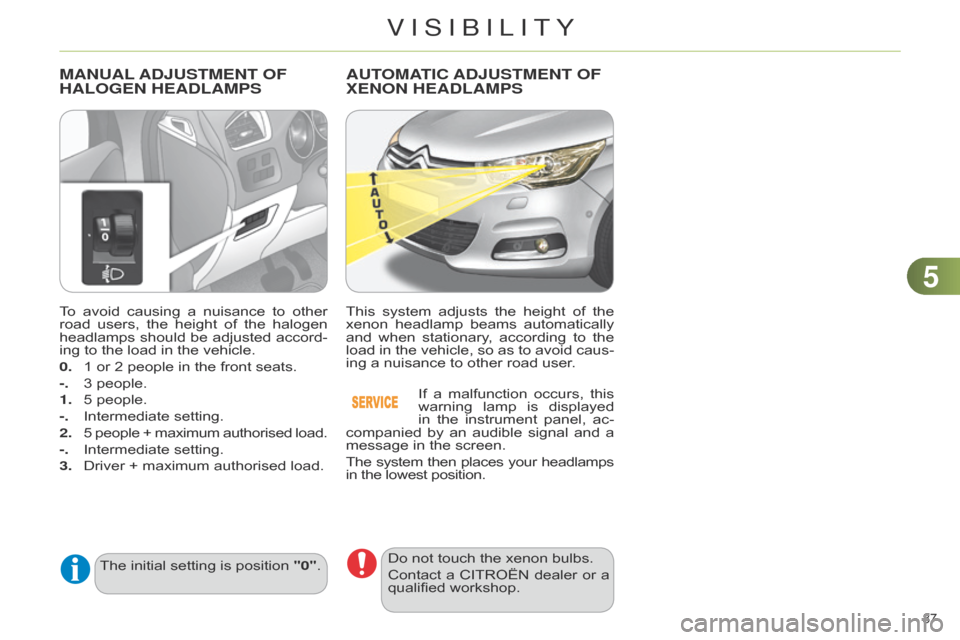
To avoid causing a nuisance to other road
users, the height of the halogen
headlamps
should
be
adjusted
accord
-
ing
to the load in the vehicle.
0.
1
or 2 people in the front seats.
-.
3
people.
1.
5
people.
-.
Intermediate
setting.
2.
5
people
+
maximum
authorised
load.
-.
Intermediate
setting.
3.
Driver
+ maximum authorised load.
MANUAL AD j USTMENT OF HALOGEN
HEADLAMPS
The initial setting is position "0".
AUTOMATIC ADjUSTMENT OF XENON
HEADLAMPS
This system adjusts the height of the xenon
headlamp beams automatically
and
when
stationary
,
according
to
the
load
in
the
vehicle,
so
as
to
avoid
caus
-
ing
a nuisance to other road user.
If
a
malfunction
occurs,
this
warning
lamp
is
displayed
in
the
instrument
panel,
ac
-
companied
by
an
audible
signal
and
a
message
in the screen.
The system then places your headlamps in
the lowest position.
Do not touch the xenon bulbs.
Contact
a
CITROËN
dealer
or
a
qualified
workshop.
VISIBILITY
Page 101 of 340
99
C4-2_en_Chap06_amenagement_ed01-2014
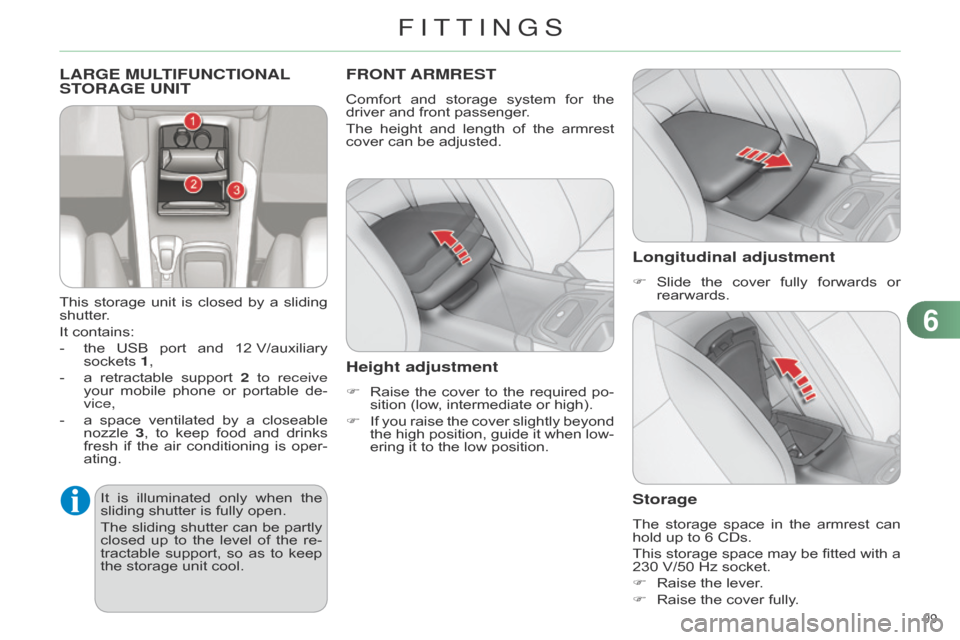
LARGE MULTIFUNCTIONAL STORAGE UNIT
This storage unit is closed by a sliding shutter
.
It
contains:
-
the
USB
port
and
12
V/auxiliary
sockets
1,
-
a
retractable
support
2
to receive
your
mobile
phone
or
portable
de
-
vice,
-
a
space
ventilated
by
a
closeable
nozzle
3
,
to
keep
food
and
drinks
fresh
if
the
air
conditioning
is
oper
-
ating.
FRONT ARMREST
Comfort and storage system for the driver
and front passenger.
The
height
and
length
of
the
armrest
cover
can be adjusted.
Height adjustment
F Raise the cover to the required po -
sition (low, intermediate or high).
F
If
you
raise
the
cover
slightly
beyond
the
high
position,
guide
it
when
low
-
ering
it to the low position.
Longitudinal adjustment
F Slide the cover fully forwards or rearwards.
Storage
The storage space in the armrest can hold
up to 6 CDs.
This
storage
space
may
be
fitted
with
a
230
V/50 Hz socket.
F
Raise
the lever.
F
Raise
the cover fully.
It
is
illu
minated
only
when
the
sliding
shutter
is
fully
open.
The
sliding
shutter
can
be
partly
closed
up
to
the
level
of
the
re
-
tractable
support,
so
as
to
keep
the
storage
unit
cool.
6
FITTInGS
Page 117 of 340
77
115
C4-2_en_Chap07_securite-enfants_ed01-2014
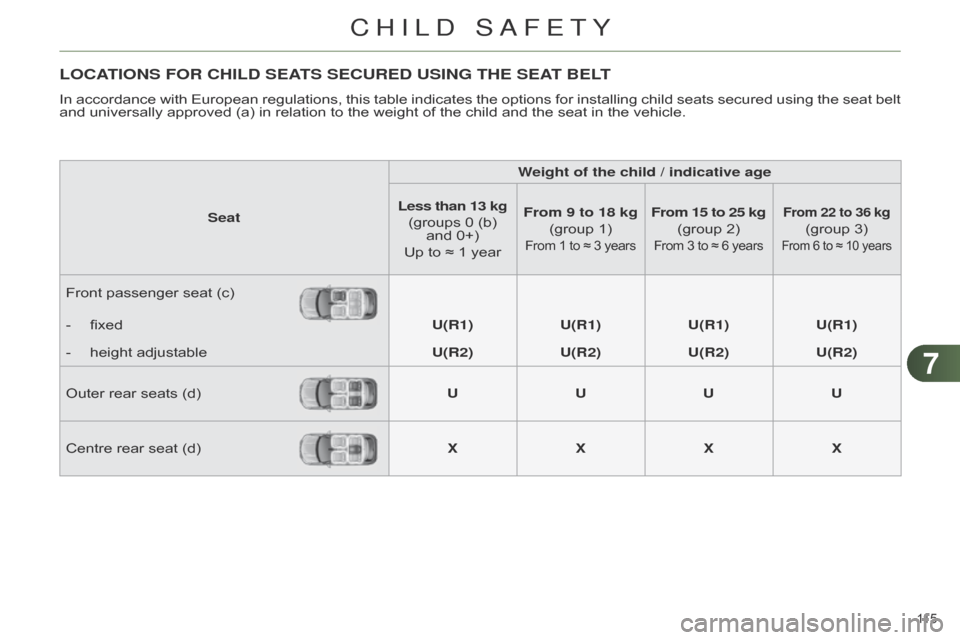
LOCATIONS FOR CHILD SEATS SECURED USING THE SEAT BELT
In accordance with European regulations, this table indicates the options for installin g child seats secured using the seat belt and
universally approved (a) in relation to the weight of the child and the seat in the vehicle.
Seat Weight of the child / indicative age
Less than 13
kg
(groups
0 (b)
and
0+)
Up
to ≈ 1 yearFrom 9 to 18 kg
(group
1)
From 1 to ≈ 3 years
From 15 to 25 kg
(group 2)
From 3 to ≈ 6 years
From 22 to 36 kg
(group 3)
From 6 to ≈ 10 years
Front passenger seat (c)
-
fixed U(R1)U(R1)U(R1)U(R1)
-
height
adjustable U(R2)U(R2)U(R2)U(R2)
Outer
rear seats (d) UUUU
Centre
rear seat (d) XXXX
CHILD SAFETY
Page 120 of 340
77
118
C4-2_en_Chap07_securite-enfants_ed01-2014
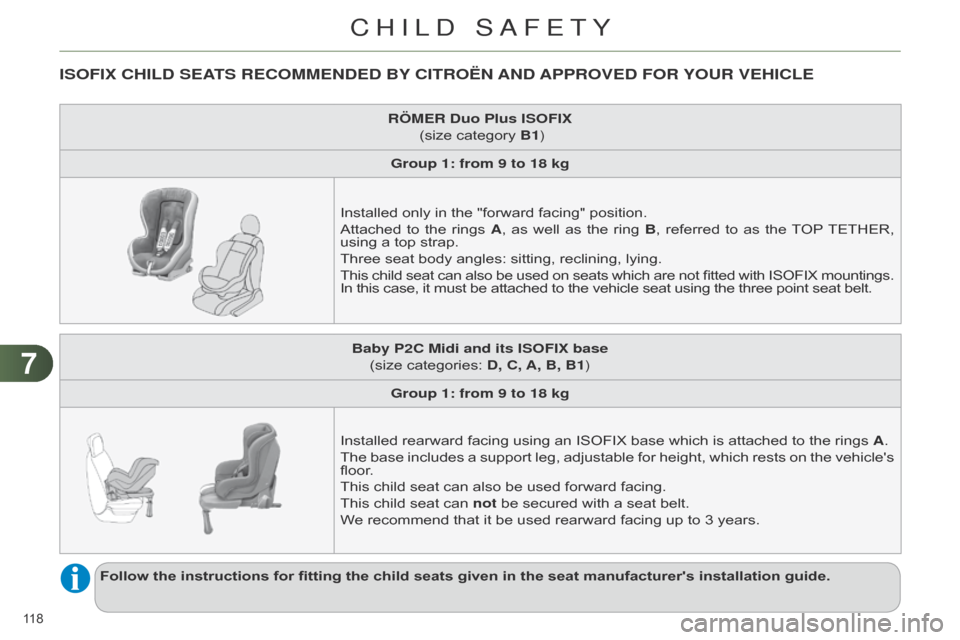
ISOFIX CHILD SEATS RECOMMENDED BY CITROËN AND APPROVED FOR YOUR VEHICLE
RÖMER Duo Plus ISOFIX
(size category B1)
Group 1: from 9 to 18 kg
Installed
only in the "forward facing" position.
Attached
to
the
rings
A
,
as
well
as
the
ring
B
,
referred
to
as
the
T
OP
TETHER,
using
a top strap.
Three
seat body angles: sitting, reclining, lying.
This
child
seat
can
also
be
used
on
seats
which
are
not
fitted
with
ISOFIX
mountings. In
this
case, it must be attached to the vehicle seat using the three point seat belt.
Follow the instructions for fitting the child seats given in the seat manufacturer's installation guide. Baby P2C Midi and its ISOFIX base
(size
categories: D, C, A, B, B1)
Group 1: from 9 to 18 kg
Installed
rearward facing using an ISOFIX base which is attached to the rings A.
The
base
includes
a
support
leg,
adjustable
for
height,
which
rests
on
the
vehicle's
floor
.
This
child seat can also be used forward facing.
This
child seat can not be secured with a seat belt.
We
recommend that it be used rearward facing up to 3 years.
CHILD SAFETY
Page 128 of 340
88
126
C4-2_en_Chap08_securite_ed01-2014
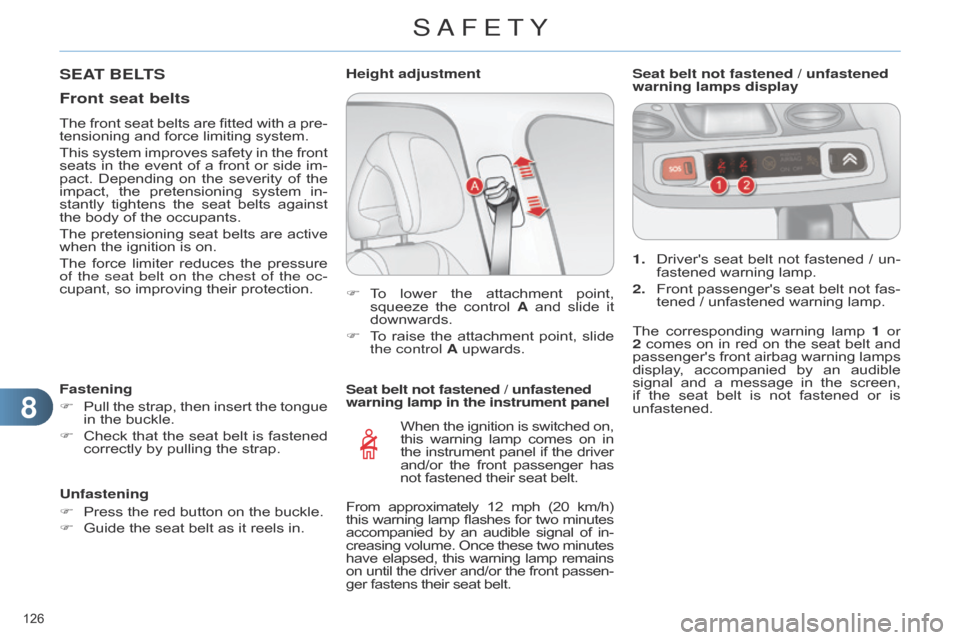
Seat belt not fastened / unfastened
warning lamp in the instrument panelWhen
the
ignition
is
switched
on, this
warning
lamp
comes
on
in the
instrument
panel
if
the
driver and/or
the
front
passenger
has not
fastened their seat belt.1.
Driver's
seat
belt
not
fastened
/
un
-
fastened warning lamp.
2.
Front
passenger's
seat
belt
not
fas
-
tened / unfastened warning lamp.
Seat belt not fastened / unfastened
warning lamps display
F
T
o
lower
the
attachment
point,
squeeze
the
control
A
and
slide
it
downwards.
F
T
o
raise
the
attachment
point,
slide
the control
A upwards.
Height adjustment
SEAT BELTS
Front seat belts
The front
seat belts are fitted with a pre -
tensioning and force limiting system.
This
system
improves
safety
in
the
front
seats
in
the
event
of
a
front
or
side
im
-
pact.
Depending
on
the
severity
of
the
impact,
the
pretensioning
system
in
-
stantly
tightens
the
seat
belts
against
the
body of the occupants.
The
pretensioning
seat
belts
are
active
when
the ignition is on.
The
force
limiter
reduces
the
pressure
of
the seat belt on the chest of the oc-
cupant,
so improving their protection.
Fastening
F
Pull
the
strap,
then
insert
the
tongue
in
the buckle.
F
Check
that
the
seat
belt
is
fastened
correctly
by pulling the strap.
Unfastening
F
Press
the red button on the buckle.
F
Guide
the seat belt as it reels in. The
corresponding
warning
lamp
1
or
2
comes
on
in
red
on
the
seat
belt
and
passenger's
front
airbag
warning
lamps
display
,
accompanied
by
an
audible
signal
and
a
message
in
the
screen,
if
the
seat
belt
is
not
fastened
or
is
unfastened.
From
approximately
12
mph
(20
km/h)
this
warning
lamp
flashes
for
two
minutes accompanied
by
an
audible
signal
of
in
-
creasing
volume.
Once
these
two
minutes have
elapsed,
this
warning
lamp
remains on
until
the
driver
and/or
the
front
passen
-
ger
fastens their seat belt.
SAFETY
Page 218 of 340
1111
216
C4-2_en_Chap11_info-pratique_ed01-2014
VERY COLD CLIMATE SCREEN *
* According to country.
Fitting
F Offer up the very cold climate screen to the front of the lower sec
-
tion
of the front bumper.
F
Press
around
its
edge
to
engage
its
fixing
clips one by one.
Removal
F Use a screwdriver as a lever to re -
lease each fixing clip in turn.
Do
not
forget
to
remove
the
very
cold
climate screen when:
-
the
ambient
temperature
ex
-
ceeds
10 °C,
-
towing,
-
driving at speeds above 75 mph
(120
km/h).
Removable
protective
screen
which
prevents
the
accumulation
of
snow
at
the
radiator
cooling
fan.
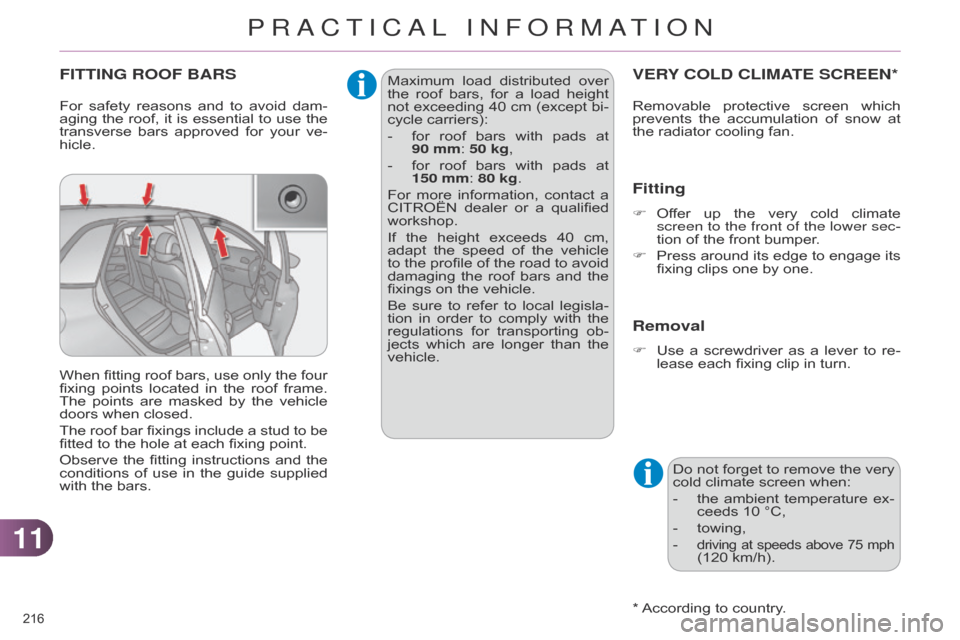
FITTING ROOF BARS
For safety
reasons and to avoid dam -
aging the roof, it is essential to use the
transverse
bars
approved
for
your
ve
-
hicle.
When
fitting
roof
bars,
use
only
the
four
fixing
points
located
in
the
roof
frame.
The
points
are
masked
by
the
vehicle
doors
when closed.
The
roof
bar
fixings
include
a
stud
to
be
fitted
to the hole at each fixing point.
Observe
the
fitting
instructions
and
the
conditions
of
use
in
the
guide
supplied
with
the bars. Maximum
load
distributed
over
the
roof bars, for a load height not
exceeding 40 cm (except bi -
cycle
carriers):
-
for
roof
bars
with
pads
at
90
mm: 50 kg,
-
for
roof
bars
with
pads
at
150
mm: 80 kg.
For
more
information,
contact
a
CITROËN
dealer
or
a
qualified
workshop.
If
the
height
exceeds
40
cm,
adapt
the
speed
of
the
vehicle
to
the
profile
of
the
road
to
avoid
damaging
the
roof
bars
and
the
fixings
on the vehicle.
Be
sure
to
refer
to
local
legisla
-
tion
in
order
to
comply
with
the
regulations
for
transporting
ob
-
jects
which
are
longer
than
the
vehicle.
PRACTICAL INFORMATION