height adjustment Citroen C4 DAG 2014.5 2.G Owner's Manual
[x] Cancel search | Manufacturer: CITROEN, Model Year: 2014.5, Model line: C4 DAG, Model: Citroen C4 DAG 2014.5 2.GPages: 340, PDF Size: 12.89 MB
Page 59 of 340
33
57
C4-2_en_Chap03_confort_ed01-2014
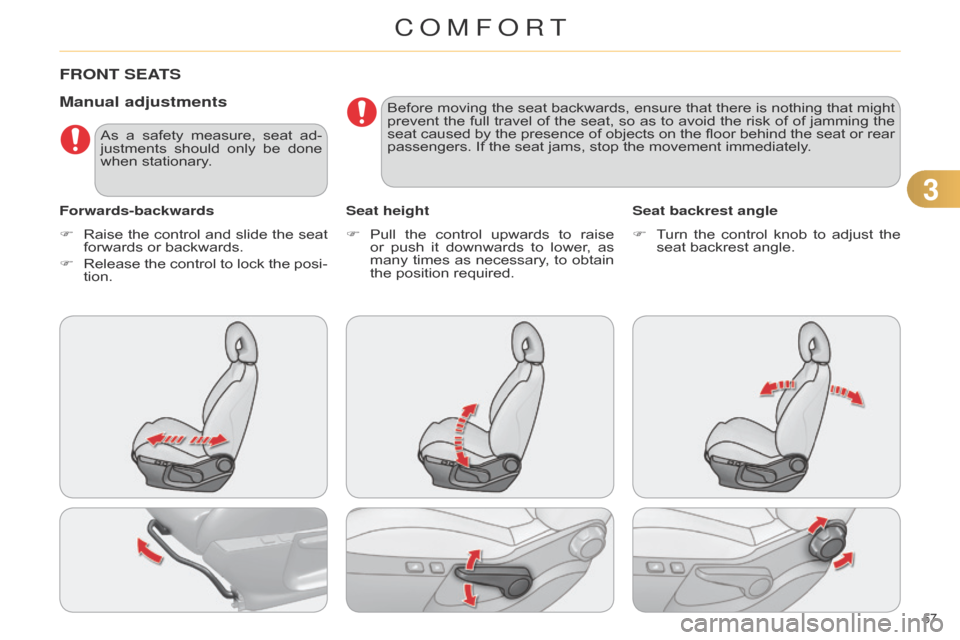
FRONT SEATS
Manual adjustments
Forwards-backwardsSeat heightSeat backrest angle
F
Raise
the
control
and
slide
the
seat
forwards
or backwards.
F
Release
the
control
to
lock
the
posi
-
tion. F
Pull
the
control
upwards
to
raise
or
push
it
downwards
to
lower
,
as
many
times
as
necessary
,
to
obtain
the
position required.F
T
urn
the
control
knob
to
adjust
the
seat
backrest angle.
As
a
safety
measure,
seat
ad
-
justments
should
only
be
done
when
stationary. Before
moving
the
seat
backwards,
ensure
that
there
is
nothing
that
might
prevent
the
full
travel
of
the
seat,
so
as
to
avoid
the
risk
of
of
jamming
the
seat
caused
by
the
presence
of
objects
on
the
floor
behind
the
seat
or
rear
passengers.
If the seat jams, stop the movement immediately.
COMFORT
Page 60 of 340
33
58
C4-2_en_Chap03_confort_ed01-2014
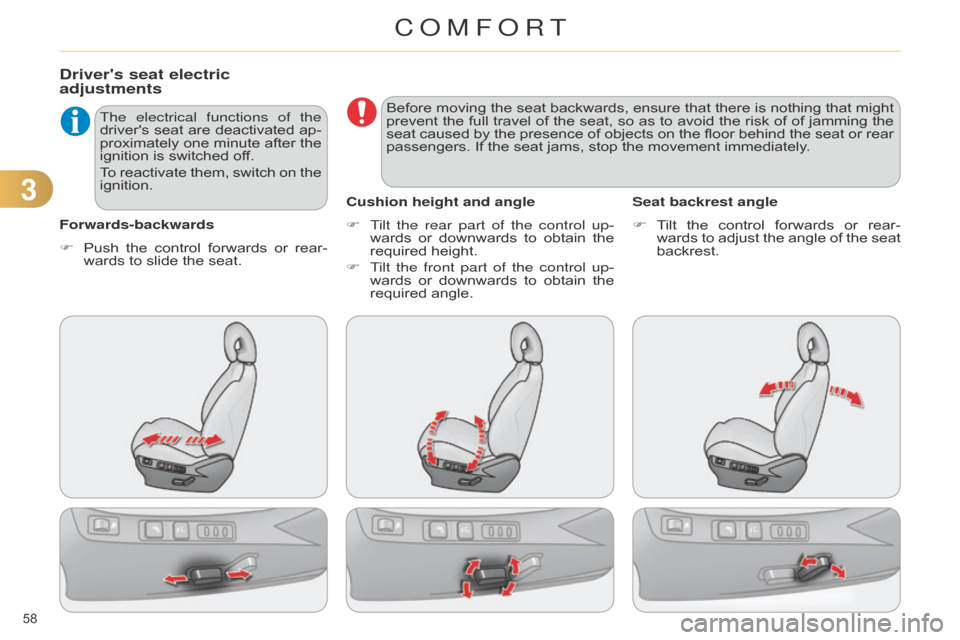
Driver's seat electric
adjustments
Forwards-backwardsThe electrical functions of the
driver's
seat
are
deactivated
ap
-
proximately
one
minute
after
the
ignition
is switched off.
To
reactivate
them,
switch
on
the
ignition.
F
T ilt the rear part of the control up-
wards
or downwards to obtain the
required
height.
F
T
ilt the front part of the control up-
wards
or
downwards
to
obtain
the
required
angle.
Cushion height and angle
F T ilt the control forwards or rear -
wards
to adjust the angle of the seat
backrest.
Seat backrest angle
F
Push
the
control
forwards
or
rear
-
wards
to slide the seat. Before
moving
the
seat
backwards,
ensure
that
there
is
nothing
that
might
prevent
the
full
travel
of
the
seat,
so
as
to
avoid
the
risk
of
of
jamming
the
seat
caused
by
the
presence
of
objects
on
the
floor
behind
the
seat
or
rear
passengers.
If the seat jams, stop the movement immediately.
COMFORT
Page 61 of 340
33
59
C4-2_en_Chap03_confort_ed01-2014
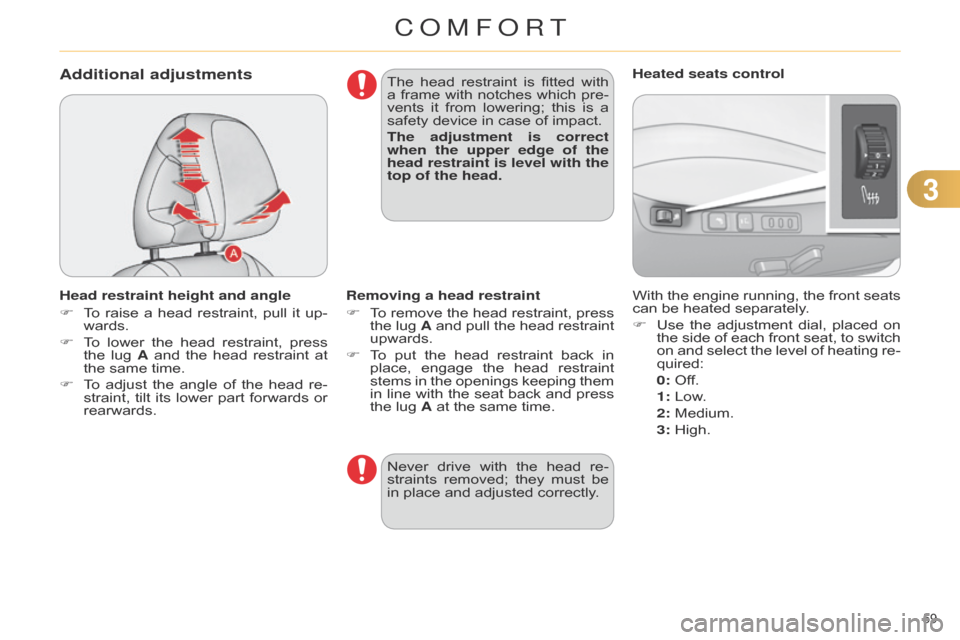
Additional adjustments
Head restraint height and angle
F
T
o
raise
a
head
restraint,
pull
it
up
-
wards.
F
T
o
lower
the
head
restraint,
press
the
lug
A
and
the
head
restraint
at
the
same time.
F
T
o
adjust
the
angle
of
the
head
re
-
straint,
tilt
its
lower
part
forwards
or
rearwards. The
head
restraint
is
fitted
with
a
frame
with
notches
which
pre
-
vents
it
from
lowering;
this
is
a
safety
device in case of impact.
The adjustment is correct
when the upper edge of the
head restraint is level with the
top of the head.
With the engine running, the front seats can
be heated separately.
F
Use
the
adjustment
dial,
placed
on
the
side
of
each
front
seat,
to
switch
on
and
select
the
level
of
heating
re
-
quired:
0:
Off.
1
: Low.
2
: Medium.
3
: High.
Heated seats control
Removing a head restraint
F
T
o
remove
the
head
restraint,
press
the
lug
A
and
pull
the
head
restraint
upwards.
F
T
o
put
the
head
restraint
back
in
place,
engage
the
head
restraint
stems
in
the
openings
keeping
them
in
line
with
the
seat
back
and
press
the
lug A at the same time.
Never
drive
with
the
head
re
-
straints
removed;
they
must
be
in
place and adjusted correctly.
COMFORT
Page 67 of 340

33
65
C4-2_en_Chap03_confort_ed01-2014
Automatic day/night model
By
means
of
a
sensor
,
which
measures
the
light
from
the
rear
of
the
vehicle,
this
system
automatically
and
progres
-
sively
changes
between
the
day
and
night
uses.In
order
to
ensure
optimum
vis
-
ibility
during
your
manoeuvres,
the
mirror
lightens
automatically
when
reverse gear is engaged.STEERING WHEEL AD j USTMENT
F When stationary, pull the control
lever to release the adjustment
mechanism.
F
Adjust
the
height
and
reach
to
suit
your
driving position.
F
Push
the
control
lever
to
lock
the
adjustment
mechanism.
a
s a safety precaution, these
operations
should
only
be
carried out
with the vehicle stationary.
Rear view mirror
Adjustable mirror providing a central rearward
view.
Equipped
with
an
anti-dazzle
system,
which
darkens
the
mirror
glass
and
re
-
duces
the
nuisance
to
the
driver
caused
by
the
sun,
headlamps
from
other
ve
-
hicles...
Manual day/night model
Adjustment
F
Adjust
the
mirror
so
that
the
glass
is
directed
correctly in the "day" position.
Day/night position
F
Pull
the
lever
to
change
to
the
"night"
anti-dazzle position.
F
Push
the
lever
to
change
to
the
normal
"day" position.
COMFORT
Page 89 of 340
55
87
C4-2_en_Chap05_visibilite_ed01-2014
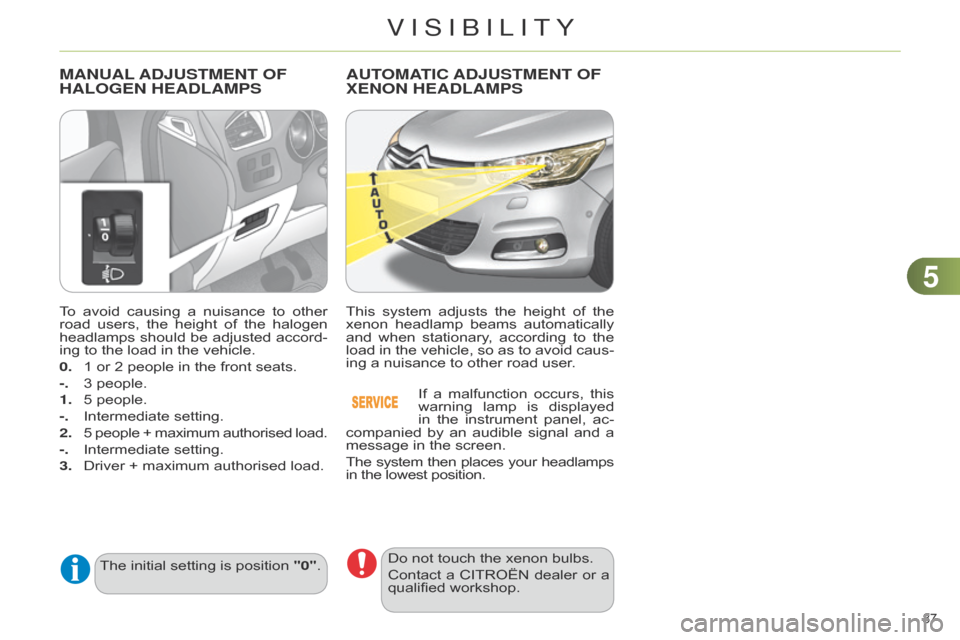
To avoid causing a nuisance to other road
users, the height of the halogen
headlamps
should
be
adjusted
accord
-
ing
to the load in the vehicle.
0.
1
or 2 people in the front seats.
-.
3
people.
1.
5
people.
-.
Intermediate
setting.
2.
5
people
+
maximum
authorised
load.
-.
Intermediate
setting.
3.
Driver
+ maximum authorised load.
MANUAL AD j USTMENT OF HALOGEN
HEADLAMPS
The initial setting is position "0".
AUTOMATIC ADjUSTMENT OF XENON
HEADLAMPS
This system adjusts the height of the xenon
headlamp beams automatically
and
when
stationary
,
according
to
the
load
in
the
vehicle,
so
as
to
avoid
caus
-
ing
a nuisance to other road user.
If
a
malfunction
occurs,
this
warning
lamp
is
displayed
in
the
instrument
panel,
ac
-
companied
by
an
audible
signal
and
a
message
in the screen.
The system then places your headlamps in
the lowest position.
Do not touch the xenon bulbs.
Contact
a
CITROËN
dealer
or
a
qualified
workshop.
VISIBILITY
Page 101 of 340
99
C4-2_en_Chap06_amenagement_ed01-2014
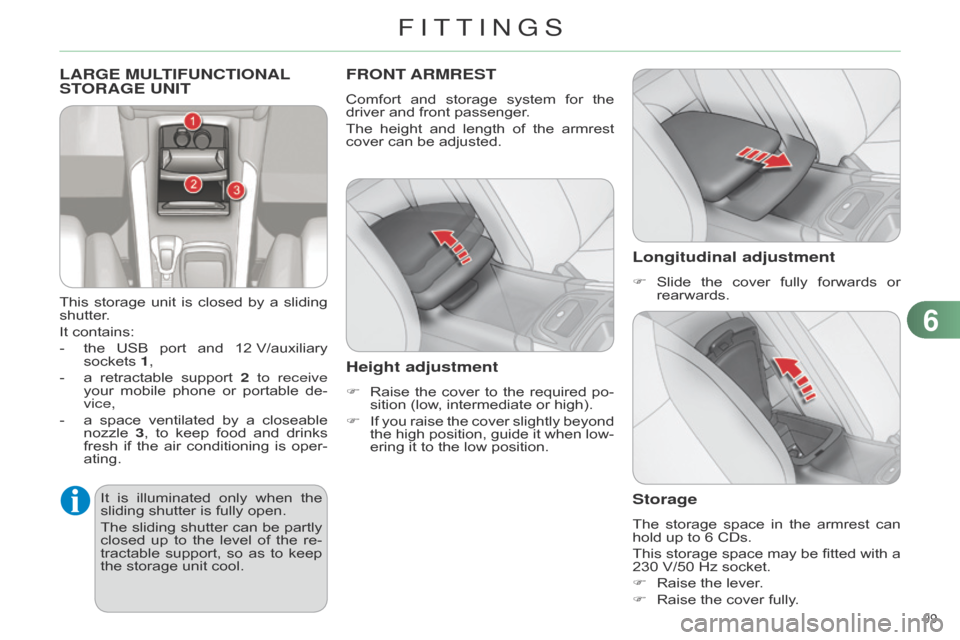
LARGE MULTIFUNCTIONAL STORAGE UNIT
This storage unit is closed by a sliding shutter
.
It
contains:
-
the
USB
port
and
12
V/auxiliary
sockets
1,
-
a
retractable
support
2
to receive
your
mobile
phone
or
portable
de
-
vice,
-
a
space
ventilated
by
a
closeable
nozzle
3
,
to
keep
food
and
drinks
fresh
if
the
air
conditioning
is
oper
-
ating.
FRONT ARMREST
Comfort and storage system for the driver
and front passenger.
The
height
and
length
of
the
armrest
cover
can be adjusted.
Height adjustment
F Raise the cover to the required po -
sition (low, intermediate or high).
F
If
you
raise
the
cover
slightly
beyond
the
high
position,
guide
it
when
low
-
ering
it to the low position.
Longitudinal adjustment
F Slide the cover fully forwards or rearwards.
Storage
The storage space in the armrest can hold
up to 6 CDs.
This
storage
space
may
be
fitted
with
a
230
V/50 Hz socket.
F
Raise
the lever.
F
Raise
the cover fully.
It
is
illu
minated
only
when
the
sliding
shutter
is
fully
open.
The
sliding
shutter
can
be
partly
closed
up
to
the
level
of
the
re
-
tractable
support,
so
as
to
keep
the
storage
unit
cool.
6
FITTInGS
Page 128 of 340
88
126
C4-2_en_Chap08_securite_ed01-2014
Seat belt not fastened / unfastened
warning lamp in the instrument panelWhen
the
ignition
is
switched
on, this
warning
lamp
comes
on
in the
instrument
panel
if
the
driver and/or
the
front
passenger
has not
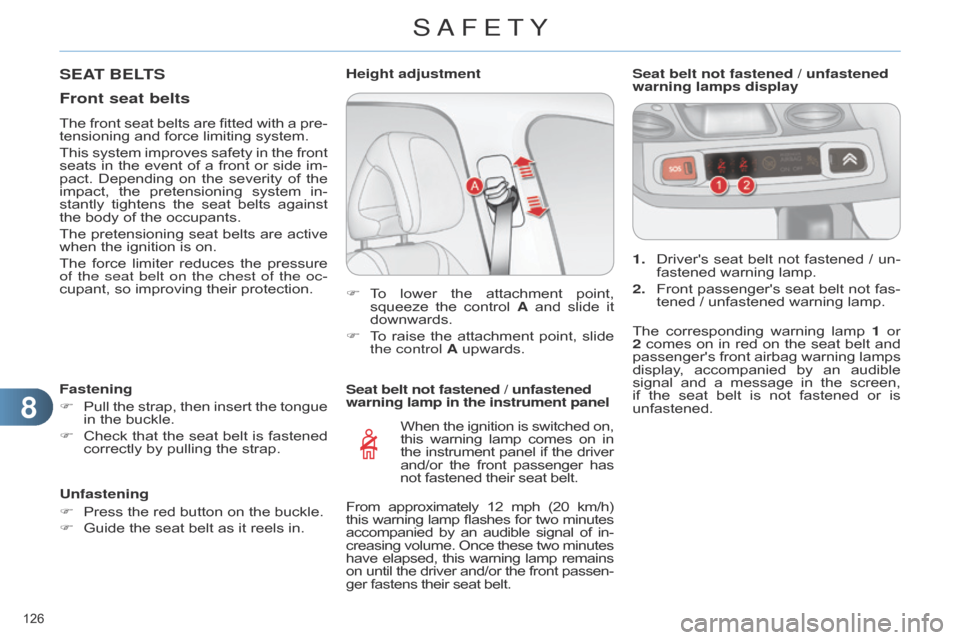
fastened their seat belt.1.
Driver's
seat
belt
not
fastened
/
un
-
fastened warning lamp.
2.
Front
passenger's
seat
belt
not
fas
-
tened / unfastened warning lamp.
Seat belt not fastened / unfastened
warning lamps display
F
T
o
lower
the
attachment
point,
squeeze
the
control
A
and
slide
it
downwards.
F
T
o
raise
the
attachment
point,
slide
the control
A upwards.
Height adjustment
SEAT BELTS
Front seat belts
The front
seat belts are fitted with a pre -
tensioning and force limiting system.
This
system
improves
safety
in
the
front
seats
in
the
event
of
a
front
or
side
im
-
pact.
Depending
on
the
severity
of
the
impact,
the
pretensioning
system
in
-
stantly
tightens
the
seat
belts
against
the
body of the occupants.
The
pretensioning
seat
belts
are
active
when
the ignition is on.
The
force
limiter
reduces
the
pressure
of
the seat belt on the chest of the oc-
cupant,
so improving their protection.
Fastening
F
Pull
the
strap,
then
insert
the
tongue
in
the buckle.
F
Check
that
the
seat
belt
is
fastened
correctly
by pulling the strap.
Unfastening
F
Press
the red button on the buckle.
F
Guide
the seat belt as it reels in. The
corresponding
warning
lamp
1
or
2
comes
on
in
red
on
the
seat
belt
and
passenger's
front
airbag
warning
lamps
display
,
accompanied
by
an
audible
signal
and
a
message
in
the
screen,
if
the
seat
belt
is
not
fastened
or
is
unfastened.
From
approximately
12
mph
(20
km/h)
this
warning
lamp
flashes
for
two
minutes accompanied
by
an
audible
signal
of
in
-
creasing
volume.
Once
these
two
minutes have
elapsed,
this
warning
lamp
remains on
until
the
driver
and/or
the
front
passen
-
ger
fastens their seat belt.
SAFETY
Page 331 of 340
329
C4-2_en_Chap14_index-alpha_ed01-2014
Head restraints, front ................... 59
Head restraints, rear .................... 62
Heated
seats
............................... 59
Heating
............................ 10,
49, 50
Height
and reach adjustment,
steering
wheel
.......................... 65
Hill start assist
........................... 150
Hooks
........................................ 105
I Markings,
identification .............. 233
Massage function ....................... 60
Mat
............................................. 102
Menu,
main
................................ 296
Mini fuel level
............................. 171
Mirror
, rear view
........................... 65
Mirrors,
door
.................. 63,
64, 158
Misfuel prevention
..................... 173
Motorway function
(direction
indicators)
............... 122
Mountings
for ISOFIX
seats
........................................11
7
MP3
CD
............................. 303,
304
Music
media players
.................. 274
Ignition
....................................... 136
Indicators,
direction
........... 122,
203
Indicator
lamps, status................. 26
Inflating
accessories
(using
the kit)
.......................... 190
Inflating
tyres
............................... 10
Inputs
for audio
system
...................... 97,
279, 307
Installing
speakers
..................... 220
Instrument
panel
lighting
...................................... 33
Instrument
panels
............. 12-14,
34
Instrument
panel
screen
.......................... 12-14,
151
Intelligent
T
raction
Control
.................................... 124
Interior
fittings
........................ 95,
96
Interior
mood lighting
................... 94
IS
o FI x
........................................ 11
8
ISOFIX
child seats
............... 1
17-119
ISOFIX
mountings
......................11
7Keeping
children safe ....... 108, 109,
113, 115, 118, 119, 129
Key
in ignition warning............... 136
Key
with remote control
........ 66,
68,
71,
134
K
Labels, identification
.................. 233
Lamps,
warning and
indicator
........................ 16,
25, 28
Lane
Departure Warning
System
(LDWS)
...................... 157
Level,
AdBlue® additive .............. 183
Level,
brake
fluid ....................... 179
Level,
power
steering fluid
......... 179
Levels
and
checks
.............. 176-180
Lighting
bulbs
(replacement)
................. 202,
206
Lighting
control stalk
.............. 81,
84
Lighting
dimmer
................ 12-14,
33
Lighting,
guide-me home
....... 84,
85
Lighting,
interior
..................... 93,
94
Loading
................................ 10,
216
Load
reduction mode
................. 215
Load
space
cover
...................... 107
Locating
your
vehicle
................... 68
Locking
from
the inside................ 72
Locking
the
boot
.......................... 77
Long
objects,
transporting
......... 103
Luggage
retaining strap
............. 104
L
M
N
Navigation.......................... 243,
244
Number
plate lamps
.................. 207
Main
beam
................... 81,
202, 204
Maintenance
................................ 10
Map
reading
lamps
...................... 93 Oil
change
................................. 178
Oil
consumption
......................... 178
Oil
filter
...................................... 181o
il level
................................ 29,
178
Opening
the bonnet
................... 175
Opening
the boot
......................... 77
Opening
the doors
....................... 76
Opening
the panoramic
sunroof
blind
............................. 80
Operation
indicator
lamps
............................ 25,
26, 28
O
jJack
........................................... 195
JACK
socket
................ 97,
279,
307 P
Paint
colour code
....................... 233
Panoramic
glass sunroof
............. 80
aLPHabETICaL IndEx