navigation system Citroen C4 DAG 2014.5 2.G Owner's Manual
[x] Cancel search | Manufacturer: CITROEN, Model Year: 2014.5, Model line: C4 DAG, Model: Citroen C4 DAG 2014.5 2.GPages: 340, PDF Size: 12.89 MB
Page 8 of 340
6
C4-2_en_Chap00b_vue-ensemble_ed01-2014
6
C4-2_en_Chap00b_vue-ensemble_ed01-2014
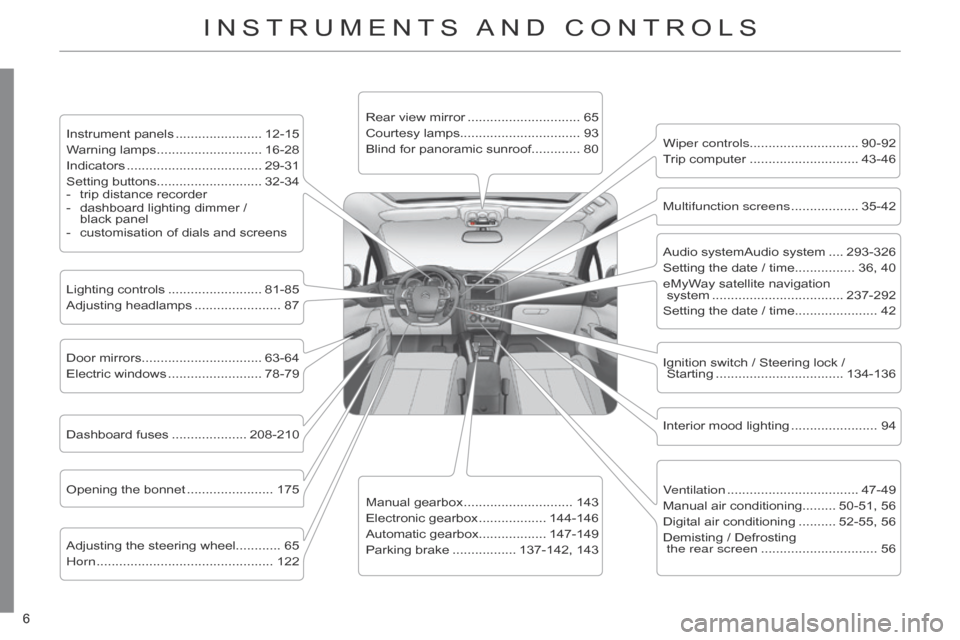
INSTRUMENTS AND CONTROLS
Instrument panels ....................... 12-15
W arning lamps ............................ 16-28
Indicators
.................................... 29-31
Setting
buttons............................ 32-34
-
trip
distance recorder
-
dashboard
lighting dimmer /
black
panel
-
customisation
of dials and screens
Lighting
controls
......................... 81-85
Adjusting
headlamps
....................... 87
Door
mirrors
................................ 63-64
Electric
windows
......................... 78-79
Dashboard
fuses
.................... 208-210
Opening
the bonnet
....................... 175
Adjusting
the steering wheel............ 65
Horn
............................................... 122 Audio
systemAudio system
.... 293-326
Setting
the date / time................ 36, 40
eMyWay
satellite navigation
system
................................... 237-292
Setting
the date / time...................... 42
Manual
gearbox
............................. 143
Electronic
gearbox
.................. 144-146
Automatic
gearbox.................. 147-149
Parking
brake
................. 137-142,
143Wiper controls............................. 90-92
Trip
computer
............................. 43-46
Rear
view mirror
.............................. 65
Courtesy
lamps................................ 93
Blind for panoramic sunroof............. 80
Interior
mood lighting
....................... 94
Ignition
switch / Steering lock /
Starting
.................................. 134-136
Multifunction screens
.................. 35-42
V
entilation
................................... 47-49
Manual
air conditioning......... 50-51, 56
Digital
air conditioning
.......... 52-55,
56
Demisting
/ Defrosting
the rear screen
............................... 56
Page 16 of 340
14
C4-2_en_Chap01_controle-de-marche_ed01-2014
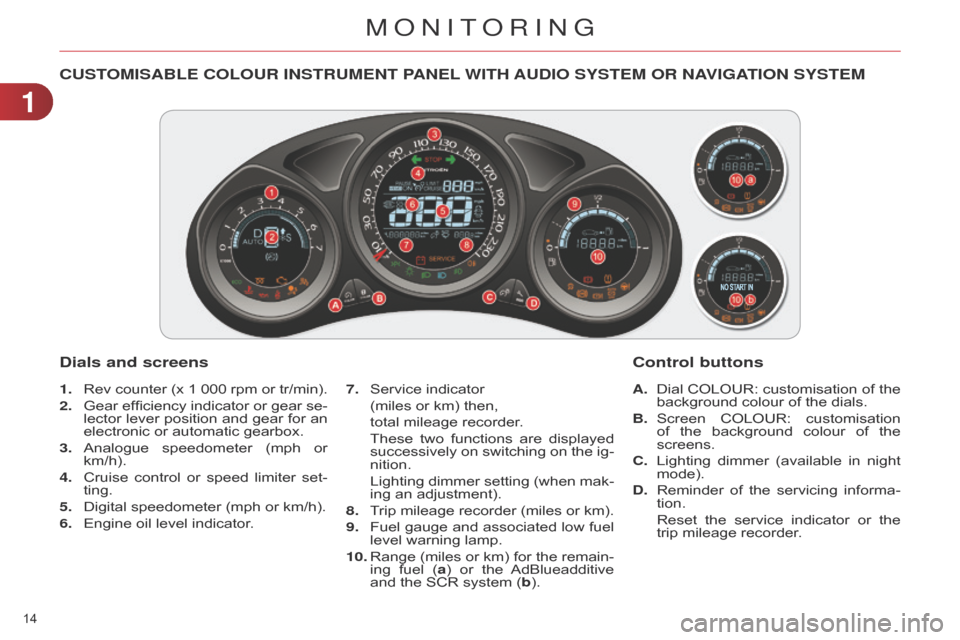
CUSTOMISABLE COLOUR INSTRUMENT PANEL WITH AUDIO SYSTEM OR NAVIGATION SYSTEM
1. Rev counter (x 1 000 rpm or tr/min).
2.
Gear
efficiency
indicator
or
gear
se
-
lector
lever
position
and
gear
for
an
electronic
or automatic gearbox.
3.
Analogue
speedometer
(mph
or
km/h).
4.
Cruise
control
or
speed
limiter
set
-
ting.
5.
Digital
speedometer (mph or km/h).
6.
Engine
oil level indicator. A.
Dial COLOUR: customisation of the background
colour of the dials.
B.
Screen
COLOUR:
customisation
of
the
background
colour
of
the
screens.
C.
Lighting
dimmer
(available
in
night
mode).
D.
Reminder
of
the
servicing
informa
-
tion.
Reset
the
service
indicator
or
the
trip
mileage recorder.
Dials and screens
7. Service indicator
(miles
or km) then,
total
mileage recorder.
These
two
functions
are
displayed
successively
on
switching
on
the
ig
-
nition.
Lighting
dimmer
setting
(when
mak
-
ing
an adjustment).
8.
T
rip
mileage
recorder
(miles
or
km).
9.
Fuel
gauge
and
associated
low
fuel
level
warning lamp.
10.
Range
(miles
or
km)
for
the
remain
-
ing
fuel
(
a)
or
the
AdBlueadditive
and
the SCR system (b).
Control buttons
1
MONITORING
Page 36 of 340
34
C4-2_en_Chap01_controle-de-marche_ed01-2014
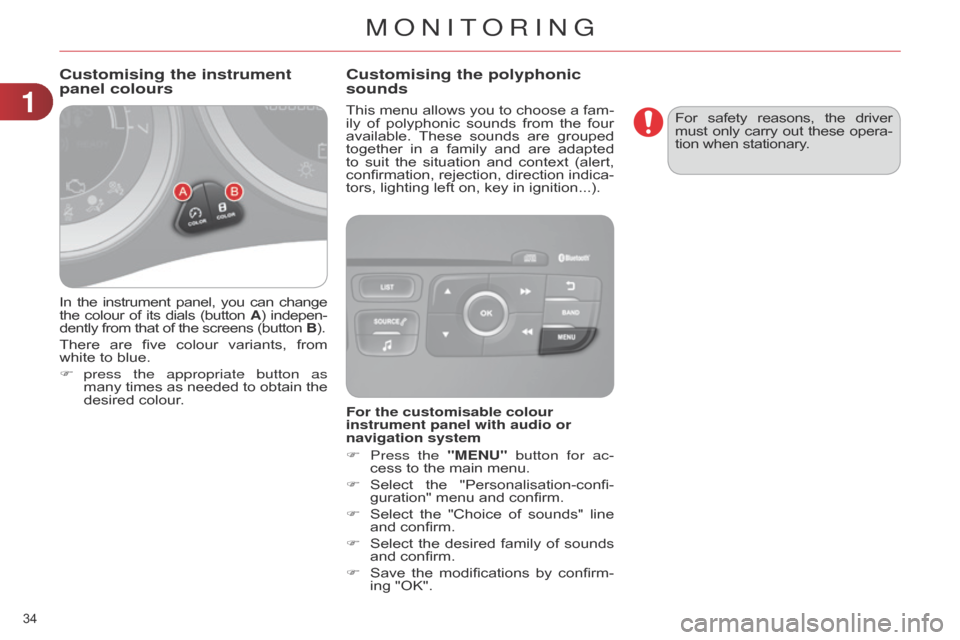
In the instrument panel, you can change the
colour of its dials (button A)
indepen -
dently
from that of the screens (button B).
There
are
five
colour
variants,
from
white
to blue.
F
press
the appropriate button as
many
times
as
needed
to
obtain
the
desired
colour. This
menu
allows
you
to
choose
a
fam
-
ily
of
polyphonic
sounds
from
the
four
available.
These
sounds
are
grouped
together
in
a
family
and
are
adapted
to
suit
the
situation
and
context
(alert,
confirmation,
rejection,
direction
indica
-
tors, lighting left on, key in ignition...).
Customising the instrument
panel colours
Customising the polyphonic
sounds
For the customisable colour
instrument panel with audio or
navigation system
F
Press the
"MENU" button for ac-
cess
to the main menu.
F
Select
the
"Personalisation-confi
-
guration"
menu and confirm.
F
Select
the
"Choice
of
sounds"
line
and
confirm.
F
Select
the
desired
family
of
sounds
and
confirm.
F
Save
the
modifications
by
confirm
-
ing
"OK". For
safety
reasons,
the
driver must
only
carry
out
these
opera
-
tion when stationary.
1
MONITORING
Page 43 of 340
22
41
C4-2_en_Chap02_ecran-multifonction_ed01-2014
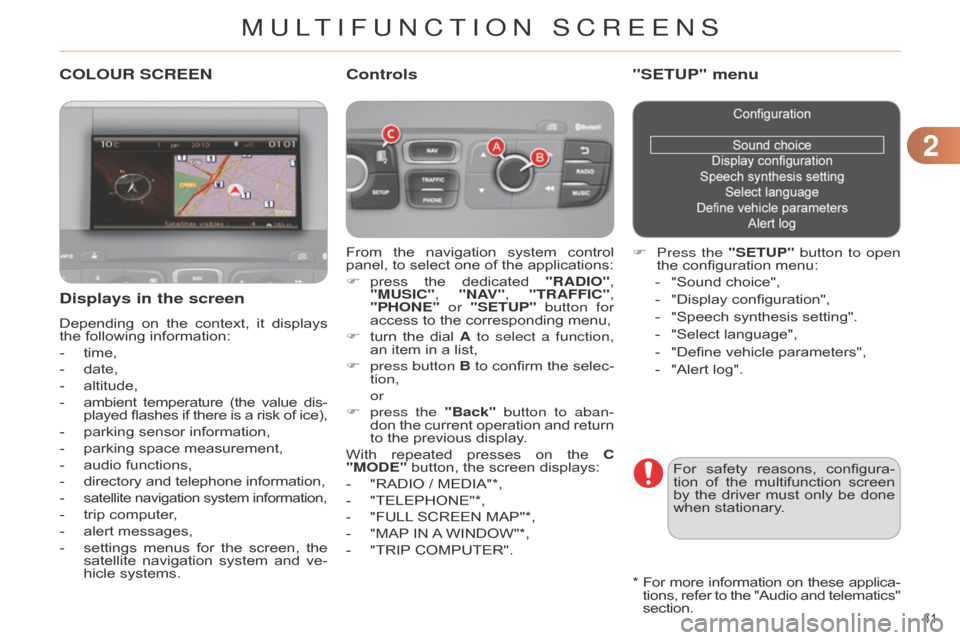
COLOUR SCREEN
From the navigation system control panel,
to select one of the applications:
F
press
the
dedicated
"RADIO"
,
"MUSIC", "NAV", "TRAFFIC",
"PHONE" or "SETUP" button for
access
to the corresponding menu,
F
turn
the
dial
A
to select a function,
an
item in a list,
F
press button
B
to
confirm
the
selec
-
tion,
or
F
press the
"Back" button to aban-
don
the
current
operation
and
return
to
the previous display.
With
repeated
presses
on
the
C
"MODE"
button, the screen displays:
-
"RADIO
/ MEDIA"*,
-
"TELEPHONE"*,
-
"FULL
SCREEN MAP"*,
-
"MAP
IN
A
WINDOW"*,
-
"TRIP
COMPUTER".
Controls "SETUP" menu
F Press the "SETUP" button to open
the configuration menu:
-
"Sound
choice",
-
"Display
configuration",
-
"Speech
synthesis setting".
-
"Select
language",
-
"Define
vehicle parameters",
-
"Alert
log".
For
safety
reasons,
configura
-
tion
of
the
multifunction
screen
by
the
driver
must
only
be
done
when
stationary.
Displays in the screen
Depending on the context, it displays the
following information:
-
time,
-
date,
-
altitude,
-
ambient
temperature
(the
value
dis
-
played
flashes
if
there
is
a
risk
of
ice),
-
parking
sensor information,
-
parking
space measurement,
-
audio
functions,
-
directory
and telephone information,
-
satellite navigation system information,
- trip computer,
-
alert
messages,
-
settings
menus
for
the
screen,
the
satellite
navigation
system
and
ve
-
hicle
systems.
* For more information on these applica -
tions, refer to the "Audio and telematics" section.
MULTIFUNCTION SCREENS
Page 163 of 340
99
161
C4-2_en_Chap09_conduite_ed01-2014
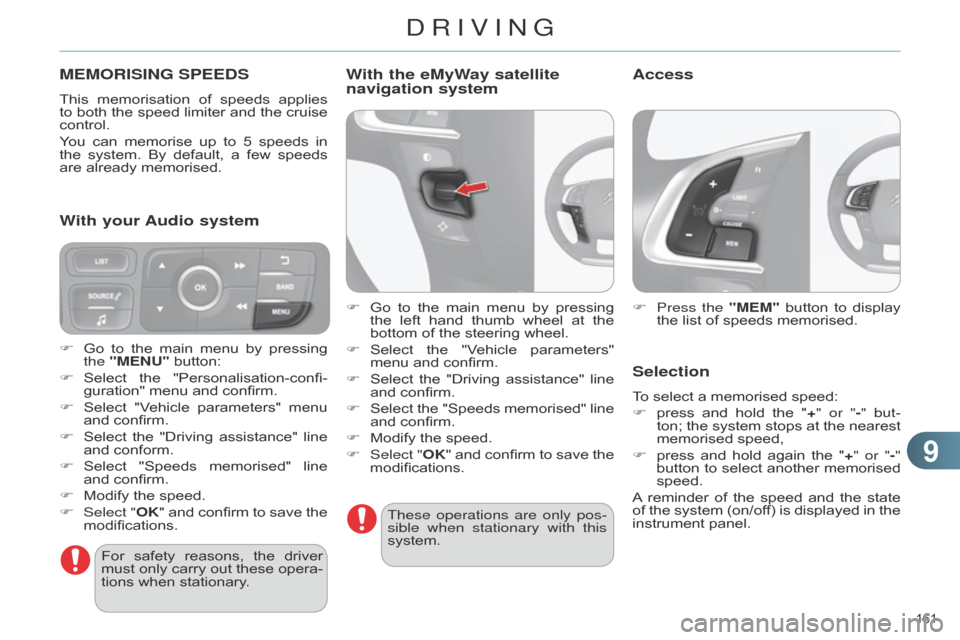
MEMORISING SPEEDS
This memorisation of speeds applies to
both the speed limiter and the cruise
control.
Y
ou
can
memorise
up
to
5
speeds
in
the
system.
By
default,
a
few
speeds
are
already memorised.
F
Press the
"MEM"
button
to
display
the
list of speeds memorised.
Selection
To select a memorised speed:
F
press
and
hold
the
"
+" or "-" but-
ton;
the
system
stops
at
the
nearest
memorised
speed,
F
press
and
hold
again
the
"
+" or "-"
button
to
select
another
memorised
speed.
A
reminder
of
the
speed
and
the
state
of
the
system
(on/of
f)
is
displayed
in
the
instrument
panel.
For
safety
reasons,
the
driver
must
only
carry
out
these
opera
-
tions
when
stationary.
F
Go
to
the
main
menu
by
pressing
the
"MENU"
button:
F
Select
the
"Personalisation-confi
-guration"
menu
and
confirm.
F
Select
"V
ehicle
parameters"
menu
and
confirm.
F
Select
the
"Driving
assistance"
line
and
conform.
F
Select
"Speeds
memorised"
line
and
confirm.
F
Modify
the
speed.
F
Select "
OK"
and
confirm
to
save
the
modifications.
With your Audio system With the eMyWay satellite
navigation system
F Go
to the main menu by pressing the
left hand thumb wheel at the
bottom
of the steering wheel.
F
Select
the
"V
ehicle
parameters"
menu
and confirm.
F
Select
the
"Driving
assistance"
line
and
confirm.
F
Select
the
"Speeds
memorised"
line
and
confirm.
F
Modify
the speed.
F
Select "
OK"
and
confirm
to
save
the
modifications.These operations are only pos
-
sible when stationary with this
system.
Access
DRIVING
Page 216 of 340
1111
214
C4-2_en_Chap11_info-pratique_ed01-2014
Charging the battery using
a battery chargerIt is advisable to disconnect the battery if the vehicle is to be left
unused
for more than one month.
The
batteries
contain
harmful
substances
such as sulphuric
acid
and
lead.
They
must
be
disposed
of
in
accordance
with
regulations
and
must
not,
in
any
circumstances,
be
discarded
with
household
waste.
Take
used
remote
control
bat
-
teries
and
vehicle
batteries
to
a
special
collection
point.
F
Disconnect the battery from the vehicle.
F Follow the instructions for use pro -
vided by the manufacturer of the
charger
.
F
Connect
the
battery
starting
with
the
negative
terminal (-).
F
Check
that
the
terminals
and
con
-
nectors
are
clean.
If
they
are
covered with
sulphate
(whitish
or
greenish
deposit),
remove
them
and
clean
them. Protect
your
eyes
and
face
be
-
fore handling the battery.
a
ll operations on the battery
must be carried out in a well ventilated
area and away from naked
flames and sources of
sparks,
so
as
to
avoid
the
risk
of
explosion
or fire.
Do
not
try
to
charge
a
frozen
battery;
the
battery
must
first
be
thawed
out
to
avoid
the
risk
of
explosion.
If
the
battery
has
been
frozen,
before
charging
have
it
checked
by
a
CITROËN
dealer
or
a
qualified
workshop
who
will
check
that
the
inter
-
nal
components
have
not
been
damaged
and
the
casing
is
not
cracked,
which
could
cause
a
leak
of toxic and corrosive acid.
Do
not
reverse
the
polarity
and
use
only a 12 V charger.
Do
not
disconnect
the
terminals
while
the engine is running.
Do
not
charge
the
batteries
with
-
out
disconnecting
the
terminals
first.
W
ash your hands afterwards.
Reinitialisation after
reconnection
after any reconnection of the battery,
switch on the ignition and wait at least
one
minute
before
starting,
to
allow
time
for
the initialisation of the
electronic
systems.
By
referring
to
the
corresponding
sec
-
tions,
you
should
set
or
initialise
the
fol
-
lowing
systems yourself:
-
one-touch
electric windows,
-
time
and date,
-
audio
and
navigation
system
set
-
tings.
Check
that
no
alert
message
or
warning
lamp
comes
on
after
switching
on
the
ignition.
However
,
if
minor
problems
persist
after
carrying
out
these
operations,
contact
a
CITROËN
dealer
or
a
quali
-
fied
workshop. Some
functions
are
not
available
if
the
battery
is
not
sufficiently
charged.
d
o not push the vehicle to start
the
engine
if
you
have
an
elec
-
tronic
or automatic gearbox.
With Stop & Start, the battery
does
not
have
to
be
disconnect
-
ed
for charging.
PRACTICAL INFORMATION
Page 217 of 340
1111
215
C4-2_en_Chap11_info-pratique_ed01-2014
LOAD REDUCTION MODE
System which manages the use of cer -
tain functions according to the level of
charge
remaining in the battery.
When the vehicle is being driven, the load
reduction function temporarily de -
activates certain functions, such as the
air
conditioning,
the
heated
rear
screen...
The deactivated functions are reactivat -
ed automatically as soon as conditions
permit.
ENERGY ECONOMY MODE
System which manages the period of use of certain functions to conserve a
sufficient
level of charge in the battery.
After
the
engine
has
stopped,
you
can
still
use
functions
such
as
the
audio
equipment,
windscreen
wipers,
dipped
beam
headlamps,
courtesy
lamps,
etc.
for
a
maximum
combined
period
of
thirty minutes.
Switching to economy mode
Once this period has elapsed, a message appears
in the screen indicating that the vehicle
has
switched
to
economy
mode and
the
active
functions
are
put
on
standby
.
If the telephone is being used at the
same time on the navigation
system,
it
will
be
interrupted
after 10
minutes.
A
flat
battery
prevents
the
en
-
gine
from
starting
(refer
to
the
corresponding
paragraph).
Exiting economy mode
These functions are reactivated auto -
matically the next time the vehicle is
driven.
F
In
order
to
resume
the
use
of
these functions
immediately
,
start
the
engine and
let it run for a few minutes.
The
time
available
to
you
will
then
be double
the
period
for
which
the
engine is left running. However , this period will
always be between five and thirty minutes.
This period may be greatly re -
duced if the battery is not fully
charged.
CHANGING A WIPER BLADE
Before removing a front wiper
blade
F Within one minute after switching of
f the ignition, operate the wiper
stalk
to
position
the
wiper
blades
vertically
on the windscreen.
Removing
F Raise the corresponding wiper arm.
F
Unclip
the wiper blade and remove it.
Fitting
F Put the corresponding new wiper blade
in place and clip it.
F
Fold
down the wiper arm carefully.
After fitting a front wiper blade
F Switch on the ignition.
F
Operate
the
wiper
stalk
again
to
park
the wiper blades.
PRACTICAL INFORMATION
Page 224 of 340
1111
222
C4-2_en_Chap11_info-pratique_ed01-2014
Installation of radio
communication transmitters
Before
installin
g
any
after-
market
radio
communication
transmitter
,
you
can
contact
a
CITROËN
dealer
for
the
speci
-
fication
of
transmitters
which
can
be
fitted
(frequency
,
maxi
-
mum
power
,
aerial
position,
specific
installation
require
-
ments),
in
line
with
the
V
ehicle
Electromagnetic
Compatibility
Directive (2004/104/EC). Depending
on the legislation in force
in the country, certain safe-
ty
equipment
may
be
compul
-
sory:
high
visibility
safety
vests,
warning
triangles,
breathalyzers,
spare
bulbs,
spare
fuses,
fire
ex
-
tinguisher,
first
aid
kit,
mud
flaps
at
the rear of the vehicle.
The
fitting
of
electrical
equip
-
ment
or
accessories
which
are
not
recommended
by
CITROËN
may
result
in
a
failure
of
your
ve
-
hicle's
electronic
system
and
ex
-
cessive
electrical consumption.
Contact
a
CITROËN
dealer
for
information
on
the
range
of
recommended
equipment
and
accessories.
"Multimedia":
audio
systems,
steering
mounted
au
-
dio
controls,
speakers,
Hi-Fi
module,
Bluetooth
hands-free
system,
port
-
able
satellite
navigation
system,
semi-
integral
support
bracket
for
portable
navigation
system,
mapping
update
CD,
driving
assistant,
portable
video
screen,
portable
video
support
bracket,
230
V/50
Hz
socket,
230
V/50
Hz
adap
-
tor, iPhone
® compatible mobile phone charger
,
mobile phone/smartphone
bracket,
Wi-Fi on board... By
going
to
a
CITROËN
dealer,
you
can
also
obtain
cleaning
and
maintenance
products
(interior
and
exterior)
- in-
cluding
ecological
products
in
the
"TECHNA
TURE"
range
-,
products
for
topping
up
(screenwash...),
touch-up
pens
and
paint
aerosols
for
the
exact
colour
of
your
vehicle,
recharges
(car
-
tridge
for
the
temporary
puncture
repair
kit...),
...
PRACTICAL INFORMATION
Page 239 of 340
237
C4-2_en_Chap13b_RT6_ed01-2014
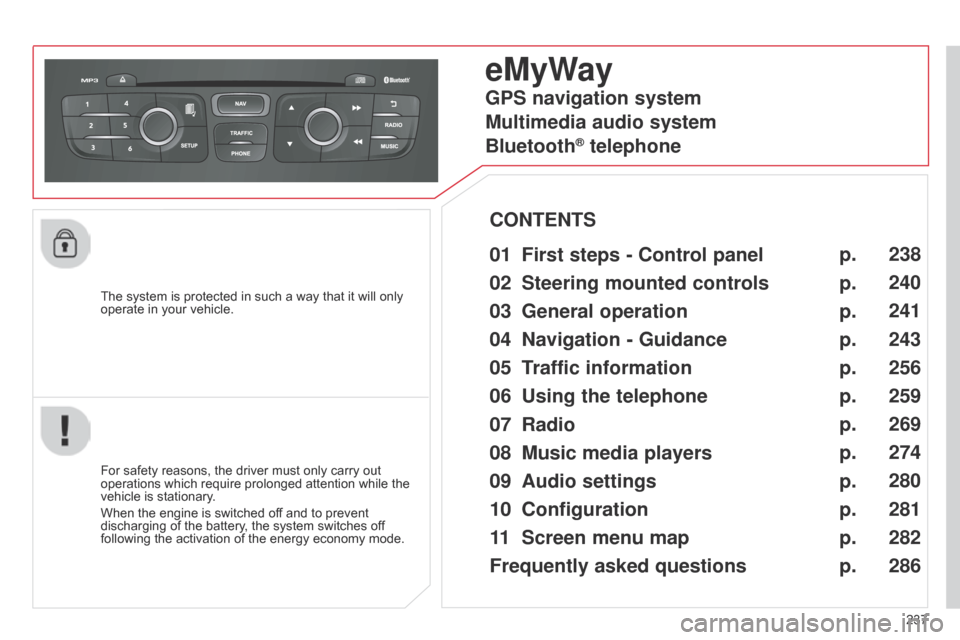
The system is protected in such a way that it will only operate in your vehicle.
eMyWay
01 First steps - Control panel
For safety reasons, the driver must only carry out operations
which require prolonged attention while the
vehicle
is stationary.
When
the engine is switched off and to prevent
discharging
of the battery, the system switches off
following
the activation of the energy economy mode.
CONTENTS
02
Steering mounted
controls
03
General operation
04
Navigation
- Guidance
05
T
raffic information
06
Using
the telephone
07
Radio
08
Music media players
09
Audio
settings
10
Configuration
11
Screen menu
map
Frequently asked questions p.
p.
p.
p.
p.
p.
p.
p.
p.
p.
p.
p. 238
240
241
243
256
259
269
274
280
281
282
286
GPS navigation system
Multimedia audio system
Bluetooth
® telephone
Page 240 of 340
01
238
C4-2_en_Chap13b_RT6_ed01-2014
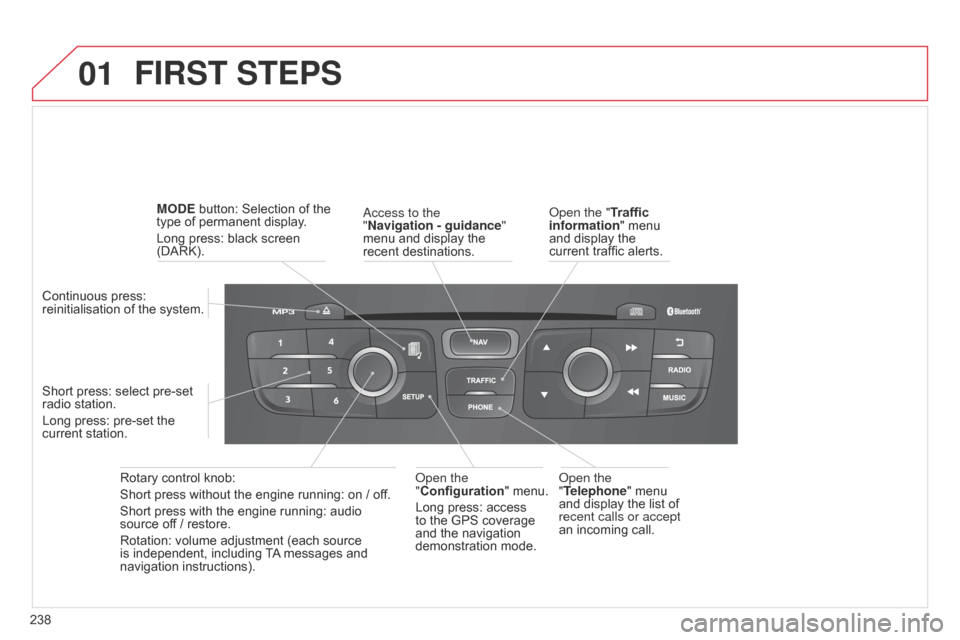
FIRST STEPS
access to the
" Navigation - guidance"
menu
and display the
recent
destinations.
Rotary
control
knob:
Short
press
without
the
engine
running:
on
/ off.
Short
press
with
the
engine
running:
audio
source
off
/
restore.
Rotation:
volume
adjustment
(each
source
is
independent,
including
T
A
messages
and
navigation
instructions).
Continuous
press:
reinitialisation
of
the
system.
Short
press:
select
pre-set
radio
station.
Long
press:
pre-set
the
current
station. MODE
button:
Selection
of
the
type
of
permanent
display.
Long
press:
black
screen
(DARK).
o
pen the
"Telephone"
menu
and
display the list of
recent calls or accept
an
incoming call.
o
pen the
"Configuration "
menu.
Long
press: access
to
the GPS coverage
and
the navigation
demonstration
mode.o pen the "Traffic
information" menu
and
display the
current
traffic alerts.