seat adjustment Citroen C4 DAG 2014.5 2.G Owner's Manual
[x] Cancel search | Manufacturer: CITROEN, Model Year: 2014.5, Model line: C4 DAG, Model: Citroen C4 DAG 2014.5 2.GPages: 340, PDF Size: 12.89 MB
Page 4 of 340
2
C4-2_en_Chap00a_sommaire_ed01-2014
Monochrome screen A 35
Monochrome screen C 37
Colour
screen
41
T
rip computer
43
2 - 35 46
MULTIFUNCTION
SCREENS
Ventilation 47
Manual air conditioning 50
Dual-zone
digital
air
conditioning
52
Front
demist - defrost
56
Rear
screen demist -
defrost
56
Front
seats
57
Rear
seats
62
Mirrors
63
Steering
wheel adjustment
65
COMFORT
3 -
47 65
Remote control key 66
Alarm 74
Doors
76
Boot
77
Electric
windows
78
Panoramic
sunroof
80
ACCESS
4 -
66 80
Lighting controls 81Automatic illumination of headlamps 85
Welcome
lighting
86
Headlamp
adjustment
87
Directional
lighting
88
Wiper
controls
90
Automatic
rain
sensitive
wipers
91
Courtesy
lamps
93
Interior
mood
lighting
94
Boot
lamp
94
5 - 81 94
VISIBILITY
Interior fittings 95
Centre consoles 98
Front
armrest
99
Boot
fittings
104
Luggage
cover
(enterprise
version)
107
6 - 95 107
FITTINGS
Instrument panels 12
Rev counter 15
W
arning and indicator lamps
16
Indicators
29
T
ime and units
32
Customisation
34
OVERVIEW 4 9
MONITORING
1 -
12 34
Child seats 108
Deactivating the passenger's front
airbag
1
10
ISOFIX
child seats
1
17
Child
lock
121
7 - 108 121
CHILD
SAFETY
E
CO
-
DRIVING
10
11
ConTEnTS
Page 29 of 340

27
C4-2_en_Chap01_controle-de-marche_ed01-2014
Passenger's
airbag system fixed
in the seat
belt and passenger's
front
airbag
warning
lamps
display.The
control switch, located
in
the glove box, has been placed
in the "ON" position.
The passenger's front airbag
is
activated.
In
this case, do not install a
"rearward
facing" child seat.Move the control switch to the "OFF"
position
to deactivate the passenger's front
airbag.
In
this case, you can install a "rearward
facing"
child seat.
Warning/indicator lamp
is onCause Action/Observations
Stop & Start fixed.
When
the vehicle stops (red
lights,
traffic jams, ...) the
Stop
& Start system has put
the
engine into STOP
mode.The
warning lamp goes off and the
engine
restarts automatically in START
mode,
as soon as you want to move off.
flashes
for a few
seconds,
then
goes
off.STOP
mode is temporarily
unavailable.
or
ST
ART
mode is invoked
automatically
.For
more information on special cases
with
STOP
mode and START
mode, refer
to
the "Stop & Start" section.
Parking space
sensors fixed.
The
parking space sensors
function
is selected.To
start measurement, operate the direction
indicator
on the side of the space to be
measured,
and do not exceed 12 mph
(20
km/h).
A
message is displayed once the
measurement
has been completed.
Automatic
wiping fixed.The wiper control is pushed
downwards.
Automatic
front wiping is activated.
To deactivate automatic wiping, operate
the
control stalk downwards or put the
stalk
into another position.
Lighting dimmer fixed.The lighting dimmer is making
an
adjustment.
You can adjust the level of illumination of
the
instruments between 1 and 16.
1
MONITORING
Page 59 of 340
33
57
C4-2_en_Chap03_confort_ed01-2014
FRONT SEATS
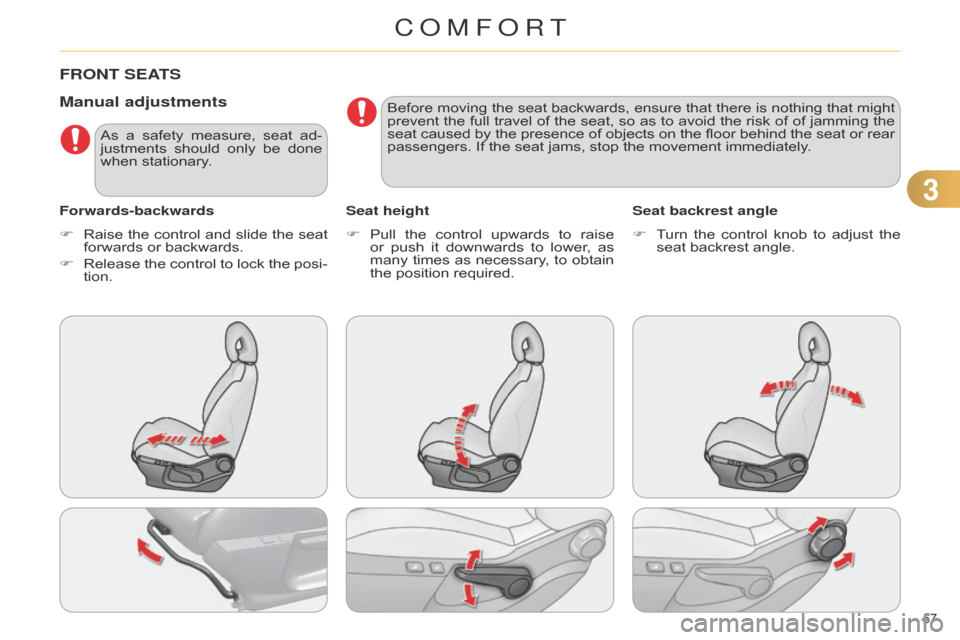
Manual adjustments
Forwards-backwardsSeat heightSeat backrest angle
F
Raise
the
control
and
slide
the
seat
forwards
or backwards.
F
Release
the
control
to
lock
the
posi
-
tion. F
Pull
the
control
upwards
to
raise
or
push
it
downwards
to
lower
,
as
many
times
as
necessary
,
to
obtain
the
position required.F
T
urn
the
control
knob
to
adjust
the
seat
backrest angle.
As
a
safety
measure,
seat
ad
-
justments
should
only
be
done
when
stationary. Before
moving
the
seat
backwards,
ensure
that
there
is
nothing
that
might
prevent
the
full
travel
of
the
seat,
so
as
to
avoid
the
risk
of
of
jamming
the
seat
caused
by
the
presence
of
objects
on
the
floor
behind
the
seat
or
rear
passengers.
If the seat jams, stop the movement immediately.
COMFORT
Page 60 of 340
33
58
C4-2_en_Chap03_confort_ed01-2014
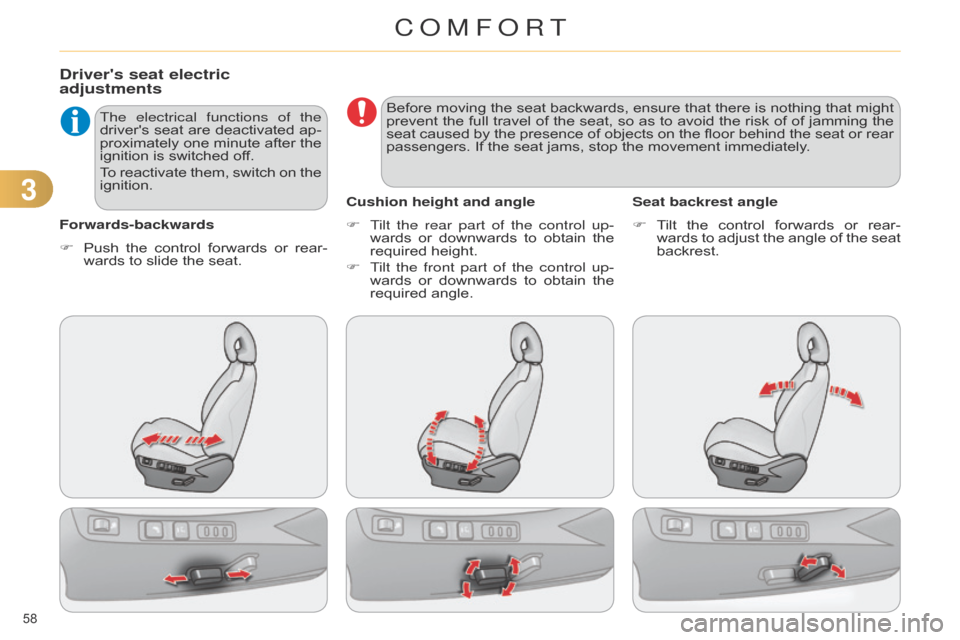
Driver's seat electric
adjustments
Forwards-backwardsThe electrical functions of the
driver's
seat
are
deactivated
ap
-
proximately
one
minute
after
the
ignition
is switched off.
To
reactivate
them,
switch
on
the
ignition.
F
T ilt the rear part of the control up-
wards
or downwards to obtain the
required
height.
F
T
ilt the front part of the control up-
wards
or
downwards
to
obtain
the
required
angle.
Cushion height and angle
F T ilt the control forwards or rear -
wards
to adjust the angle of the seat
backrest.
Seat backrest angle
F
Push
the
control
forwards
or
rear
-
wards
to slide the seat. Before
moving
the
seat
backwards,
ensure
that
there
is
nothing
that
might
prevent
the
full
travel
of
the
seat,
so
as
to
avoid
the
risk
of
of
jamming
the
seat
caused
by
the
presence
of
objects
on
the
floor
behind
the
seat
or
rear
passengers.
If the seat jams, stop the movement immediately.
COMFORT
Page 61 of 340
33
59
C4-2_en_Chap03_confort_ed01-2014
Additional adjustments
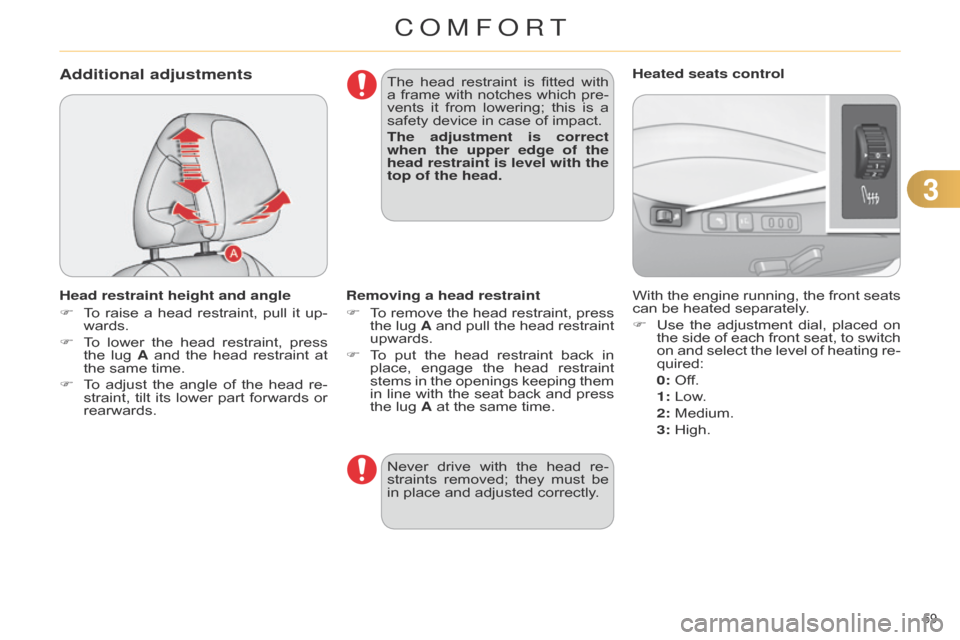
Head restraint height and angle
F
T
o
raise
a
head
restraint,
pull
it
up
-
wards.
F
T
o
lower
the
head
restraint,
press
the
lug
A
and
the
head
restraint
at
the
same time.
F
T
o
adjust
the
angle
of
the
head
re
-
straint,
tilt
its
lower
part
forwards
or
rearwards. The
head
restraint
is
fitted
with
a
frame
with
notches
which
pre
-
vents
it
from
lowering;
this
is
a
safety
device in case of impact.
The adjustment is correct
when the upper edge of the
head restraint is level with the
top of the head.
With the engine running, the front seats can
be heated separately.
F
Use
the
adjustment
dial,
placed
on
the
side
of
each
front
seat,
to
switch
on
and
select
the
level
of
heating
re
-
quired:
0:
Off.
1
: Low.
2
: Medium.
3
: High.
Heated seats control
Removing a head restraint
F
T
o
remove
the
head
restraint,
press
the
lug
A
and
pull
the
head
restraint
upwards.
F
T
o
put
the
head
restraint
back
in
place,
engage
the
head
restraint
stems
in
the
openings
keeping
them
in
line
with
the
seat
back
and
press
the
lug A at the same time.
Never
drive
with
the
head
re
-
straints
removed;
they
must
be
in
place and adjusted correctly.
COMFORT
Page 89 of 340
55
87
C4-2_en_Chap05_visibilite_ed01-2014
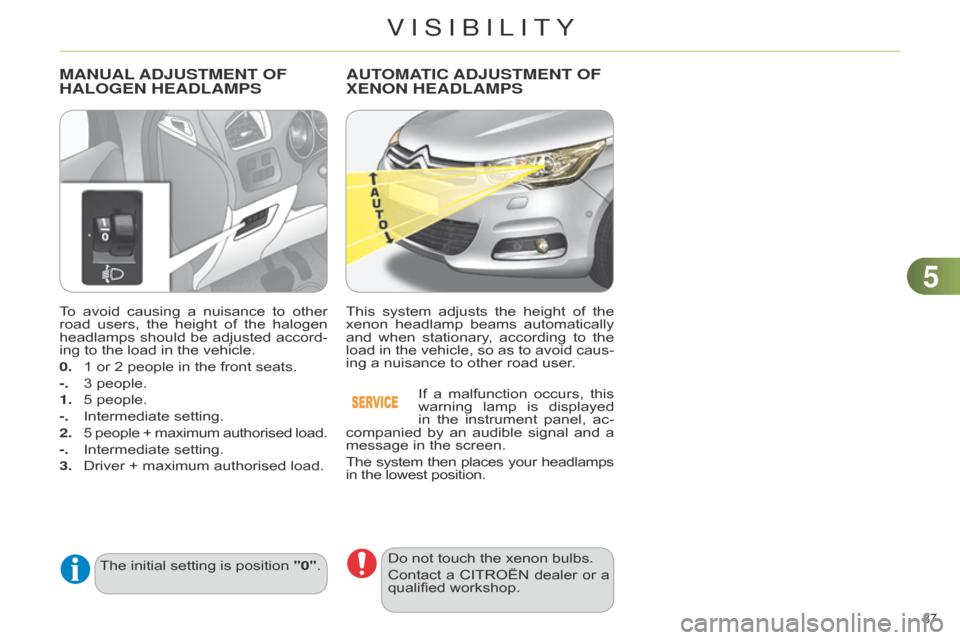
To avoid causing a nuisance to other road
users, the height of the halogen
headlamps
should
be
adjusted
accord
-
ing
to the load in the vehicle.
0.
1
or 2 people in the front seats.
-.
3
people.
1.
5
people.
-.
Intermediate
setting.
2.
5
people
+
maximum
authorised
load.
-.
Intermediate
setting.
3.
Driver
+ maximum authorised load.
MANUAL AD j USTMENT OF HALOGEN
HEADLAMPS
The initial setting is position "0".
AUTOMATIC ADjUSTMENT OF XENON
HEADLAMPS
This system adjusts the height of the xenon
headlamp beams automatically
and
when
stationary
,
according
to
the
load
in
the
vehicle,
so
as
to
avoid
caus
-
ing
a nuisance to other road user.
If
a
malfunction
occurs,
this
warning
lamp
is
displayed
in
the
instrument
panel,
ac
-
companied
by
an
audible
signal
and
a
message
in the screen.
The system then places your headlamps in
the lowest position.
Do not touch the xenon bulbs.
Contact
a
CITROËN
dealer
or
a
qualified
workshop.
VISIBILITY
Page 128 of 340
88
126
C4-2_en_Chap08_securite_ed01-2014
Seat belt not fastened / unfastened
warning lamp in the instrument panelWhen
the
ignition
is
switched
on, this
warning
lamp
comes
on
in the
instrument
panel
if
the
driver and/or
the
front
passenger
has not
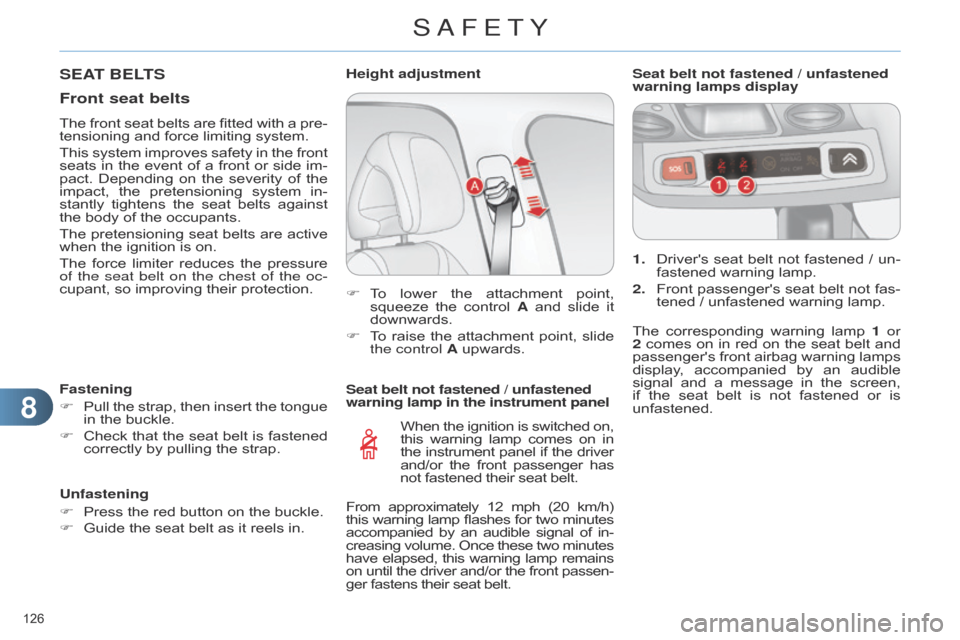
fastened their seat belt.1.
Driver's
seat
belt
not
fastened
/
un
-
fastened warning lamp.
2.
Front
passenger's
seat
belt
not
fas
-
tened / unfastened warning lamp.
Seat belt not fastened / unfastened
warning lamps display
F
T
o
lower
the
attachment
point,
squeeze
the
control
A
and
slide
it
downwards.
F
T
o
raise
the
attachment
point,
slide
the control
A upwards.
Height adjustment
SEAT BELTS
Front seat belts
The front
seat belts are fitted with a pre -
tensioning and force limiting system.
This
system
improves
safety
in
the
front
seats
in
the
event
of
a
front
or
side
im
-
pact.
Depending
on
the
severity
of
the
impact,
the
pretensioning
system
in
-
stantly
tightens
the
seat
belts
against
the
body of the occupants.
The
pretensioning
seat
belts
are
active
when
the ignition is on.
The
force
limiter
reduces
the
pressure
of
the seat belt on the chest of the oc-
cupant,
so improving their protection.
Fastening
F
Pull
the
strap,
then
insert
the
tongue
in
the buckle.
F
Check
that
the
seat
belt
is
fastened
correctly
by pulling the strap.
Unfastening
F
Press
the red button on the buckle.
F
Guide
the seat belt as it reels in. The
corresponding
warning
lamp
1
or
2
comes
on
in
red
on
the
seat
belt
and
passenger's
front
airbag
warning
lamps
display
,
accompanied
by
an
audible
signal
and
a
message
in
the
screen,
if
the
seat
belt
is
not
fastened
or
is
unfastened.
From
approximately
12
mph
(20
km/h)
this
warning
lamp
flashes
for
two
minutes accompanied
by
an
audible
signal
of
in
-
creasing
volume.
Once
these
two
minutes have
elapsed,
this
warning
lamp
remains on
until
the
driver
and/or
the
front
passen
-
ger
fastens their seat belt.
SAFETY
Page 130 of 340
88
128
C4-2_en_Chap08_securite_ed01-2014
The driver must ensure that passen -
gers use the seat belts correctly and
that
they
are
all
restrained
securely
before
setting off.
Wherever
you
are
seated
in
the
ve
-
hicle, always fasten your seat belt,
even
for short journeys.
Do
not
interchange
the
seat
belt
buckles
as
they
will
not
fulfil
their
role
fully
.
The
seat
belts
are
fitted
with
an
inertia
reel
permitting
automatic
adjustment
of
the
length
of
the
strap
to
your
size.
The
seat
belt
is
stowed
automatically
when
not in use.
Before
and
after
use,
ensure
that
the
seat
belt is reeled in correctly.
The
lower
part
of
the
strap
must
be
positioned
as
low
as
possible
on
the
pelvis.
The
upper
part
must
be
positioned
in
the
hollow of the shoulder.
The
inertia
reels
are
fitted
with
an
auto
-
matic
locking
device
which
comes
into operation in the event of a collision,
emergency
braking
or
if
the
vehicle rolls
over
.
Y
ou
can
release
the
device by
pulling
the
strap
firmly
and
then
re
-
leasing
it so that it reels in slightly.In
order to be ef fective, a seat belt must:
-
be
tightened
as
close
to
the
body
as possible,
-
be
pulled
in
front
of
you
with
a
smooth
movement,
checking
that
it
does not twist,
-
be
used
to
restrain
only
one
person,
-
not
bear
any
trace
of
cuts
or
fraying,
-
not
be
converted
or
modified
to
avoid
affecting its performance.
In
accordance
with
current
safety
regulations,
for
all
repairs
on
your
vehicle's
seat
belts,
go
to
a
qualified
workshop
with
the
skills
and
equip
-
ment
needed,
which
a
CITROËN
dealer
is able to provide.
Have
your
seat
belts
checked
regu
-
larly
by
a
CITROËN
dealer
or
a
qualified
workshop,
particularly
if
the
straps
show signs of damage.
Clean the seat belt straps with soapy
water
or
a
textile
cleaning
product,
sold
by CITROËN dealers.
After
folding
or
moving
a
seat
or
rear
bench seat, ensure that the seat belt
is
positioned and reeled in correctly.Recommendations for children
Use
a
suitable
child
seat
if
the
pas
-
senger
is
less
than
12
years
old
or
shorter
than one and a half metres.
Never
use
the
same
seat
belt
to
se
-
cure
more than one person.
Never
allow
a
child
to
travel
on
your
lap.
For
more
information,
refer
to
the
"Child
seats" section.
In the event of an impact
Depending on the nature and se-
riousness of the impact, the pre-
tensioning
device
may
be
deployed
before
and
independently
of
the
airbags.
Deployment
of
the
preten
-
sioners
is
accompanied
by
a
slight
discharge
of
harmless
smoke
and
a
noise,
due
to
the
activation
of
the
pyrotechnic
cartridge
incorporated
in
the
system.
In
all
cases,
the
airbag
warning
lamp
comes
on.
Following
an
impact,
have
the
seat
belts
system
checked,
and
if
neces
-
sary
replaced,
by
a
CITROËN
dealer
or
a qualified workshop.
SAFETY
Page 330 of 340

328
C4-2_en_Chap14_index-alpha_ed01-2014
Courtesy mirror ............................ 96
Cruise control .................... 161, 164
Cup
holder
................................... 98
DAB
(Digital
Audio
Broadcasting)
................ 272,
273,
300,
301
Date
(setting)
................... 35,
37, 42
Daytime
running
lamps
........................ 82,
202, 204
Deactivating
the passenger
airbag...................................... 129
Defrosting
.................................... 56
Diesel
additive level
................... 180
Diesel
engine pre-heat
warning
lamp
............................ 26
Dimensions
................................ 232
Dipped
beam
............... 81,
202, 204
Dipstick
................................ 29,
178
Directional
lighting
................. 88,
89
Direction
indicators
............. 84,
122,
202,
203, 206
d
oors
........................................... 76
Doors
emergency
control
....................................... 73d
oor trays
.................................... 95
Driving
positions
(memorising)
............................. 61
Dynamic
emergency
braking
.................................... 137
Dynamic
stability control
(
d SC)
...................................... 124 Eco-driving
.................................. 10
Eco-driving (advice) ..................... 10
Economical
driving
..................... 10
Economy
mode.......................... 215
Electric
window controls
.............. 78
Electronic
brake force
distribution
(EBFD)
................. 123
Electronic
engine
immobiliser
....................... 71,
134
Electronic
gearbox
system
...... 10,
144, 154, 182, 214
Emergency
boot release.............. 77
Emergency
braking system
....... 123
Emergency
call
.......... 125,
235, 236
Emergency
warning lamps
........ 122
Emissions
control system,
SCR
.......................................... 24
eMyW
ay
............................... 41,
237
Energy
economy mode.............. 215
Engine
compartment
......... 176,
177
Engine
compartment
fusebox
................................... 208
Engine,
Diesel
.................... 26,
172,
174,
177, 227
Engine
oil
................................... 178
Engine
oil level indicator
...... 29,
178
Engine,
petrol
............ 172,
176, 223
Engines.............................. 223,
227
Environment
.......................... 10,
71
Equipment
settings
.... 35,
37, 41, 42Flashing
indicators.............. 84, 122,
203, 205
Foglamps,
rear
.................... 83,
206
Front
foglamps....... 83, 89, 202, 205
Front seats ....................... 57,
58, 61
Fuel...................................... 10,
172
Fuel
consumption
........................ 10
Fuel
filler flap
..................... 171,
173
Fuel
gauge................................. 171
Fuel
tank
............................ 171,
173
Fusebox,
dashboard
.................. 208
Fuses
......................................... 208
D
Fillin
g with fuel
.................... 171-173
Fitting
a wheel
........................... 198
Fitting
roof bars.......................... 216
Fittings,
boot
...................... 104,
107
Fitting
speakers
......................... 220
F G
Gearbox,
automatic
............ 10,
147,
182,
214
Gearbox,
manual
.............. 10,
143, 154, 182
Gear
efficiency indicator
............ 151
Gear lever
.................................... 10
Gear
lever, automatic
gearbox................................... 147
Gear
lever, manual gearbox
...... 143
Glove
box
.................................... 96
G.P
.S.
........................................ 246
Grab
handles
............................... 95
Guidance
........................... 244,
251
EBA
(Emergency braking
assistance)
............................. 123
E H
Halogen
headlamps................... 202
Hands-free
kit
.................... 260,
309
Hazard
warning lamps
............... 122
Headlamp
adjustment.................. 87
Headlamps,
directional
.....87,
88, 202
Headlamp
wash
........................... 91
aLPHabETICaL IndEx
Page 331 of 340
329
C4-2_en_Chap14_index-alpha_ed01-2014
Head restraints, front ................... 59
Head restraints, rear .................... 62
Heated
seats
............................... 59
Heating
............................ 10,
49, 50
Height
and reach adjustment,
steering
wheel
.......................... 65
Hill start assist
........................... 150
Hooks
........................................ 105
I Markings,
identification .............. 233
Massage function ....................... 60
Mat
............................................. 102
Menu,
main
................................ 296
Mini fuel level
............................. 171
Mirror
, rear view
........................... 65
Mirrors,
door
.................. 63,
64, 158
Misfuel prevention
..................... 173
Motorway function
(direction
indicators)
............... 122
Mountings
for ISOFIX
seats
........................................11
7
MP3
CD
............................. 303,
304
Music
media players
.................. 274
Ignition
....................................... 136
Indicators,
direction
........... 122,
203
Indicator
lamps, status................. 26
Inflating
accessories
(using
the kit)
.......................... 190
Inflating
tyres
............................... 10
Inputs
for audio
system
...................... 97,
279, 307
Installing
speakers
..................... 220
Instrument
panel
lighting
...................................... 33
Instrument
panels
............. 12-14,
34
Instrument
panel
screen
.......................... 12-14,
151
Intelligent
T
raction
Control
.................................... 124
Interior
fittings
........................ 95,
96
Interior
mood lighting
................... 94
IS
o FI x
........................................ 11
8
ISOFIX
child seats
............... 1
17-119
ISOFIX
mountings
......................11
7Keeping
children safe ....... 108, 109,
113, 115, 118, 119, 129
Key
in ignition warning............... 136
Key
with remote control
........ 66,
68,
71,
134
K
Labels, identification
.................. 233
Lamps,
warning and
indicator
........................ 16,
25, 28
Lane
Departure Warning
System
(LDWS)
...................... 157
Level,
AdBlue® additive .............. 183
Level,
brake
fluid ....................... 179
Level,
power
steering fluid
......... 179
Levels
and
checks
.............. 176-180
Lighting
bulbs
(replacement)
................. 202,
206
Lighting
control stalk
.............. 81,
84
Lighting
dimmer
................ 12-14,
33
Lighting,
guide-me home
....... 84,
85
Lighting,
interior
..................... 93,
94
Loading
................................ 10,
216
Load
reduction mode
................. 215
Load
space
cover
...................... 107
Locating
your
vehicle
................... 68
Locking
from
the inside................ 72
Locking
the
boot
.......................... 77
Long
objects,
transporting
......... 103
Luggage
retaining strap
............. 104
L
M
N
Navigation.......................... 243,
244
Number
plate lamps
.................. 207
Main
beam
................... 81,
202, 204
Maintenance
................................ 10
Map
reading
lamps
...................... 93 Oil
change
................................. 178
Oil
consumption
......................... 178
Oil
filter
...................................... 181o
il level
................................ 29,
178
Opening
the bonnet
................... 175
Opening
the boot
......................... 77
Opening
the doors
....................... 76
Opening
the panoramic
sunroof
blind
............................. 80
Operation
indicator
lamps
............................ 25,
26, 28
O
jJack
........................................... 195
JACK
socket
................ 97,
279,
307 P
Paint
colour code
....................... 233
Panoramic
glass sunroof
............. 80
aLPHabETICaL IndEx