whil Citroen C4 PICASSO 2009 1.G Owner's Manual
[x] Cancel search | Manufacturer: CITROEN, Model Year: 2009, Model line: C4 PICASSO, Model: Citroen C4 PICASSO 2009 1.GPages: 337, PDF Size: 12.91 MB
Page 7 of 337
10
F A M I L I A R I S A T I O N
Folding the seats
From the boot - whilst loading,
for example (Grand C4 Picasso)
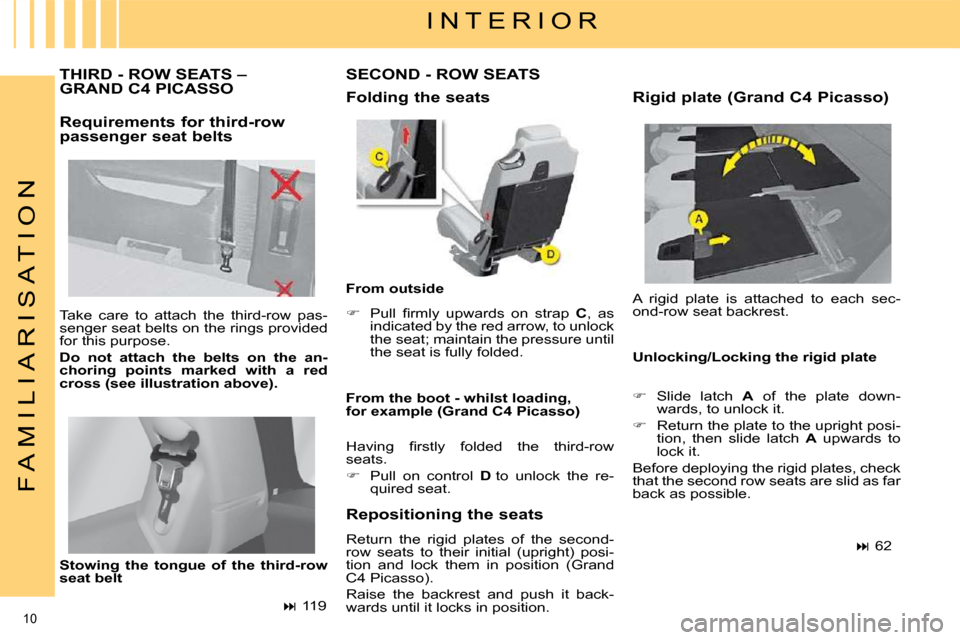
Take care to attach the third-row pas-
senger seat belts on the rings provided
for this purpose.
Do not attach the belts on the an-
choring points marked with a red
cross (see illustration above).
Stowing the tongue of the third-row
seat belt
SECOND - ROW SEATS
� 119
Requirements for third-row
passenger seat belts
From outside
� � � �P�u�l�l� �fi� �r�m�l�y� �u�p�w�a�r�d�s� �o�n� �s�t�r�a�p� � C , as
indicated by the red arrow, to unlock
the seat; maintain the pressure until
the seat is fully folded.
� Slide latch A of the plate down-
wards, to unlock it.
� Return the plate to the upright posi-
tion, then slide latch A upwards to
lock it.
Before deploying the rigid plates, check
that the second row seats are slid as far
back as possible.
� 62
I N T E R I O R
THIRD - ROW SEATS – GRAND C4 PICASSO
� �H�a�v�i�n�g� �fi� �r�s�t�l�y� �f�o�l�d�e�d� �t�h�e� �t�h�i�r�d�-�r�o�w�
seats.
� Pull on control D to unlock the re-
�q�u�i�r�e�d� �s�e�a�t�.� � �
Repositioning the seats
Return the rigid plates of the second-
row seats to their initial (upright) posi-
tion and lock them in position (Grand
C4 Picasso).
Raise the backrest and push it back-
wards until it locks in position. Rigid plate (Grand C4 Picasso)
A rigid plate is attached to each sec-
ond-row seat backrest.
Unlocking/Locking the rigid plate
Page 12 of 337
15
F A M I L I A R I S A T I O N
Adjusting the steering wheel
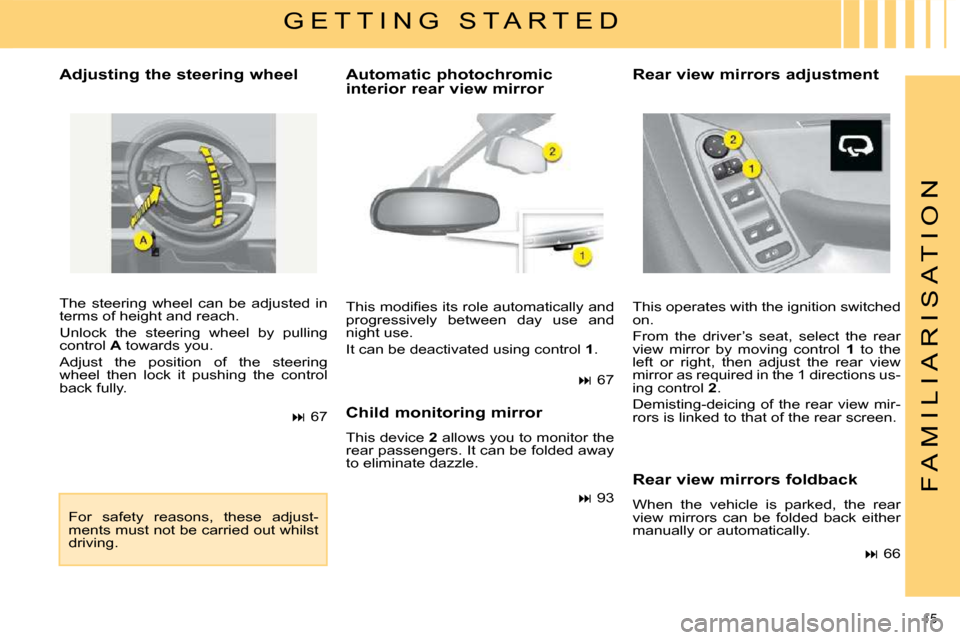
The steering wheel can be adjusted in
terms of height and reach.
Unlock the steering wheel by pulling
control A towards you.
Adjust the position of the steering
wheel then lock it pushing the control
back fully.
� 67 � �T�h�i�s� �m�o�d�i�fi� �e�s� �i�t�s� �r�o�l�e� �a�u�t�o�m�a�t�i�c�a�l�l�y� �a�n�d�
progressively between day use and
night use.
It can be deactivated using control
1 . This operates with the ignition switched
on.
From the driver’s seat, select the rear
view mirror by moving control
1 to the
left or right, then adjust the rear view
�m�i�r�r�o�r� �a�s� �r�e�q�u�i�r�e�d� �i�n� �t�h�e� �1� �d�i�r�e�c�t�i�o�n�s� �u�s�-
ing control 2 .
Demisting-deicing of the rear view mir-
rors is linked to that of the rear screen.
� 93
� 66
For safety reasons, these adjust-
ments must not be carried out whilst
driving. Child monitoring mirror
This device
2 allows you to monitor the
rear passengers. It can be folded away
to eliminate dazzle.
Rear view mirrors foldback
When the vehicle is parked, the rear
view mirrors can be folded back either
manually or automatically.
G E T T I N G S T A R T E D
Automatic photochromic
interior rear view mirror Rear view mirrors adjustment
� 67
Page 47 of 337
47
III
C O M F O R T
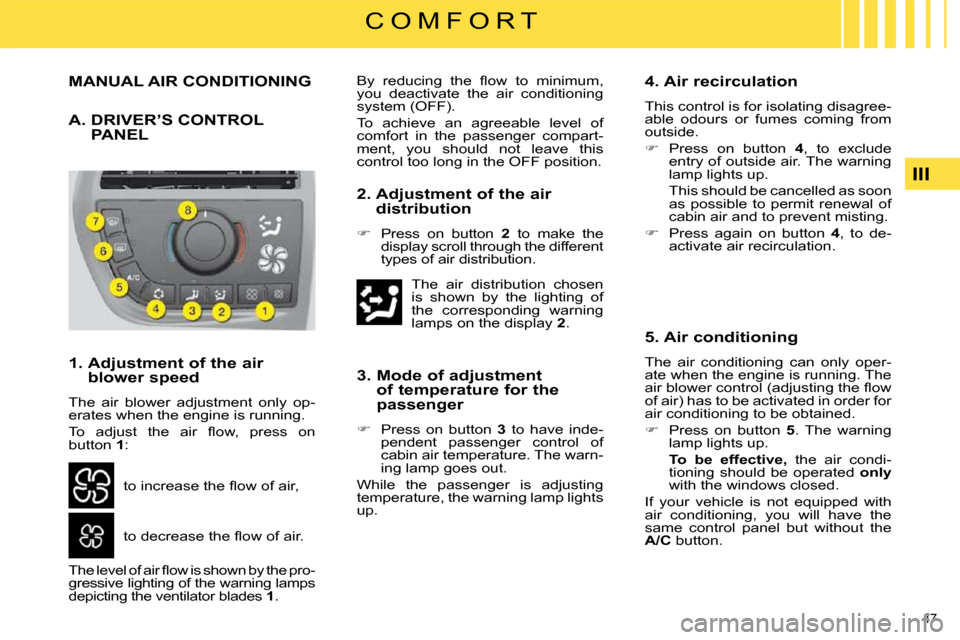
MANUAL AIR CONDITIONING
A. DRIVER’S CONTROL PANEL
1. Adjustment of the air blower speed
The air blower adjustment only op-
erates when the engine is running.
� �T�o� �a�d�j�u�s�t� �t�h�e� �a�i�r� �fl� �o�w�,� �p�r�e�s�s� �o�n�
button 1 :
� �t�o� �i�n�c�r�e�a�s�e� �t�h�e� �fl� �o�w� �o�f� �a�i�r�,�
� �t�o� �d�e�c�r�e�a�s�e� �t�h�e� �fl� �o�w� �o�f� �a�i�r�.�
� �T�h�e� �l�e�v�e�l� �o�f� �a�i�r� �fl� �o�w� �i�s� �s�h�o�w�n� �b�y� �t�h�e� �p�r�o�-
gressive lighting of the warning lamps
depicting the ventilator blades 1 .
� �B�y� �r�e�d�u�c�i�n�g� �t�h�e� �fl� �o�w� �t�o� �m�i�n�i�m�u�m�,�
you deactivate the air conditioning
system (OFF).
To achieve an agreeable level of
comfort in the passenger compart-
ment, you should not leave this
control too long in the OFF position.
2. Adjustment of the air
distribution
� Press on button 2 to make the
display scroll through the different
types of air distribution.
The air distribution chosen
is shown by the lighting of
the corresponding warning
lamps on the display 2.
3. Mode of adjustment of temperature for the
passenger
� Press on button 3 to have inde-
pendent passenger control of
cabin air temperature. The warn-
ing lamp goes out.
While the passenger is adjusting
temperature, the warning lamp lights
up. 4. Air recirculation
This control is for isolating disagree-
able odours or fumes coming from
outside.
� Press on button 4 , to exclude
entry of outside air. The warning
lamp lights up.
This should be cancelled as soon as possible to permit renewal of
cabin air and to prevent misting.
� Press again on button 4 , to de-
activate air recirculation.
5. Air conditioning
The air conditioning can only oper-
ate when the engine is running. The
�a�i�r� �b�l�o�w�e�r� �c�o�n�t�r�o�l� �(�a�d�j�u�s�t�i�n�g� �t�h�e� �fl� �o�w�
of air) has to be activated in order for
air conditioning to be obtained.
� Press on button 5 . The warning
lamp lights up.
To be effective, the air condi-
tioning should be operated only
with the windows closed.
If your vehicle is not equipped with
air conditioning, you will have the
same control panel but without the
A/C button.
Page 52 of 337
51
III
C O M F O R T
Closing of the air inlet
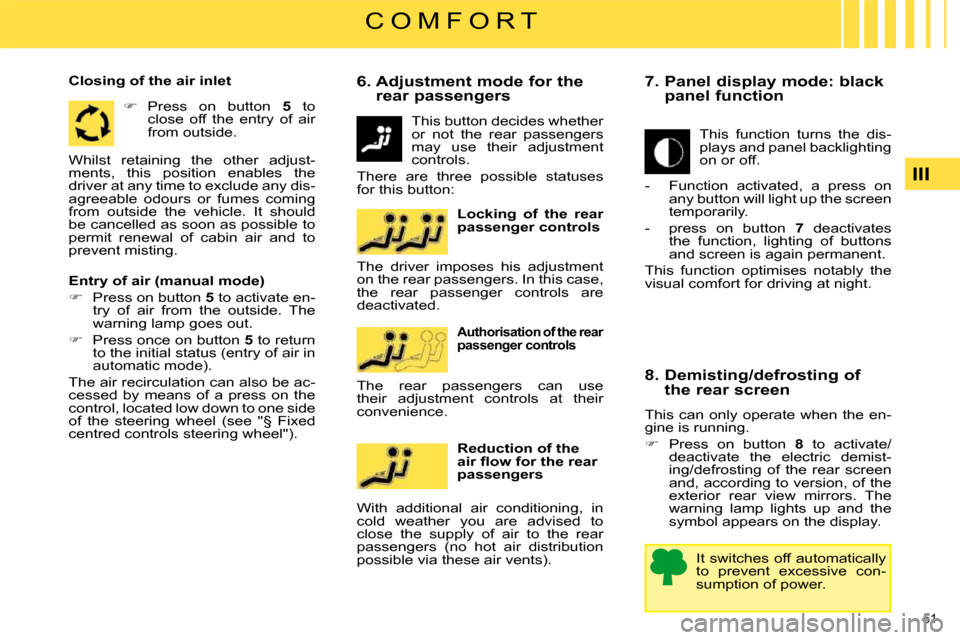
� Press on button 5 to
close off the entry of air
from outside.
Entry of air (manual mode)
� Press on button 5 to activate en-
try of air from the outside. The
warning lamp goes out.
� Press once on button 5 to return
to the initial status (entry of air in
automatic mode).
The air recirculation can also be ac-
cessed by means of a press on the
control, located low down to one side
of the steering wheel (see "§ Fixed
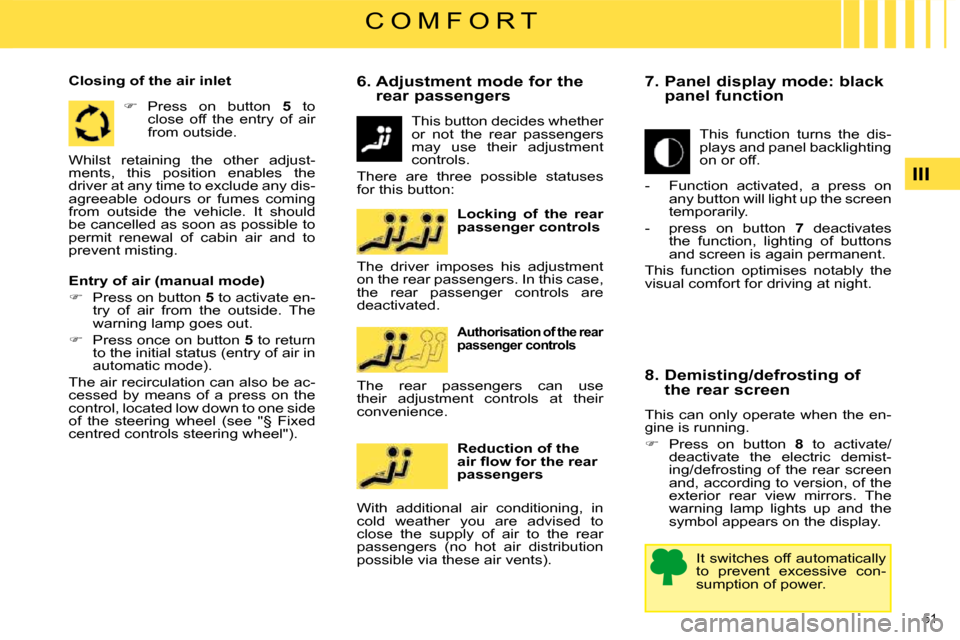
centred controls steering wheel"). 6. Adjustment mode for the
rear passengers
This button decides whether
or not the rear passengers
may use their adjustment
controls.
There are three possible statuses
for this button:
Locking of the rear
passenger controls
Authorisation of the rear
passenger controls
Reduction of the
�a�i�r� �fl� �o�w� �f�o�r� �t�h�e� �r�e�a�r�
passengers
With additional air conditioning, in
cold weather you are advised to
close the supply of air to the rear
passengers (no hot air distribution
possible via these air vents).
The rear passengers can use
their adjustment controls at their
convenience.
The driver imposes his adjustment
on the rear passengers. In this case,
the rear passenger controls are
deactivated. 7. Panel display mode: black
panel function
This function turns the dis-
plays and panel backlighting
on or off.
- Function activated, a press on any button will light up the screen
temporarily.
- press on button 7 deactivates
the function, lighting of buttons
and screen is again permanent.
This function optimises notably the
visual comfort for driving at night.
8. Demisting/defrosting of the rear screen
This can only operate when the en-
gine is running.
� Press on button 8 to activate/
deactivate the electric demist-
ing/defrosting of the rear screen
and, according to version, of the
exterior rear view mirrors. The
warning lamp lights up and the
symbol appears on the display.
It switches off automatically
to prevent excessive con-
sumption of power.
Whilst retaining the other adjust-
ments, this position enables the
driver at any time to exclude any dis-
agreeable odours or fumes coming
from outside the vehicle. It should
be cancelled as soon as possible to
permit renewal of cabin air and to
prevent misting.
Page 55 of 337
51
III
C O M F O R T
Closing of the air inlet
� Press on button 5 to
close off the entry of air
from outside.
Entry of air (manual mode)
� Press on button 5 to activate en-
try of air from the outside. The
warning lamp goes out.
� Press once on button 5 to return
to the initial status (entry of air in
automatic mode).
The air recirculation can also be ac-
cessed by means of a press on the
control, located low down to one side
of the steering wheel (see "§ Fixed
centred controls steering wheel"). 6. Adjustment mode for the
rear passengers
This button decides whether
or not the rear passengers
may use their adjustment
controls.
There are three possible statuses
for this button:
Locking of the rear
passenger controls
Authorisation of the rear
passenger controls
Reduction of the
�a�i�r� �fl� �o�w� �f�o�r� �t�h�e� �r�e�a�r�
passengers
With additional air conditioning, in
cold weather you are advised to
close the supply of air to the rear
passengers (no hot air distribution
possible via these air vents).
The rear passengers can use
their adjustment controls at their
convenience.
The driver imposes his adjustment
on the rear passengers. In this case,
the rear passenger controls are
deactivated. 7. Panel display mode: black
panel function
This function turns the dis-
plays and panel backlighting
on or off.
- Function activated, a press on any button will light up the screen
temporarily.
- press on button 7 deactivates
the function, lighting of buttons
and screen is again permanent.
This function optimises notably the
visual comfort for driving at night.
8. Demisting/defrosting of the rear screen
This can only operate when the en-
gine is running.
� Press on button 8 to activate/
deactivate the electric demist-
ing/defrosting of the rear screen
and, according to version, of the
exterior rear view mirrors. The
warning lamp lights up and the
symbol appears on the display.
It switches off automatically
to prevent excessive con-
sumption of power.
Whilst retaining the other adjust-
ments, this position enables the
driver at any time to exclude any dis-
agreeable odours or fumes coming
from outside the vehicle. It should
be cancelled as soon as possible to
permit renewal of cabin air and to
prevent misting.
Page 60 of 337
56
III
C O M F O R T
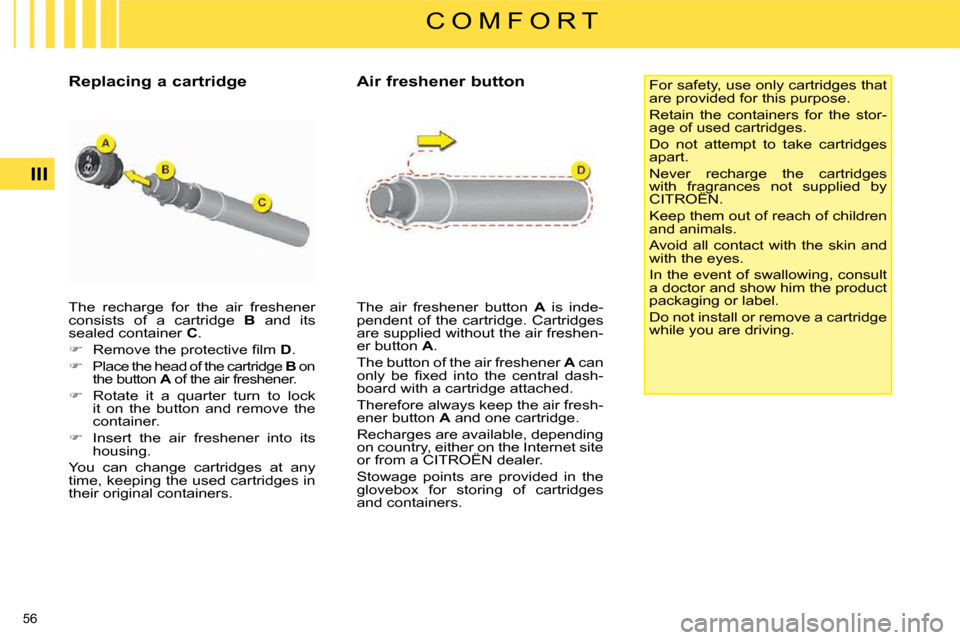
The recharge for the air freshener
consists of a cartridge B and its
sealed container C .
� � � �R�e�m�o�v�e� �t�h�e� �p�r�o�t�e�c�t�i�v�e� �fi� �l�m� � D .
� Place the head of the cartridge B on
the button A of the air freshener.
� Rotate it a quarter turn to lock
it on the button and remove the
container.
� Insert the air freshener into its
housing.
You can change cartridges at any
time, keeping the used cartridges in
their original containers. The air freshener button
A is inde-
pendent of the cartridge. Cartridges
are supplied without the air freshen-
er button A .
The button of the air freshener A can
�o�n�l�y� �b�e� �fi� �x�e�d� �i�n�t�o� �t�h�e� �c�e�n�t�r�a�l� �d�a�s�h�-
board with a cartridge attached.
Therefore always keep the air fresh-
ener button A and one cartridge.
Recharges are available, depending
on country, either on the Internet site
or from a CITROËN dealer.
Stowage points are provided in the
glovebox for storing of cartridges
and containers. For safety, use only cartridges that
are provided for this purpose.
Retain the containers for the stor-
age of used cartridges.
Do not attempt to take cartridges
apart.
Never recharge the cartridges
with fragrances not supplied by
CITROËN.
Keep them out of reach of children
and animals.
Avoid all contact with the skin and
with the eyes.
In the event of swallowing, consult
a doctor and show him the product
packaging or label.
Do not install or remove a cartridge
while you are driving.
Replacing a cartridge Air freshener button
Page 63 of 337
59
III
C O M F O R T
Storing driving positions
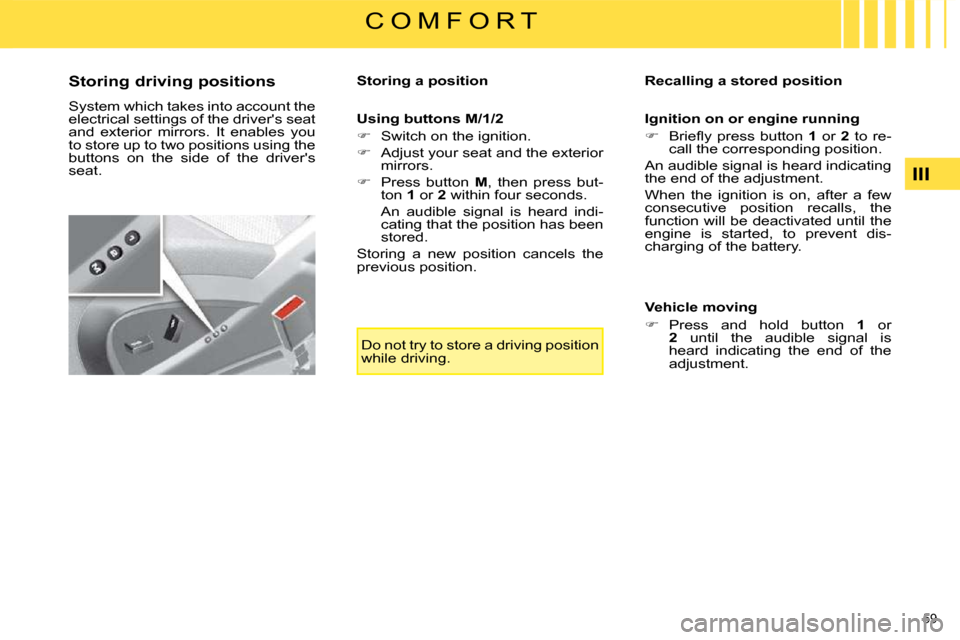
System which takes into account the
electrical settings of the driver's seat
and exterior mirrors. It enables you
to store up to two positions using the
buttons on the side of the driver's
seat. Storing a position
Using buttons M/1/2
� Switch on the ignition.
� Adjust your seat and the exterior
mirrors.
� Press button M , then press but-
ton 1 or 2 within four seconds.
An audible signal is heard indi- cating that the position has been
stored.
Storing a new position cancels the
previous position. Recalling a stored position
Ignition on or engine running
� � � �B�r�i�e�fl� �y� �p�r�e�s�s� �b�u�t�t�o�n� � 1 or 2 to re-
call the corresponding position.
An audible signal is heard indicating
the end of the adjustment.
When the ignition is on, after a few
consecutive position recalls, the
function will be deactivated until the
engine is started, to prevent dis-
charging of the battery.
Vehicle moving
� Press and hold button 1 or
2 until the audible signal is
heard indicating the end of the
adjustment.
Do not try to store a driving position
while driving.
Page 72 of 337
67
III
C O M F O R T
Interior mirror
Adjustable mirror providing a central
rearward view.
Manual model
�T�h�e� �m�i�r�r�o�r� �i�s� �fi� �t�t�e�d� �w�i�t�h� �a� �n�i�g�h�t�-�t�i�m�e�
anti-dazzle device.
Adjustment
� Adjust the mirror so that the
glass is directed correctly in the
"day" position.
Day/night position
� Pull the lever to change to the
"night" anti-dazzle position.
� Push the lever to change to the
normal "day" position.
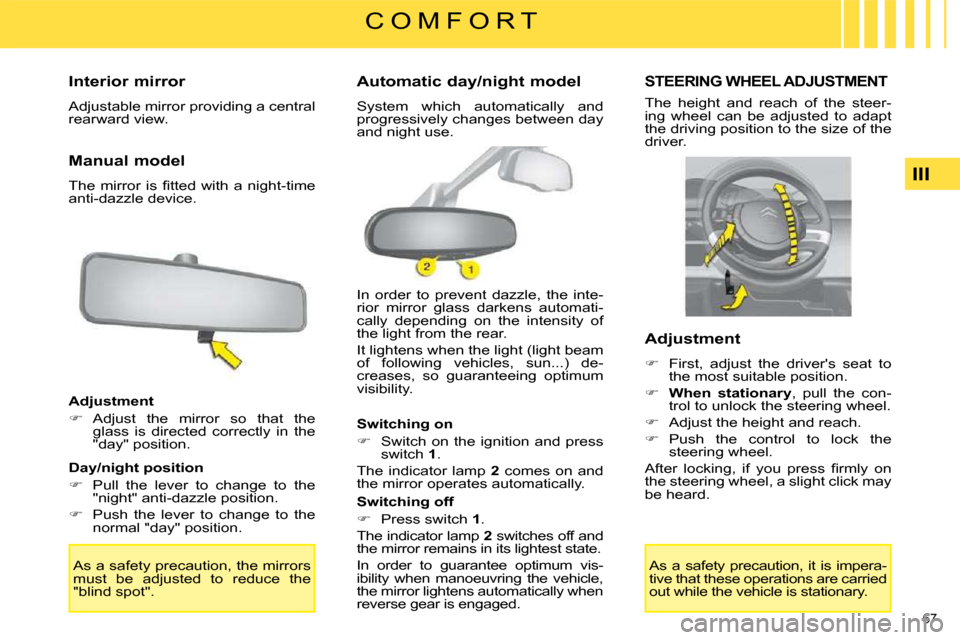
In order to prevent dazzle, the inte-
rior mirror glass darkens automati-
cally depending on the intensity of
the light from the rear.
It lightens when the light (light beam
of following vehicles, sun...) de-
creases, so guaranteeing optimum
visibility.
Switching on
� Switch on the ignition and press
switch 1 .
The indicator lamp 2 comes on and
the mirror operates automatically.
Switching off
� Press switch 1 .
The indicator lamp 2 switches off and
the mirror remains in its lightest state.
In order to guarantee optimum vis-
ibility when manoeuvring the vehicle,
the mirror lightens automatically when
reverse gear is engaged.
STEERING WHEEL ADJUSTMENT
The height and reach of the steer-
ing wheel can be adjusted to adapt
the driving position to the size of the
driver.
Adjustment
� First, adjust the driver's seat to
the most suitable position.
� When stationary , pull the con-
trol to unlock the steering wheel.
� Adjust the height and reach.
� Push the control to lock the
steering wheel.
� �A�f�t�e�r� �l�o�c�k�i�n�g�,� �i�f� �y�o�u� �p�r�e�s�s� �fi� �r�m�l�y� �o�n�
the steering wheel, a slight click may
be heard.
As a safety precaution, the mirrors
must be adjusted to reduce the
"blind spot". Automatic day/night model
System which automatically and
progressively changes between day
and night use.
As a safety precaution, it is impera-
tive that these operations are carried
out while the vehicle is stationary.
Page 76 of 337
71
IV
A C C E S S
STARTING
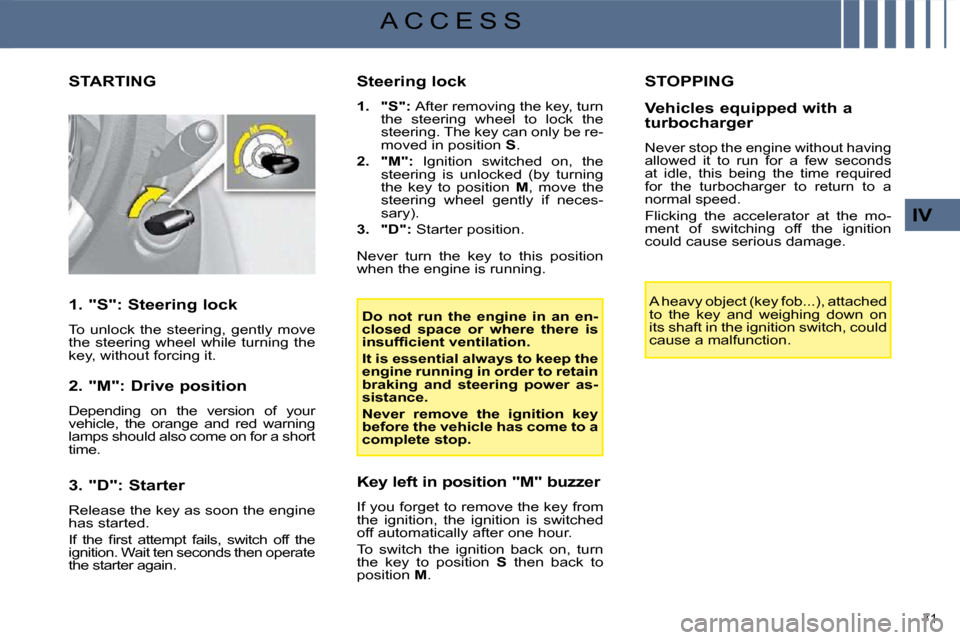
1. "S": Steering lock
To unlock the steering, gently move
the steering wheel while turning the
key, without forcing it.
2. "M": Drive position
Depending on the version of your
vehicle, the orange and red warning
lamps should also come on for a short
time.
3. "D": Starter
Release the key as soon the engine
has started.
�I�f� �t�h�e� �fi� �r�s�t� �a�t�t�e�m�p�t� �f�a�i�l�s�,� �s�w�i�t�c�h� �o�f�f� �t�h�e�
ignition. Wait ten seconds then operate
the starter again. Steering lock
1. "
S": After removing the key, turn
the steering wheel to lock the
steering. The key can only be re-
moved in position S .
2. "M": Ignition switched on, the
steering is unlocked (by turning
the key to position M , move the
steering wheel gently if neces-
sary).
3. "D": Starter position.
Key left in position "M" buzzer
If you forget to remove the key from
the ignition, the ignition is switched
off automatically after one hour.
To switch the ignition back on, turn
the key to position S then back to
position M .
Do not run the engine in an en-
closed space or where there is
�i�n�s�u�f�fi� �c�i�e�n�t� �v�e�n�t�i�l�a�t�i�o�n
.
It is essential always to keep the
engine running in order to retain
braking and steering
power
as-
sistance .
Never remove the ignition key
before the vehicle has come to a
complete stop.
STOPPING
Vehicles equipped with a
turbocharger
Never stop the engine without having
allowed it to run for a few seconds
at idle, this being the time required
for the turbocharger to return to a
normal speed.
Flicking the accelerator at the mo-
ment of switching off the ignition
could cause serious damage.
A heavy object (key fob...), attached
to the key and weighing down on
its shaft in the ignition switch, could
cause a malfunction.
Never turn the key to this position
when the engine is running.
Page 78 of 337
73
IV
A C C E S S
Lost keys
Visit a CITROËN dealer with the
vehicle's V5 registration document
�a�n�d� �y�o�u�r� �p�e�r�s�o�n�a�l� �i�d�e�n�t�i�fi� �c�a�t�i�o�n�
documents.
The CITROËN dealer will be able to
retrieve the key code and the trans-
ponder code required to order a
replacement key.
Remote control
The high frequency remote control is
a sensitive system; do not operate it
while it is in your pocket as there is
a possibility that it may unlock the
vehicle, without you being aware of it.
Do not repeatedly press the buttons
of your remote control out of range
and out of sight of your vehicle. You
run the risk of stopping it from work-
ing and the remote control would
have to be reinitialised.
The remote control does not operate
when the key is in the ignition, even
when the ignition is switched off,
except for reinitialisation.
Locking the vehicle
Driving with the doors locked may
make access to the passenger com-
partment by the emergency services
�m�o�r�e� �d�i�f�fi� �c�u�l�t� �i�n� �a�n� �e�m�e�r�g�e�n�c�y�.�
As a safety precaution (with children
on board), remove the key from the
ignition when you leave the vehicle,
even for a short time. Anti-theft protection
� �D�o� �n�o�t� �m�a�k�e� �a�n�y� �m�o�d�i�fi� �c�a�t�i�o�n�s� �t�o�
the electronic engine immobiliser
system; this could cause malfunc-
tions.
When purchasing a
second-hand vehicle
Have the key codes memorised by a
CITROËN dealer, to ensure that the
keys in your possession are the only
ones which can start the vehicle.
Do not throw the remote
control batteries away, they
contain metals which are
harmful to the environment.
Take them to an approved collection
point.