heating Citroen C4 PICASSO 2015 2.G Owner's Manual
[x] Cancel search | Manufacturer: CITROEN, Model Year: 2015, Model line: C4 PICASSO, Model: Citroen C4 PICASSO 2015 2.GPages: 420, PDF Size: 10.72 MB
Page 4 of 420
7-inch touch screen tablet 11
Instrument panels
2
0
Indicator
and warning lamps
2
5
Adjustment
buttons
4
4
Setting
the date and time
4
7
Trip
computer
4
8
Monitoring
ove
r view
Electronic key - remote control 5
1
Keyless Entry and Starting
5
4
Central
locking
6
1
Doors
6
2
Boot
6
4
Motorised
tailgate
6
5
Alarm
6
8
Electric
windows
7
1
access
Front seats 73
Rear seats
8
0
Seat
modularity
87
M
irrors
8
9
Steering
wheel adjustment
9
1
Ventilation
9
2
Heating
9
4
Dual-zone
m
anual
a
ir
c
onditioning
9
5
Dual-zone
automatic air conditioning
9
7
Front
demist - defrost
1
02
Rear
screen demist -
d
efrost
10
3
Scented
air freshener
1
04
Interior
fittings
1
06
Comfort
Driving recommendations 1 21
Starting-switching off the engine with
t
he electronic key
1
22
Starting-switching
off the engine with
t
he "Keyless Entry and Starting" system
1
24
Electric
parking brake
1
28
Hill
start assist
1
35
5 -speed
manual gearbox
1
36
6 -speed
manual gearbox
1
36
Electronic
gearbox (ETG6)
1
37
Automatic
gearbox
1
41
Gear
ef ficiency indicator
1
46
Stop
& Start
1
47
Display
of inter-vehicle time
1
50
Memorising
speeds
1
54
Speed
limiter
1
55
Cruise
control
1
58
Active
cruise control
1
61
Collision
risk alert
1
69
Lane
departure warning
system
1
72
Blind
spot sensors
1
73
Parking
sensors
1
76
Reversing
camera
1
78
360
Vision
1
79
Park
Assist
1
81
Driving
Eco-driving
Contents
Page 8 of 420
6
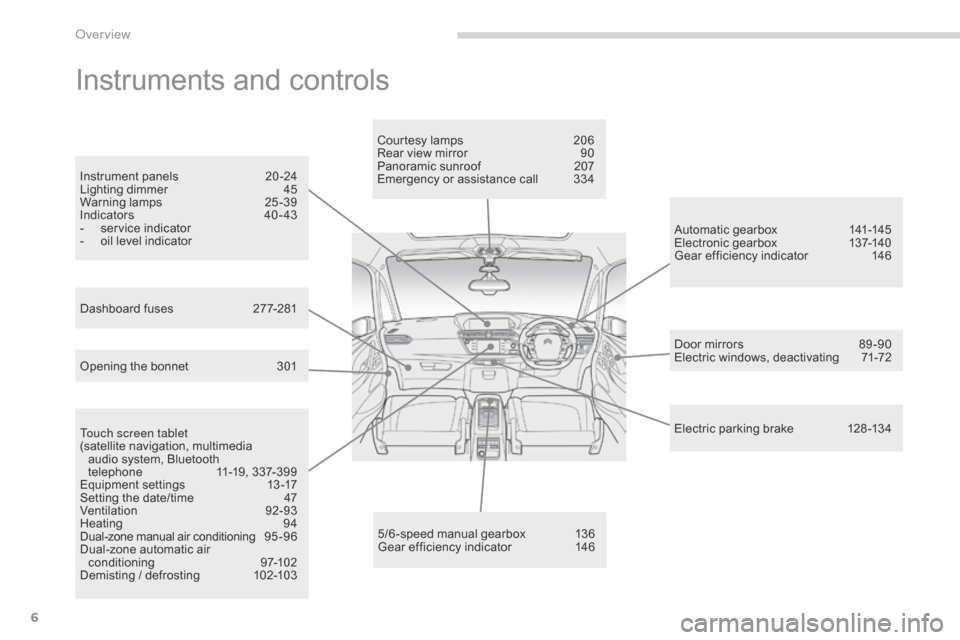
Instruments and controls
Touch screen tablet
(satellite navigation, multimedia
a
udio system, Bluetooth
t
elephone
1
1-19, 337-399
Equipment
se
ttings
1
3-17
Setting
the date/time
4
7
Ventilation
9
2-93
Heating
9
4
Dual-zone
m
anual
a
ir
c
onditioning
9
5 - 9 6
Dual-zone
automatic air
c
onditioning
9
7-102
Demisting
/ defrosting
1
02-103 Door
mirrors
8
9 -90
Electric windows, deactivating
7
1-72
5/6 -speed manual gearbox
1
36
Gear
efficiency indicator
1
46Automatic
gearbox
1
41-145
Electronic gearbox
1
37-140
Gear efficiency indicator
1
46
Opening the bonnet
3
01Courtesy lamps
2
06
Rear view mirror
9
0
Panoramic sunroof
2
07
Emergency or assistance call
3
34
Instrument panels
2
0 -24
Lighting dimmer
4
5
Warning
lam
ps
2
5-39
Indicators
4
0 - 43
-
s
ervice indicator
-
o
il level indicator
Electric parking brake 1 28 -134
Dashboard fuses
2
77-281
over view
Page 13 of 420
11
7-inch touch screen tablet
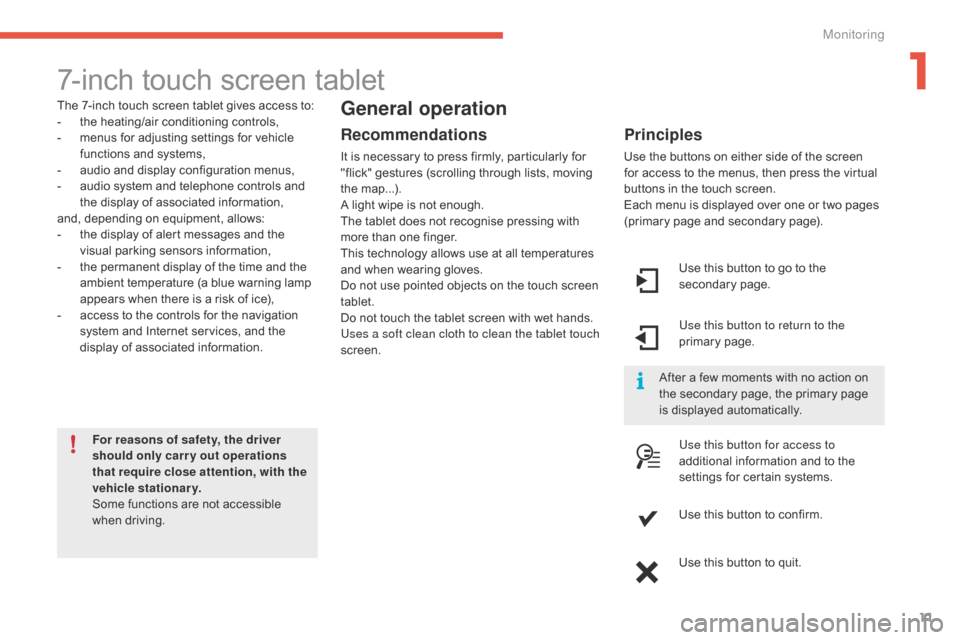
The 7-inch touch screen tablet gives access to:
- t he heating/air conditioning controls,
-
m
enus for adjusting settings for vehicle
f
unctions and systems,
-
a
udio and display configuration menus,
-
a
udio system and telephone controls and
t
he display of associated information,
and,
depending on equipment, allows:
-
t
he display of alert messages and the
v
isual
par
king
s
ensors
in
formation,
-
t
he permanent display of the time and the
a
mbient temperature (a blue warning lamp
a
ppears when there is a risk of ice),
-
a
ccess to the controls for the navigation
s
ystem and Internet services, and the
d
isplay of associated information.
For reasons of safety, the driver
should only carr y out operations
that require close attention, with the
vehicle stationary.
Some
functions are not accessible
w
hen
d
riving.General operation
Recommendations
It is necessary to press firmly, particularly for "flick" gestures (scrolling through lists, moving
t
he
m
ap...).
A
light wipe is not enough.
The
tablet does not recognise pressing with
m
ore than one finger.
This
technology allows use at all temperatures
a
nd when wearing gloves.
Do
not use pointed objects on the touch screen
t
ablet.
Do
not touch the tablet screen with wet hands.
Uses a soft clean cloth to clean the tablet touch
screen. Use
this button to go to the
s
econdary
pag
e.
Use this button to return to the
primary
pag
e.
Use this button for access to
additional
information and to the
s
ettings for certain systems.
Use
this button to confirm.
Use
this button to quit.
Principles
Use the buttons on either side of the screen for access to the menus, then press the virtual
b
uttons in the touch screen.
Each
menu is displayed over one or two pages
(
primary page and secondary page).
After
a few moments with no action on
t
he secondary page, the primary page
i
s displayed automatically.
1
Monitoring
Page 14 of 420
12
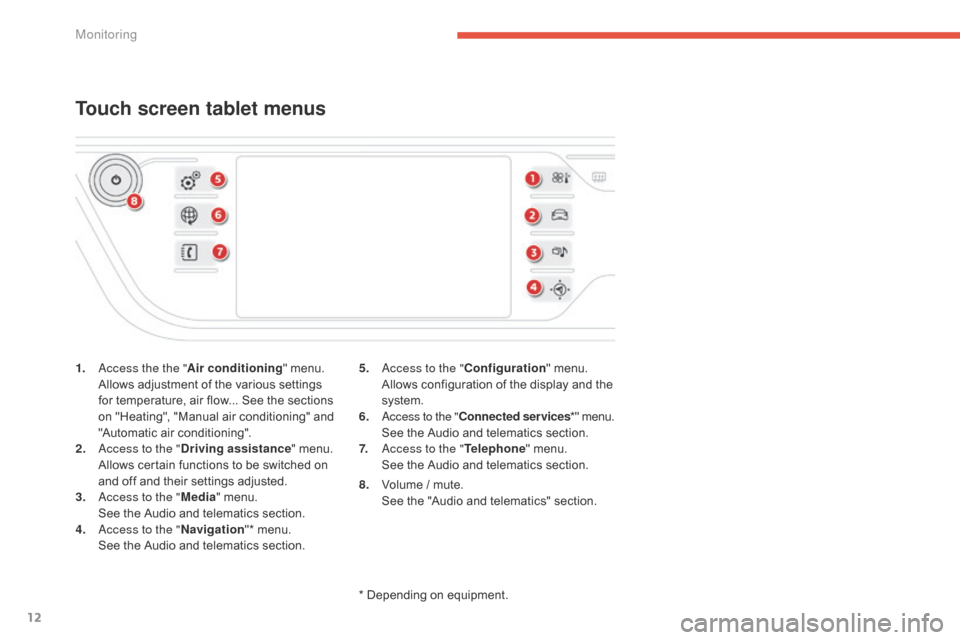
1. access the the "Air conditioning" menu. A
llows adjustment of the various settings
f
or temperature, air flow... See the sections
o
n "Heating", "Manual air conditioning" and
"
Automatic air conditioning".
2.
a
c
cess to the " Driving assistance "
menu.
A
llows certain functions to be switched on
a
nd off and their settings adjusted.
3.
a
c
cess to the " Media"
menu.
S
ee the Audio and telematics section.
4.
a
c
cess to the " Navigation"*
menu.
S
ee the Audio and telematics section.
Touch screen tablet menus
5. access to the "Configuration" menu. A
llows configuration of the display and the
s
ystem.
6.
a
c
cess to the " Connected services *"
menu.
S
ee the Audio and telematics section.
7.
a
c
cess to the " Telephone"
menu.
S
ee the Audio and telematics section.
*
Depending on equipment.
8.
V
olume / mute.
S
ee the "Audio and telematics" section.
Monitoring
Page 30 of 420
28
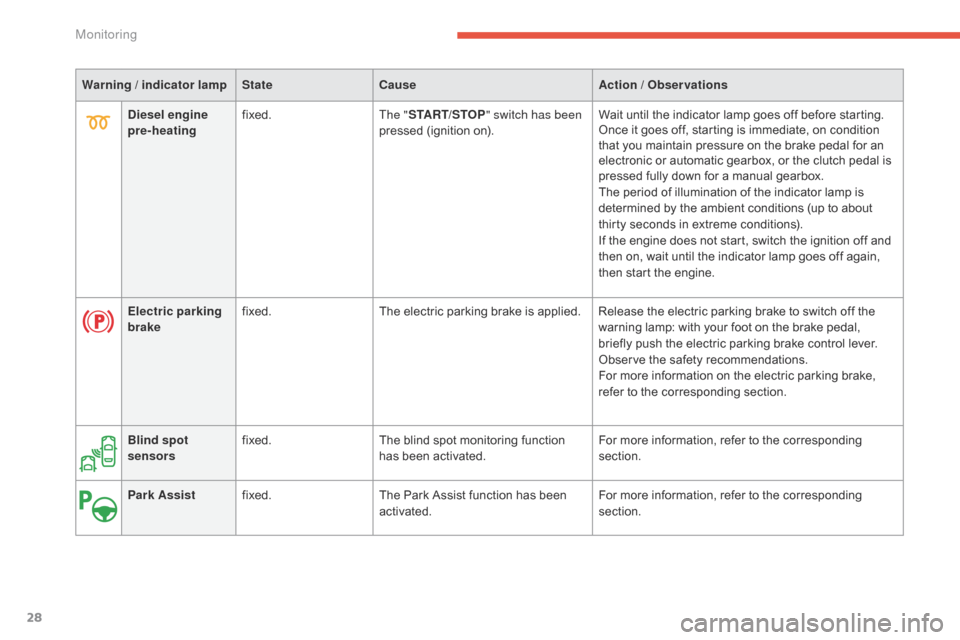
Warning / indicator lampStateCause Action / Observations
Electric parking
brake fixed.
The
electric parking brake is applied. Release the electric parking brake to switch off the
w
arning lamp: with your foot on the brake pedal,
b
riefly push the electric parking brake control lever.
Observe
the safety recommendations.
For
more information on the electric parking brake,
r
efer to the corresponding section.
Diesel engine
pre-heating
fixed.
The "START/STOP " switch has been
pressed
(ignition on).Wait
until the indicator lamp goes off before starting.
Once
it goes off, starting is immediate, on condition
t
hat you maintain pressure on the brake pedal for an
e
lectronic or automatic gearbox, or the clutch pedal is
p
ressed fully down for a manual gearbox.
The
period of illumination of the indicator lamp is
d
etermined by the ambient conditions (up to about
t
hirty seconds in extreme conditions).
If
the engine does not start, switch the ignition off and
t
hen on, wait until the indicator lamp goes off again,
t
hen start the engine.
Blind spot
sensors fixed.
The
blind spot monitoring function
h
as been activated.For
more information, refer to the corresponding
s
ection.
Park Assist fixed. The
Park Assist function has been
a
ctivated.For
more information, refer to the corresponding
s
ection.
Monitoring
Page 69 of 420
67
Manual operation
When opening and closing a motorised tailgate manually, there is no assistance from gas-filled
s
truts. Resistance to opening and closing is
t
herefore entirely normal.
Reinitialising the tailgate
This operation is necessary where there is no
movement - after detection of an obstacle, after
c
onnecting or recharging the battery, ...
F
O
pen the tailgate by hand, if necessary.
F
M
anually close the tailgate fully.
If
the problem persists, contact a CITROËN
d
ealer or a qualified workshop.
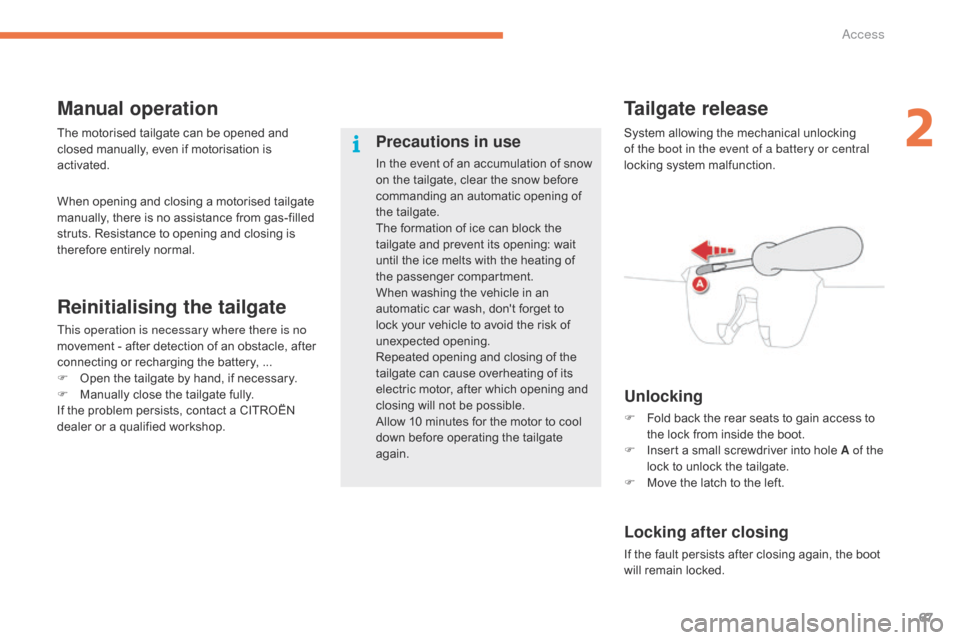
Tailgate release
Unlocking
F Fold back the rear seats to gain access to t
he lock from inside the boot.
F
I
nsert a small screwdriver into hole A of the
lock
to unlock the tailgate.
F
M
ove the latch to the left.
Locking after closing
If the fault persists after closing again, the boot will remain locked.
The
motorised
tailgate
can
be
opened
and
c
losed
manually,
even
if
motorisation
is
a
ctivated.
Precautions in use
In the event of an accumulation of snow o
n the tailgate, clear the snow before
c
ommanding an automatic opening of
t
he tailgate.
The
formation of ice can block the
t
ailgate and prevent its opening: wait
u
ntil the ice melts with the heating of
t
he
p
assenger
c
ompartment.
When
washing the vehicle in an
a
utomatic car wash, don't forget to
l
ock your vehicle to avoid the risk of
u
nexpected
ope
ning.
Repeated
opening and closing of the
t
ailgate can cause overheating of its
e
lectric motor, after which opening and
c
losing will not be possible.
Allow
10 minutes for the motor to cool
d
own before operating the tailgate
ag
ain. System
allowing the mechanical unlocking o
f the boot in the event of a battery or central
locking system malfunction.
2
Access
Page 81 of 420

79
Heated seats control
F Use the adjustment wheel to switch on and s
elect the level of heating required:
0 :
Off.
1 :
Low.
2 :
Medium.
3 :
High.
With
the engine running, the front seats can be
h
eated
s
eparately.
Before
operating
the
leg
rest,
ensure
t
hat
nothing
could
inter fere
with
its
m
ovement.Electric passenger seat
F Push the control for wards or backwards to u
nfold or fold away the leg rest.
The
movement stops when you release the
c
ontrol.
Front armrest
Height adjustment
F Fully lower the armrest.
F R aise it to the required position (low,
i
ntermediate or high).
F
O
nce in the high position, lift to release it
a
nd return it to the low position.
Comfort
system for the driver and front
p
assenger.
3
Comfort
Page 94 of 420
92
Ventilation
Air intake
The air circulating in the passenger compartment is filtered and originates either from the outside via t
he grille located at the base of the windscreen or
f
rom the inside in air recirculation mode.
Air treatment
The incoming air follows various routes depending on the controls selected by the
d
river:
-
d
irect arrival in the passenger
c
ompartment (air intake),
-
p
assage through a heating circuit (heating),
-
p
assage through a cooling circuit (air
c
onditioning).
Control panel
The controls of this system are accessible in the " Air conditioning "
menu of the touch
s
creen tablet A .
The
demisting/defrosting controls for the
w
indscreen and rear screen are located on the
l
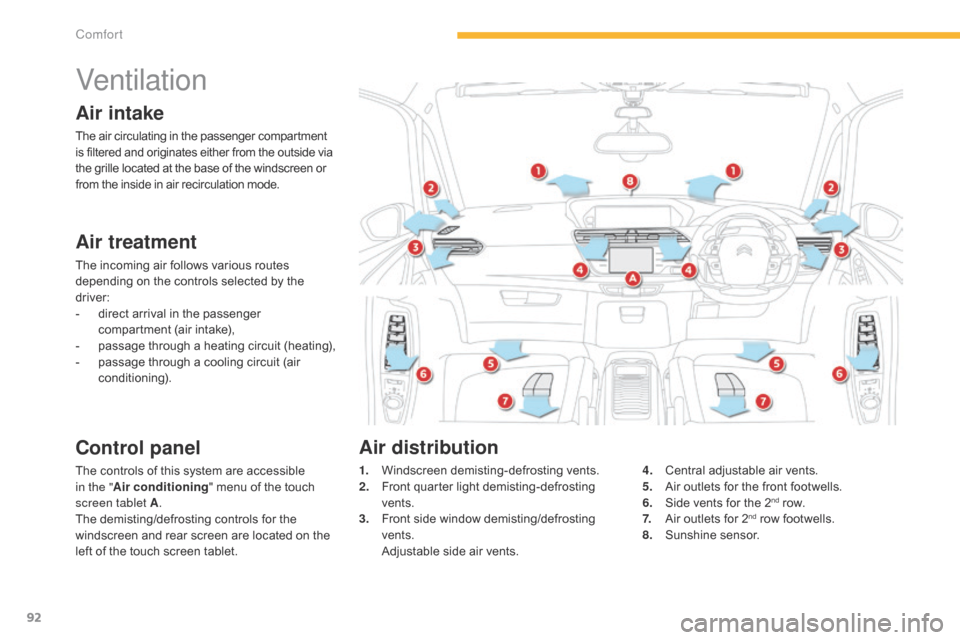
eft of the touch screen tablet. 1. W
indscreen d emisting-defrosting v ents.
2. F ront quarter light demisting-defrosting
ve
nts.
3.
F
ront side window demisting/defrosting
ve
nts.
A
djustable side air vents.4. C
entral adjustable air vents.
5. A ir outlets for the front footwells.
6.
S
ide vents for the 2
nd row.
7. A
ir
outlets
for
2nd row footwells.
8. S
unshine s
ensor.
Air distribution
Comfort
Page 95 of 420
93
In order for these systems to be fully effective, follow the operation and maintenance guidelines belo w:
F
T
o obtain an even air distribution, take care not to obstruct the exterior air intake grilles
l
ocated at the base of the windscreen, the nozzles, the vents and the air outlets, as well
a
s the air extractor located in the boot.
F
D
o not cover the sunshine sensor, located on the dashboard; this is used for regulation
o
f the air conditioning system.
F
O
perate the air conditioning system for at least 5 to 10 minutes, once or twice a month
t
o keep it in per fect working order.
F
E
nsure that the passenger compartment filter is in good condition and have the filter
e
lements replaced regularly.
W
e recommend the use of a combined passenger compartment filter. Thanks to its
s
pecial active additive, it contributes to the purification of the air breathed by the
o
ccupants and the cleanliness of the passenger compartment (reduction of allergic
s
ymptoms, bad odours and greasy deposits).
F
T
o ensure correct operation of the air conditioning system, you are also advised to have
i
t checked regularly as recommended in the maintenance and warranty guide.
F
I
f the system does not produce cold air, switch it off and contact a CITROËN dealer or a
q
ualified
w
orkshop.
Recommendations for ventilation and air conditioning
If after an extended stop in sunshine, the i nterior t emperature i s v ery h igh, f irst
v
entilate the passenger compartment for
a
few moments.
Put
the air flow control at a setting high
e
nough to quickly change the air in the
p
assenger
c
ompartment.
The
air conditioning system does not
c
ontain chlorine and does not present
a
ny danger to the ozone layer.
The
condensation created by the air
c
onditioning results in a discharge
o
f water under the vehicle which is
p
er fectly normal.
When
towing
the
maximum
load
on
a
steep
gradient
in
high
temperatures,
switching
off
the
a
ir
conditioning
increases
the
available
engine
power
and
so
improves
the
towing
ability.
Stop & Start
The heating and air conditioning s ystems only work when the engine
i
s running. To maintain a comfortable
t
emperature in the passenger
c
ompartment, you can temporarily
d
eactivate the Stop & Start system
(see
the corresponding section).
3
Comfort
Page 96 of 420

94
Heating
Temperature adjustment
F Press one of these buttons, or move the cursor from blue
(
cold) to red (hot) to adjust the
t
emperature to your wishes.
Air flow adjustment
F Press one of these buttons to increase or decrease the speed
o
f the booster fan.
Air distribution adjustmentThe intake of exterior air prevents and eliminates misting of the windscreen and side
w
indows.
The
recirculation of interior air prevents exterior
o
dours and smoke entering the passenger
c
ompartment.
Windscreen.
Centre
and
side
vents.
Footwells. The
air distribution can be varied by using more
t
han one button.
Each press of a button activates or deactivates
t
he function.
The indicator lamp is on when the button is
a
ctivated. For an even distribution of air in the
p
assenger compartment, the three buttons can
b
e activated simultaneously.
Air intake / Air recirculation
F Press this button to recirculate
the interior air. The indicator
l
amp in the button comes on.
F
P
ress the button again to allow
t
he intake of exterior air. This is
c
onfirmed by the indicator lamp
g
oing off.
Avoid
driving
for
too
long
without
v
entilation
(risk
of
misting
and
d
eterioration
of
air
quality).
The
heating
system
works
only
when
the
e
ngine
is
running.
Press the button for the " Air conditioning"
menu
to
display
the
page
for
the
system
c
ontrols.
The
symbol
for
air flow
(a
fan)
fills
progressively
a
ccording
to
the
air
flow
setting
made.
By
reducing
the
air
flow
to
the
minimum,
you
a
re
stopping
ventilation
of
the
passenger
c
ompartment.
Comfort